We’ve received feedback from several of our users asking for a better way to assign users and groups to steps in a job. You asked and we delivered! In the 11.0 release of Workflow Manager, we’ve added the Advanced Assignment step that allows a user to assign a subsequent step in the workflow to a specific user or use the job’s location to automatically assign a subsequent step to a user or group.
In this blog post, we’ll be working through the following use case to better demonstrate how the Advanced Assignment step works. As a Project Manager for a regional data collection project, you work with several local organizations to collect data. Each of these organizations have specialists with in-depth knowledge about certain local areas, and you need to ensure that they are assigned to handle data collection in those areas. In addition, you also need to be able to choose specific users to assign data collection to when an area expert is not available. Let’s take a look at how we can accomplish this in Workflow Manager.
The basics
The Advanced Assignment step is available in the Advanced section of the Step Library in the Workflow Manager web app. When you drag it onto the workflow canvas, the step’s configuration options appear in the Step Details panel.
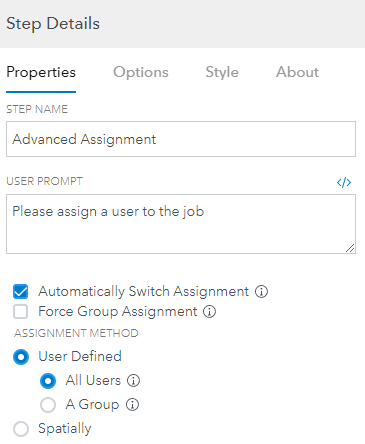
You can choose to automatically assign the next step in the workflow to the chosen user or group when the step is run by leaving the Automatically Switch Assignment check box checked. However, some workflows require that a later step in the workflow be assigned to the chosen user or group and not the next step. To use the output value of the Advanced Assignment step to assign a subsequent step to the chosen user or group using an Arcade expression on the path leading to the step, uncheck the Automatically Switch Assignment check box.
Step assignment can be assigned using one of the following methods:
- User Defined: When this option is chosen, the user that runs the Advanced Assignment step is asked to choose a user to assign to a subsequent step. There are two options for the User Defined assignment method.
- All Users: This option allows the user that runs the step to choose any Workflow Manager user
- A Group: This option allows the user that runs the step to only choose from a group of users that are part of a specific Portal group. The Workflow Manager Administrator or Workflow Designer must choose a group in the drop-down menu when this option is chosen.

- Spatially: When this option is chosen, the step uses a reference layer configured in the step to determine the user or group to which the subsequent is assigned. The reference layer must contain users and/or groups that can be used to determine who the step is assigned to based on the job’s location. We’ll cover this in more detail in the next section.
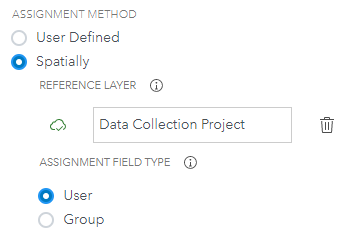
The last item required to configure the Advanced Assignment step is the Force Group Assignment check box. When you configure the step to spatially assign the step to a group, the user that runs the Advanced Assignment step might be a member of the group that is chosen when the step is run. In this case, if the Force Group Assignment check box is not checked, the subsequent step will remain assigned to the user that runs the step and not the chosen group. To force the step to be assigned to the group, you’ll need to check the Force Group Assignment checkbox.
Set up and running the step in a Job
Now that we’ve gone over the step’s configuration options at a high-level, lets configure the step for our regional data collection project use case and run it in a job.

Our workflow is quite simple. The Project Manager starts the job by creating a job specific version of spatial data and defines the job’s location. They will then answer a question that asks if an editor, who is a specialist in that area, is available. Based on their answer, the workflow proceeds to one of two Advanced Assignment steps before being assigned to an editor and continuing. We’ll just focus on the Advanced Assignment steps in the workflow for the purposes of this blog post.
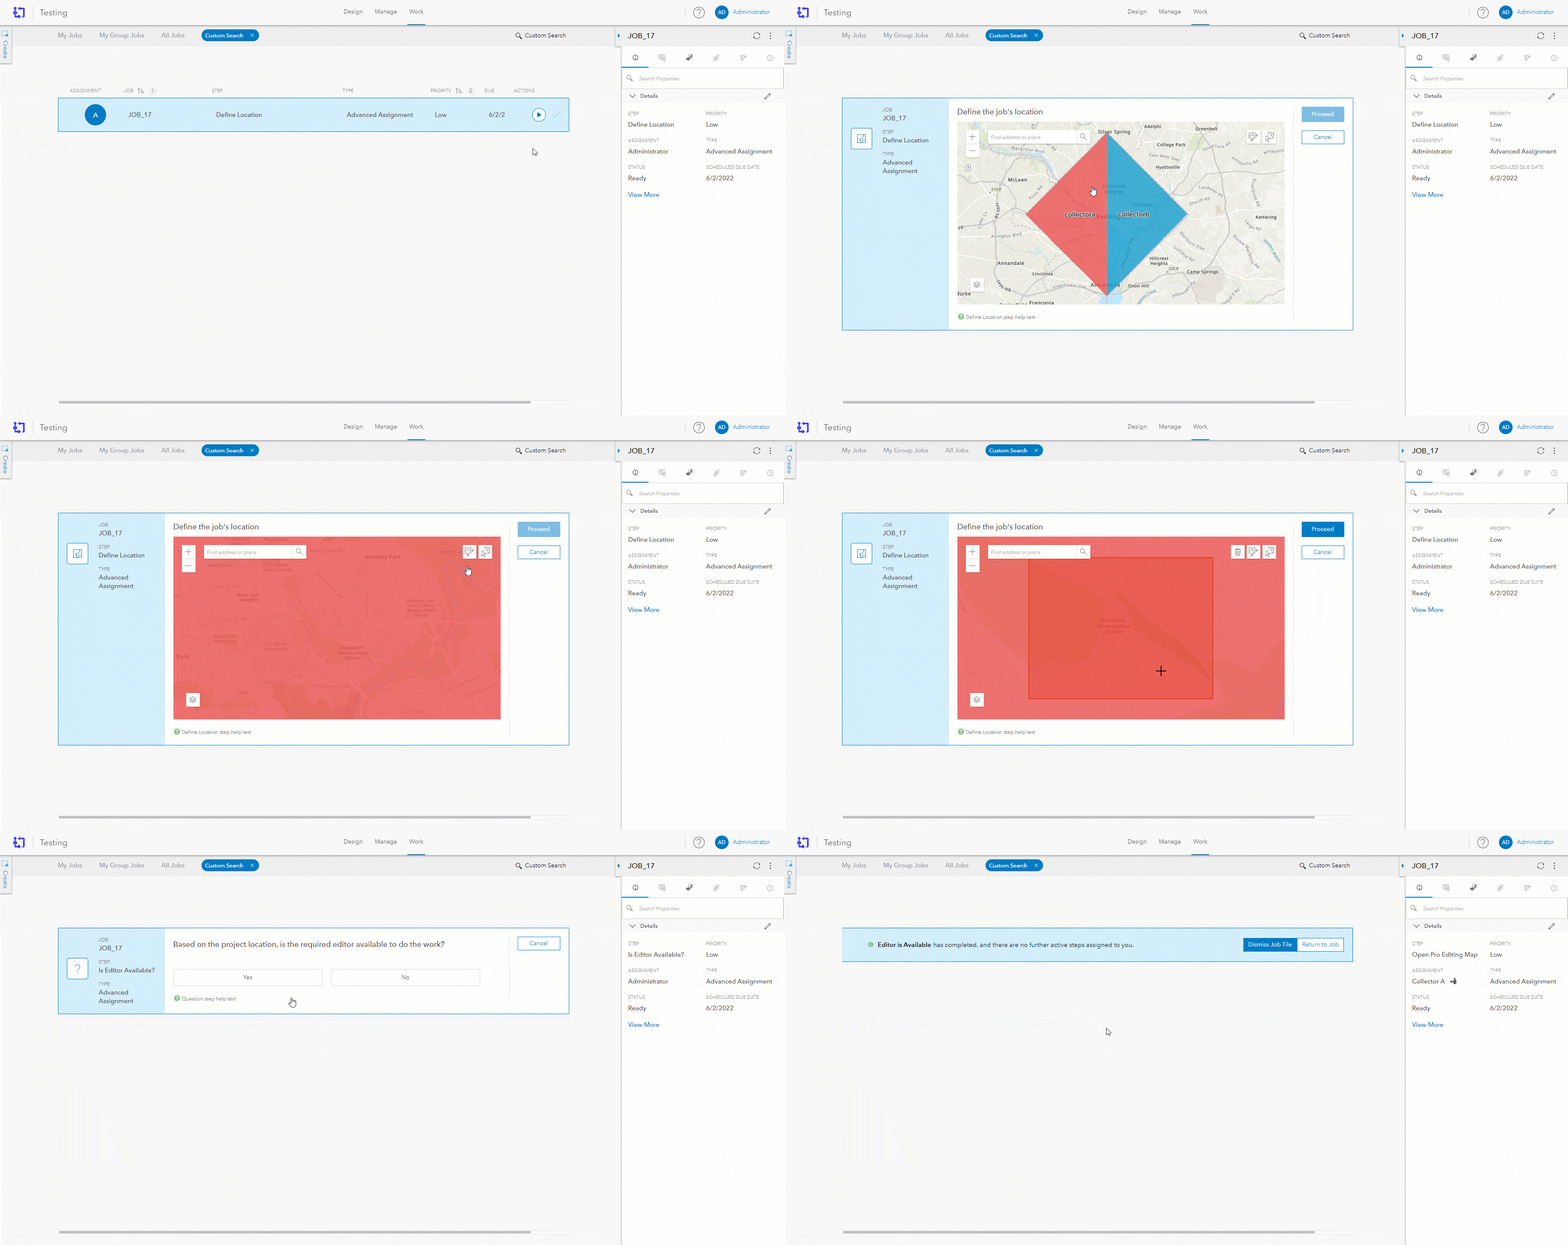
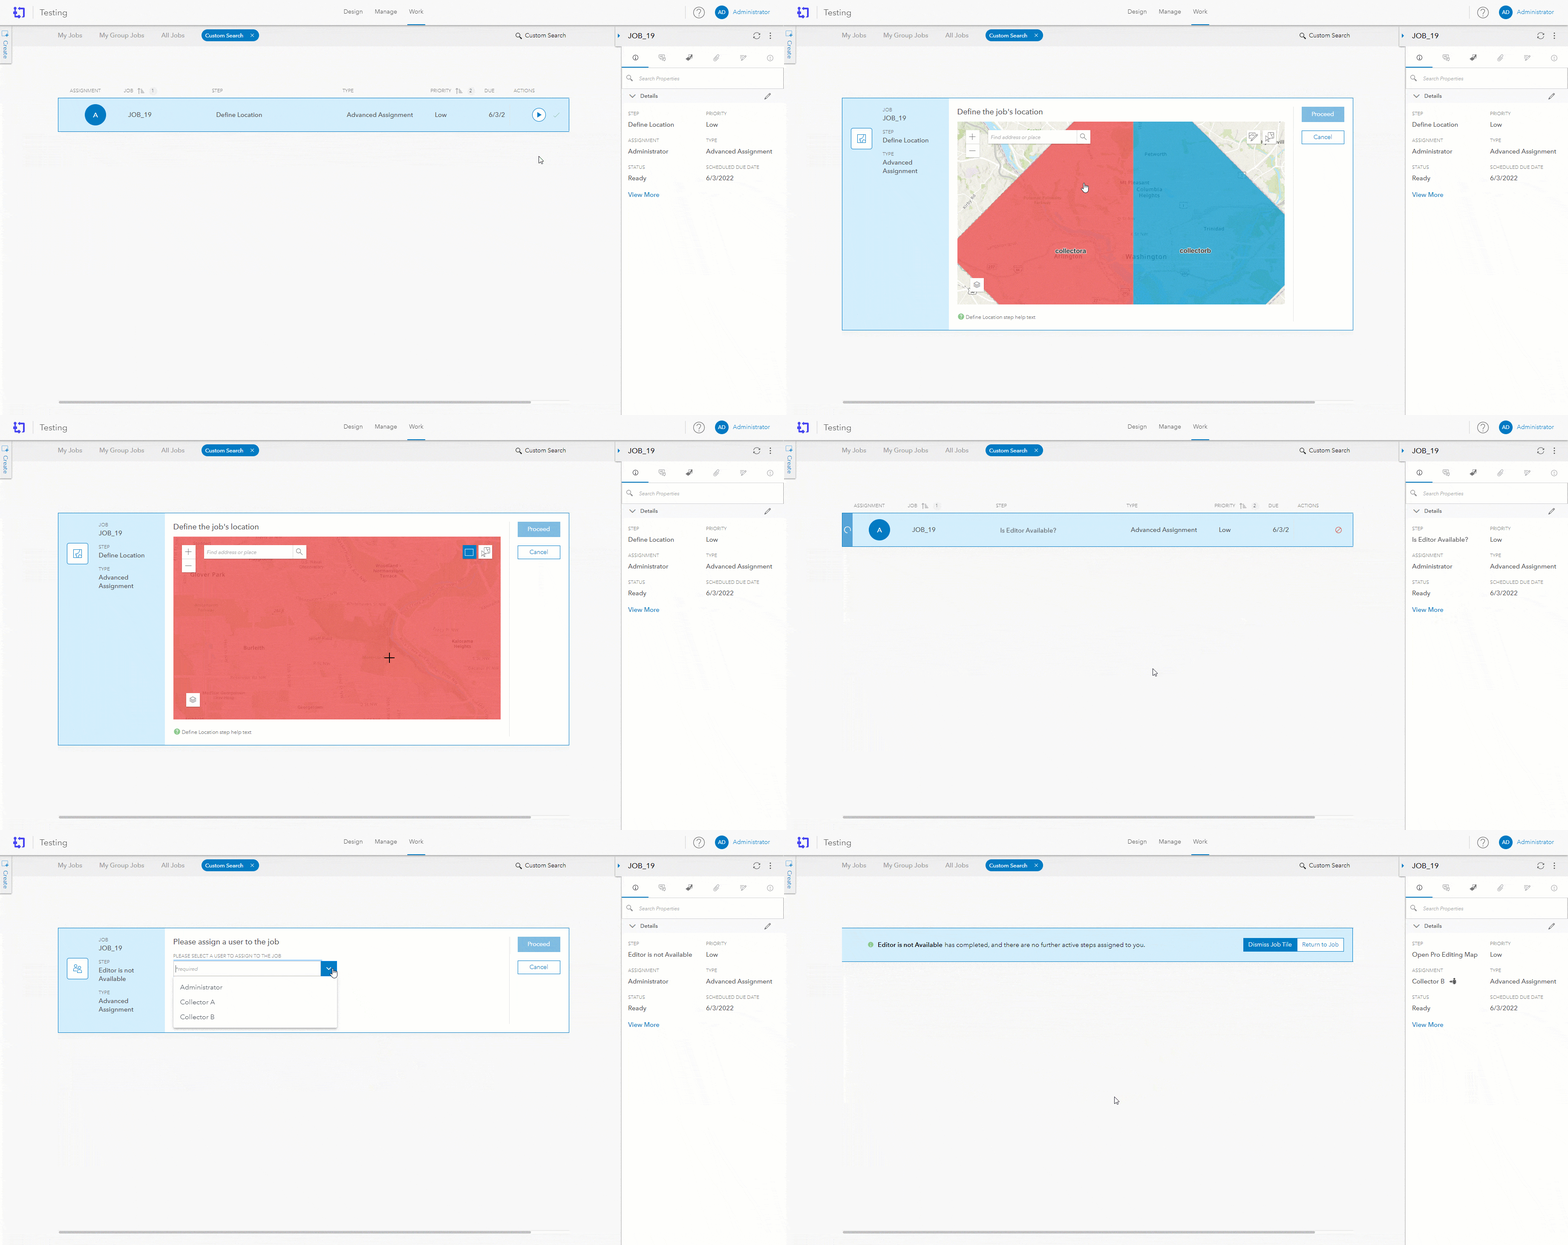
First let’s discuss the scenario where the editor is available to do the work. The Advanced Assignment step in this scenario uses the Spatially option we discussed previously to assign the next step to the correct editor.

But how does this work? Let’s take a closer look. The reference layer being used here is a simple one. We have two editors which are responsible for two different areas of the Washington D.C. metro region.
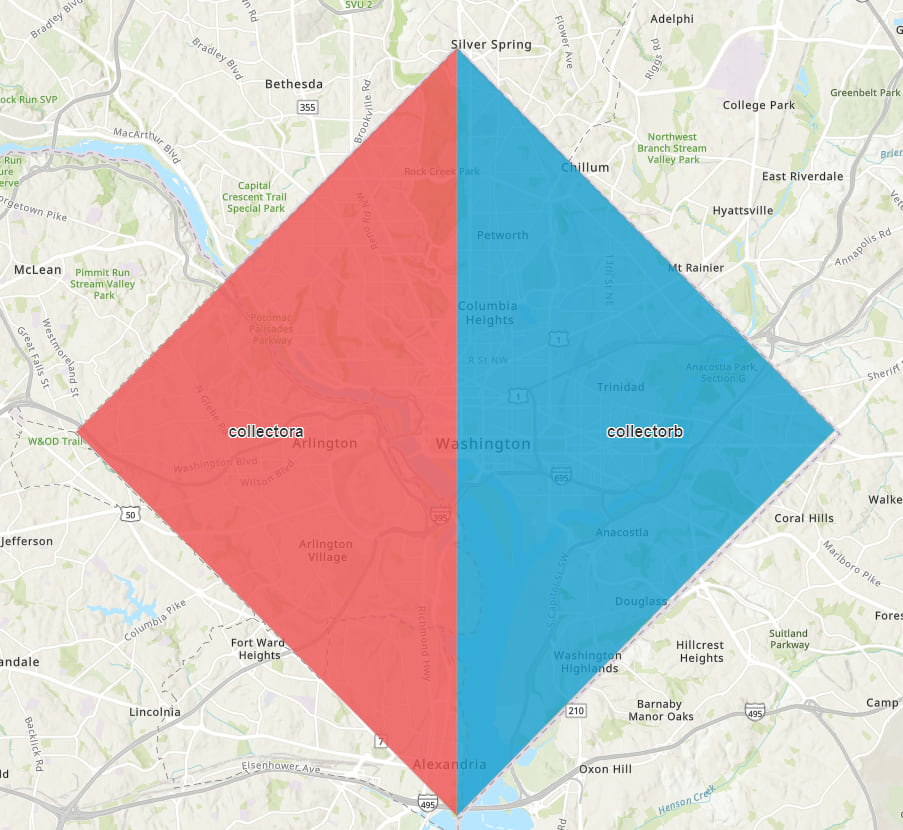
If the job’s location is in the area shaded in red, the Advanced Assignment step would assign the subsequent step to collector A. if the job’s location is in the area shaded in blue, collector B would be assigned. One important thing to note about spatial assignment is that it uses the centroid of the job location to determine the assignment. For points, the centroid is the point itself, for lines, it’s the middle of the line, and for polygons, it’s the centroid of the polygon. This is important to remember in scenarios where the job’s location overlaps different editor regions.
To use the spatially assignment option, our job must have a location that was defined using the Define Location step prior to the Advanced Assignment step. The video below shows what happens when the spatial option is used in a job.
Next, lets discuss the scenario where the editor who is a specialist in the area is not available to do the work. This scenario could be handled using one of the following methods:
- You can add a second Advanced Assignment step that configured to have the user who runs the step to choose a user to assign to a subsequent step.
- You could use the spatially option again, but instead of using a reference layer that contains users, you could use a reference layer that contains groups (or the same reference layer using a different field for groups). When the step is run, the subsequent step would be assigned to a group, allowing an editor within that group to assign themselves to the job and continue the work.
For our example use case, we’ll choose the first method, but the second method is also a valid use case and many of you may choose use it instead. The video below shows what happens when the User Defined option is used in a job.
Output Values
There is still one piece of the Advanced Assignment step that we haven’t explored yet. Earlier we mentioned that it’s possible to use the output value of the Advanced Assignment step to assign a subsequent step in the workflow to the chosen user or group and not necessarily the next step after the Advanced Assignment step. Regardless of step’s configuration, output values are returned when the step is run. The Advanced Assignment step has two output values:
- assignment: This is the username or group ID of the chosen user or group
- assignmentMethod: This returns “UserDefined” or “Spatial” depending on which option was chosen in the step’s configuration.
Here’s what the output value would look like if we manually chose Collector B when the step was run:
{
“outputs”:[
{
“value”:”collectorb”,
“name”:”assignment”
},
{
“value”:”UserDefined”,
“name”:”assignmentMethod”
}
],
“returnValue”:”S000001″
}
To use the assignment output value to assign a subsequent step in a workflow, we will need to use an Arcade expression on a path leading to the step that we want to have reassigned.
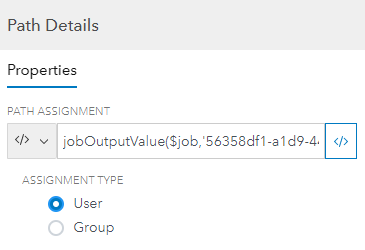
The expression in this case would be as follows:
jobOutputValue($job,’56358df1-a1d9-4457-9737-e503258a29f2′,’assignment’)
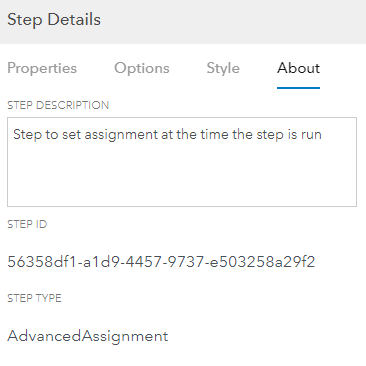
If you are not familiar with using Arcade expressions to retrieve an output value, our documentation is full of great information and examples. In this case, we are using the Advanced Assignment step ID value and the assignment output value which contains the chosen username. You can find the step ID for any step in your workflow on the About tab in the Step Details panel.
Wrap up
The Advanced Assignment step is just one of several new features in the 11.0 release of ArcGIS Workflow Manager. This new step provides Workflow Manager Administrators and Workflow Designers with the flexibility to allow a specific user to be assigned to a subsequent step in the workflow or use the job’s location to automatically assign a subsequent step to a user or group. In this blog we looked at an example use case where different editors were chosen as part of a regional data collection project. These editors covered different geographic locations and we needed to ensure that the correct editor was assigned to perform the required edits.
Some other examples of when you might use the Advanced Assignment step are:
- Your organization has different field offices that handle tasks associated with their geographic areas and you need to ensure the correct jobs are assigned to the correct groups based on their location.
- Your organization sends data editing work to various sub-contractors and you need to ensure the correct sub-contractors are chosen based on their location.
- Your organization has different internal groups that work on different types of work. You need to ensure that project managers can choose to assign steps from a list of users in the correct internal group based on the type of work being performed.
Here are some additional examples of how you can use the Advanced Assignment step in combination with other automation capabilities in Workflow Manager:
- In our example workflow, we used a Question step to ask the Project Manager if a specific editor was available to perform the editing work. If you wanted to automate this step, you could instead use the Send Web Request step to send a request to your organization’s email/calendar provider’s API to determine if the editor is out of the office.
- Do you want to automatically send an email to the user that was chosen to let them know that they have work to perform after the Advanced Assignment step runs? You can configure a Send Email step and set it to run automatically after the Advanced Assignment step to notify the user.
For a complete list of new Workflow Manager 11.0 features, be sure to check out the What’s new topic in the Workflow Manager documentation. We’d love to hear your feedback and hear about how you are using the Advanced Assignment step in your own workflows through Esri Community as well.
Learn More
- Connect with the ArcGIS Workflow Manager Community
- Learn more on the ArcGIS Workflow Manager product page
- Check out the Workflow Manager Learning Plan on Esri Academy
- Access Workflow Manager documentation
- Check out the Workflow Manager Getting Started video on YouTube

Article Discussion: