Update 3/17/2025: While this article is a great resource for customers interested in implementing a Utility Network Foundation, the Migration toolset provides an alternative path toward implementation. You can learn more about the Migration toolset and your options for implementation by reading the Get started with the Migration toolset article.
Update 11/4/2024: A video from the user conference announcing these changes is now publicly available: ArcGIS Solutions: Utility Network Foundations
Update 9/9/2024: A new tutorial has been released that demonstrates how to use these simpler tools and models: Load data into the ArcGIS Utility Network
Update 8/5/2024: The ArcGIS Solutions team has published an article providing an overview of the Essentials Model.
In 2018 the Solutions team published the first set of the Utility Network Foundations along with the Utility Network Package toolbox. This important release helped simplify implementations by providing preconfigured, ready-to-deploy utility network models designed to meet the business requirements of all the major industries interested in implementing the ArcGIS Utility Network.
In the time since these models were first released, they have grown organically in response to requests from customers and partners to provide examples of how to solve increasingly complex problems and to support an ever-growing catalog of different asset types. However, while partners who have had time to learn and understand these models appreciate them for their robust set of features; new customers or smaller utilities often report feeling overwhelmed by the complexity of the model.
Over the past year, the team has been working hard at improving and simplifying the utility network migration process. This has taken the form of releasing tutorials for the migration process, publishing industry-specific learning series, and most recently with the 2024 Q3 Solutions update, the release of data models and tools that further simplify and streamline this process. The purpose behind these improvements and simplification was to establish a base data model that could be extended to meet specific business needs rather than try to understand and remove what is not needed. In addition, having a simplified model also reduced the complexities of the target data model which supported a more streamlined and straightforward migration process.
This article focuses on the three main areas that were improved with this recent release and how you can best take advantage of these improvements:
Simplified Data Model
One question that is often asked often about the foundations is “which fields are required”? This question has largely been given in response to the number of fields, asset types, and rules of the models, and in recognition of this the Solutions team has changed the method they use to deliver the data model for the utility network foundations. When existing models are updated, the team will consider whether there is a need to provide a simpler version of the model. If there is, then the foundation will contain a simpler essentials model while also retaining the fully detailed models as an expanded model.

What is an essentials model?
It is a functionally complete, pre-configured utility network model that contains a simplified set of fields, domains, asset types, and rules that are designed for customers who have a less complicated set of requirements. This essentials model can then be extended by adding your own fields, domains, and configurations to support any integrations, analytics, or other business requirements you have. It can also be extended by importing configurations from the corresponding expanded model.
Let’s examine some of the benefits of starting with one of these simpler, essentials models by looking at another common challenge expressed by the user community.
Customers performing their own utility network migrations into the expanded models have found that the process could be quite time consuming with a significant investment of time required to review and understand the target data model. One example of this is the number fields in each model. The complexity of a model is about more than just the number of fields in the model, but for the purposes of this article we will focus on this one aspect of each model since it’s easy to discuss and draw conclusions from. The more fields a data model contains the more time you must spend reviewing and understanding those fields. Below you can see a graphic of the total number of fields on utility network tables for each data model.
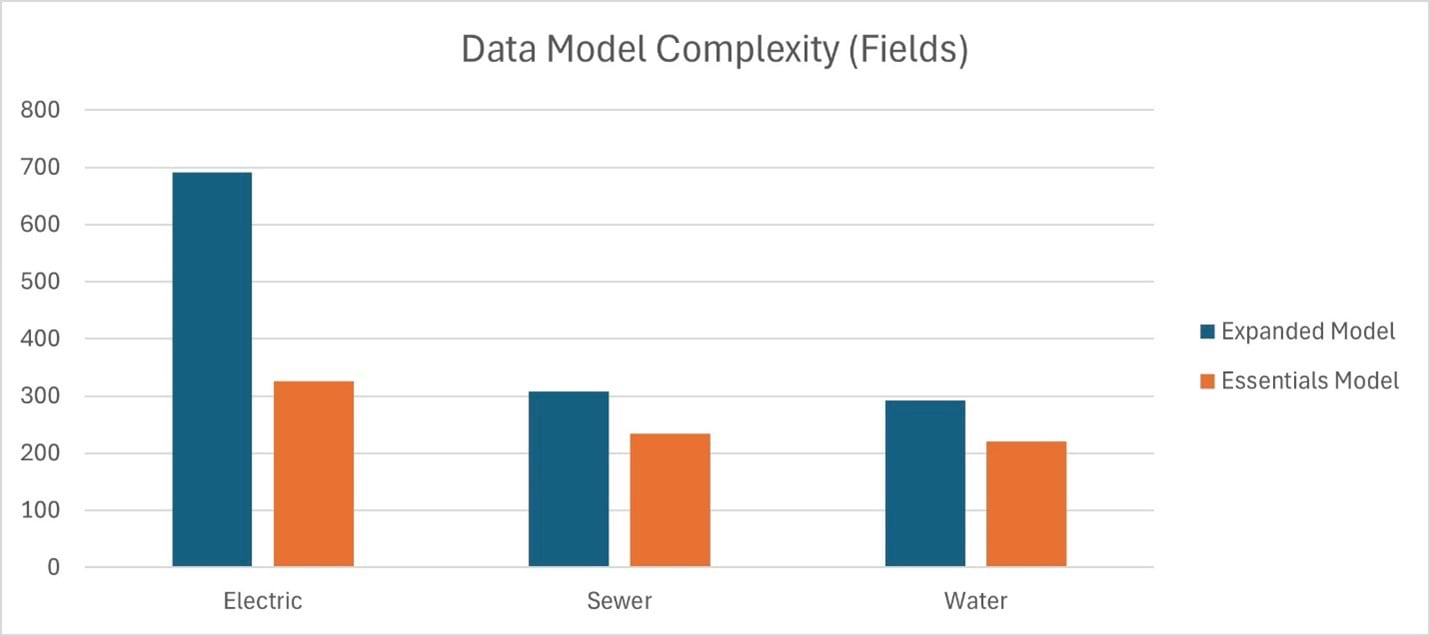
When a new customer opens up the data model for the first time and sees that a table with over a hundred fields, it can be quite intimidating. This is an area where business partners have an advantage, since they’ve had years to familiarize themselves with the models and to develop tools to streamline this process. With an essentials model that contains less fields, customers have less information to review in the target data model before they can start making decisions. Less fields also makes it easier to identify fields that need to be extended in the target model to address business specific requirements.
One other benefit of the essentials models is that they provide a simpler foundation which can be expanded upon to match your data model without creating tables with an unreasonable number of fields. The first, and most immediate benefit of this is that you will lessen the impact that the transition will have on existing users and business processes by preserving many of the field names and values of your existing system.
A subtler, but equally important benefit is that it reduces the number of field names and values from the old system that need to be translated to match the new model. These kinds of changes may seem small at first, but they have downstream impacts forcing customers to rebuild certain displays, web applications, reports, or interfaces that the utility maintains to match the new schema. Some work is obviously still required to point displays to new services and layers, yet many of the fields and dropdowns in your applications will remain the unchanged.
Simplified Data Mapping
Another challenge that customers encountered was that the data mapping and migration process often took a significant investment of time to get started and required specialized tools and training. Esri addressed part of this problem with the introduction of the Data Loading tools as a no-cost downloadable solution. Starting with ArcGIS Pro 3.2 the Data Loading tools are part of the core product, meaning they no longer require a separate download to use. While these improvements allow a customer to get started more easily, using OOTB software, the time investment component remained unaddressed.
So, what did we do to address this?
We started by looking at how customers were performing utility network migrations and noticed that most data migration projects took the following approach:
- Create an inventory of the source database
- Download and review the target data model
- Create a giant spreadsheet to map the source system to the target geodatabase
- Extend the target data model to capture any fields unique to the source data model
- Extend the target data model to capture any new asset types unique to your source data
- Add required configuration for any newly created asset types
- Update the giant mapping spreadsheet again
- Configure a data migration tool to perform the translation
This process was time consuming, and often resulted in a significant time gap between kicking off a project and being able to realize your data in a utility network. To streamline this process, we tackled it in two ways: Simplifying the data mapping process and automating the creation of a data migration workspace for the data loading tools.
Simple Data Mapping Spreadsheet
The first tool we introduced to streamline this process is the Create Simple Data Mappings tool. You simply point this tool at your current database and any asset package and it will create a mapping spreadsheet for you that contains counts and descriptions for all your source layers.
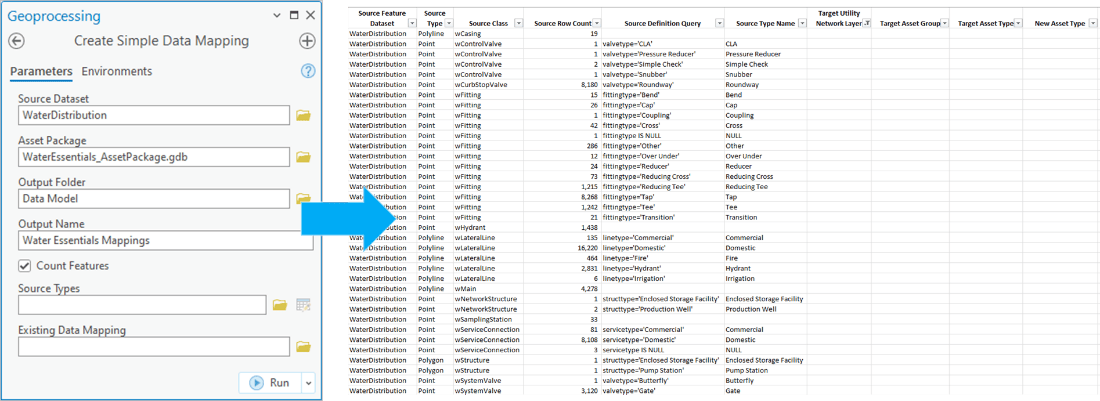
From here you review each line in the spreadsheet and determine its corresponding utility network feature, if any. It takes only a few minutes to train someone to use this spreadsheet, and it usually takes less than a few hours to populate. Another important feature of this spreadsheet is that the target mapping fields include dropdowns for the layers, asset groups, and asset types of the utility network. Because the spreadsheet contains all the information about source and target features that you need to determine their mappings, this allows you to be focused on a single spreadsheet to perform your mappings without having to switch between multiple spreadsheets and applications.
Now that you have a simplified data mapping spreadsheet that helped automate the first three steps of the data migration process, what can be done to address the remaining steps?
Simplified Data Migration
Data mappings are only the first step of a data migration. After this is completed, you still need to develop an actual data migration process, extend the data model, and configure rules for newly added items to the model. This is where the Create Migration Workspace tool comes into play.
Let’s look at how this tool solves all three of those problems.
Creating a data migration
If you’re a customer doing this for the first time you are likely looking for an uncomplicated solution to get you moving forward. Luckily for you, the Create Migration Workspace was designed to read the simple data mapping spreadsheets and turn them into a fully configured data loading workspace for use with Esri’s Data Loading tools. This allows you to migrate your data to the utility network without needing to install or license any additional software.
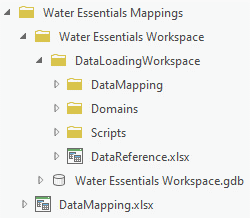
What is created in this data loading workspace?
You get a data reference workbook that contains all the mappings from your simple data mappings spreadsheet. This controls how the classes in your source database are extracted and loaded into the utility network.
But what about all the field mappings?
Each data mapping in the data reference workbook has its own field mappings workbook that allows you to control how the data is transformed between the two systems. What’s great about using the create migration workspace tool is that it will automatically identify and pre-populate fields in the mapping spreadsheet if they exist with the same name in both the source and target workspace.
This brings into focus another common challenge with utility network migrations, which is that they often require a considerable amount of time to extend the target data model with new fields and domains. Even then, once that is complete, these new fields must then be incorporated into the data mapping worksheets. Fortunately, if you use the Create Migration Workspace tool, all of this is handled for you automatically!
Extending the data model
When you run the Create Migration Workspace tool there is an option to “Copy Fields”. Selecting this will cause the tool to copy all the fields and domains from your source features onto the target utility network, which use new Copy Fields and Domains tool. These fields are then referenced in the newly created data migration workspace, providing a like-for-like migration of all your business specific fields into the utility network. This automatic option can save several days or weeks of work.
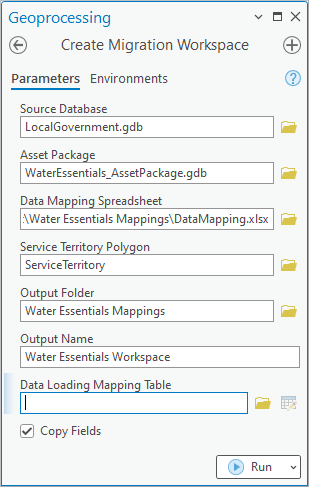
This approach is convenient and is wonderful for prototyping, but the models produced by this option can be quite bloated and require refinement. While you wouldn’t want to go-live with a system like this, having the fields available in the target model are suitable for a prototype and make it easier to review and remove unnecessary fields and domains and to identify better patterns for consolidating and re-using fields.
Since you are starting with a simpler model and are extending it with the fields that support your current business processes this approach complements the essentials model very well. However, extending data models is about more than just adding fields and domains, most utilities also must add their own asset types to the model as well. Fortunately, there are also tools that make it easy to add and automatically configure new asset types!
Configuring new asset types
If you look at the simple data mapping spreadsheet again, you can see that in addition to the expected target layer, asset group, and asset type fields there is also a column provided for new asset types. This allows you to identify a new asset type you want to add to the model (new asset type) and have the system configure it like an existing asset type in the model (target asset type).

Why is this such a big deal?
Each asset type has many configurations (rules, network categories, etc.) that may be associated with it, and if this is your first experience with the utility network, you may not be familiar with how to perform all these configurations. Even for those who are familiar with these configurations, know how easy it is to miss a step when manually configuring a new asset type.
Automating this process reduces the likelihood of mistakes, saves time, and allows newer or less technical users to enjoy the benefits of extending the model to suit their needs. Like other extensions of the data model, this is fantastic for getting started with a prototype, but you still need to review the changes and make sure they make sense for your model.
Conclusion
If we look back at the original data migration process, we can see how these new tools and models improve the process in the following ways:
- The essentials models provide a simpler data model with less fields and asset types you need to learn.
- The create simple data mappings tool creates a data mapping spreadsheet for you that contains a source data inventory as well as the target data model.
- The creation migration workspace tool creates a data loading tools migration workspace for all your layers and fields.
- The create migration workspace tool can extend the data model with new fields, domains, asset types and configurations to meet your requirements.
While there remains manual work that needs to be done to populate the simple data mapping spreadsheet and adjust the migration workspace, these tools enable you to perform in a few hours, work which may have previously taken months to complete. Even more important is that if you find you’ve made a mistake with your data mappings, or you need to re-run the data migration after performing data cleanup you can quickly regenerate a new model and data migration workspace in just a few minutes!
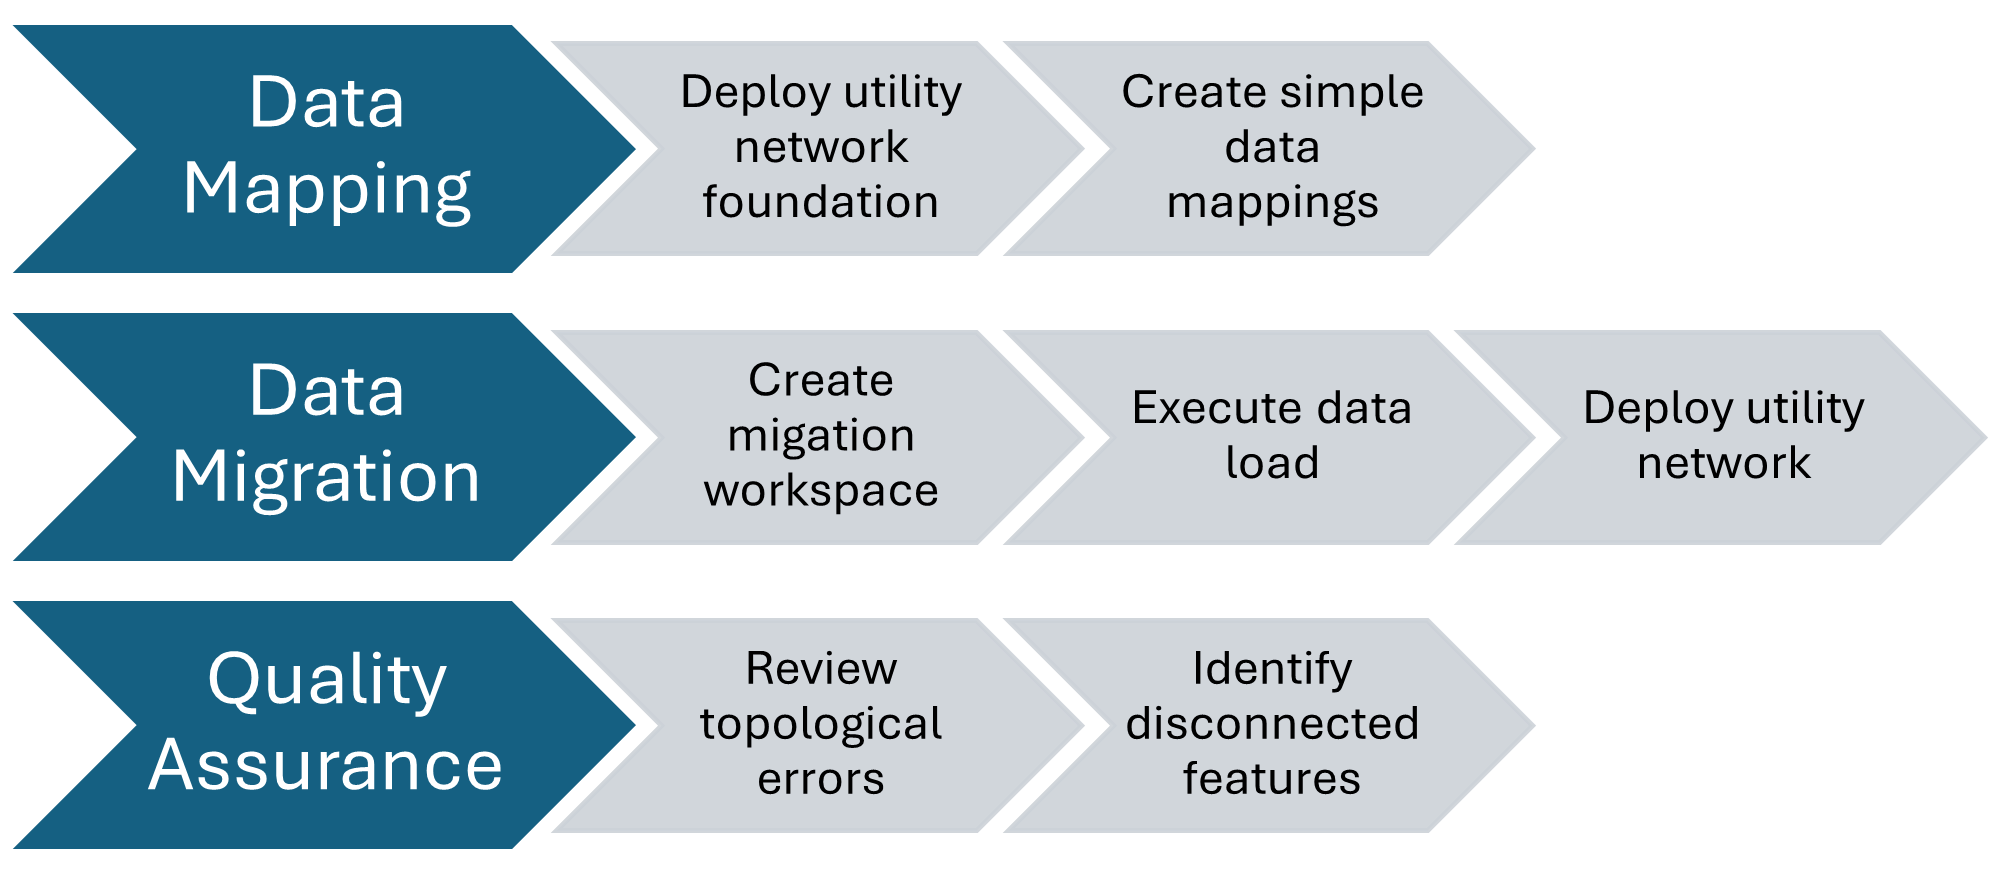
If you’re looking for technical resources to help you out with data migration, make sure to check out the Migrating to the ArcGIS Utility Network learning series. The diagram below shows a high-level overview of a complete data migration that uses these tools.
If you want to learn more about the utility network, you should read the Learning about the ArcGIS Utility Network article to discover all the different resources we have. We have many different resources available, regardless of your level of technical expertise or learning style.


Commenting is not enabled for this article.