This article is part of a series looking at the workflows associated with migrating data to a utility network and deploying it to an ArcGIS Enterprise environment. This article focuses on the data migration process and tools used by the Utility Network Foundation. The other common option for data migration is to use the Migration Toolset. If you want to know more about why you may prefer one of these approaches over the other, read the Choosing the right model for you article.
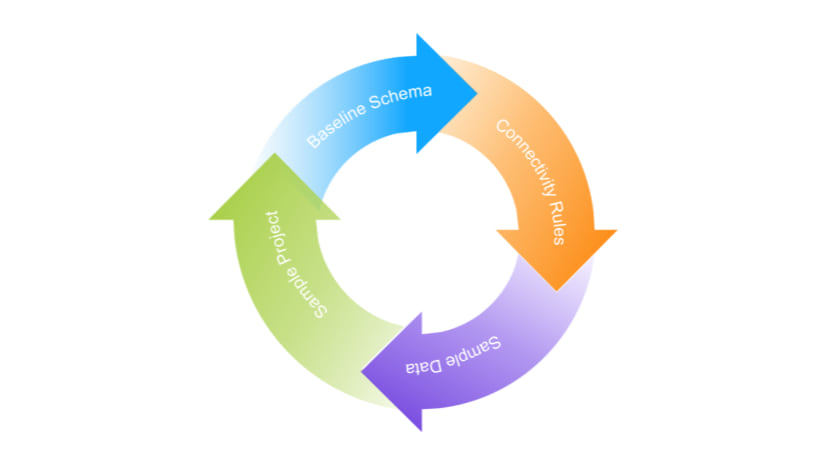
An important thing to remember about any project involving data migration, data modelling, or configuration is that these projects are often iterative. What is outlined here is going to be the first iteration of many that you will work through as you refine your migration process, data model, maps, and begin incorporating the utility network into your business processes and system.
Data Migration
The first step you need to take when implementing a Utility Network Foundation is to download the model appropriate for the dataset(s) you are implementing. If you are unfamiliar with what the Utility Network Foundations are or want an easy way to get links to the latest version of each foundation, check out the Introducing the Utility Network Foundations article. The video below shows you how to download a utility network foundation:
Once you’ve downloaded a foundation you will then have access to a project that includes the data model, sample data, and the Utility Data Management Support tools. The Utility Data Management Support Tools are a collection of tools to help with the implementation of a utility network; you can read more about all the tools and find several tutorials on their GitHub. Included in the documentation for each Utility Network Foundation you will also find tutorials that cover instructions for data migration, deployment, and using each foundation.
Creating a data migration to a known industry model, like a Utility Network Foundation, is best approached as an iterative process. These models can contain thousands of different types of features, each with their own set of rules and capabilities, with some features having upwards of a hundred fields. Because of this, it is reasonable to tackle the problem in three steps:
- High Level Data Mappings – Identify the target class, asset group, and asset type for every feature in your network.
- Required Fields – Create mappings for the minimal fields required to create subnetworks and perform quality assurance.
- Additional Fields – Only focus on mapping the remaining fields in the model, or reconciling them with your own fields and domains, once you have a fully connected utility network.
Let’s discuss why this approach is so effective and mitigating risk and change.
High Level Data Mappings
The target class and asset group (subtype) for a feature in the network determine which fields and domains you need to create detailed mappings for. If you change either of these values, you will need to redo some or all your mappings for those features. Each asset type has thousands of rules and behaviors associated with it. If you map a feature to the wrong asset type it can create errors for each of those features in your model or cause the network to not work properly.
How can you be confident that you have your high-level data mappings correct? If you can resolve all the topology errors in your utility network without having to add any rules, then there is a good chance your high-level mappings are correct.
Required Fields
Your priority in data migration is to produce a fully connected, traceable model. This means that when you create mappings on fields you should start with the fields that are required for tracing in connectivity. This typically only requires you to map a handful of fields, like a field indicating whether a device is open/closed and another field indicating whether a device in service or not. Watch the Running a successful utility network prototype video for a discussion of this approach, with examples from each model.
Additional Fields
You should only focus on mapping the rest of your fields once you’ve worked through all your topology errors and connected all your features to at least one subnetwork. This is because going through all the source and target fields in the model takes the most time, and you don’t want to risk doing the work twice. Once you’ve created a fully connected, error-free model the likelihood of you changing your high-level mappings in a way significant enough to affect your detailed mappings is very low.
Creating Mappings
With those best practices out of the way, let’s look at what it takes to create these mappings. The first video below shows the process for creating high-level data mappings then running through the complete data migration process using those mappings.
This second video shows how to adjust the detailed mapping information for one of the mappings to include one of the required fields from the utility network. After updating the mappings, the video also shows you how to run the data migration using the Load Data to Workspace tool.
Once you’ve finished your high-level data mappings and detailed data mappings you are ready to migrate your data to an asset package using the Load Data Using Workspace tool shown in the video above. With your data migrated to an asset package, you are ready to deploy the asset package.
Deploying Asset Packages
If you are working on a prototype, pilot, or proof-of-concept you will likely deploy your utility network to a local geodatabase using the Asset Package to Geodatabase tool. There are typically two approaches to deploying your utility network to ArcGIS Enterprise.
First, if you already have an error-free utility network with an enabled network topology and subnetworks, you can use the Copy/Paste process outlined in the Deploying a utility network to ArcGIS Enterprise article. The main benefit of this approach is that it loads the network as-is allowing you to quickly get a functioning utility network in your enterprise environment. The downside to this approach is that it doesn’t make use of some of the bulk loading techniques available for SDE, so it is slower for loading datasets with many associations.
Second, if you have a utility network dataset with many associations to ArcGIS Enterprise is to use the Stage Utility Network and Apply Asset Package tools. This is because these tools create a utility network with the topology disabled, with editor tracking turned off, and attribute rules disabled. This allows features and associations to be loaded faster, since they are bypassing much of the validation that is normally present when loading data into a utility network. However, because of this you want to make sure that you have fixed all your errors before you use these tools, as they will allow you to import data with errors that is easier to fix prior to data loading.
You can see a video showing how to use these tools below:
After your utility network is deployed, you are ready to identify and correct any topology errors in the data. This is an essential part of implementing a utility network because the utility network cannot perform tracing or analysis in areas of a network that contain errors. If you do not fix these errors, you will not be able to satisfy any business requirements related to tracing and analysis. It also means you will not be able to be able to identify features that are disconnected in your network, a vital form of quality assurance for any network dataset.
Fortunately, the Migration Toolset includes tools to help you identify and resolve your topology errors through automation. The first step of this process is to run the Analyze Network Data tool to identify any problems with your utility network data. The video below demonstrates how to use this tool to create a database that summarizes all the errors in your data.
In addition to reviewing the layers and charts created by the tool, you can also populate an Error Resolutions table to provide instructions that an automated data cleanup tool can use to resolve your errors. The Migration Toolset includes an Apply Error Resolutions tool that provides automated resolutions for the most common types of error resolutions. The video below demonstrates how to specify a resolution for an error along with how to run the tool to correct the error.
Once you have applied automated resolutions for all your topology errors you are now ready to enable the network topology. This will make the utility network validate all the features in the network and create error features for any remaining errors. At this point you can now manually resolve any remaining errors.
Once all your errors are resolved you will then create one or more subnetworks. This will allow you to identify any disconnected features in your network caused by improperly drawn or snapped features. The video below demonstrates manually creating a subnetwork and identifying disconnected features.
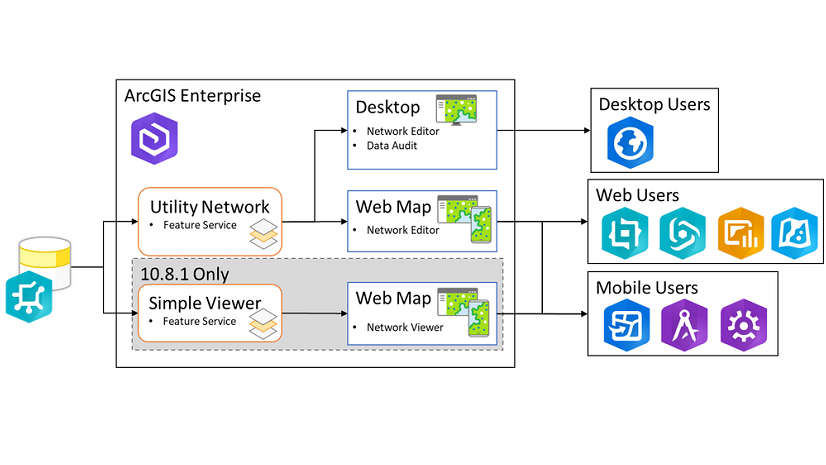
If you’ve followed these steps, you will have a fully connected, traceable utility network in a mobile geodatabase that is great for prototyping and testing different workflows with the utility network on your local machine using ArcGIS Pro with a single user. Once you’re ready to take it to the next level and use the utility network in web and mobile applications, you’ll need to deploy your utility network to an ArcGIS Enterprise environment. You can find the articles covering these workflows in the related articles below this blog post.
However, when working with the utility network foundations there are special considerations for this process that we will discuss in the next section.
Recreating Maps
Most client-applications that interact with ArcGIS Enterprise access data using a web map. A web map contains a collection of layers from one or more services that is typically overlaid on a thematically appropriate basemap. The feature service itself provides access to the data, but all the symbology, labeling, etc are defined in the web map. This approach makes it easier for administrators to manage larger deployments, since they only need to maintain a relatively small number of services while also allowing end-users to have the flexibility to create and style their own maps.
Implementing a Utility Network Foundation requires making many schema changes that must be reflected in your maps. Not only are your layer names different, but many of your field names and domain values have changed as well. This has a large impact on any maps in your organization that referenced your network data, and you will need to update all your maps to use the new schema in your utility network feature service while trying to retain as much of your original symbology, labeling, etc as possible.
One important thing to remember when creating displays for your utility network features is to pay attention to field visibility settings. Because each layer contains a consolidated set of fields for all the different types of lines, devices, etc in that layer you should always adjust field visibility to make it appropriate for the map that you are using. If you are using subtype group layers, you should make sure you are only showing fields that are appropriate for each asset group. If you are using a map where you are showing all your features in a single layer, you should consider using field visibility to only show the handful of fields that are important for that map.
Fortunately, each Utility Network Foundation includes an example map that includes subtype group layers that show the recommended field order and visibility for the subtype layer for each asset group. Depending on the version of the Utility Network Foundation you are using the map is either called the “Network Asset Type” map or the “Network Editor” map. The first map you share should be a version of this map that you have pointed at your utility network service. You can see an example of this in the video below:
If you want to know more about the best practices for creating your own maps for utility network data, check out the Configure a map for ArcGIS Utility Network tutorial. It shows you many tips and tricks while also demonstrating the importance of using subtype group layers, a feature new to ArcGIS Pro that is essential to creating performant maps for datasets like the utility network.
When your data is error free and you’re ready to publish it to ArcGIS Enterprise, follow the remaining instructions for deploying a utility network to ArcGIS Enterprise.
Conclusion
Now that you’ve seen how to migrate data into a Utility Network Foundation, you are ready to do it with your own data. It’s important to remember that this is an iterative process, and that the first time you do this is as much about learning the tools/processes as it is about getting the work done.
The processes outlined here are just the beginning, here are some other things you should consider doing with your model:
- Add any new asset types or fields to your model
- Finish your detailed mappings for all your fields and domains
- Review the existing fields in your model and consolidate similar fields or remove unused fields.
You can find additional articles describing the data migration, deployment, and sharing process in the related articles section below. If you run into issues or have questions, I strongly recommend you ask question on the ArcGIS Utility Network community site. The ArcGIS Utility Network community page is visited by tens of thousands of users every year, many of whom have been through this same process, and who take an active role in supporting the community through post and comments.


Commenting is not enabled for this article.