Creating a Merged Orthomosaic
Orthomosaics are some of the most important imagery products that are derived from your drone collects. They serve as the culmination of all your flying and provide a valuable and accurate representation of your collection. Site Scan allows you to process orthomosaics from multiple flights simultaneously in the cloud. But, because you collect at different times or because the area is too large you may be left with multiple separate orthomosaics that should fit together like puzzle pieces, giving you a complete picture of your project, land, or assets. Subsequently, ArcGIS Pro allows you to assemble these pieces together to create one authoritative, seamless and unifying orthomosaic. In this article, we will walk through how you can use ArcGIS Pro to create a merged orthomosaic from multiple drone collections. We can also apply this process to other types of imagery.
Creating a Mosaic Dataset
Our example uses four orthomosaics derived from four flights along a coast. We downloaded them locally to our machine from Site Scan. The first step to merge orthomosaics will be creating a mosaic dataset. If you are unfamiliar with mosaic datasets they are used to manage, display, analyze, serve, and share imagery and raster data. When you create a new mosaic dataset, it is created as an empty container in the geodatabase with some default properties to which you can add raster data. You can learn more about them here. John Nelson also has a great video explaining other mosaic dataset workflows here.
1. We will first add our orthomosaics into ArcGIS Pro by creating a folder connection. From the Catalog pane right click
2. Select Add Folder Connection. Next, navigate to the folder where your orthomosaics are stored locally, select the folder, and click
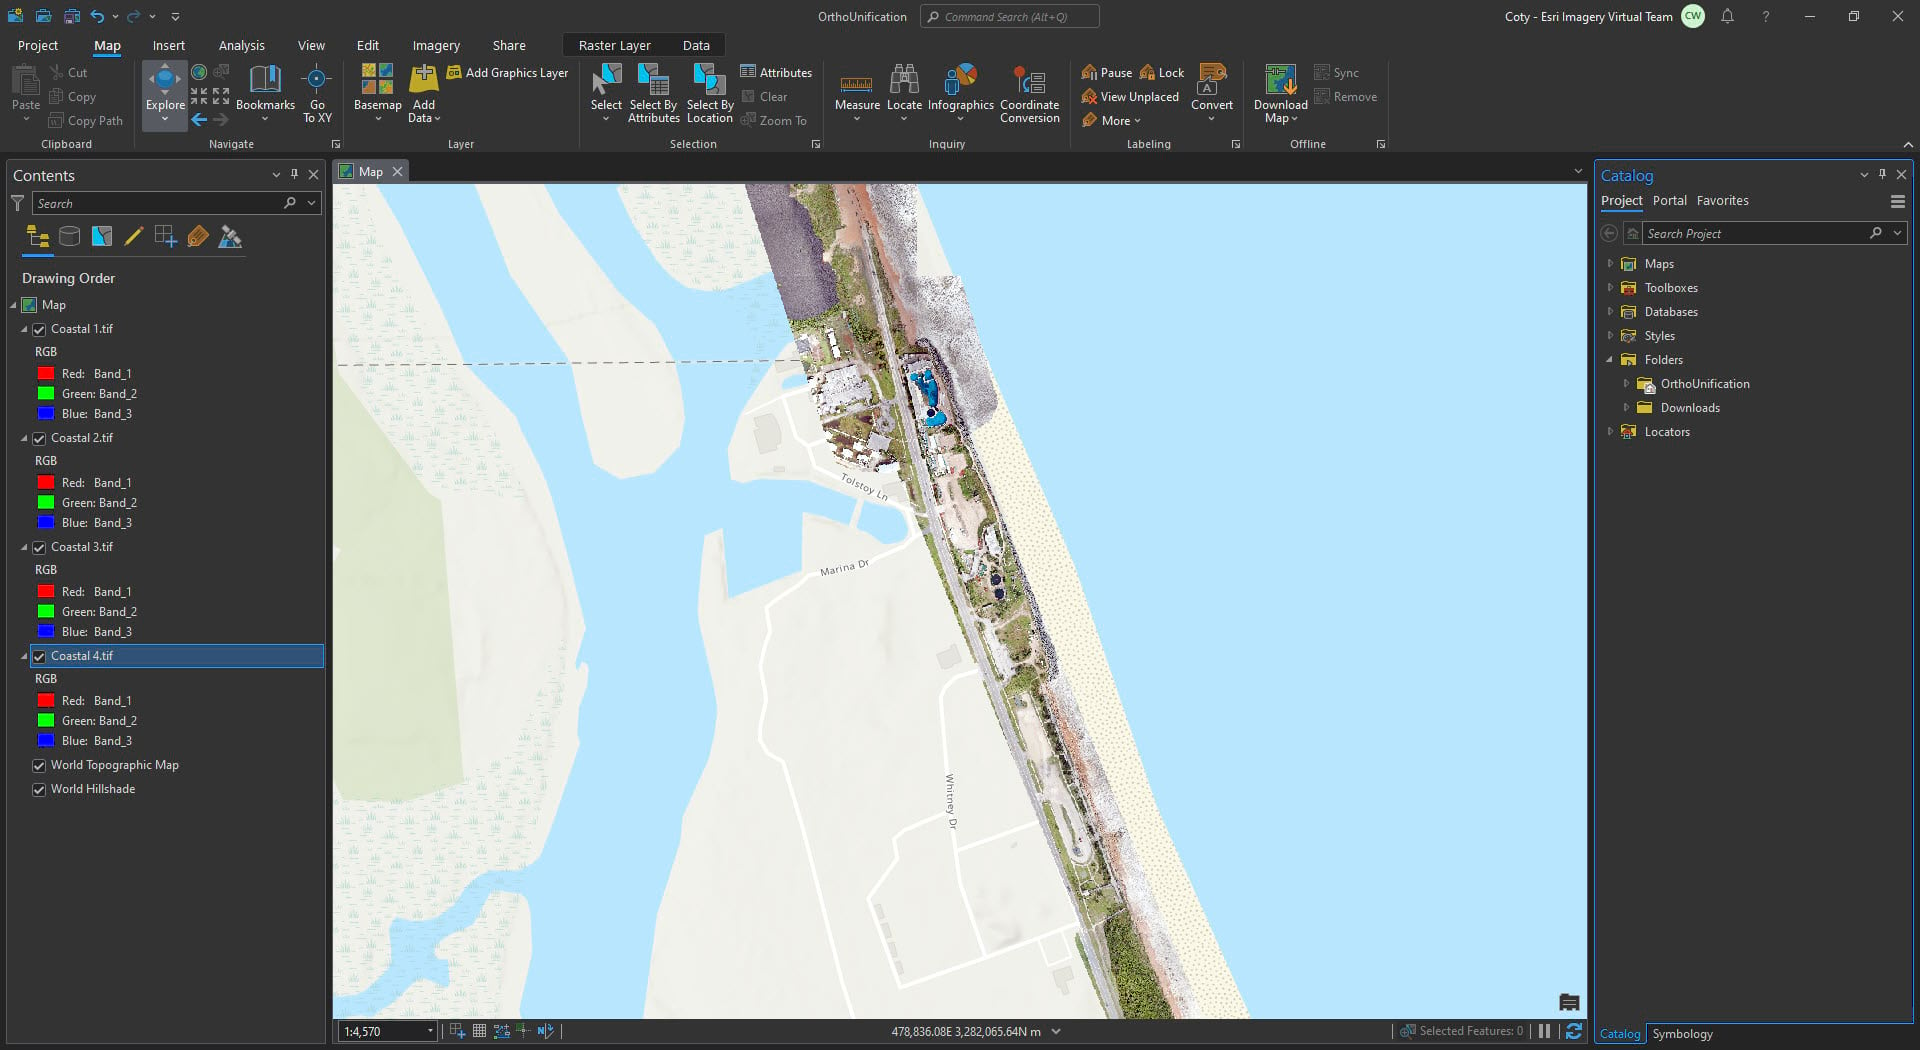
3. From the folder each orthomosaic can be dragged and dropped into the map. ArcGIS Pro could prompt you to build pyramids. If so select “yes” which will optimize your image’s performance.
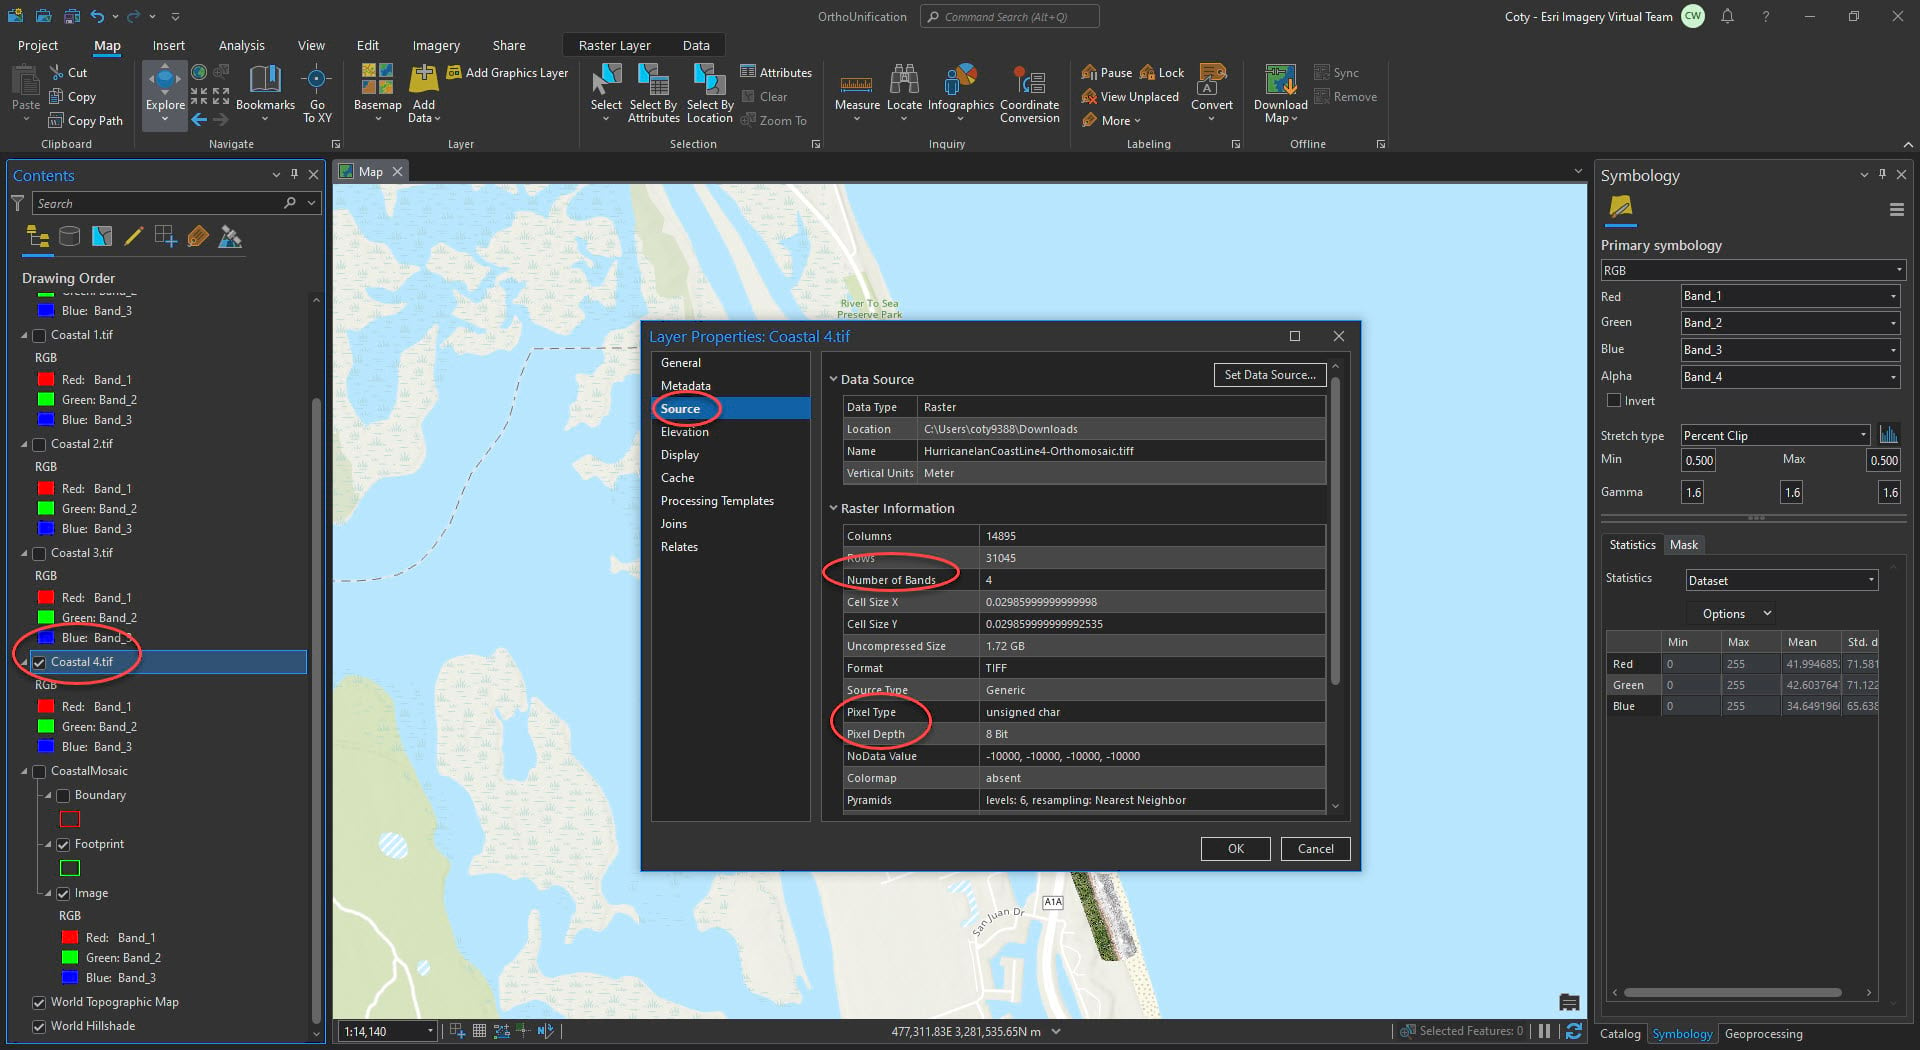
4. We now need to validate that each orthomosaic is consistent and standardized before processing. We can do this by examining raster properties and checking that Band Count and Pixel Depth is the same for each mission. This can be done by, right-clicking a raster in Contents > Properties >Source. In our case, the imagery has 4 bands and the pixel depth is 8-bit unsigned. These values will be used as inputs when creating the mosaic dataset.
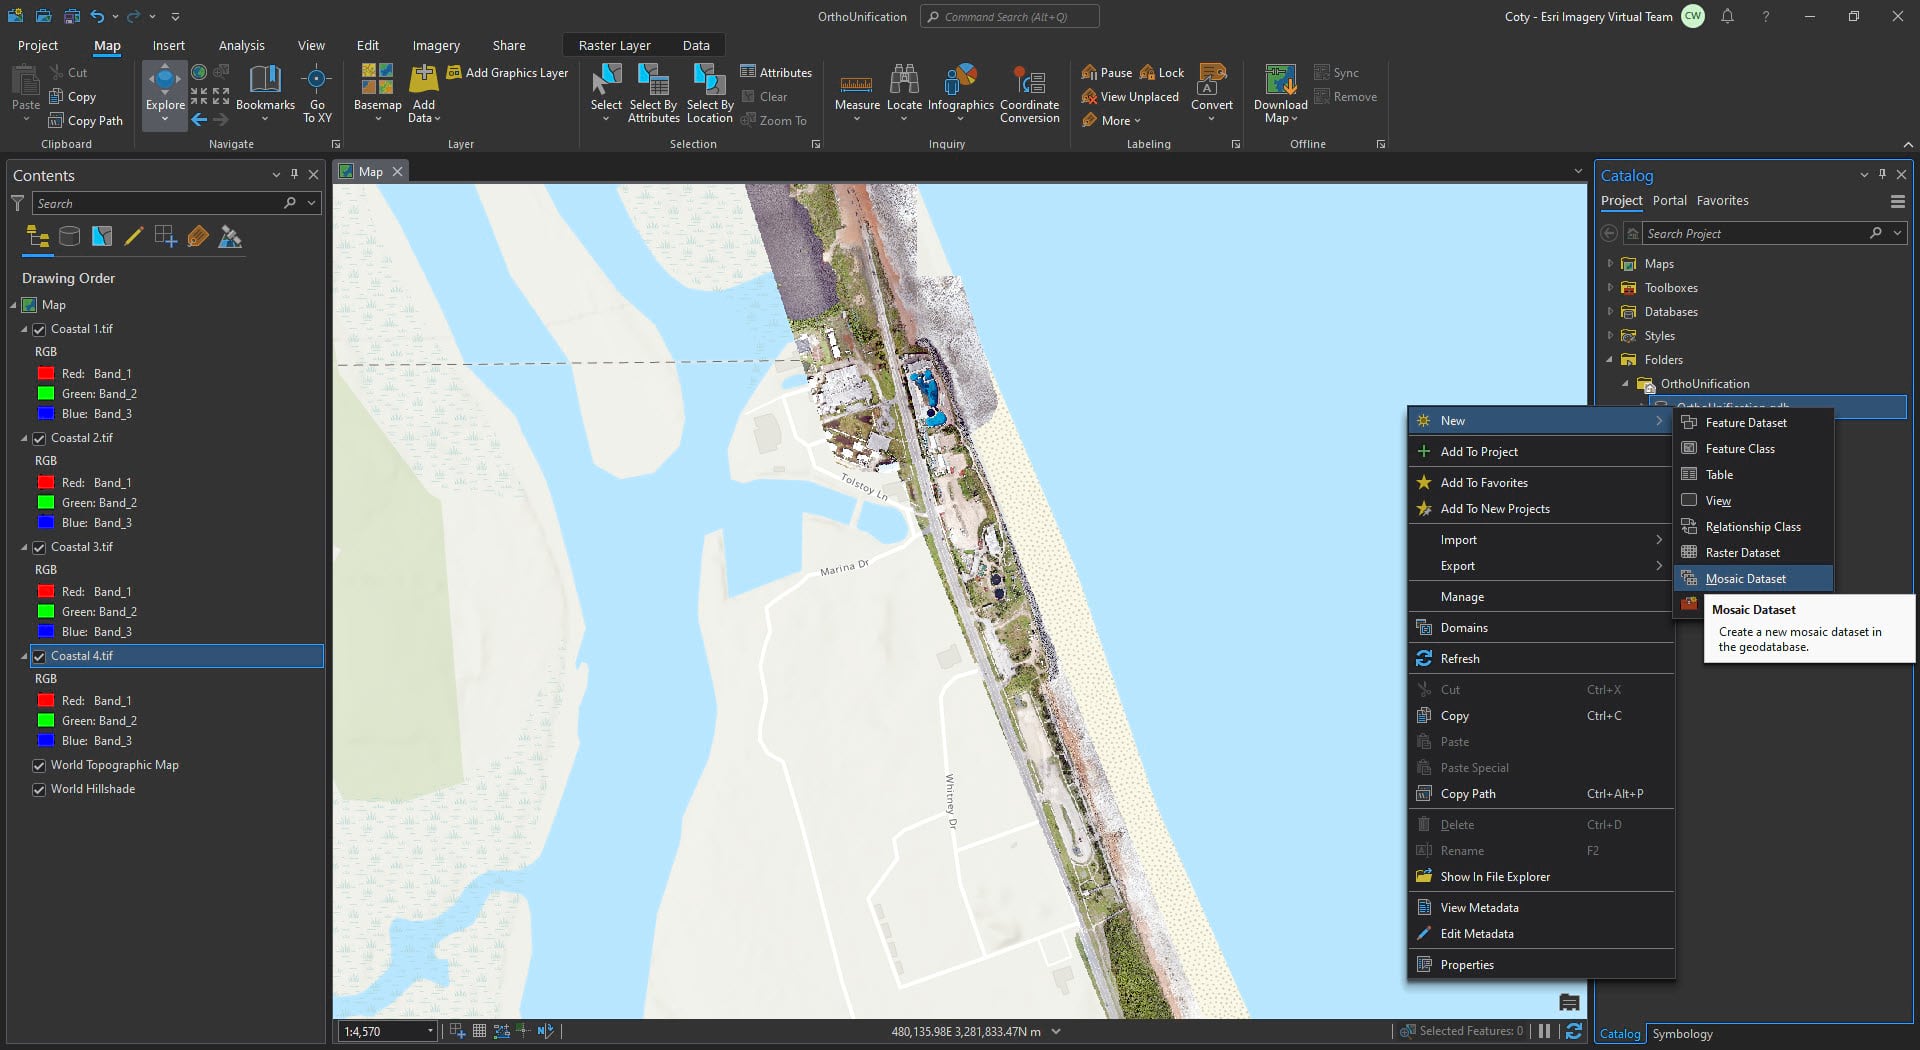
5. To create the mosaic dataset we can click the drop-down under “Databases” and then right-click the geodatabase (.gbd) where we would like to store the mosaic dataset. Then click New > Mosaic Dataset.
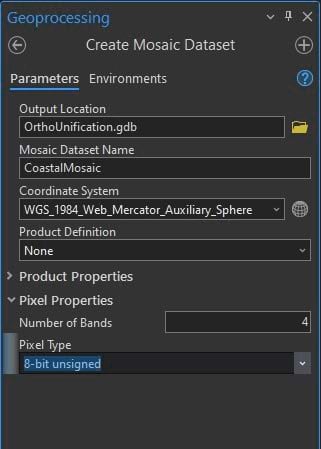
6. This opens the “Create Mosaic Dataset” geoprocessing tool. Input a name. Select the coordinate system you would like to use. Set the Number of Bands and Pixel Type to be consistent with your imagery. Click Run
7. Now we will add the orthomosaics to the newly created and empty mosaic dataset. Right-click the mosaic dataset in the .gdb and select “Add Rasters”
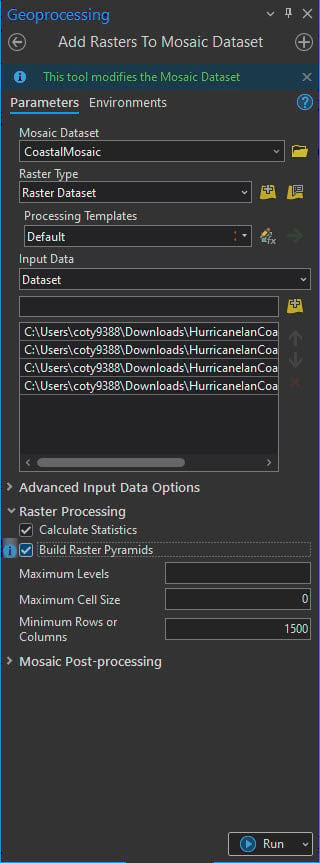
8. This opens the “Add Rasters To Mosaic Dataset” geoprocessing tool. For the raster type select “Raster Dataset. ” Leave the processing template as default. Input the orthomosaics into the “Input Data” field. We can add rasters individually or if all of the rasters are in the same folder we can select the folder to add all of the rasters to the mosaic dataset. Lastly, under “Raster Processing” check the boxes to Calculate Statistics and Build Raster Pyramids for consistent and fast rendering. Click Run.
Working with the Mosaic Dataset
Now that we created the mosaic dataset and added the rasters we can see the footprints of each raster in bright green plus a black box representing the 4th band. Masking allows us to visualize only the RGB bands and exclude the no-data values.
- We need to mask the 4th band. To do so right-click the mosaic dataset in the table of contents > Symbology > Mask > Check the box
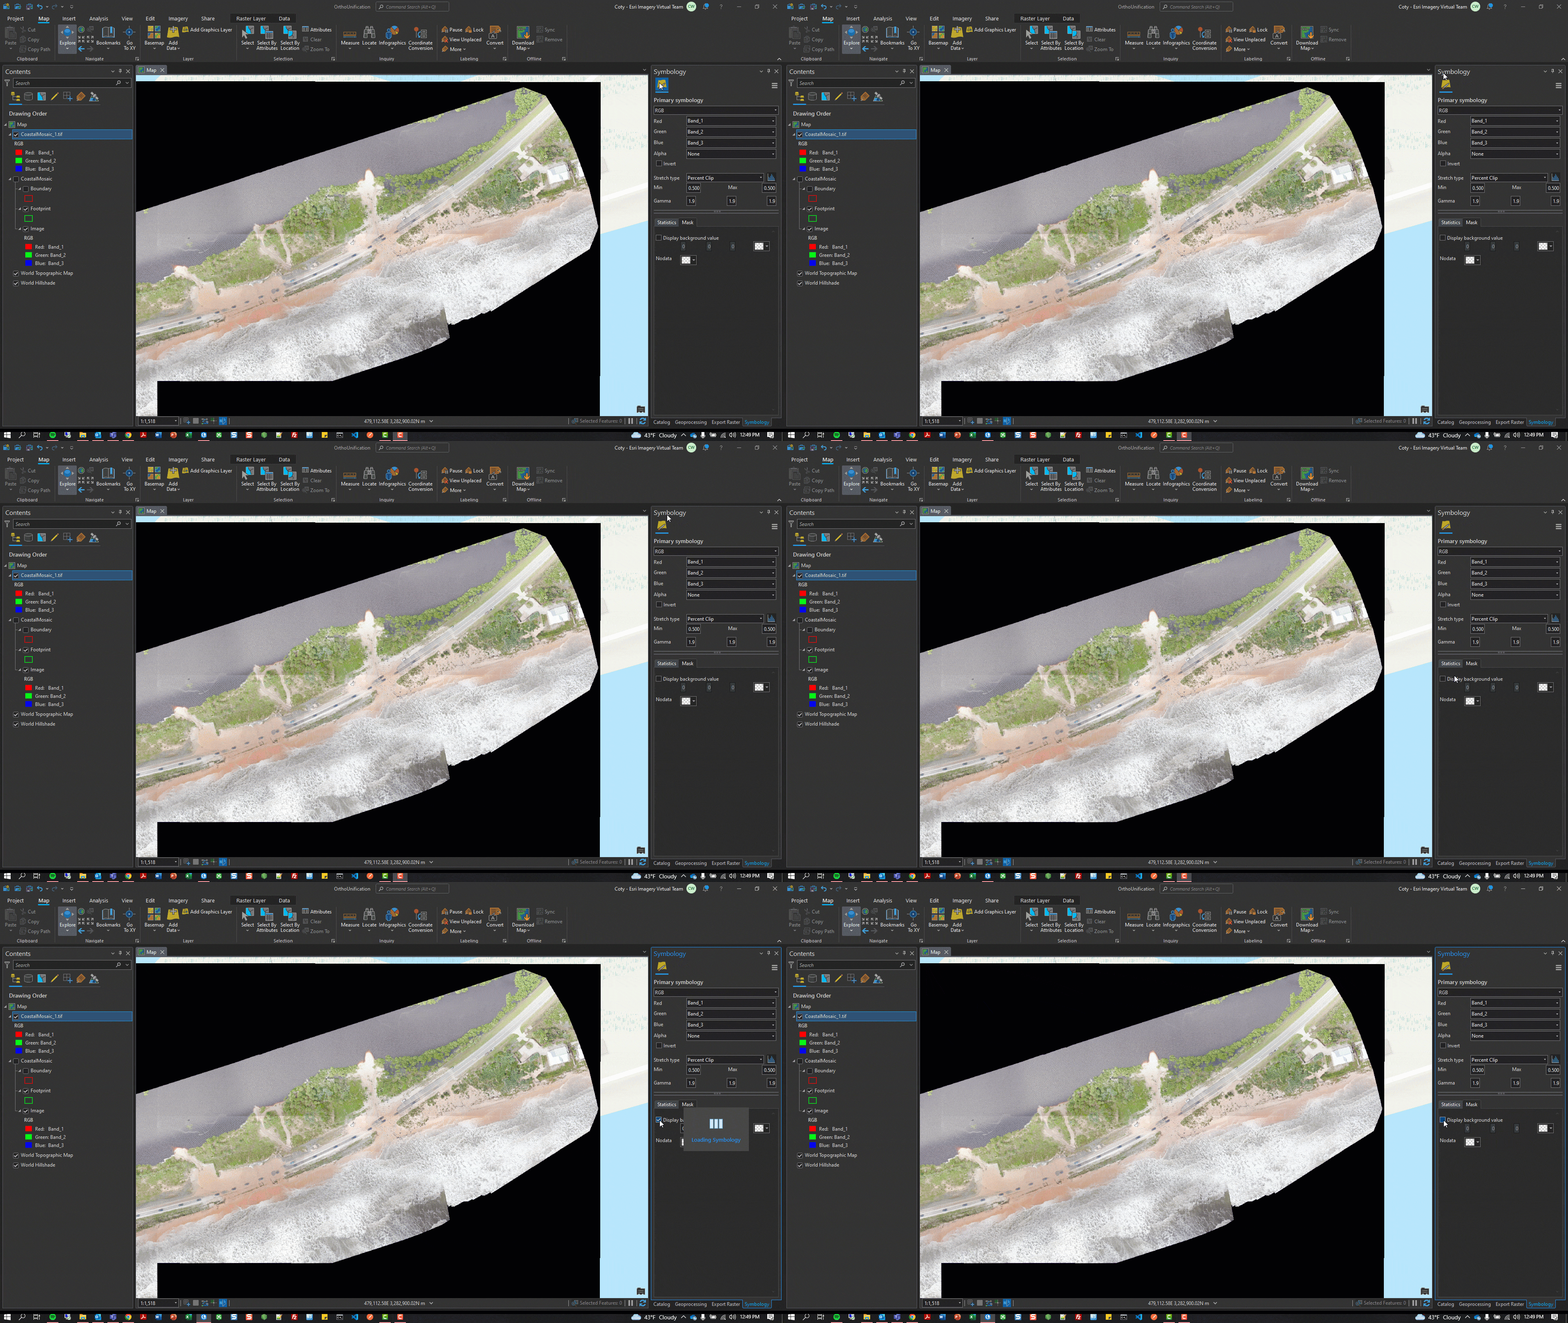
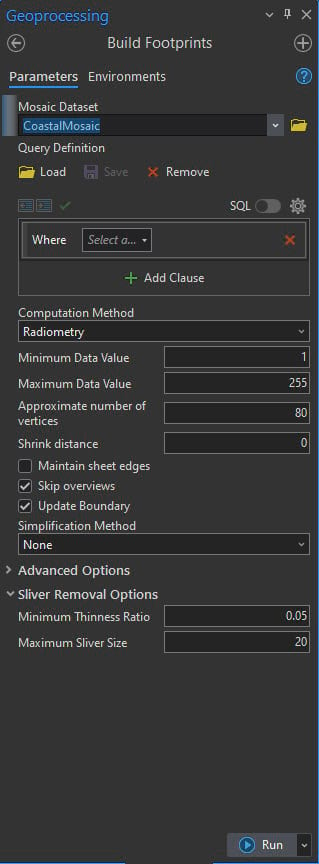
2. Now we can see that the images overlap. However, there are still large footprints that do not fit the coverage of the imagery. We can update the footprint to the extent of the imagery with the “Build Footprints” geoprocessing tool. We can access the “Build Footprints” geoprocessing tool by searching for it in the geoprocessing pane. For the Mosaic Dataset dropdown select the mosaic dataset we created and then leave the rest of the defaults as they will work for this example. Click Run.
3. The footprints are now updated to fit with the extent of the imagery.
Exporting the Merged Orthomosaic
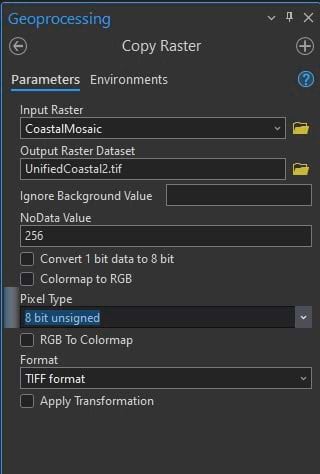
We now have a seamless mosaic dataset. Next, if we want to work directly with the mosaic dataset, composed of several individual rasters, a best practice would be to “Build Overviews” to see the mosaic dataset easily at all scales. However, if we want a single unified orthomosaic that combines each of our orthomosaics we will need to export it from the mosaic dataset as a new raster. We can use the “Copy Raster” geoprocessing tool to create a .tif file that is a single raster that matches the source images. “Copy Raster” allows you to export imagery into several image formats with parameters to meet your project requirements.
- Open the “Copy Raster” geoprocessing tool from the Geoprocessing pane. Then, set the input raster as the mosaic dataset. Next, give the output raster file a name. Set the pixel type to be consistent with our starting orthomosaics. In this example, it is 8-bit unsigned. Lastly, set the format, In this case, we selected TIFF format. Click Run.
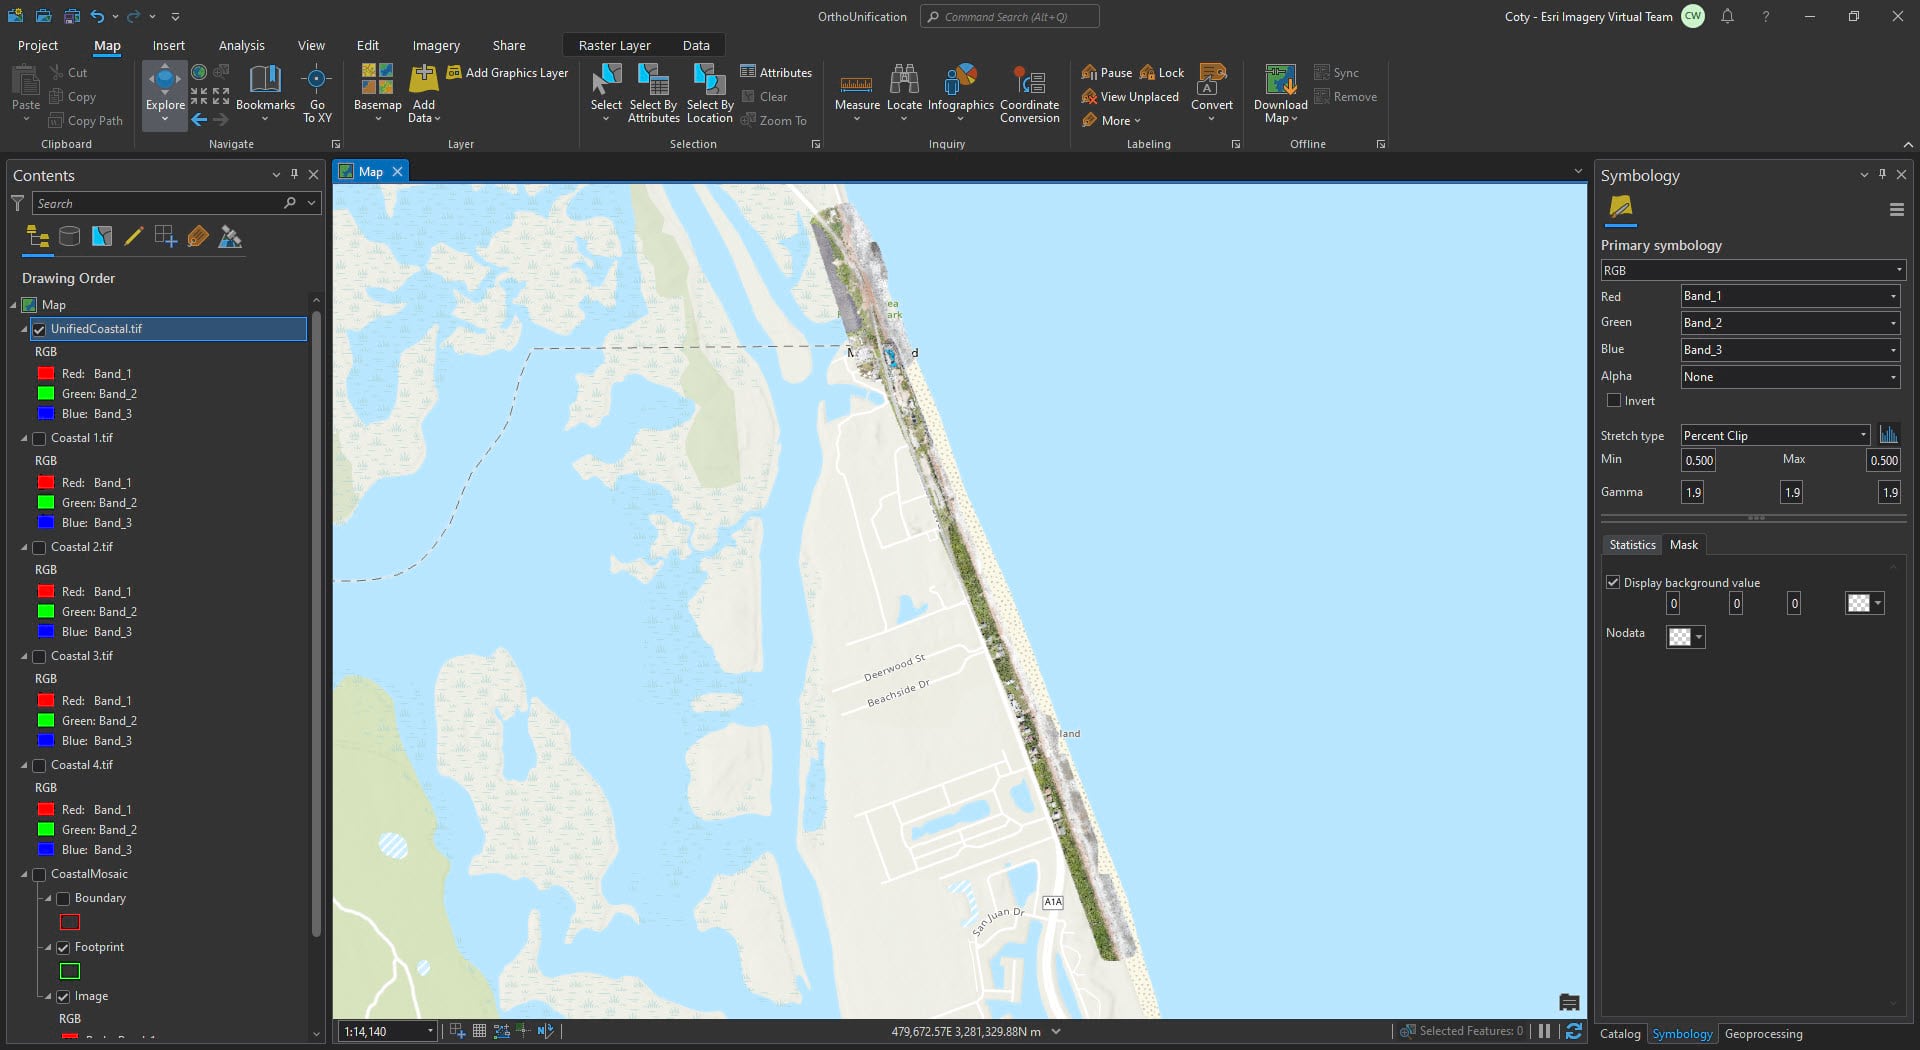
2. We now have a merged orthomosaic, but a final step will allow us to view it at multiple scales. Hence, we can use the “Build Pyramids” geoprocessing tool to update overviews for optimized performance. Open the “Build Pyramids” tool from the geoprocessing pane.
In conclusion, We now have a single unified image from multiple drone flights that we can use for other processes or if project delivery requires it to be in a single image. Additionally, we can use this workflow on any flight type or other rasters we need to merge into a single orthomosaic.
Summary
Here are our steps in summary:
- Add drone derived orthomosaics to ArcGIS Pro.
- Create a mosaic dataset.
- Add orthomosaics to the empty mosaic dataset.
- Set appropriate masking for the mosaic dataset.
- Update footprints to fit the collection of orthomosaics.
- Export the merged orthomosaic from the mosaic dataset.
- Build pyramids for easy viewing.


I would emphasize the need to check for proper overlap between orthos before creating a mosaic dataset. If the orthos don’t line up properly I would suggest the use of the georeferencing toolbar. In this example, the first photo shows the orthos not overlapping correctly. Better to fix this before merging is done using the copy raster tool.