Many local governments have detailed geographic data for their community’s streets and highways. But accurate transportation analysis, such as routing work crews or inspectors and assessing fire station coverage, requires network connectivity. One-way streets, overpasses, and speed limits affect the routes vehicles can take between streets, so your data must account for these variables.
To prepare your street data for transportation analysis, you’ll create a network dataset. A network dataset contains all your street centerline features and also accounts for the connectivity between them. This article contains a downloadable ArcGIS Pro project with network dataset templates and a task that walks you step-by-step through the process of creating a network dataset from street centerline data.
If you don’t have your own street centerline data, the download also includes a sample street centerline dataset from Aurora, Colorado, so you can test the workflow.
This workflow requires ArcGIS Pro 2.2 or later, the Desktop Standard license or higher, and the Network Analyst extension.
This workflow was last tested on January 6, 2022, using ArcGIS Pro 2.9.
Step 1: Download data
1. Go to the ArcGIS Pro Tasks to Create a Local Government Network Dataset details page.
2. Click Download.
The ZIP file downloads to your machine.
3. Locate the downloaded file on your computer. Right-click the file and extract it to a location you can easily find, such as your Documents folder.
4. Open the extracted Create Local Government Network Dataset folder.

The folder contains the following items:
- Two geodatabases, Create_Local_Government_Network_Dataset and Street_Network. The first contains a schema for road centerlines. The second is empty and will be used to contain your street network.
- The Sample Data folder, which contains road centerline data for Aurora, Colorado.
- The Create Local Government Network Dataset project, which contains the task that walks you step-by-step through the workflow.
- Two toolboxes, Create Local Government Network Dataset and Data Preparation and Validation Tools. The first is an empty default toolbox. The second contains several custom scripts to help you create a network dataset.
- The Elevation Field Symbology layer file. This file contains custom symbology that shows the direction in which your roads were originally digitized.
- Two Network Dataset Template files, one for imperial units and one for metric units.
- A Get Started document that explains how to open the task and a Technical Documentation PDF with information about the templates.
Step 2: Open the project and run the task
1. Double-click Create Local Government Network Dataset.aprx (the ArcGIS Project File).
The project opens. By default, it contains an imagery map centered on the United States.
2. In the Catalog pane, expand the Tasks folder.

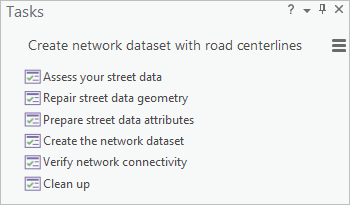
3. Double-click the Create network dataset with road centerlines task.
The Tasks pane opens. It displays a collection of six tasks, which must be followed sequentially to create a network dataset.

4. Double-click the first task, Assess your street data.
5. Follow the steps in order.
Once you’ve followed the steps in all six tasks, you’ll have created a network dataset for your transportation network. This network dataset can be used for routing and transportation analysis. It can also be edited and improved as necessary over time.
For additional resources, check out What is the ArcGIS Network Analyst extension? and What is a network dataset?
Commenting is not enabled for this article.