As we continue the fight against COVID-19 and enter the wildfire and hurricane season, web applications like dashboards help people make informed, time-sensitive, and even life-saving decisions. Depending on the events your organization is monitoring, things can change rapidly. You’ll need to efficiently publish your web layers, update your data, and overwrite your web layers to keep your dashboards current and relevant.
ModelBuilder in ArcGIS Pro allows you to automate analyzing and updating the data used in your web layers. You may already have a model you routinely run to prepare your data for publishing. All that remains is the ability to publish web layers or overwrite existing ones in the model. In this article, you’ll learn how to create a script tool in ArcGIS Pro 2.8 that publishes or overwrites a web feature layer. The script tool is built on ArcPy functions and geoprocessing tools, allowing you to run it like any other geoprocessing tool in new or existing ModelBuilder models.
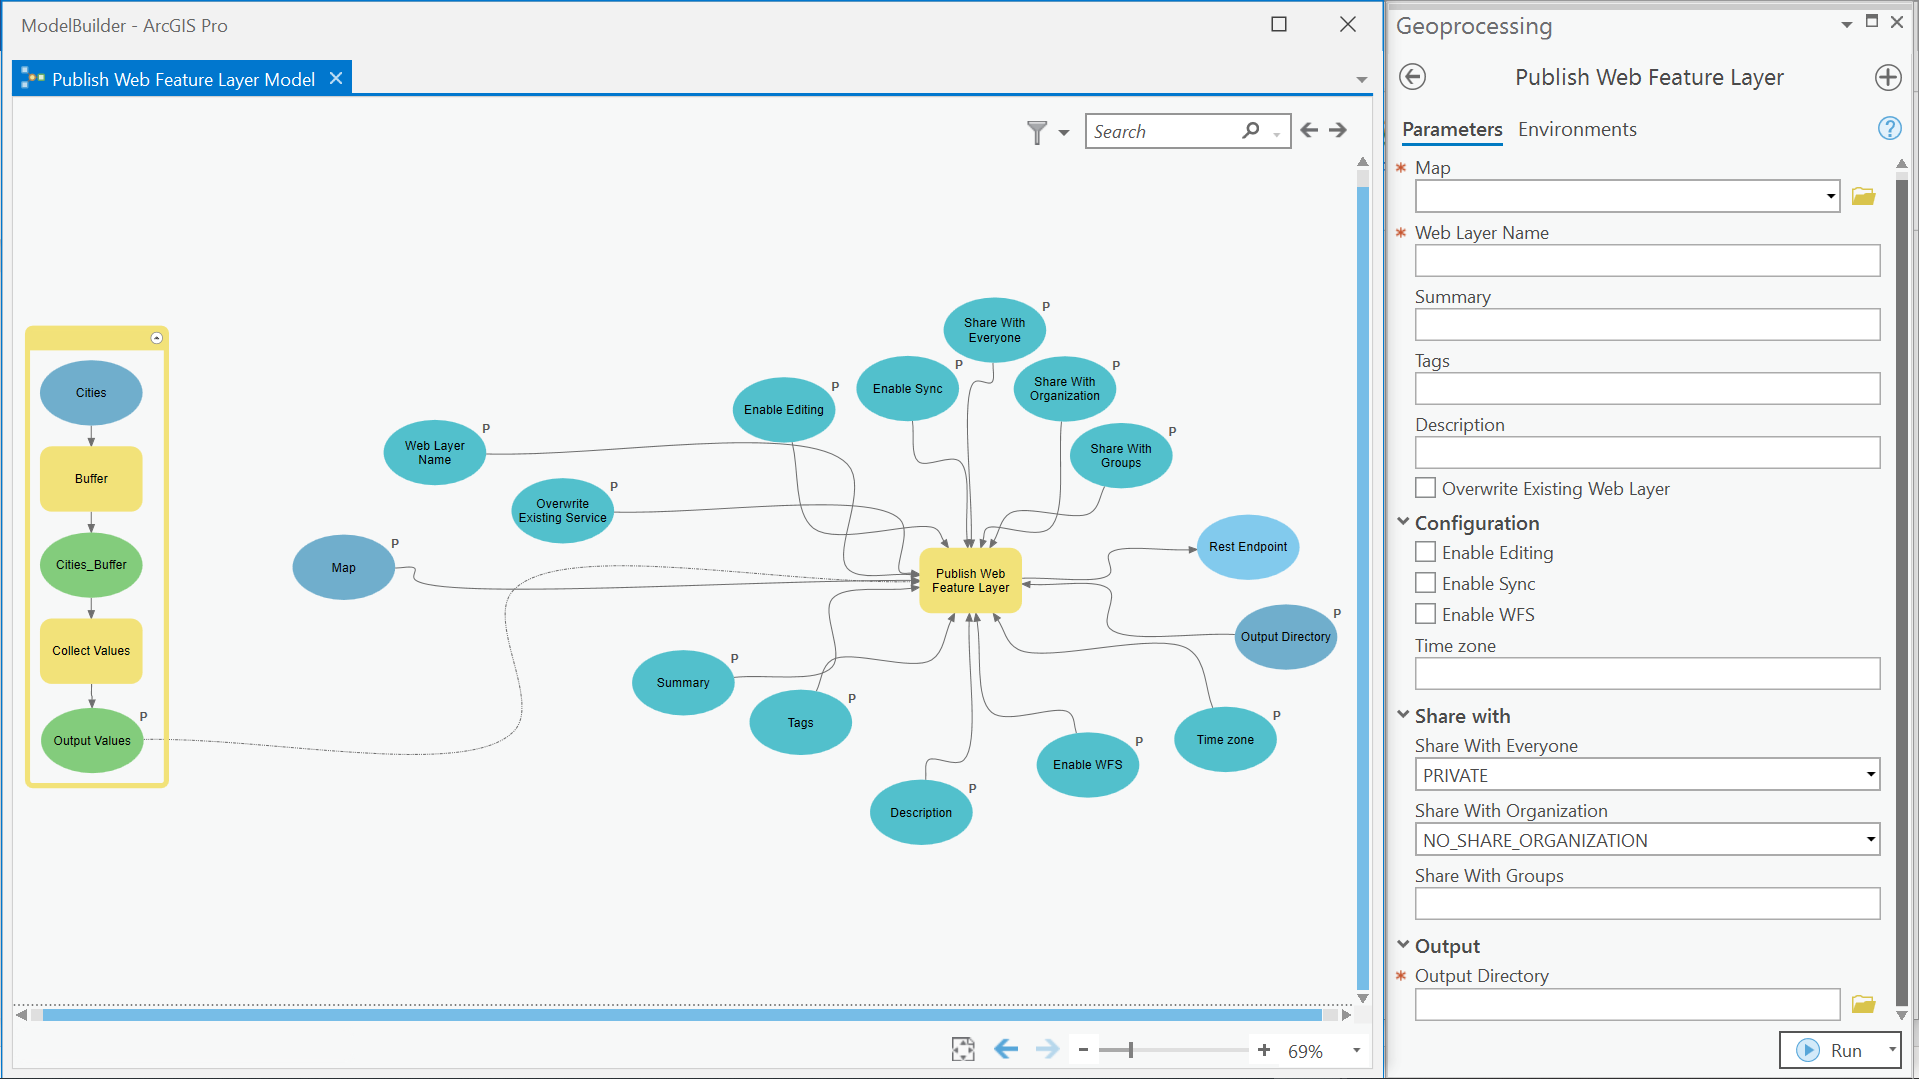
You’ll be guided through each of the four steps below:
- Write a Python script. (Not too familiar with Python? Don’t worry; a sample script is provided that you can modify to meet your specific needs.)
- Create a script tool.
- Add the script tool to ModelBuilder.
- Run the model.
If you want to view the completed script tool and see how it works in an existing model, download this project to follow along.
Step 1: Write a Python script
The code below publishes a new web feature layer or overwrites an existing web feature layer in ArcGIS Online or ArcGIS Enterprise. Copy and paste the script in a text editor like Notepad and save it as a Python file (.py). This script can be modified to meet your specific needs. You’ll learn how to do this under Next Steps at the end of this article. If you would like to learn more about this publishing script and others like it, see Introduction to arcpy.sharing.
Step 2: Create a script tool
Next, follow all three sections below to create a script tool.
Create a custom toolbox to store your tool
1. Open your ArcGIS Pro project. In the Catalog pane, right-click Toolboxes and click New Toolbox.
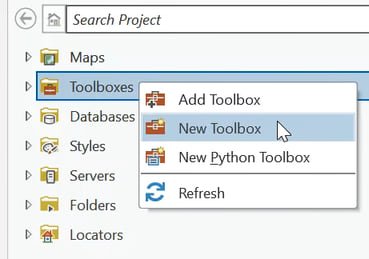
2. On the New Toolbox dialog box, provide a name for your toolbox and click Save.
Import the Python script
- In the Catalog pane, right-click the new toolbox you just created, and select New > Script.
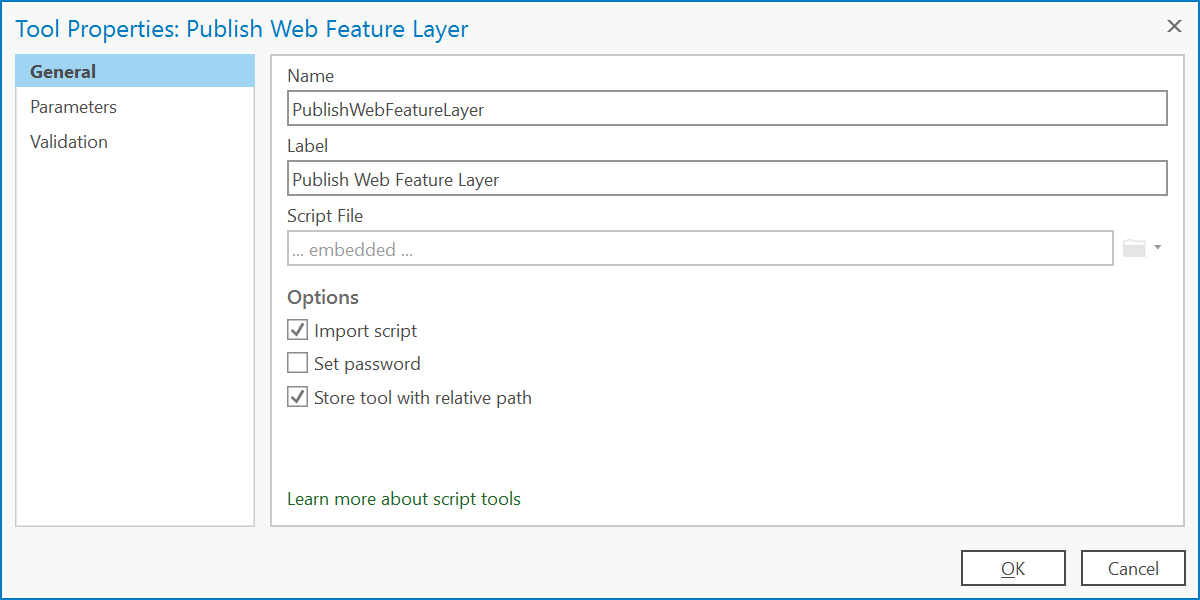
- On the New Script dialog box, under General, provide the following:
Name: PublishWebFeatureLayer
Label: Publish Web Feature Layer
- Browse to the location of the Python script file you saved earlier. Select the file and click OK.
- Check Import script.
- Leave the Tool Properties dialog box open for the next section.
Define the parameters of your script tool
Parameters are variables that serve as inputs for your script tool. When you run the tool, the Python script reads the parameter values before executing the rest of the script.
Under Parameters, add the following parameters with their properties:
Note: These properties can be modified based on your preferences. (For example, you can change the Share With Organization parameter so that it defaults to SHARE_ORGANIZATION instead of NO_SHARE_ORGANIZATION.)
0. Label: Map
Name: in_map
Data Type: Map
Type: Required
Direction: Input
1. Label: Web Layer Name
Name: service
Data Type: String
Type: Required
Direction: Input
2. Label: Summary
Name: summary
Data Type: String
Type: Optional
Direction: Input
3. Label: Tags
Name: tags
Data Type: String
Type: Optional
Direction: Input
4. Label: Description
Name: description
Data Type: String
Type: Optional
Direction: Input
5. Label: Overwrite Existing Web Layer
Name: overwrite_existing_service
Data Type: Boolean
Type: Optional
Direction: Input
6. Label: Enable Editing
Name: enableEditing
Data Type: Boolean
Type: Optional
Direction: Input
Category: Configuration
7. Label: Enable Sync
Name: enableSync
Data Type: Boolean
Type: Optional
Direction: Input
Category: Configuration
8. Label: Enable WFS
Name: enableWFS
Data Type: Boolean
Type: Optional
Direction: Input
Category: Configuration
9. Label: Time zone
Name: timezone
Data Type: String
Type: Optional
Direction: Input
Category: Configuration
10. Label: Share With Everyone
Name: share_public
Data Type: String
Type: Optional
Direction: Input
Category: Share with
Filter: Value List
PUBLIC
PRIVATE
Default: PRIVATE
11. Label: Share With Organization
Name: share_organization
Data Type: String
Type: Optional
Direction: Input
Category: Share with
Filter: Value List
SHARE_ORGANIZATION
NO_SHARE_ORGANIZATION
Default: NO_SHARE_ORGANIZATION
12. Label: Share With Groups
Name: share_groups
Data Type: String
Type: Optional
Direction: Input
Category: Share with
13. Label: Output Directory
Name: sddraft_output_directory
Data Type: Folder
Type: Required
Direction: Input
Category: Output
14. Label: Rest Endpoint
Name: Rest_Endpoint
Data Type: String
Type: Derived
Direction: Output
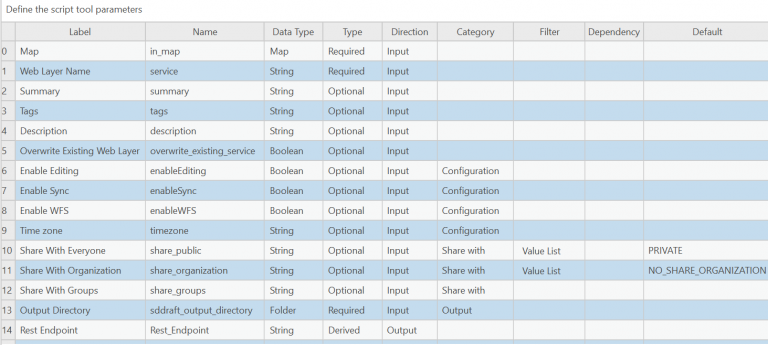
Now that you’ve imported your script and set parameters for your tool, click OK on the Tool Properties dialog box.
Learn more about setting script tool parameters
Let’s examine the script tool you created. Double-click your script tool to open it.
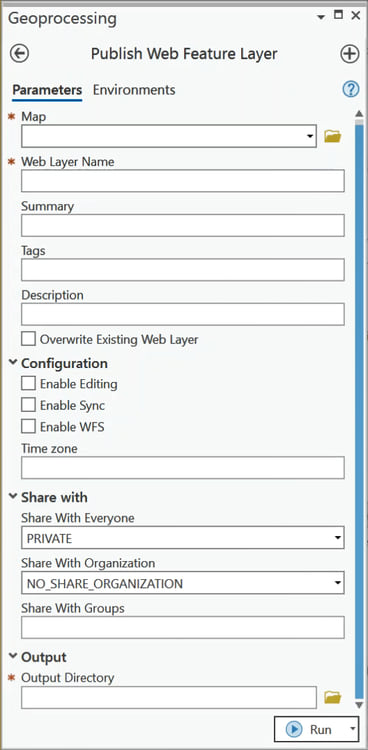
Publish Web Feature Layer is now a custom geoprocessing tool that can be run like any other system geoprocessing tool. It’s ready to be added to a model.
Optional: Include metadata
When creating a custom geoprocessing tool, it’s recommended to include documentation that helps others use your tool.
Right-click your script and click Edit Metadata.
Enter tags, summary, and usage. Under Syntax, fill out the fields below and click Save.
in_map:
Dialog Explanation: Map to publish.
Scripting Explanation: Map object of the map to publish.
service:
Dialog Explanation: Enter the name of a new or existing web layer. If the name already exists, the web layer will be overwritten. Otherwise, a new web layer will be created.
Scripting Explanation: A string that represents the service name.
summary:
Dialog Explanation: Enter a short summary of the web layer.
Scripting Explanation: A string that represents summary.
tags:
Dialog Explanation: Enter keywords or terms that describe the web layer.
Scripting Explanation: A string that represents tags, with different tags separated by comma.
description:
Dialog Explanation: Enter an in-depth description of the item.
Scripting Explanation: A string that represents a description.
overwrite_existing_service:
Dialog Explanation: If checked and a web layer with the same name exists, it will be overwritten.
Scripting Explanation: A Boolean that determines whether to overwrite an existing web layer.
enableEditing:
Dialog Explanation: Allow users to edit the web layer.
Scripting Explanation: A Boolean that determines whether to enable editing.
enableSync:
Dialog Explanation: Disconnected editing with synchronization.
Scripting Explanation: A Boolean that determines whether to enable sync.
enableWFS:
Dialog Explanation: Include a WFS layer.
Scripting Explanation: A Boolean that determines whether to share a WFS layer as well.
timezone:
Dialog Explanation: Enter the time zone in which your date values are stored.
Scripting Explanation: A string to set the time zone.
share_public:
Dialog Explanation: Share web layer with the public.
Scripting Explanation: A string that determines if the layer is PUBLIC or PRIVATE.
share_organization:
Dialog Explanation: Share web layer with all authenticated users in your organization.
Scripting Explanation: A string that determines whether the layer is shared to the organization.
share_groups:
Dialog Explanation: Share web layer with groups you belong to and its members.
Scripting Explanation: List of existing groups that the layer is to be shared to.
sddraft_output_directory:
Dialog Explanation: The folder on disk where your .sddraft and .sd files will be stored.
Scripting Explanation: Output directory to create .sddraft and .sd files.
Step 3: Add the script tool to ModelBuilder
To use the tool in ModelBuilder, open an existing model or right-click the toolbox and select New > Model to create a new model. Right-click the script in your toolbox and click Add To Model (or drag it into your model).

You can include other geoprocessing tools in your model. For example, you can set other processes as preconditions so that they execute before the web layer is overwritten. To learn more, see Use ModelBuilder.
Step 4: Run the model
Double-click the tool and fill out the fields. To overwrite a web layer, provide the name of the existing web layer and check the Overwrite Existing Web Layer check box. If the name already exists, the web layer will be overwritten. Otherwise, a new web layer will be created. Before running it, validate the model to ensure that it will successfully run by clicking ModelBuilder > Run > Validate. Once the model has been validated, click Run to run the entire model. You can also schedule a model to run repeatedly or at a designated time.

After the model successfully runs, add the web layer to a map in ArcGIS Pro or open it in Map Viewer.
Next steps
In this article, you learned how to publish and overwrite web feature layers in ModelBuilder by creating and running a script tool in a model. One of the advantages of authoring your own script tool is that you can modify it to meet your specific needs. A couple of examples are provided below. If you want to learn more about automating sharing workflows in ArcGIS Pro, see Introduction to arcpy.sharing.
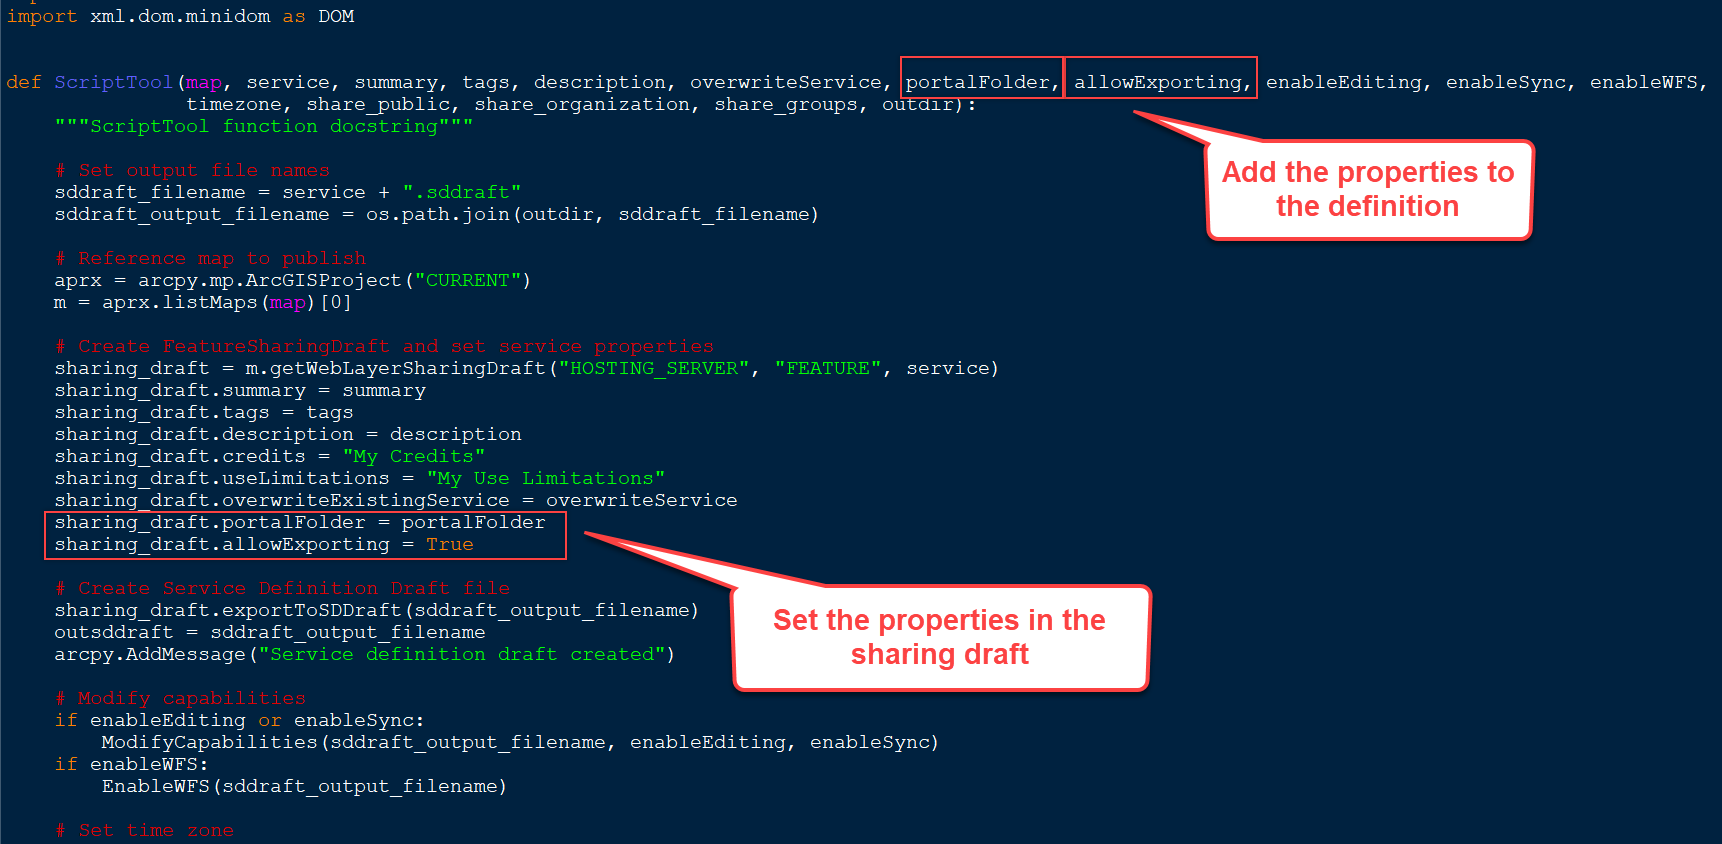
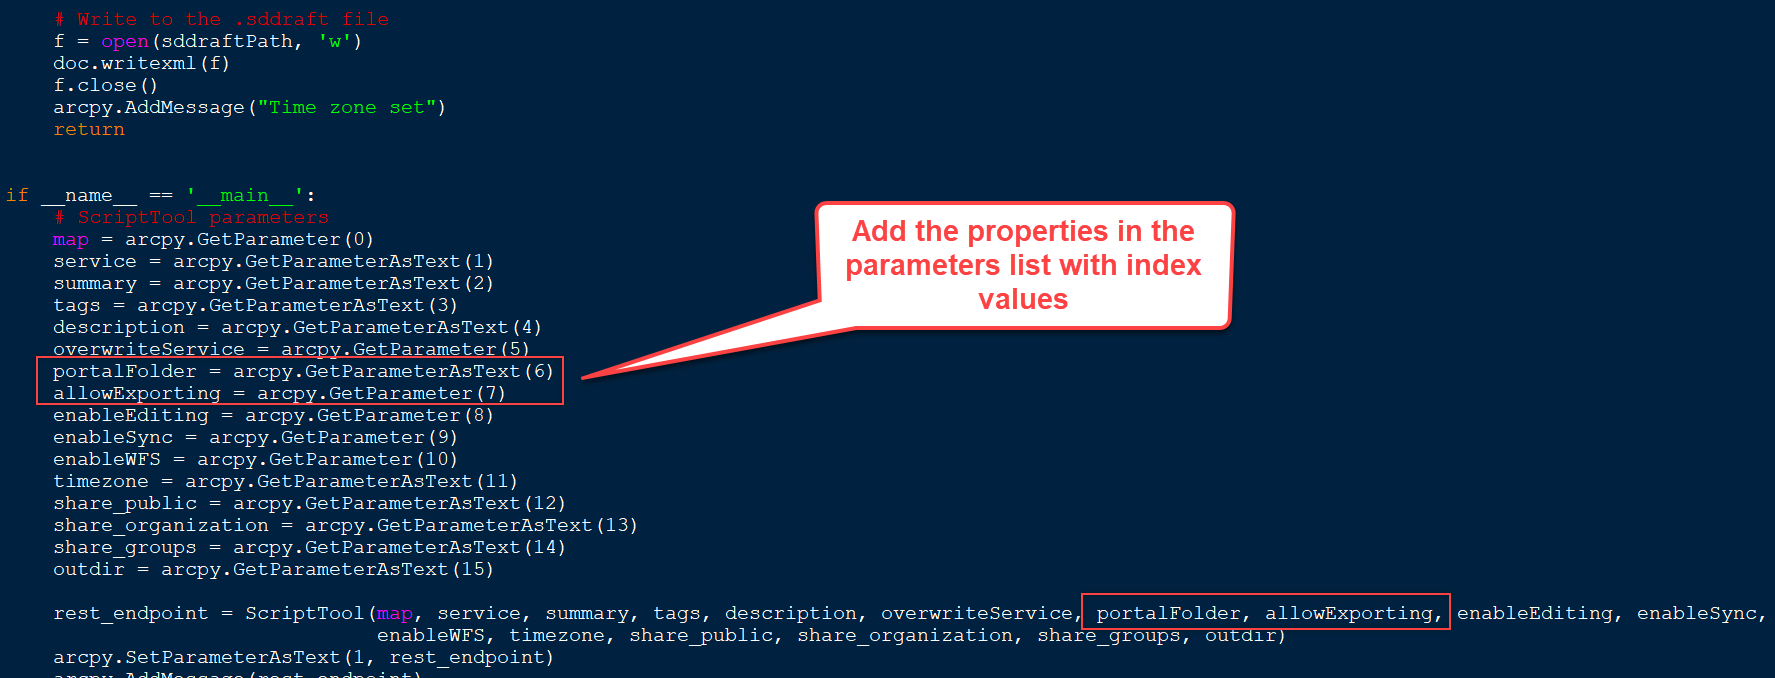
Let’s suppose you want to publish your web feature layer to a portal folder and allow users to export the data. This can be done by adding the portalFolder and allowExporting properties in the FeatureSharingDraft.
Right-click the script tool in your toolbox and click Edit. Modify the Python file as shown below.
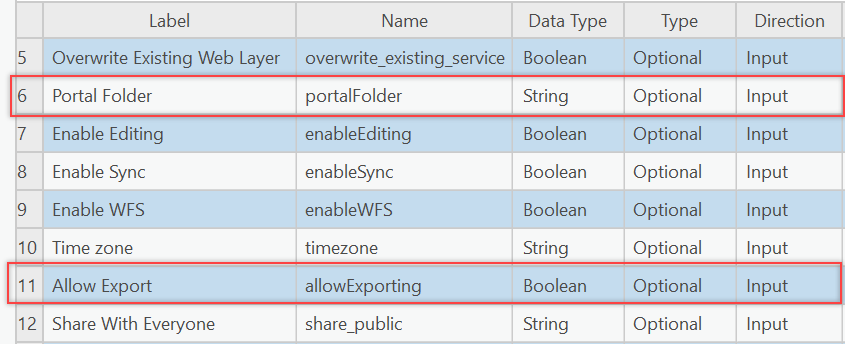
Save the file. Right-click the script tool and click Properties. Add two more script tool parameters (6 and 11) for the new properties.
Using what you’ve learned in the previous sections, you can create a script tool specific to map image layers. The code below publishes or overwrites a map image layer on ArcGIS Enterprise. Follow the same steps discussed previously: save the code as a new Python file (.py), create a script tool, import the .py file, and define script tool parameters. Add the script tool to ModelBuilder and run the model when you have configured it to meet your needs.
The need for readily available information during times of crisis makes your GIS work invaluable. In this article, we’ve discussed how to create and use script tools and ModelBuilder in ArcGIS Pro to efficiently publish and update your web layers. Learn more about how to share your work in ArcGIS Pro.
How will the filter work? Will it be possible to filter by floor like in a floor-aware map?