
I was recently introduced to an idea by an Esri employee. They received feedback from a customer about being able to obtain metadata from their image attachments. Specifically, they needed to know the date and time of the image capture. The images were collected from a Survey 123 form. When the data from the geodatabase is viewed in ArcGIS Pro it does not currently show this information. The idea is to extract and store this information in a table. A similar idea was also submitted to our Esri Community site. Please keep sharing your ideas!
Sample scripts and tools provide a way to share solutions for data management ideas outside the scope of release cycles. They help organizations who need the functionality but may not have the time or resources to build them.
In this blog, I will share with you a new sample tool that extracts the available metadata (EXIF) of the date taken for an image attachment. The tool adds the data to the existing attachment table, a stand-alone table or both. In the blog I will illustrate how to use this information in a feature class pop-up window.
If you are new to attachments, you can learn more about working with attachments in the geodatabase and how to enable attachments on a feature class or table.
What is EXIF metadata?
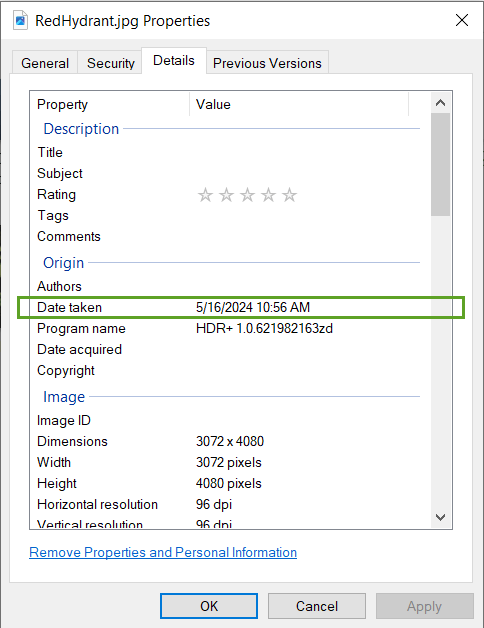
Exchange Image File or EXIF for short, is a metadata standard stored in digital photos. Just about any smartphone that you take a picture with will have EXIF metadata. Common metadata items are the location, camera settings, and the date and time of the photo. For example, this data can be easily accessed from images stored on a Windows PC. Open Windows File Explorer, navigate to a photo, right click and select Properties. Select the Details tab to see the photo metadata.
Knowing the date of a photo can provide significant information for GIS projects, workflows and analysis. I realized this benefit with some of my own sample data. For example, I use a picture of an aircraft sitting at a gate in Salt Lake City in many projects. This airport has undergone complete renovations over the past decade. The photo metadata, date taken, confirms the photo is from the old section of the airport that no longer exists.
We will use the sample tool to gather the metadata (date taken) and add it to a table.
Sample tool overview
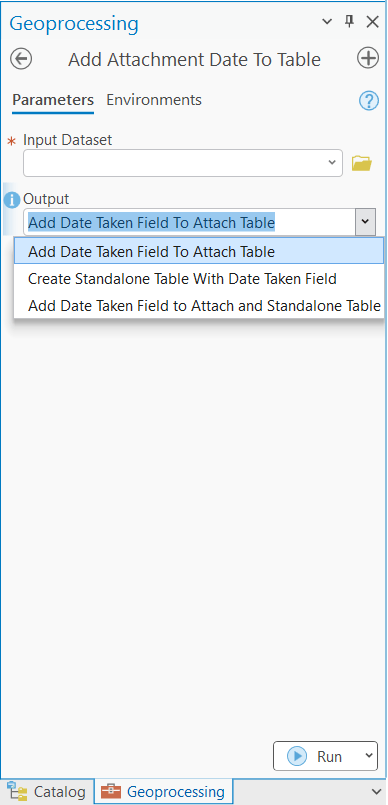
The Add Attachment Date To Table sample tool has two parameters.
Input Dataset – The input dataset that has existing image attachments.
Output—This parameter has the user choose where they want to add the new DATE_TAKEN field for the input dataset.
– Add Date Taken Field to Attach Table
– Create Stand-alone Table With Date Taken Field
– Add Date Taken Field to Attach and Stand-alone table
Tool option scenarios
The first two scenarios will use the default option adding the DATE_TAKEN field to the feature class attachment table.
Scenario 1 – Adds the new field to the input dataset’s attachment table (ATTACH). Populates it with the date taken metadata for all image attachments only.
Scenario 2 – Illustrates populating rows for selected features and non-image attachments for the new field in the input dataset’s attachment (ATTACH) table.
Scenario 3 – Creates a stand-alone geodatabase table in the same geodatabase workspace as the input data. The output table name is: (input dataset name + _DATETAKEN). For example, Fire_Hydrants_DATETAKEN. This table contains the new date taken field, attachment names and global ID’s.
Scenario 4 – Is not really a scenario, rather it confirms that both output tables contain the same field and data.
1. Add Date Taken Field to Attach Table

In this scenario, I will use a single feature class (Fire_Hydrants). The tool will add a new field to the ATTACH table and populate it with the date taken.
- For the input dataset parameter, I added the Fire_Hydrants feature class.
- For the output parameter, I kept the default selection – Add Date Taken Field to Attach Table.
- I clicked Run.

The tool added the DATE_TAKEN field to the ATTACH table, with date and time from the image inserted into the row.
2. Add Date Taken Field to Attach Table – Selections and non-image files

In this scenario, I selected two airports to show how the tool works with selections.
- Select two features from the airport data.
- For input dataset, add the Airports feature class.
- For output parameter, I kept the default option – Add Date Taken Field to Attach Table.
Before I click Run, notice that the last entry in the attachment table above has a .pdf file named ATL.pdf.
- I clicked Run.

Here we see how the tool works with selected features and non-image data types. Only the selected airports with image attachments show the extracted date taken in the new field. Non-image data types will have a null value. If I had not made any selections, the tool would have returned the date taken for all image attachments. All non-image attachments, like the .pdf document would have a null value.
3. Add Date Taken Field to Stand-alone table
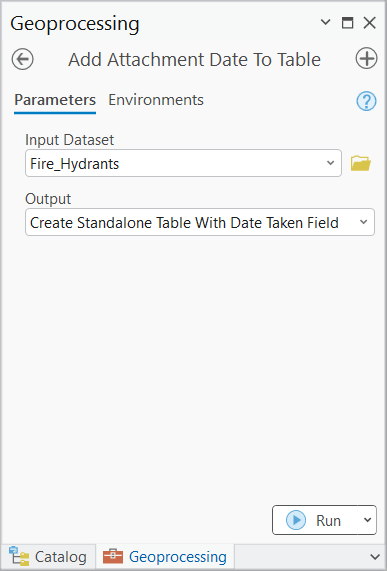
The tool has the option to output the date taken information to a stand-alone table. The purpose of having a stand-alone table is to optionally join the table to the attribute or other tables. The stand-alone table can provide a separate record of each image’s date taken metadata.
- Add the input dataset that has attachments to extract to a stand-alone table.
- For the output parameter, choose Create Stand-alone Table With Date Taken Field.
- I clicked Run.
The stand-alone table outputs to the same geodatabase of the input dataset. For example, the input dataset is Fire_Hydrants. The output stand-alone table name combines the input data name with _DATETAKEN: Fire_Hydrants_DATETAKEN.

The stand-alone geodatabase table has three fields (REL_GLOBALID, ATT_NAME, DATE_TAKEN) with the first two from the original attachment table.
REL_GLOBALID – to be used for joining the original input dataset attribute table or other tables with the GlobalID field that have the same values.
ATT_NAME – the name of each attachment.
DATE_TAKEN – the metadata information of the date and time of the image. The values of this field will be null if the attachment is not an image, or if the image does not include the date taken metadata.
4. Add Date Taken Field to Attach and Stand-alone Table
Lastly, the final option on the tool output parameter may be the best of both worlds for some organizations. The purpose of this option is to provide outputs to both the attachment table and a stand-alone table, without having to run the tool twice.
Access the information in an active map pop-up window
ArcGIS Pro 3.4 released with new features and updates for feature class pop-up behavior. These updates provide a way to display the date information for our attachment images. I will show you one way to configure pop-ups for the feature class to illustrate how these updates work with the new data.
Pop-up scenario
By default, the pop-up window only shows the attachment elements with their associated name.
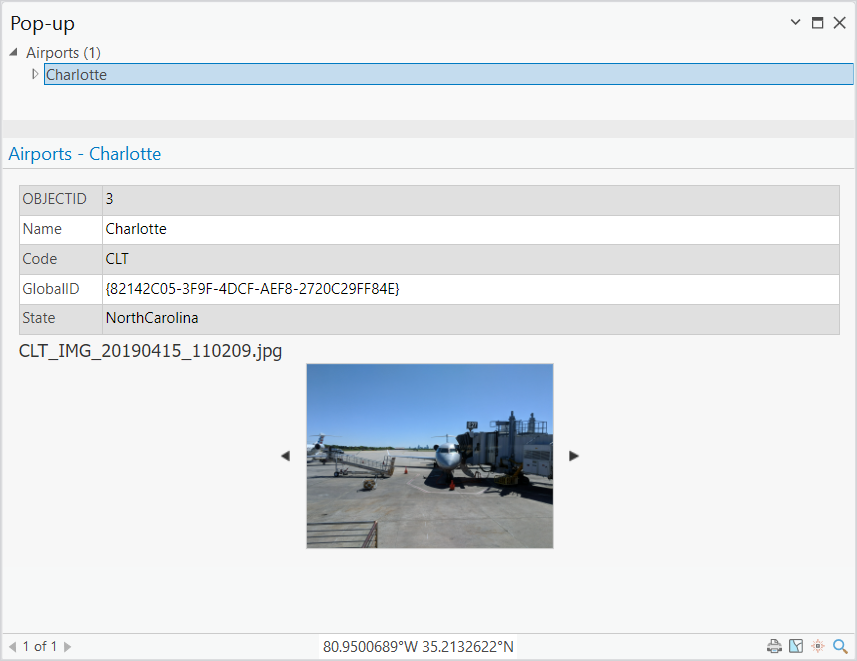
In this scenario, I will configure the Airports feature class pop-up to show the date taken for each attached image of a feature.
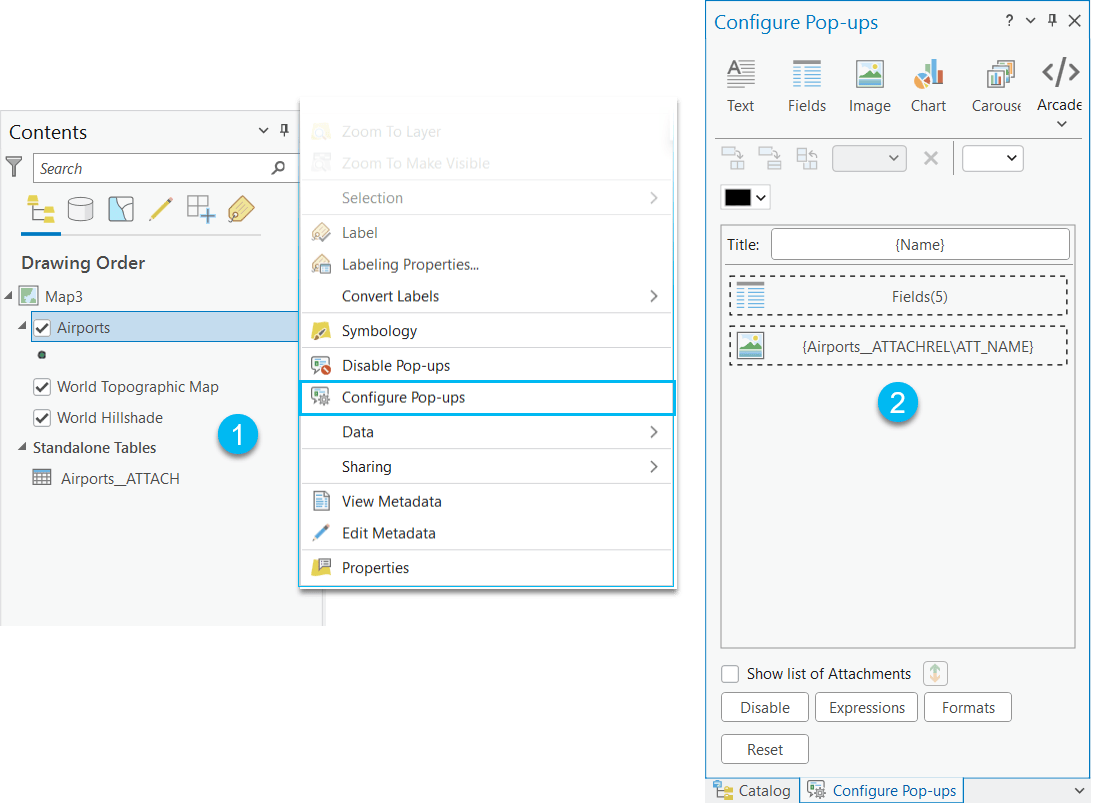
- With the Airports feature class in the active map, I’ll right click on the Airports layer in the Contents pane. Select Configure Pop-ups.
- The Configure Pop-ups pane opens. The pane shows the default settings for a feature class with attachments not configured previously.
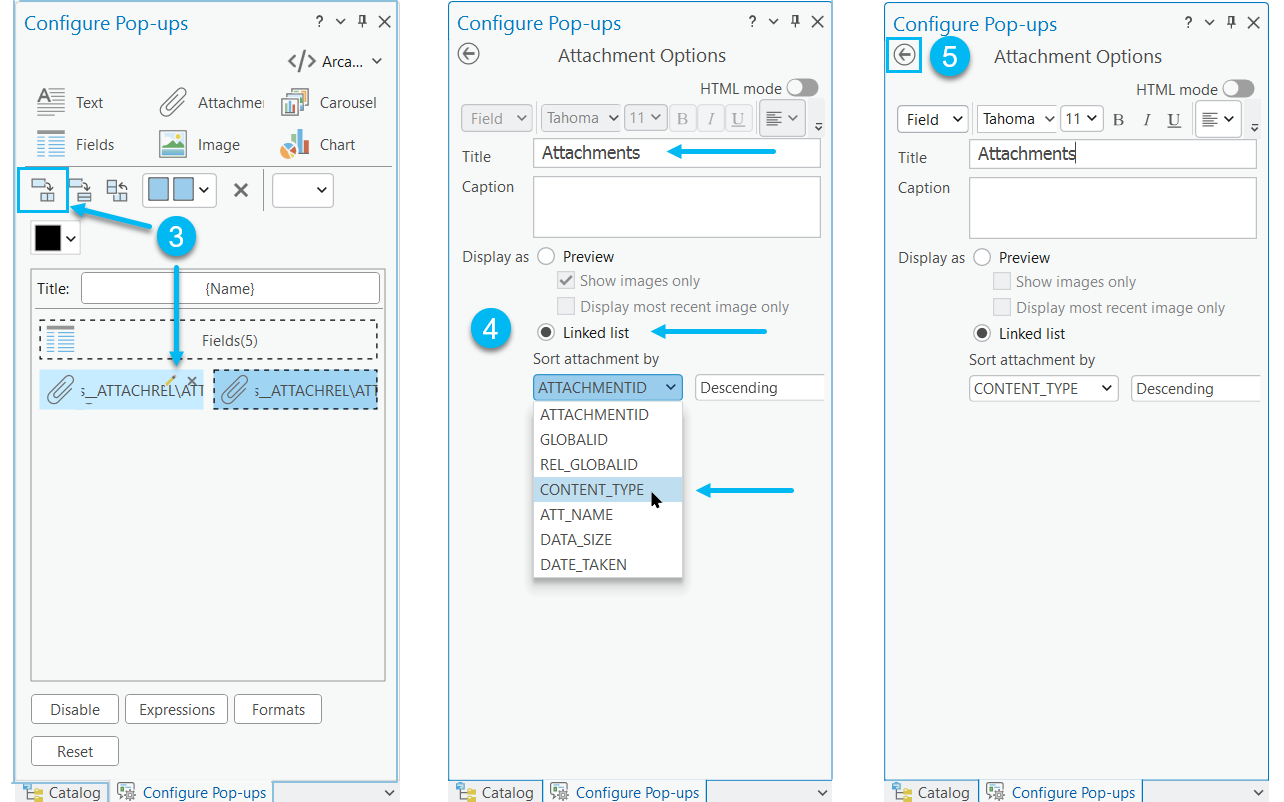
- For this step, I will click the button that splits the related attachment table information into two halves. I will then click the pencil icon on the left half to configure how the bottom left side of the pop-window will look.
- When the pane opens, I’ll configure the left side by naming the Title: Attachments. I changed the radio button to Linked list, and sort descending by CONTENT_TYPE.
- I clicked the back arrow to save the updates in the left-side pane.
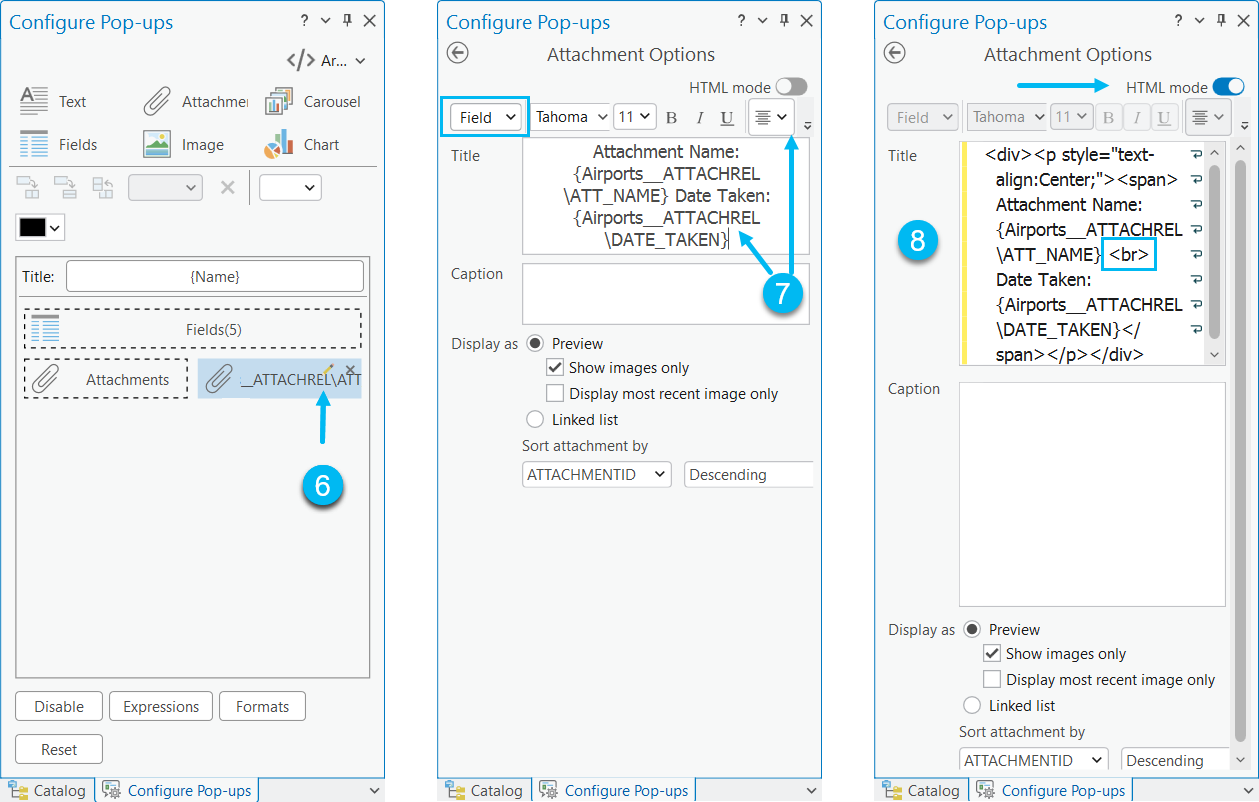
- I clicked the pencil on the right half to configure the bottom right-side of the pop-up window.
- In the Title window, I’ll copy and paste the {Airports__ATTACHREL\ATT_NAME} and change the ATT_NAME field of the duplicate text to \DATE_TAKEN. Next, I’ll add additional text to identify the attachment name and date taken. From the alignment dropdown, I’ll change the text from left alignment to center alignment. Alternatively, you can also access the desired fields from the Field button drop-down list at the top left of the pane.
- Lastly, I want a line break between the Attachment Name and Date Taken. The easiest way to accomplish this is to enable HTML mode and add <br> before the Date Taken text.
View the updated pop-up configuration
With the pop-up configured for the Airport feature class, I’ll select an airport from the active map to see the configured updates.
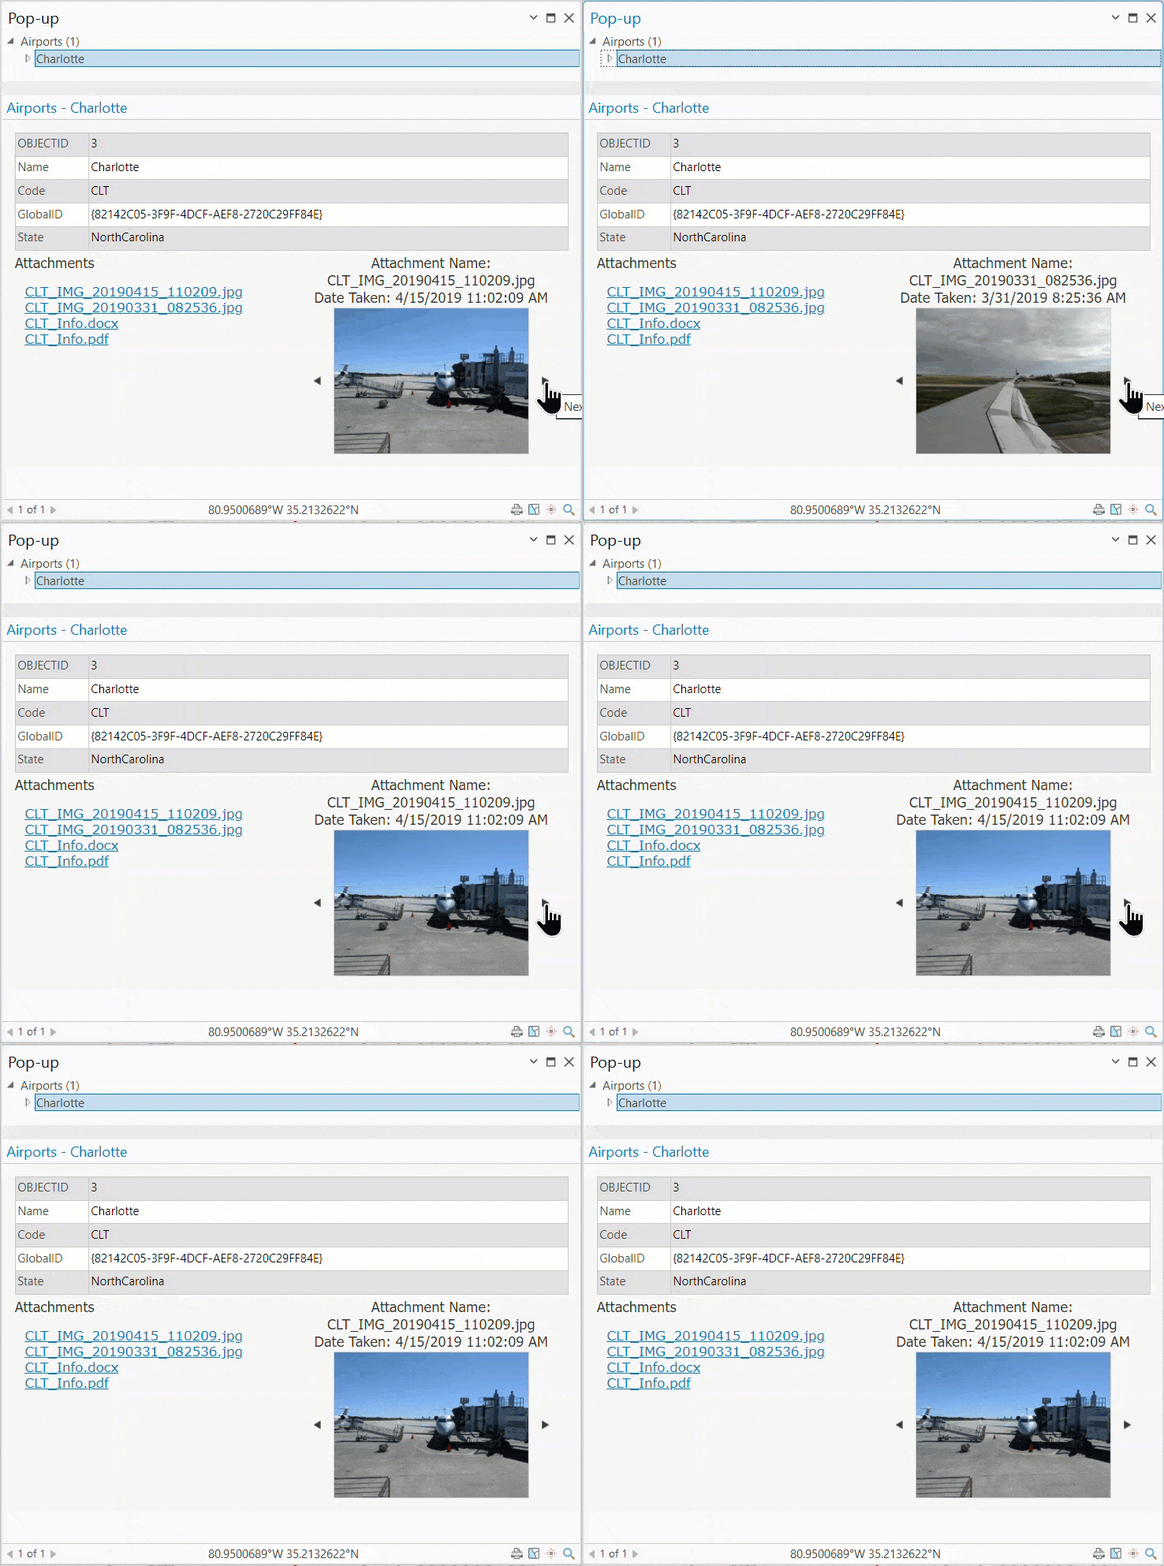
My goal for the pop-up window was to show a full list of all attachment links on the bottom left for quick access. I then wanted the bottom right half to allow me to cycle through the image attachments while showing their name and date taken information dynamically.
Learn more about configuring pop-ups.
Download the tool
The sample tool can be downloaded from ArcGIS Online.
To access the downloaded toolbox in ArcGIS Pro.
- Extract all contents from the .zip file.
- In ArcGIS Pro, Add Folder Connection to the extracted folder.
- The toolbox (.atbx) file should now be visible in the added folder from the Catalog pane.
Summary
As always, we hope this sample tool and demonstration provide another way of meeting your data management workflows and project needs.
Here is a list that summarizes the features of the sample tool.
- The tool honors selections. If a selection exists, only the selected items add the date taken information to the output table (if applicable).
- The tool only extracts the metadata (date taken) information from images if available. Non-image attachments will have a null value.
- The tool adds a new field named DATE_TAKEN to the feature class attachment table, a stand-alone table, or both depending on the output option selected.
- Choosing to output to a stand-alone table adds the table to the same geodatabase of the input dataset.
- The tool works with file, mobile and enterprise geodatabases. Enterprise users must be the data owner to execute the tool.
- The tool works with traditional versioned datasets but does not support Branch versioning.
- The tool only supports feature classes and tables in a geodatabase, enabled for attachments. It does not support feature services.
- The tool will return a warning for an enabled dataset that has no attachments.
- If you add new attachments, run the tool again to update any date taken metadata for new images.
Licensing information:
Basic: Yes Standard: Yes Advanced: Yes
Resources
For data management resources visit the Geodatabase Resources Hub
Additionally, check out these other helpful resources for data management, Python, and custom script tools:
- Python for Everyone
- Creating Python Scripts for ArcGIS
- Managing Geospatial Data in ArcGIS
- Building Geoprocessing Tools with Python: Beyond the Basics
Please continue to share your ideas.




Commenting is not enabled for this article.