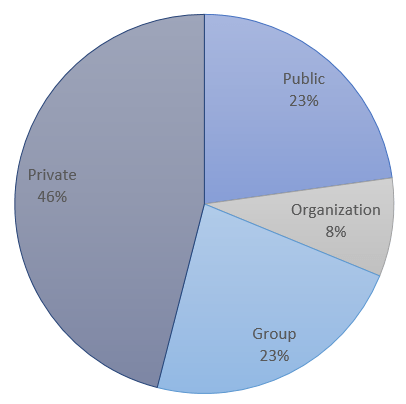
Once upon a UC, David Hansen, COO at Geo Jobe stated, “ArcGIS Online is the largest global repository of geospatial information in the history of the species.” And although the amount of data in ArcGIS Online is not the point of this blog, as of May 21st, 2018 around 17 million items that exist in ArcGIS Online. That is 17 million layers, maps, scenes, apps and files that can be used for data collection, analysis, presentations and more. The items have a variety of sharing settings that enable the public or specific groups of users to access content. Twenty-three percent of ArcGIS Online content is public, meaning that anyone can access and find content that has been shared without requiring a username and password. Thirty-one percent of the items are shared with specific users through the group or organizational sharing setting.
 Did you know that ArcGIS Online has about 1.4 Million organizational members? As an ArcGIS Online organizational member, you can securely share and collaborate Group sharing is a powerful tool for working with GIS professionals, contractors and clients within and outside of your organization enabling you to set up a secure connection to your web content. Whether you want to show results to a potential client or collaborate on data collection with other organizations members, group sharing can enable these workflows.
Members of ArcGIS Online organizations already have the capability to securely share content to members and their own organizations but this article will focus on workflow specific to sharing with members outside of your organization (external users). All members and groups have the capability to participate in cross-organizational group sharing, but there are some required privileges and settings that are needed to ensure that the user and group can be viewed and accessed by the intended audiences. The first section will outline required user and group settings while the second section will review two specific scenarios that use cross organizational sharing.
Cross-Organizational Sharing Required Settings
User Privileges
For a user to participate in a group as an external user (a group where they are not a member of the host organization), the user must be assigned the privilege to join external groups in their role. The default Publisher and User roles have this privilege enabled, whereas the default Viewer role does not have this privilege. Note: Level 1 users can be assigned the join external groups privilege as a custom role.

Profile Visibility
Group managers can invite any user to a group if they know the invitee’s ArcGIS Online username. If as a user you want other members to be able to search for your profile, change the option of who can see your profile to everyone (public) . Note. If you are unable to update your profile, get in contact with your administrator as this capability can be turned off for an organization.

Required Group Setting
When creating a cross-organizational sharing group, ensure that group members can only update their own items option is selected in for the last group setting (default setting). If the setting is changed to All Items, group members are given the ability to make updates to feature layers and web maps regardless of the item settings. Only organizational members can join groups with this capability, sometimes called an update capability group. It is not possible to invite users from another organization to a group if members can update all items and this setting cannot be changed after the group is created. Moral of the story, don’t change this default setting if you want to invite members from another organization to the group.

Group Visibility
Consider who should be able to view and search for the group. There isn’t a required setting for this but it is something that should be considered when setting up a group. The Who can view this group setting determines who can browse and search for the group but not its content. If you want users who are not members of your organization to find the group through a search and have users apply to join the group, make it available to everyone. If you want to create a group that only group members can view, select only group members and ensure that you invite the desired users. Note. This blog is about cross organizational sharing so selecting the option to have the group visible to people in the organization won’t allow users outside of the organization to see the group. This won’t have much use for these scenarios but is a great option for groups specific to an internal organization and its members.
Cross Organizational Sharing Scenarios
Scenario 1: Share project results with a client
Kelly, a real-estate GIS consultant has created a web application (Story Map Cascade) that guides her client through three potential Dog Food store property locations. The application contains some images and information about the properties, but also includes three maps with the locations, drive time areas and potential competitors that needs to be shared with his client but contains confidential data. Kelly can use cross-organizational group sharing to securely share the interactive deliverables with his client. This cross organizational group will have the purpose to securely give the client access to the Story Map of results. The client has an ArcGIS Online identity, DeliciousDogFood, but is not very familiar with searching and finding content in ArcGIS Online.
Steps to establish the cross organizational sharing group with a client:
1. Create a group and configure the group settings
- Create a group from the Groups page
- Configure the setting only allow group members to view the group
- Configure the setting where only group owners and managers can contribute content
This will ensure that the group owner controls who can see the group and who can contribute content.

2. Invite User
- Select the Invite Users button on the group page
- Uncheck the only search for member in the organization check box
- Search for client’s username, and follow the prompts to invite the username
3. Have the client accept the invitation
- The client must login to their ArcGIS Online account
- Navigate to the Groups page
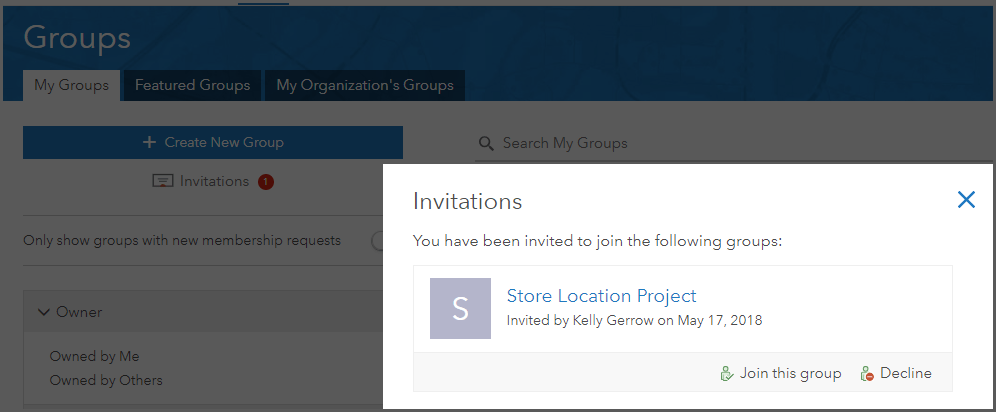
- Click on the available invitation and select Join this group
4. Share items with the Group
- Share the web application and supporting items such layers, webmaps and files with the group to give the client access to the items
5. Communicate with the client how to access the items
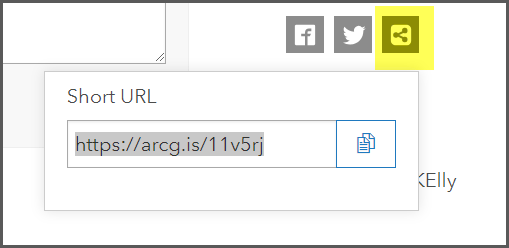
As the group is set up with the correct items, share the link to the application with the customer. All the client needs to do is navigate to the app link and provide their ArcGIS Online username and password. Although more items have been shared with them, the client doesn’t need to navigate to these directly. Note. Ensure that you share the short url of the application from the details page. This ensures that external users can access the url
Scenario 2: Collaborate in data collection with another organization
Clean Water Inc. is implementing a summer project to collect water quality samples from many municipalities. It has teamed up with local universities to have students collect and record samples throughout the summer. Clean Water Inc. has created an editable feature layer a data collection app to be made available to participating students who already have ArcGIS Online identities through their university organization. They only want authorized users contributing to the study and don’t want the input from the anonymous public. They will use editor tracking to identify which users entered the data. The students are familiar with ArcGIS Online and Clean Water Inc. is going to set up a cross organizational sharing group that allows users to contribute to a single dataset.
Steps to establish the cross organizational sharing group for data collaboration:
1. Create a group and configure the group settings
- Create a group from the Groups page
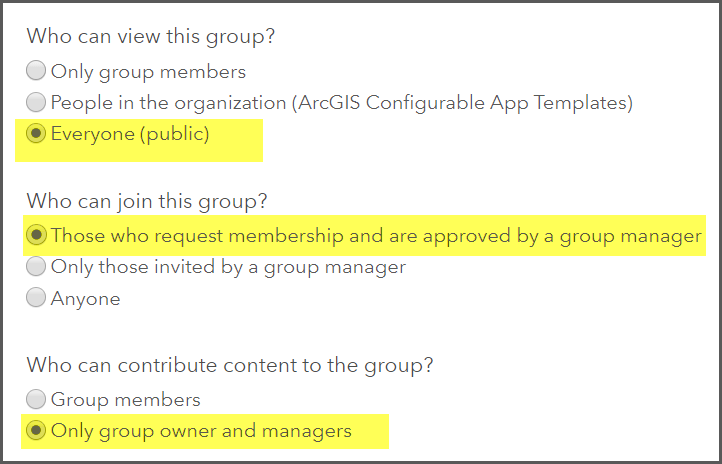
- Configure the setting only Anyone to view the group
- Configure the option that members who have requested membership can join the group
- Configure the setting where only group owners and managers can contribute content
This will ensure that the only Clean Water Inc can contribute content, but other users can search and request to join the group
2. Invite Users/have users apply to join
- Clean Water Inc. will invite some users using the same method as step 2 in scenario 1
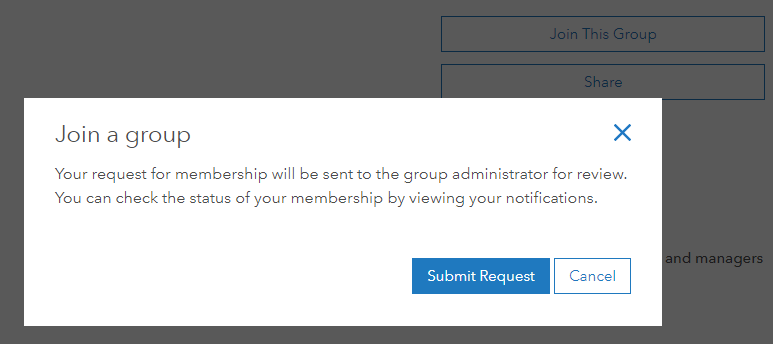
- Other students can search to find the group by name and select the Join This Group button to request membership. They can also navigate directly to the group URL
3. Have the student accept the invitation/approve membership requests
- For Students that are invited in the same method as Scenario 1, they must accept the invitation as described in step 3, Scenario 1
- When a student requests to join the group, Clean Water Inc can approve or decline requests

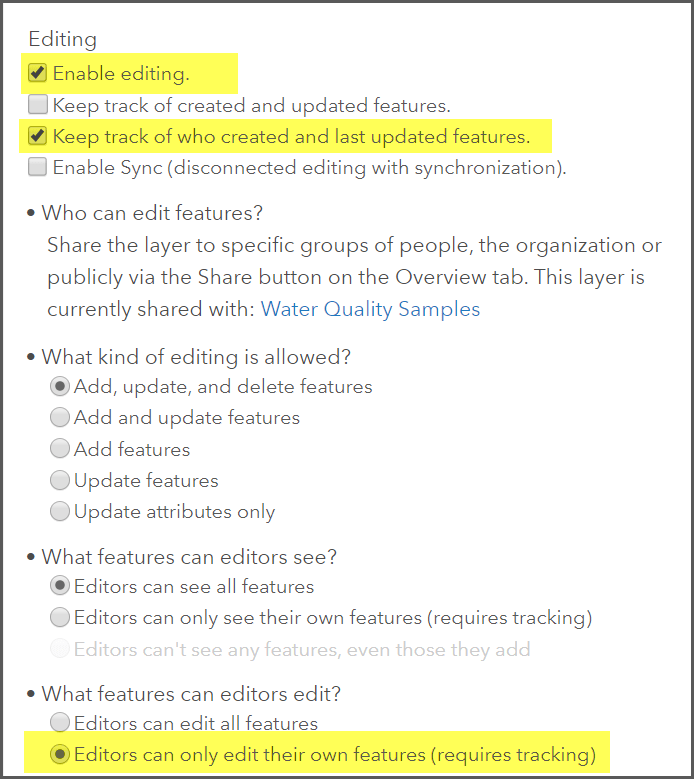
4. Configure Editing settings for the hosted feature Publish a hosted feature layer with the desired data collection schema
- Enable editing, editor tracking in the feature layer settings. (Editor tracking will record the students username and date when the features were created and modified)
- Select the option that Editors can only edit their own features.
(Note. If multiple versions of the layer are needed, use feature layer views)
5. Share items with the Group
- Create a web map and web application that includes the editable feature layer.
- Share the web application and supporting items such layers, webmaps and files with the created group to give students access to the items.
6. Communicate how to find the application
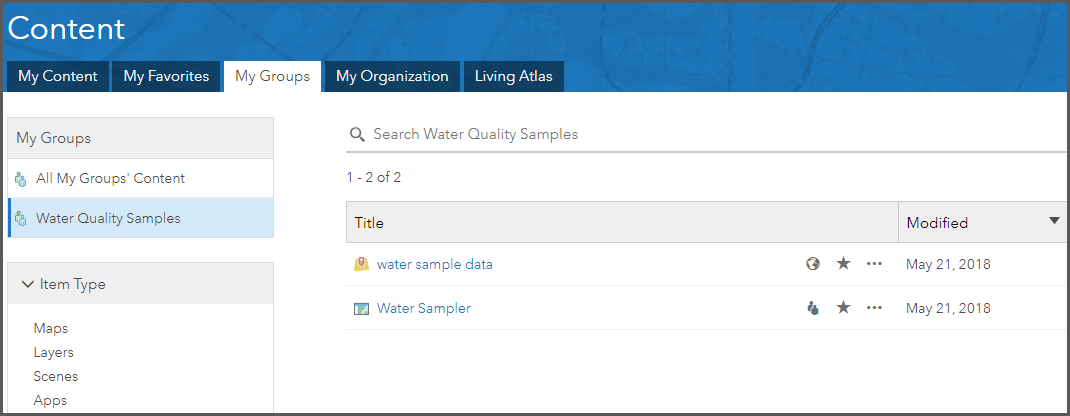
Notify the members of your organization how to find the application by navigating to their groups page or selecting the My groups tab on the content pane.
The above scenarios outline two common scenarios when collaborating across organizations. Using group sharing provides a secure way to allow access to content with a variety of capabilities allowing you to work with some of the 1.5 million ArcGIS Online users in the system.
The Future of sharing and collaboration
With cross-organizational sharing a lot of powerful capabilities are available to use today. Future releases of ArcGIS Online are going to work towards an improved user invitation and management workflow to make it easier to add and manage users when sharing across organizations. Let us know how you want to share and collaborate with other ArcGIS Online users on Geonet and at the User Conference!

Commenting is not enabled for this article.