No, this blog is not about retirement planning or the weekly special at your local grocery store. However, understanding how to save a layer’s symbology and other settings in ArcGIS Online will save you time as you build your web GIS. While you can save both layers and maps, the controls are in different places and serve different purposes.
Layers and Maps
Layers are the building blocks of web GIS. Feature layers, imagery layers, tile layers, and scene layers are all examples of layers. Each layer is an item in ArcGIS Online and combines data with symbology, pop-up configuration, filters, and other properties.

To view layers, we add them to a web map. Like layers, each web map is an item in ArcGIS Online. Web maps have a base map and may have one or more additional layers.
Web maps can store many of the same properties as layers including symbology, pop-up configurations, and filters. Understanding when you should save these properties to the layer or the web map is key to a successful web GIS implementation.
Two Ways to Save
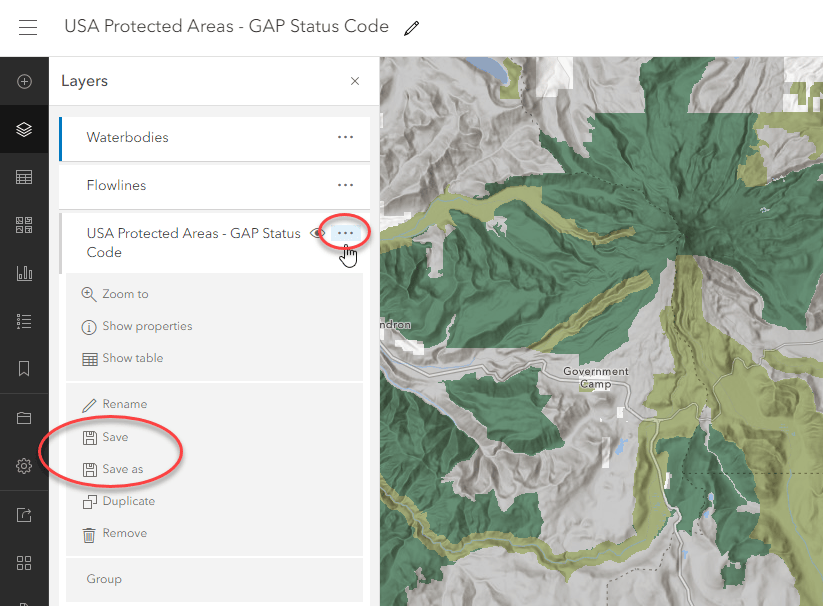
In the Map Viewer there are two places where you can save: in the Contents Tool bar on the left side of the map and under the options menu on layers that you own.
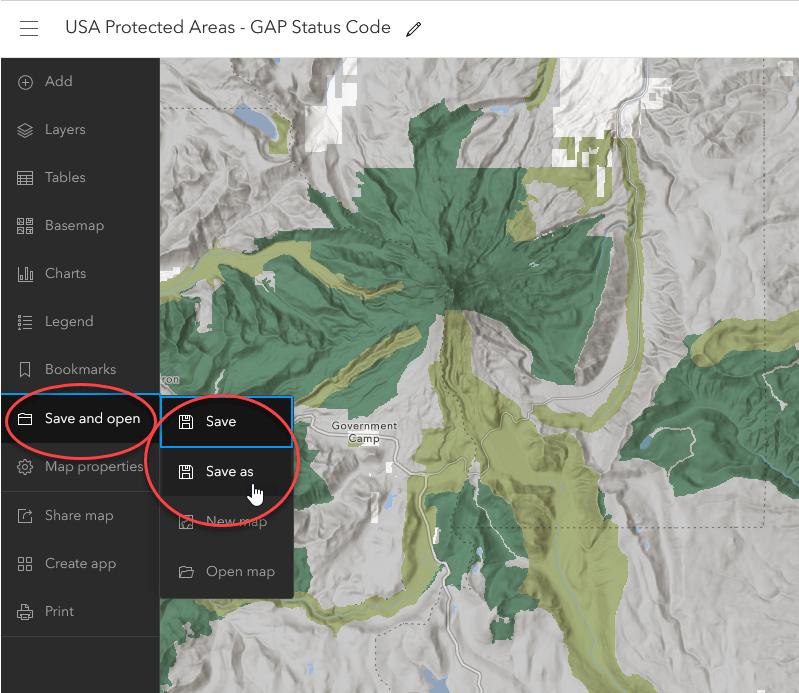
The Important Part
Save Map on the left side of the Map Viewer saves any changes you have made to the web map. If you close and re-open the map you will see that your configuration has been saved.
However, if you add the layer to a new map you will see that the settings you changed and saved in the map are not reflected in the layer.
In this case every time the layer is added to a map the layer will need to be symbolized and the pop-up configured. As a best practice we recommend saving the layer’s configuration to the layer itself by selecting More Options (the three dots under each layer in the table of contents) and then Save Layer at the bottom of the list. Note that this option will only appear if you are logged in as the layer’s owner.
Now when you add the layer to a map it is ready to use with no configuration needed for a neat, professional looking map.
Understanding how to save a layer’s properties will go a long ways to helping you build an effective web GIS.
This blog is an up date of a previous post where you can learn how to save layers and maps in the classic map viewer.


Hi Alix, Great article. It seems there is a bit of a process for publishing a webmap that is suitable for the trace widget in Experience Builder. We are using the ExB Dev .Ed. v1.8 against an Enterprise 10.9.1 implementation with UN. We are having problems with the Trace widget accepting our webmap and I have been able to debug to the point that the widget is looking for the UtilityNetworks property in the WebMap and is not finding it. We have created named trace configurations and checked them in the share dialog. Can you confirm that ArcGIS Pro creates… Read more »
@Mark Turnbull That process sounds correct. If you ever opened that webmap in the classic viewer and clicked save, it will remove the UN layer from the webmap. Can you try publishing a new webmap from ArcGIS Pro, use a tool like the AGO-Assistant to view the json and see if the UN layer is in there. Also, are you using ArcGIS Pro 2.9.x?
Hi Alix,
When will the Sidebar Template and Utility Network Trace Widget come to the Enterprise?
Thanks,
Hi @Bekir Küçükağa, the Utility Network Trace widget will come to the Sidebar template in ArcGIS Enterprise in 11.0.
Hi Alix,
Please help me understand something about licensing.
You wrote, that the Utility Network user type extension is required for users who wish to run trace on feature service. However, with nem 11.2 version of Enterprise, Esri changes the UN user type extension to Advanced Editing user type extension.
In the future, if useres want to use the UN Trace widget, do they need the Advanced Editing user type extension? For someone who doesnt want to edit anything at all, jus trace, is it necessary to purchase the Advanced Editing userty?
Thanks,
Robert
Hi Robert,
Starting at 11.2, you no longer need a User Type extension to run a trace.
Hello @Alix Vézina
I have a question regarding ArcGIS Web Editor for creating and editing for Utility Network feature services particularly for electric lines. Because i have been trying to create an electric line as low voltage service but it can’t be create and also the browser get stack immediately. It seems this editing for electric line is not supported. I wanted to hear your view or any guidelines would be very helpfully.
Hi, for any questions related to ArcGIS Web Editor, I would recommend reaching out through the Esri Community: ArcGIS Web Editor