
If you edit data in ArcGIS Online, you already know that Map Viewer offers out-of-the-box tools for things like updating attributes or adding new features to a map. We want to make sure that you’re in the loop on the latest capabilities that make editing and managing data online even easier. In this article, we’ll explore five tips you can use right away to level up your editing experience in Map Viewer.

Tip 1: Manage Editing Settings in the Map
As a data owner or administrator, you can enable editing for a hosted feature layer. But did you know that you have additional editing settings for those same layers in the map? This is especially useful when you have a map that includes editable layers that you want to serve as read-only reference layers that provide context in a specific map.
To access editing settings for a layer in a web map, follow these steps:
- Select the layer.
- The Properties pane opens.
- Scroll to the Editing tab.
- Toggle to change editing settings for the selected layer.
- If the switch is on, editing is enabled for the layer. If the switch is off, editing is not allowed for this layer.
Note: Changing the editing settings in a web map doesn’t affect the settings for the layer, the settings only apply to the layer in that map.

Tip 2: Create Views for More Flexibility
Data can serve many purposes. In some cases, you create a layer for collecting data, while in other cases, you simply want people to view the data on a map. What if you want the same layer to serve both purposes? That’s where Hosted Feature Layer Views, aka views, come into play.
In a feature layer view, you can control access to the view, adjust the style, and even apply different editing capabilities to each view. For example, you can create a view with limited fields visible to the public, while another view allows editors to access all fields. Both views point to the same layer, so there is no need to reconcile edits or manage the view, making your workflows easier.
Check out this article for a real world example.
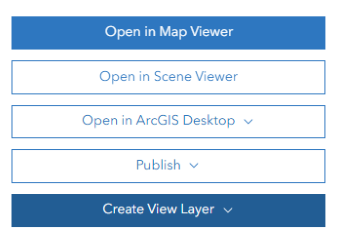
When creating views, you define the sharing level and editing settings independently from those of the hosted feature layer. You create View Layers on the layer’s Item Details page. Check out this blog post for a detailed guide to creating views.
Tip 3: Author Forms for Efficient Editing
Forms can make editing quick and easy. Field Maps Designer is well-known for its user-friendly form authoring experience, aka Form builder. But did you know that Form builder is also baked right into Map Viewer? That’s right, you can create custom forms for easier data entry without leaving Map Viewer.
To get started creating forms in Map Viewer, follow these steps:
- Select your editable layer in the Layers pane.
- Click Configure editing
 on the Settings (light) toolbar.
 - In the menu that opens, felect Forms

- The form builder opens.
In Form builder, you can customize forms as much or as little as you like. You can:
- drag, drop, Group, and reorder fields,
- choose from input types like combo boxes, radio buttons, or multi-line text,
- set rules for field vilsibility, or requirements based on values entered in other fields, and
- use Arcade expressions to automatically calculate fields.

Check out these previous blog articles for inspiration when creating your own custom forms:
Tip 4: Save and Reuse Forms
To save and reuse a form in Map Viewer, you can either save it to the map or to the layer. Saving it to the map means it’s only used within that specific map, while saving it to the layer allows you to use it across multiple maps that use that same layer. That way anytime you add the layer to a map, the form is good to go.

To save a layer,
- Click the Options menu (3 dots) next to the Layer name.
- From the drop down menu, click Save or Save as -depending on your needs.
- The layer will be saved along with all the properties you configured in the map, such as forms, pop-ups, labels, and symbology.
Tip 5: Save and Reuse Group Layers
As of the October 2023 update, you can create, save, and reuse your own Group Layers. Yup, that’s a thing. In an editing project, you might have a set of editable layers and pertinent reference layers that you want to use in more than one map. Now you can preserve a set of layers as a Group Layer, and add the Group to other maps.

When you save a Group Layer, it preserves the properties you configured on each layer in the group- that includes forms, pop-ups, symbols, and even effects and blend modes. That way when you add the Group Layer to new or existing maps, all those properties are already configured, saving you loads of time.
Check out this blog article to learn more about Group Layers:
Summary
You can easily edit data in Map Viewer using out-of-the-box tools you may already be familiar with. In this article, we explored five tips to improve the editing experience in Map Viewer: managing layer editing settings in the map, creating views for flexibility, authoring and saving forms and leveraging group layers.
We hope the time-saving tips we explored help you streamline your editing workflows and make editing in Map Viewer even easier. Be sure to join the conversation on Esri Community to share your own thoughts, tips, or experiences.


Commenting is no longer enabled for this article