In a previous article, we learned that ArcGIS can enable architecture, engineering, and construction (AEC) firms to extend their internal GIS content to customers in order to communicate and collaborate on project work. The most common way is with an ArcGIS AEC Project Delivery Subscription (PDS) to enable modernized workflows and a better level of engagement that increases trust from stakeholders. This unique approach to integrated project delivery can exist outside of your organization as an ArcGIS Enterprise instance or an ArcGIS Online organization. You will determine the right method for your project at the time of purchase. For this article, we will be configuring a PDS in ArcGIS Online.
When you deploy a PDS, you are essentially standing up a new, separate ArcGIS Online organization that you will use to deliver data, maps, and apps to collaborate with project stakeholders. If you are already an administrator of your company’s ArcGIS Online organization, this will be familiar to you. The following steps will guide you through setting up and collaborating with your PDS:
1. Activate your subscription
After purchasing a PDS, an activation email will be sent to the purchaser. The email includes a unique link that you will use to activate your subscription and perform the initial set up. During this process you will create a new ArcGIS Online account to be the administrator of the project delivery organization. During this setup, you will also provide an organization name and choose an organization URL (consider naming it after the project or customer, for example, MainStreetBridge.maps.arcgis.com).
2. Configure the new PDS ArcGIS Online organization
As an administrator of an organization, you can configure and design your ArcGIS Online PDS website to showcase the project information that’s important to your stakeholders. Consider that this ArcGIS Online organization is going to serve as a project portal for your stakeholders to securely access to interact with the apps and dashboards your company created to monitor a project’s status, view recently collected data and provide feedback on designs. For now, you can configure general settings such as adding a logo. Eventually, you’ll want to configure the home page, the gallery, groups, user types and roles, credits, and security.
For more guidance, we recommend checking out these instructions from our free Learn ArcGIS lesson gallery: Set up an ArcGIS organization
3. Create a group for sharing and collaborating
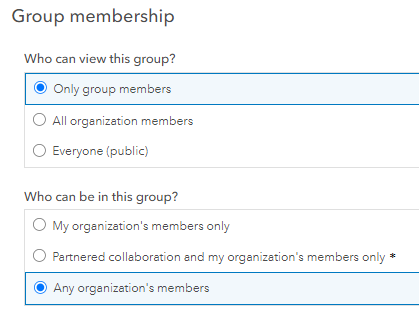
This initial group organizes project deliverables and shares them with stakeholders. When you create the group, ensure that external members can join so that you can invite other project partners who have existing ArcGIS Online licenses. Create at least one group with the following settings applied during group creation.
- Who can view this group? Only group members
- Who can be in this group? Any organizations members
- Who can contribute content? All group members

4. Add members to this new group
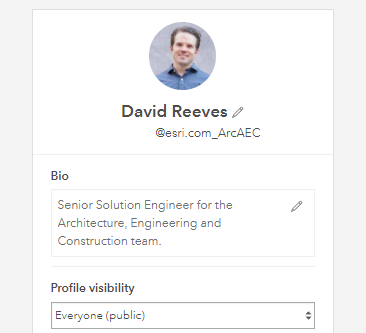
The group members will consist of project stakeholders from any ArcGIS Online organization; this includes the AEC firm, the client, and any other ArcGIS Online user who can contribute to the project. Consider inviting your own internal ArcGIS Online users and users from project partners such as cities, counties, utilities, and subcontractors. Group managers can invite any user to a group if they know the invitee’s ArcGIS Online username and their profile is set to public. To make your profile public, change the profile setting of who can see your profile to everyone (public). For a user to participate in a group as an external user (a group of which they are not a member of the host organization), the user must be assigned the privilege to join external groups in their role. The default Publisher and User roles have this privilege enabled, whereas the default Viewer role does not have this privilege, but it can be configured through a custom role. The settings mentioned above are not needed for connecting to members of a partnered collaboration (one of the main benefits).

5. Add content to the PDS
These are your customer-facing, digital deliverables including maps, apps, surveys, dashboards, and hubs. Everyone invited to the group you just created can contribute content to the group in a variety of ways, including the following:

- Once members of the AEC firm have joined the PDS group, they can add their own items to the group. The item does not get copied; you are simply granting item access to group members.
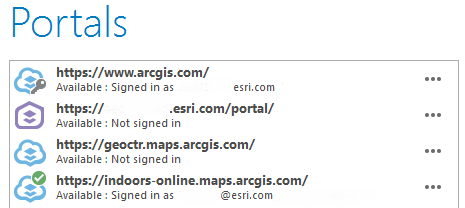
- You can publish directly from ArcGIS Pro, which can connect to multiple ArcGIS Online organizations. Seen here, a license can come from one organization, while you are connected to and publishing to a different organization. Simply provide your administrator PDS credentials and publish data and web maps directly to the PDS.
- Alternatively, you can use Python in an ArcGIS Online Notebook to automate the transfer of content, add members, or complete the entire group configuration. Free scripts from Esri available here.
- Official Esri partners have also created easy-to-use desktop and web-based tools to backup, copy, and clone content between organizations. Examine the options here.
6. Setup client access
The PDS comes with a 2nd Creator user type to be used by the client to sign in and securely view the groups and apps that have been shared. Consider what your client will see and interact with after signing in. This may encourage you to adjust the home page or set default apps. We encourage you to organize your apps into a story or even a Hub to share project progress. For testing and set up purposes, considering creating that user with your email and a temporary password. When you’re ready, change the email to match your client’s email address and reset the password.
What about partnered collaboration?
If you have many project stakeholders accessing the PDS, you can set up a partnered collaboration to establish a formal relationship between the two ArcGIS Online organizations. This allows your organization to work more closely with members of the PDS using groups and member management tools to collaboratively edit content such as web maps and web apps. Also, check out this blog post to understand the different sharing methods and benefits of a partnered collaboration. **A partnered collaboration is not required for Project Delivery.
What happens when the project is over?
If the client would like access to the data, maps or apps after the project is over, ownership and maintenance costs of the Project Delivery organization will be transferred to the client. No data transfer or export is necessary. The client will become the administrator and begin to pay the annual maintenance costs. If you need to transfer content between ArcGIS Online organizations or with ArcGIS Enterprise, use these free ArcGIS Notebooks/Python scripts. Automated tasks include deploying templates, customizing organizations, and adding users. The scripts will save time and money and avoid user error by curating template content, which is cloned, customized, and deployed automatically.
If you would like to purchase or learn more about an ArcGIS PDS, please email AEC_Consulting@esri.com


Commenting is not enabled for this article.