We are happy to inform our user community that ArcGIS Living Atlas of the World not only provides a collection of pretrained deep learning models, but also provides World Imagery as a high-resolution imagery source for automated feature extraction.
Acquiring high-resolution aerial and satellite imagery may not be feasible for some organizations. Visually inspecting or hand digitizing features from imagery can be time consuming, tedious, and expensive. AI and deep learning can help save time and money by automating manual processes, but not everyone has the expertise or resources to train a deep learning model. If you are experiencing any of these limitations, we just might have a solution for you.
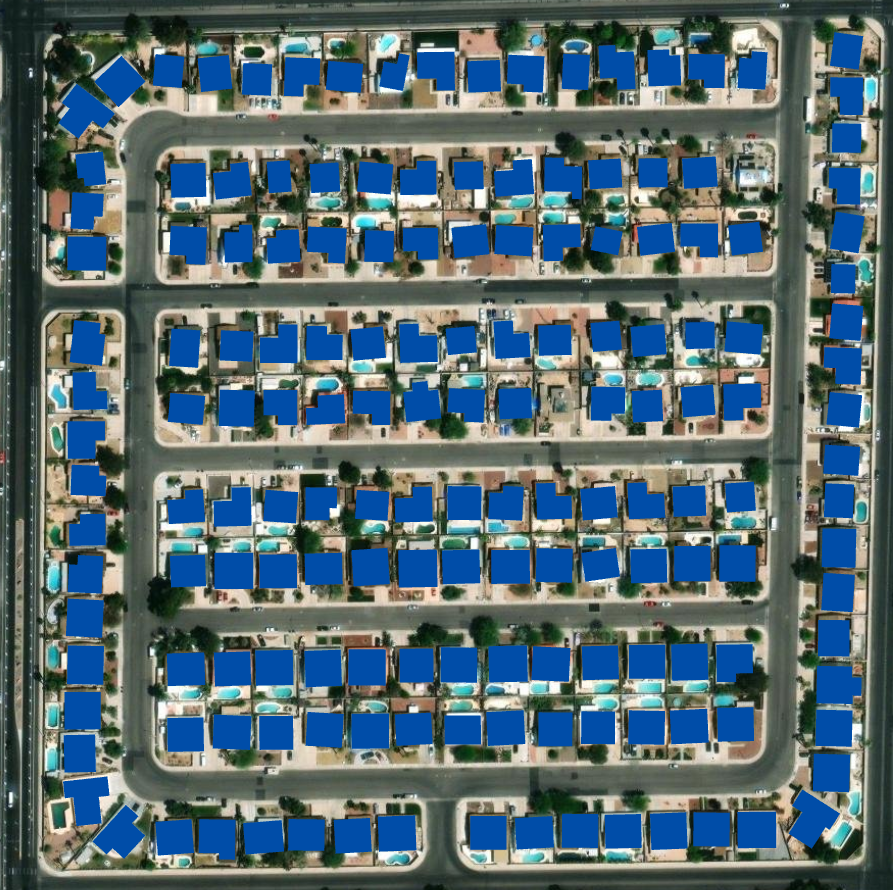
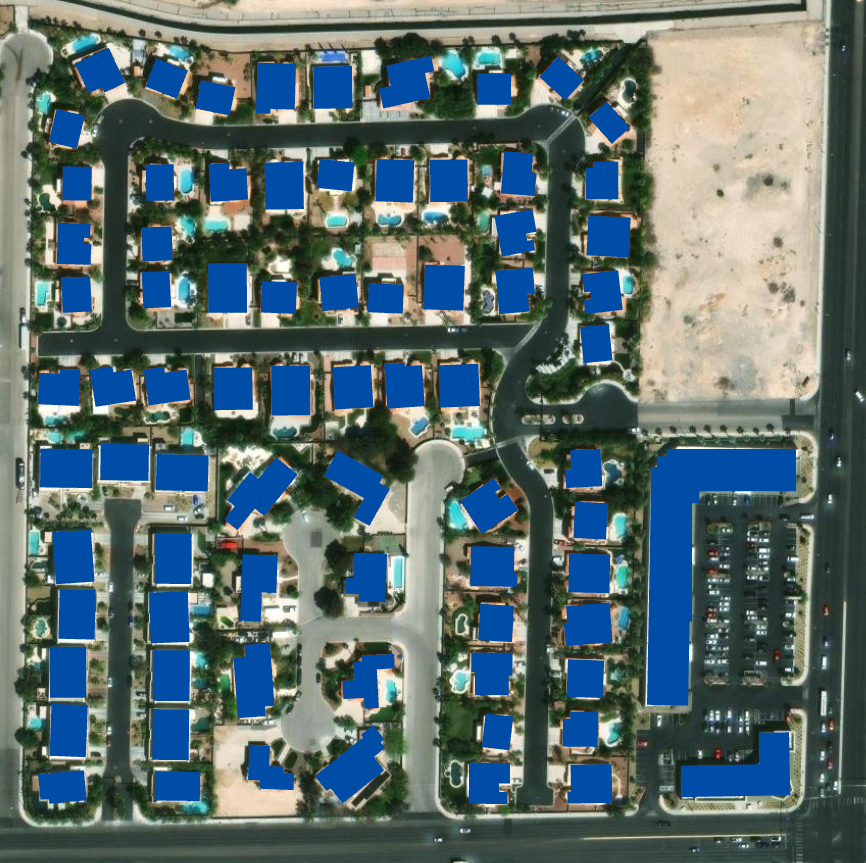
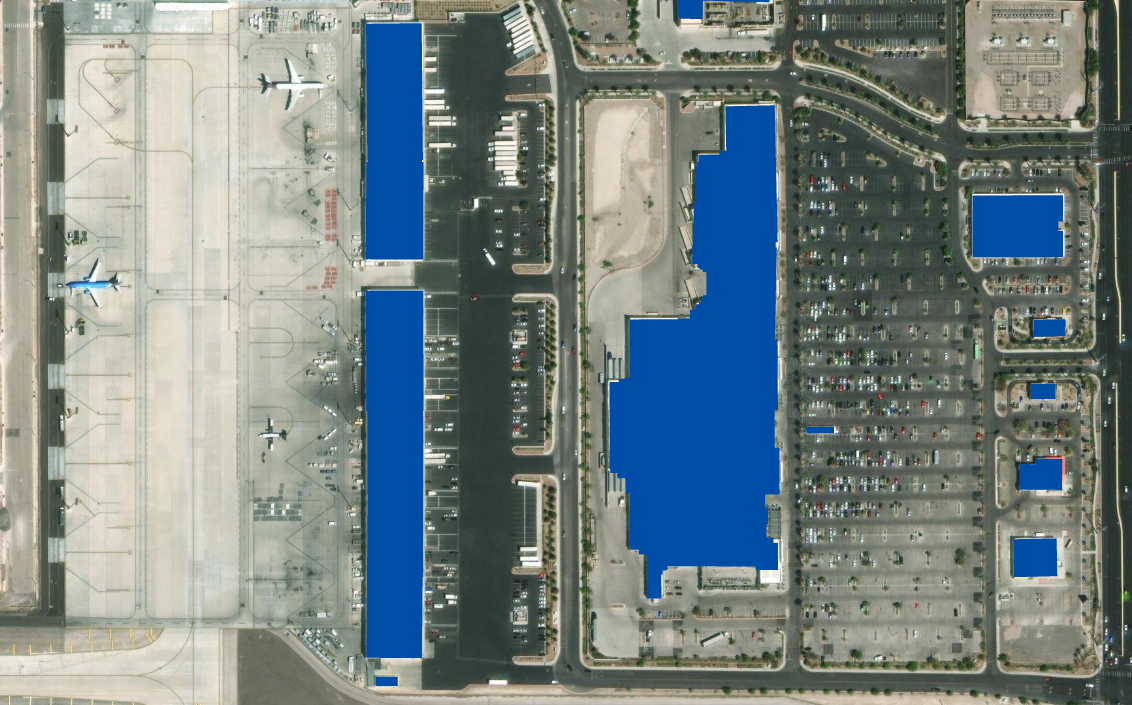
This learning tutorial will walk you through a step-by-step workflow using a pretrained deep learning model from Living Atlas to detect building footprints from the World Imagery basemap in ArcGIS Pro. While this tutorial focuses specifically on building footprint extraction, you will find a number of pretrained deep learning models in Living Atlas that you can leverage to extract a variety of information.

Quick links
Use the links below to navigate to different sections of this article.
- Terms of Use
- System Requirements
- Imagery Selection
- Deep Learning Package Selection
- Information Extraction
- Refining Results

Terms of Use
World Imagery is available for automated information extraction under the following conditions:
- Information derived from World Imagery layers, services, and tiles, including but not limited to vector and raster derivatives, is strictly for non-commercial use.
- Derived raster data cannot be shared outside the originator’s organization.
- Each user must have an ArcGIS organizational account.
- World Imagery layers/services cannot be used as direct input to automated information extraction.
- Users must export their area of interest to a tile package for use as input to information extraction processes.
- World Imagery for automated information extraction is limited to 150,000 tiles.
- Tile packages created from World Imagery layers/services are strictly for use within ArcGIS.

System Requirements
This workflow requires ArcGIS Pro with the Image Analyst extension and the deep learning frameworks for ArcGIS installed.
It is recommended that you execute this workflow on a machine with a dedicated GPU and at least 16 GB of RAM.

Imagery Selection
Step 1 – If you do not already have a project prepared, create a new project in ArcGIS Pro using the “Map” option.

Step 2 – Open the project and ensure the ribbon is on the Map tab. Navigate to the Layer group and click on Basemap button, and select Imagery.
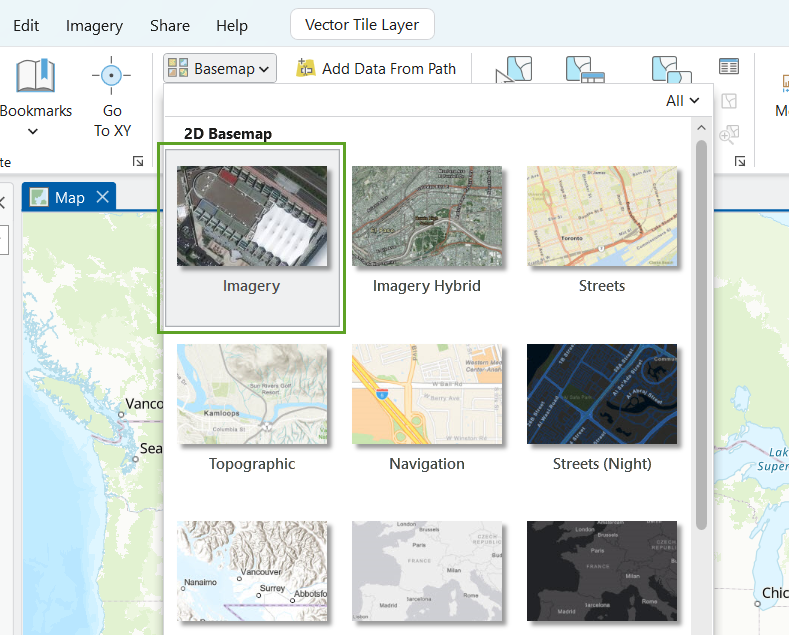
Note: be sure to select the Imagery basemap, and not the Imagery Hybrid basemap.
Step 3 – With the imagery basemap as the only layer in the map, use the navigation tools to pan/zoom the current map frame to the desired extent.
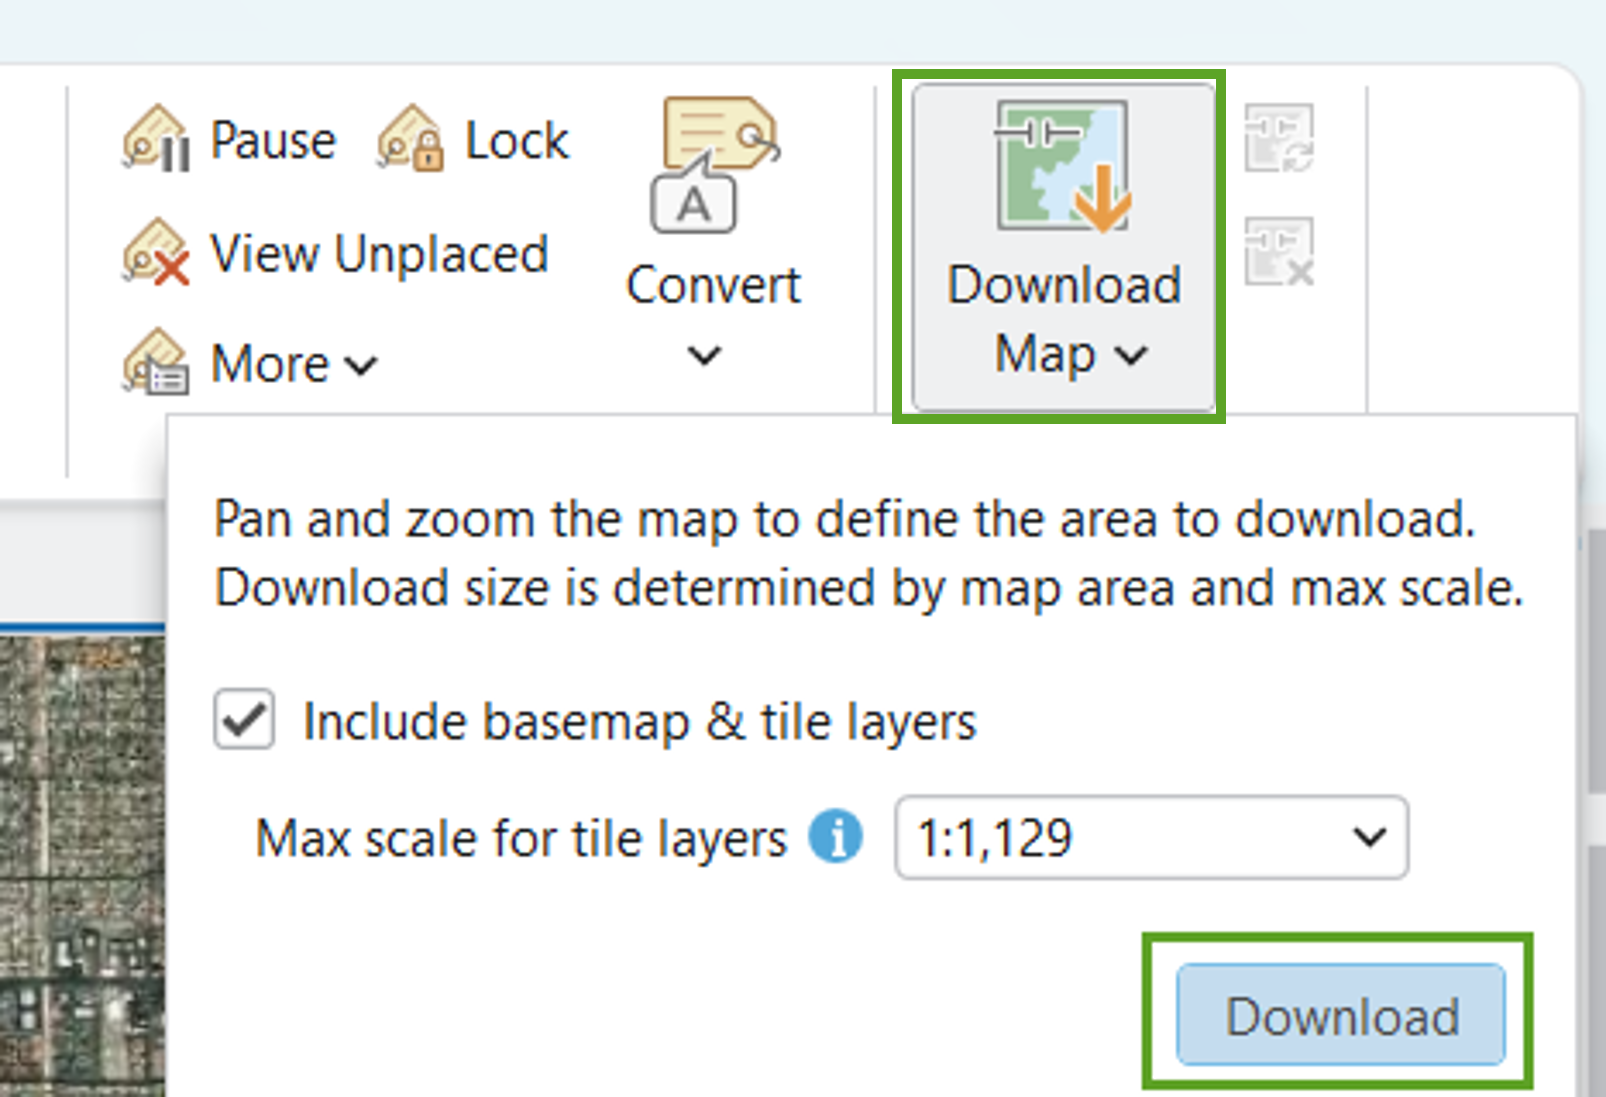
Step 4 – To download a tile package of the current extent, go to the ribbon (ensure it’s still on the Map tab) and find the Offline group. Click the Download Map button.
- In the drop down, ensure the Include basemap & tile layers option is checked.
- The model used in this tutorial was trained on 30-cm data, and it’s important that our data matches that scale. For 30-cm (Level 19) tiles, set the Max scale for tile layers option to “1:1,129”.
- Click Download.
Note: the World Imagery (for Export) map service supporting Download Map will allow exports up to 150,000 tiles in a single request. For estimation purposes, this is a large enough to support the export of a large city (e.g. San Franscisco) down to full level of detail at 1:1,129 scale (Level 19 or 30-cm spatial resolution).
The tile package will automatically be added to your current map frame. If it’s removed, you can find it in the project folder.
OPTIONAL – When the tile package is exported from ArcGIS Pro, it is given a complex naming scheme associated with the basemap. At this point, it is a good idea to rename the tile package, so you can more easily identify it.

Deep Learning Package Selection
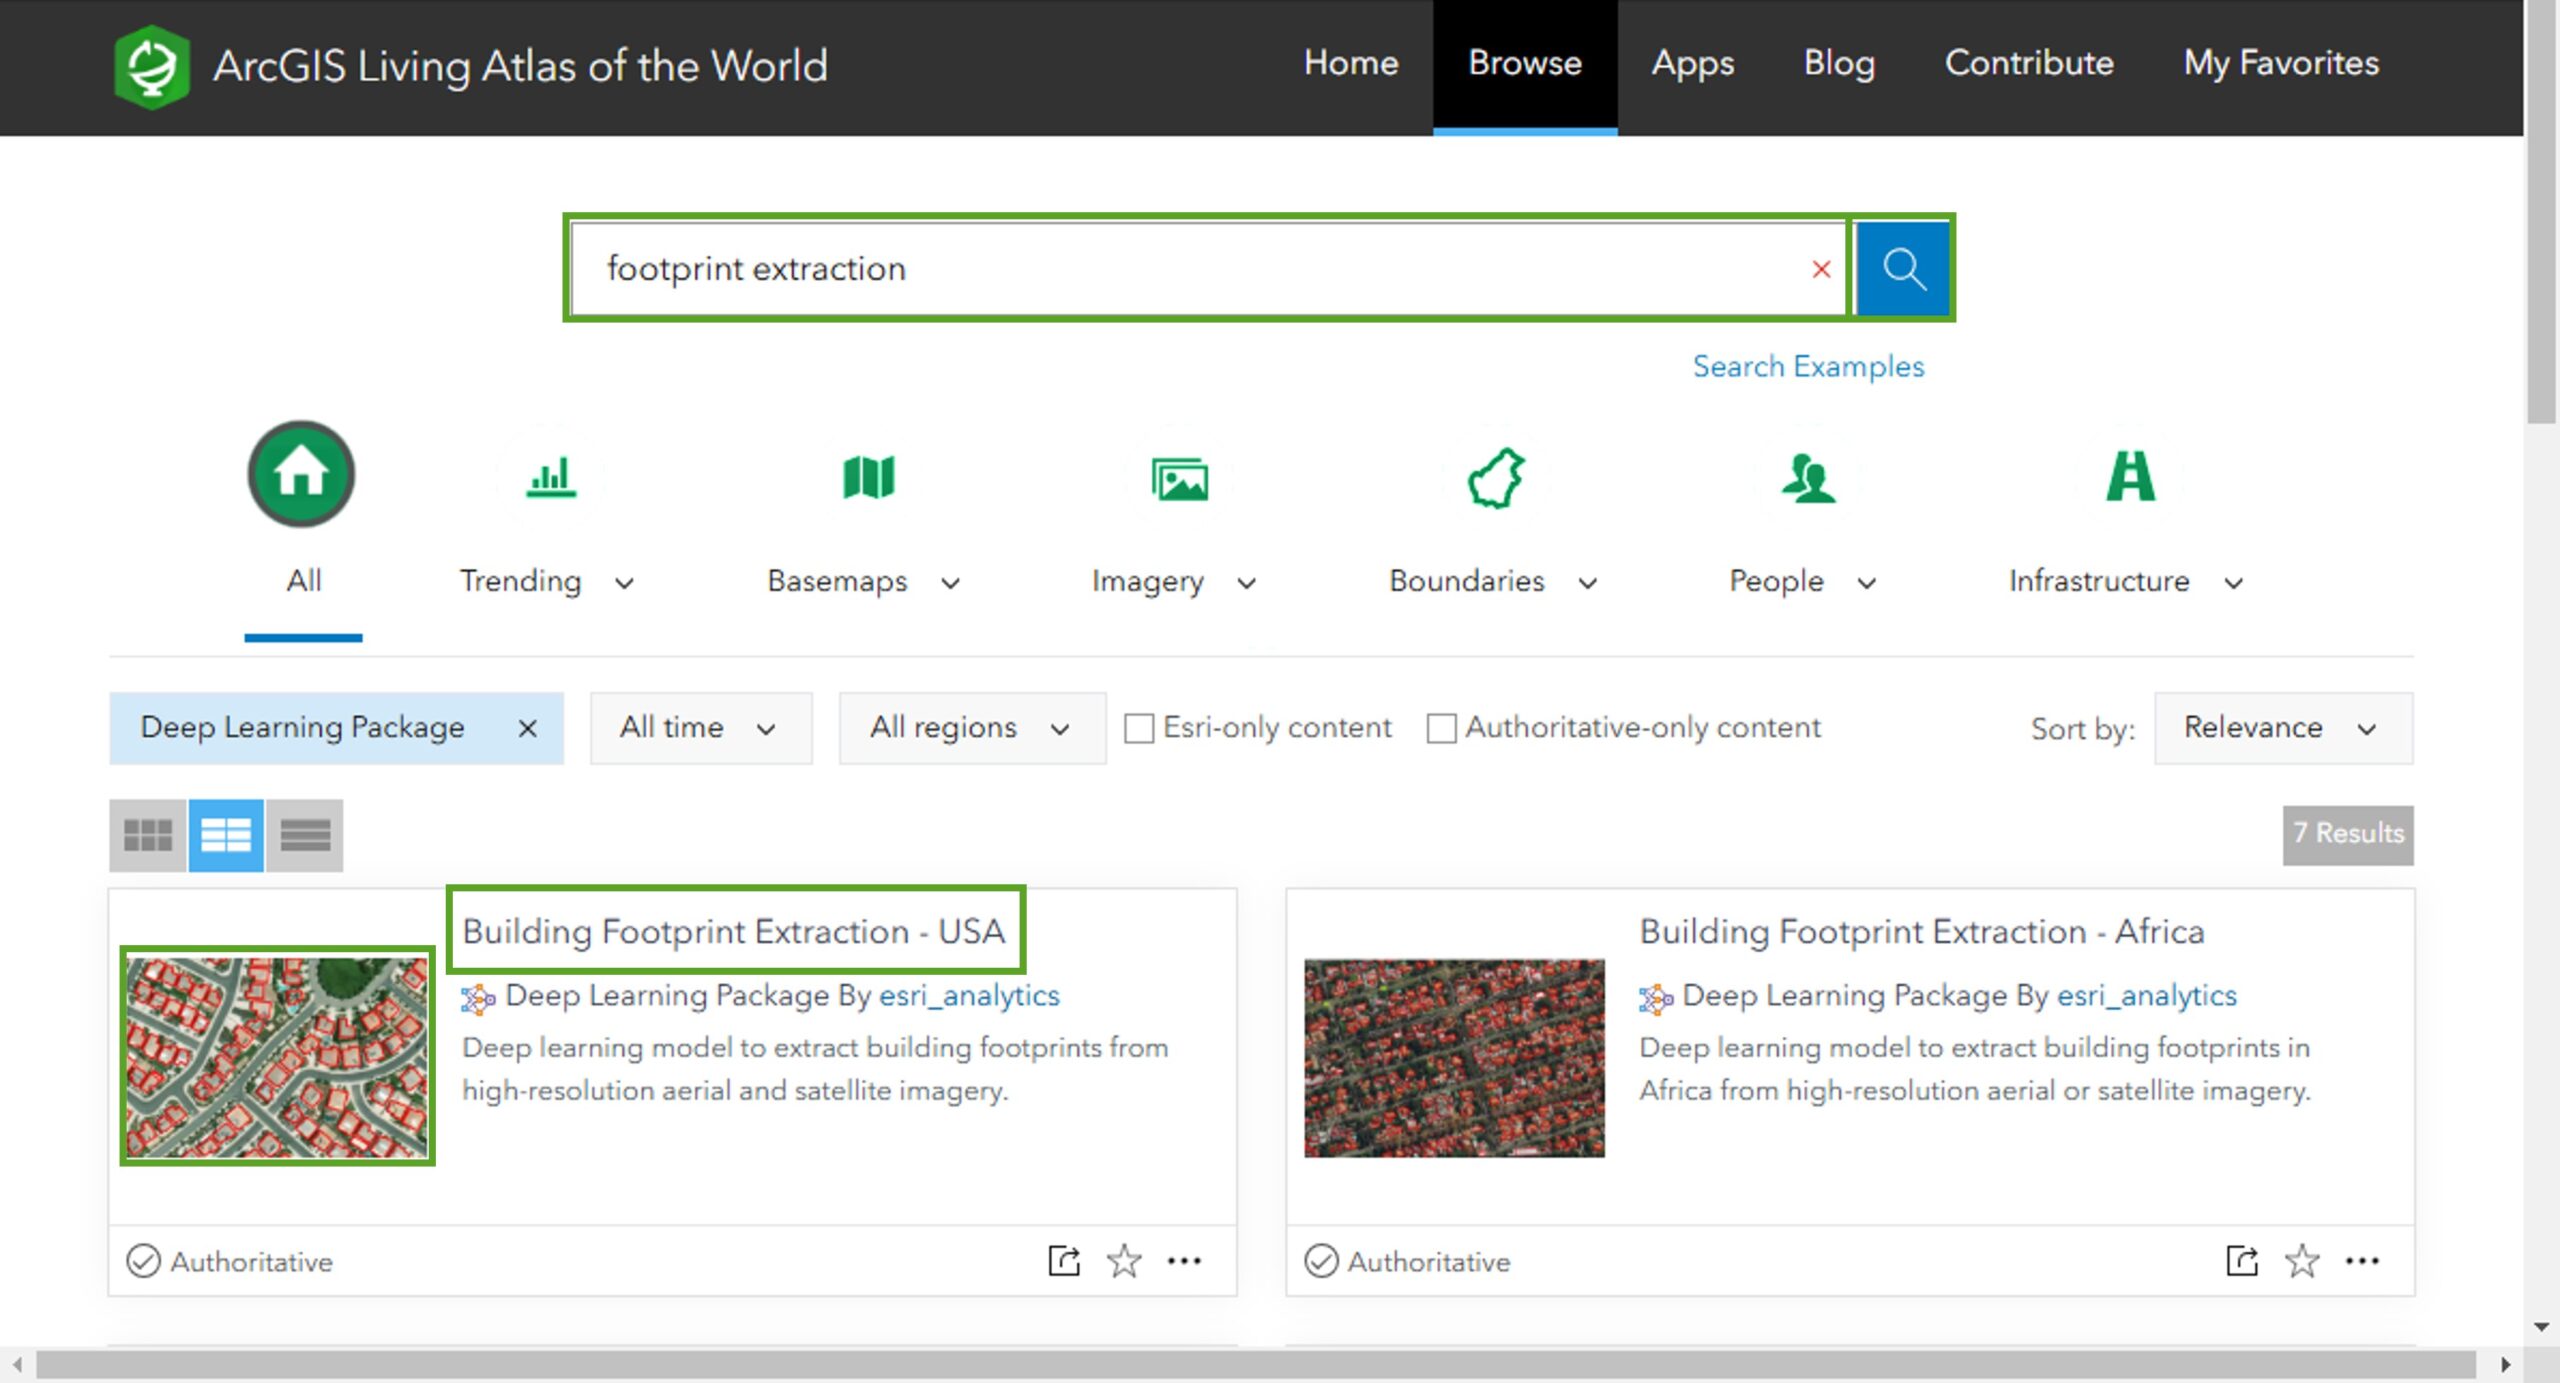
Step 1 – Go to the Living Atlas website https://livingatlas.arcgis.com and click Browse on the right side of the top banner. Click the Content Types dropdown above the content cards and select Deep Learning Package. The results will now be filtered to show all the deep learning packages available in Living Atlas.

Step 2 – In the search box, type “building footprint” and click Search to return a list of items related to building footprints. Our area of interest is in the United States, so find “Building Footprint Extraction – USA” and click the Title or Thumbnail to open the item details.
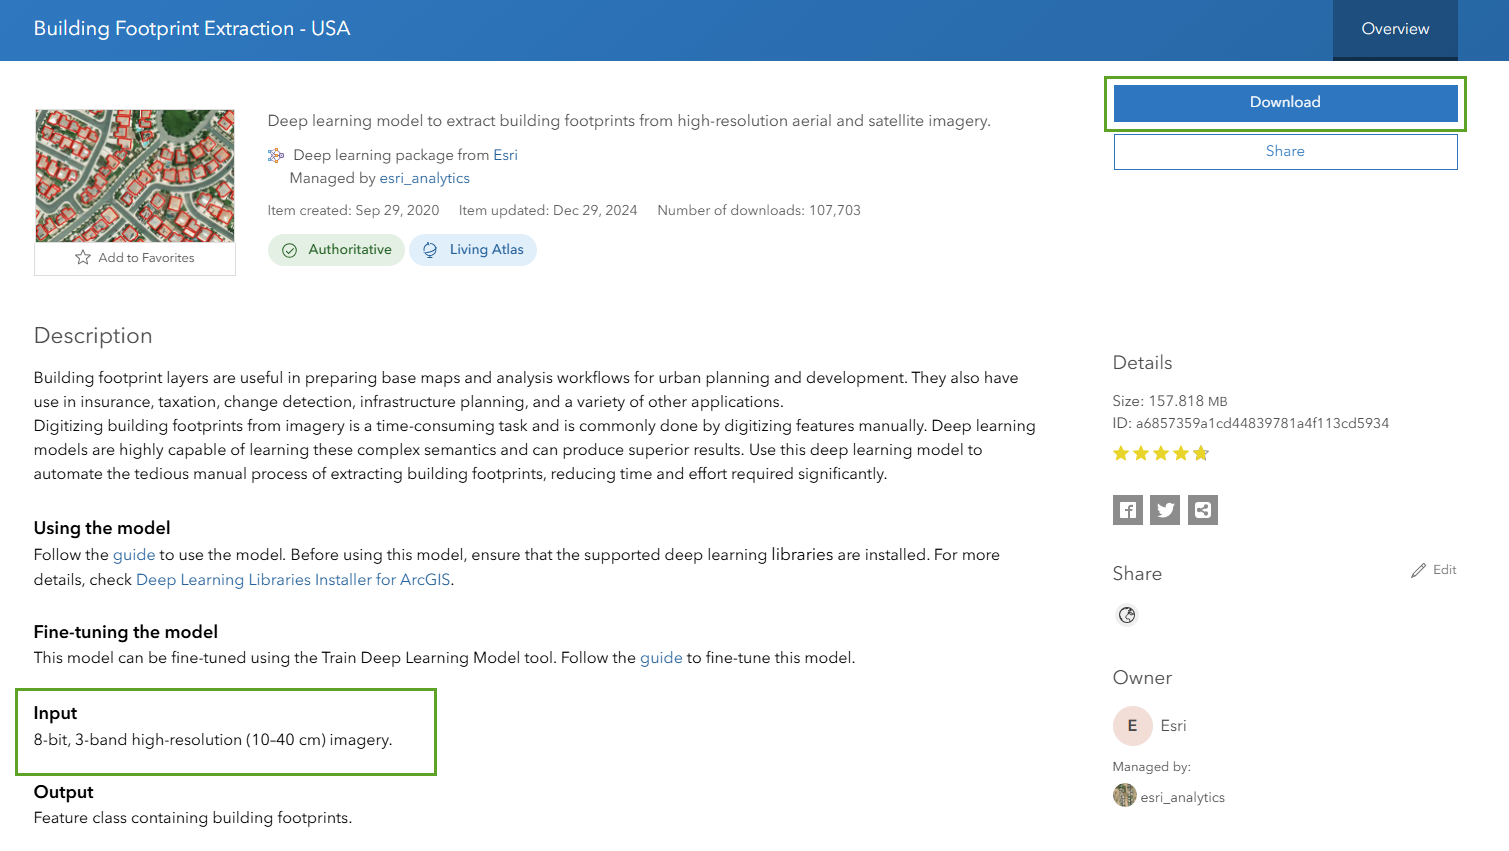
Step 3 – The item details page contains a variety of useful information about the package. Find the Input section and read it. This will tell you what kind of data the model was trained on, thus what kind of data is required for the package to work properly. This deep learning model is a good match for World Imagery tiles. In the top right corner, click Download to create a local copy of the package as a .dlpk file.

Information Extraction
Step 1 – Open the project you created during the data acquisition portion. If you haven’t yet created a project, create a new one now using the Map option.
Step 2 – If the geoprocessing pane is not currently open, navigate to the Analysis tab on the ribbon, and click the Tools button. In the pane, use the search bar to search for “Detect Objects Using Deep Learning” and click on the first tool with the matching name. You can read more about the tool here.
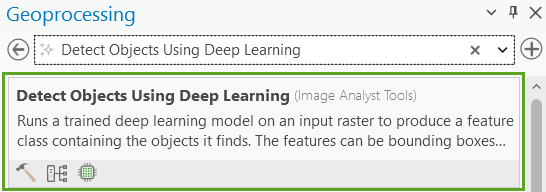
Note: to navigate to the parent toolbox and view other similar tools, go to the geoprocessing pane, then click on the Toolboxes tab. From there, click Image Analyst Tools then Deep Learning.
Step 3 – With the tool open, use the Input Raster dropdown to set the tile package as the input parameter.
Step 4 – Using the Output Detected Objects box, name the output and optionally change where it is being saved to.
Step 5 – To load in the model, use the file icon next to the Model Definition box to browse your files. Navigate to where the “.dlpk” file downloaded in the “Model Selection” section was saved. Select the model and click OK. It may take a moment to load the model and all its parameters.
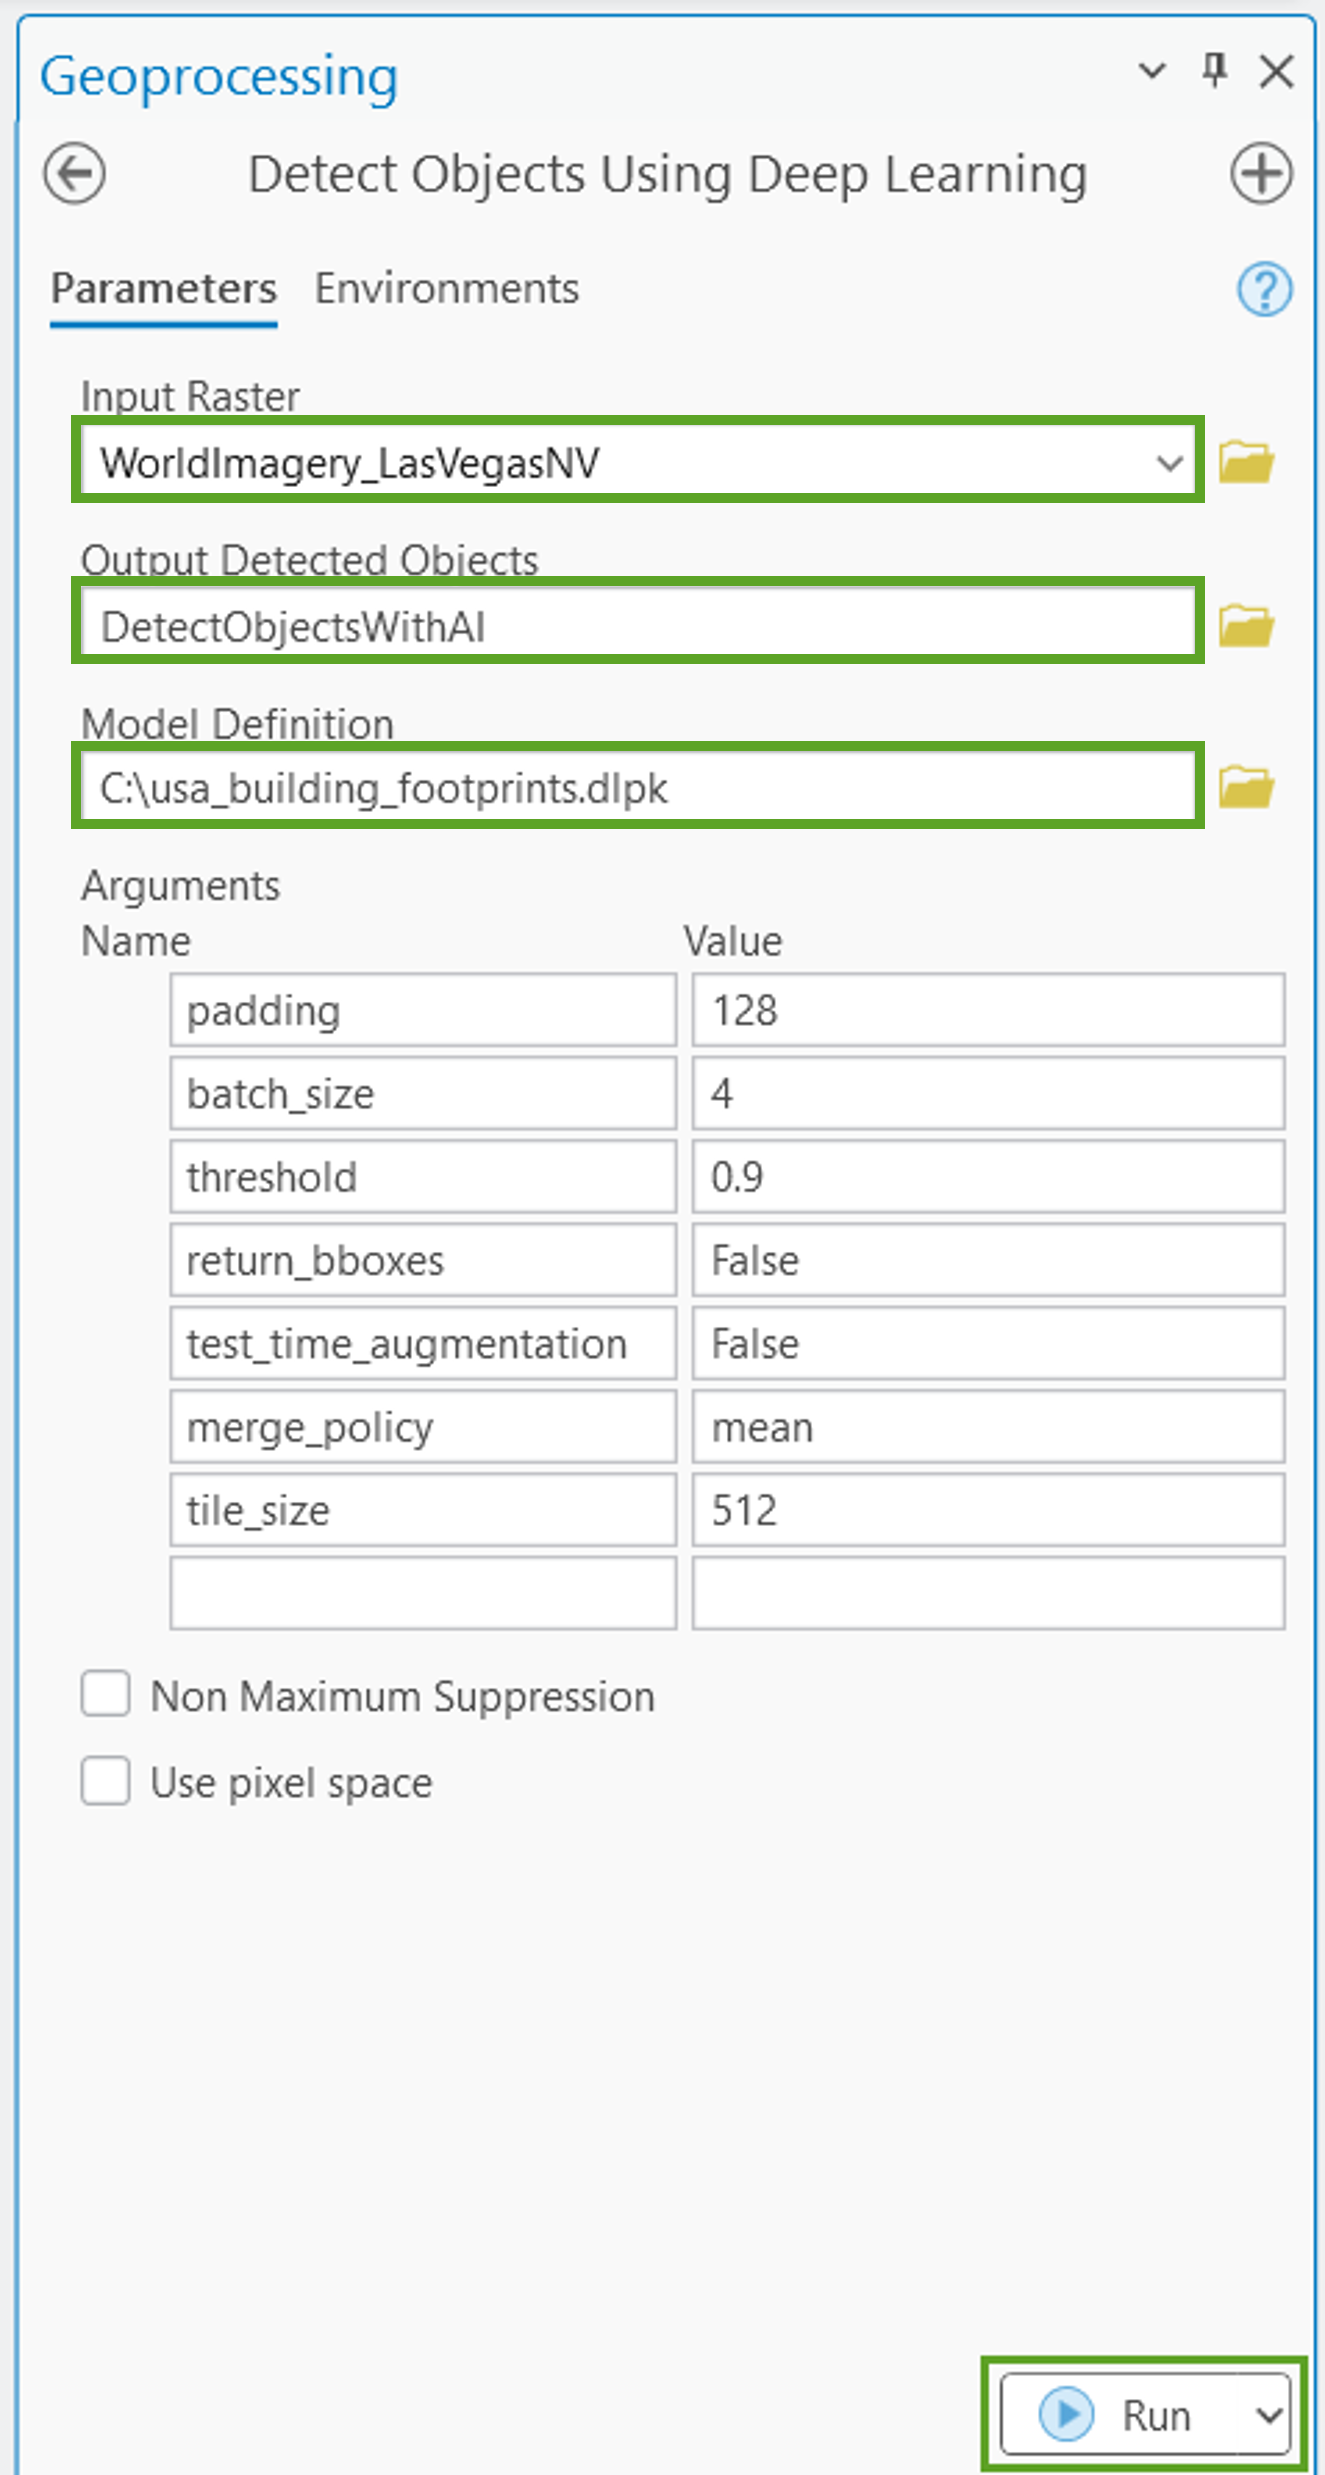
OPTIONAL – When the model is loaded, a set of default values for the parameters will be given: the default values tend to perform well on their own, but some modification could improve performance and results.
- Lowering the default value for padding may increase performance
- Increasing tile size may provide better results detecting larger buildings.
- Lowering the threshold to 0.8 or 0.7 may help improve building detection
To understand what each argument does, hover over the information icon next to the Arguments subheading and read the short description.
Note: the Environments tab can be used to change the processing extent if you only want to process a subsection of the image.
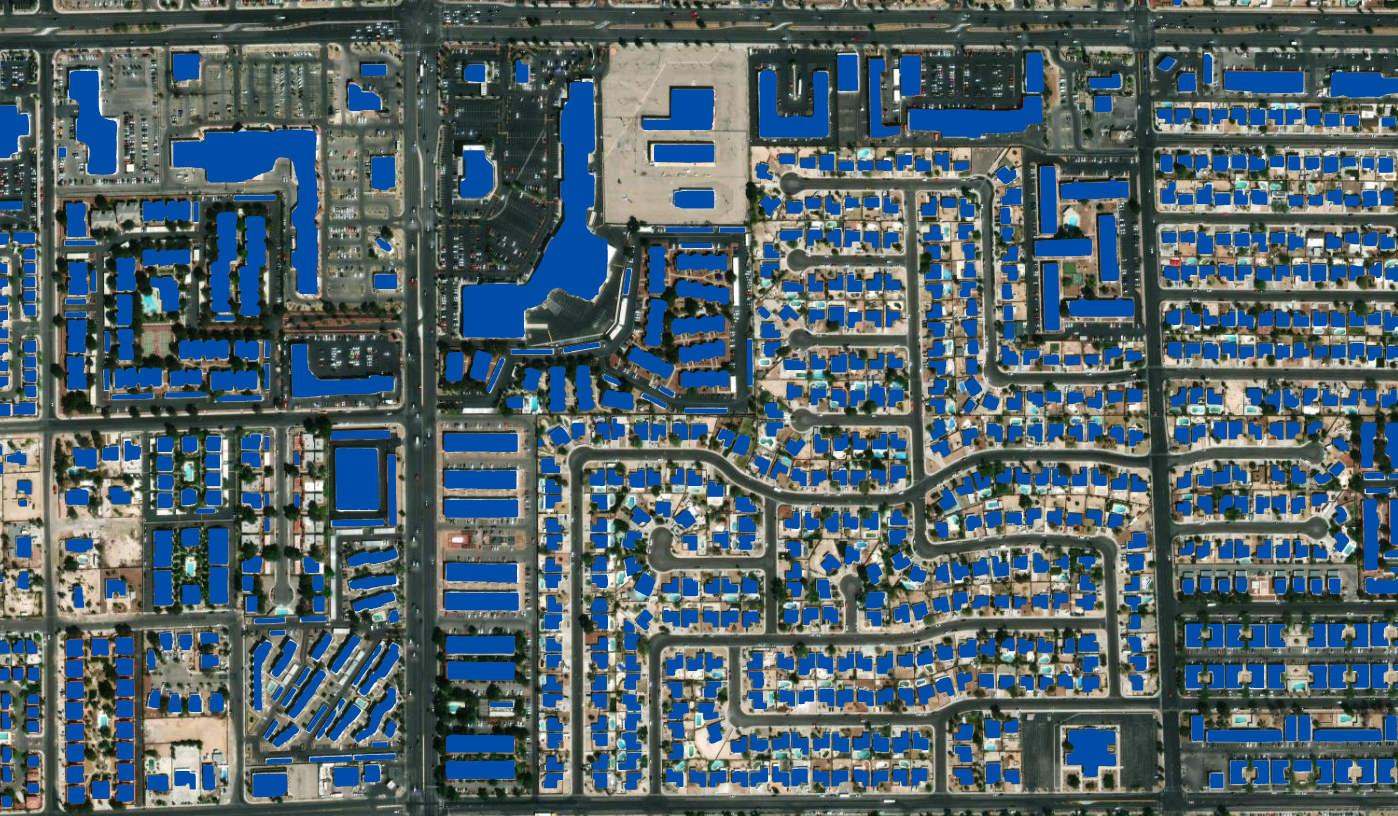
Step 6 – Click Run. The process may take up to several hours to complete. When it is done, review the results in the map frame. If the results aren’t satisfactory, adjust the arguments and try running the process again. Information regarding how to fine tune the model can be found here.

Refining Results
Once you’ve successfully extracted your building footprints, you can use a variety of other geoprocessing tools to clean up the results.
Note: this section requires the ArcGIS Pro Advanced level of licensing.
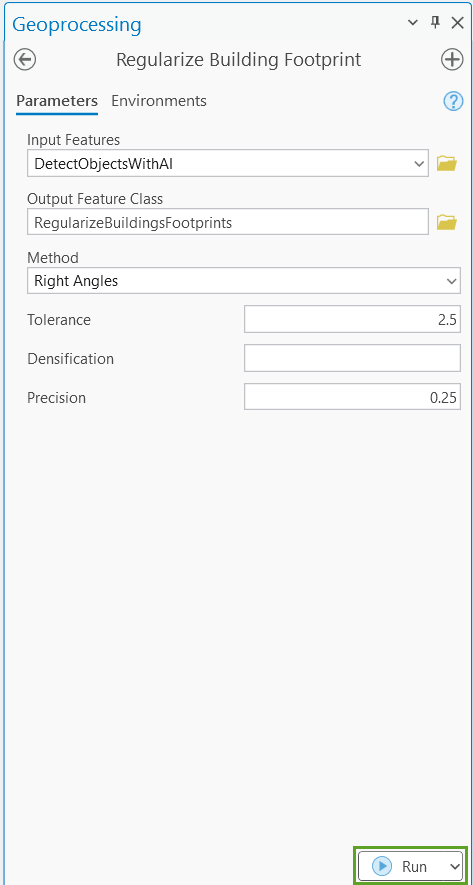
Step 1 – In the ArcGIS Pro project, navigate to the geoprocessing pane and search for “Regularize Building Footprint” and select the tool with the matching name. You can read more about the tool here.

Step 2 – Fill in the tool parameters and use the output created from the Detect Objects Using Deep Learning tool as the input. Based on the data, select a method and tolerance that will work best with the input data. Run the tool and assess the results–if necessary, adjust the parameters and run the tool again.
Step 3 – Once you have regular building footprints, go back to the geoprocessing pane and search for “Dissolve Boundaries”. Select the tool with the matching name and run it with the regular building footprints as the input.
At this point, your detected building footprints should be regularized and uniform.

More Information
Learn more about deep learning with ArcGIS on the ArcGIS Blog
Explore deep learning in ArcGIS Pro
Find more deep learning models on the Living Atlas of the World
Commenting is not enabled for this article.