Hosted feature layer views allow you to provide the same data as a web layer but with different configurations or filters applied, which results in a different “view” of the source data. But how do you get a different view of the data when you publish web feature layers (feature services) that reference a registered database? The answer: publish multiple feature layers from the same source data.
As a publisher, you can add supported source data to a map in ArcGIS Pro, configure the map layers for different purposes, and publish web feature layers with different settings for each of those purposes. And, as with all web layers, you’ll share each one with the targeted group whose members need access to the layer that you configured specifically for them.
Some of the configuration steps you can take include…
Use definition queries
Add definition queries to the map layers to filter which features are present. These queries are saved in the web feature layer when you publish it.
You can set multiple query definitions in the map and switch between them. The query that you make active before you publish is the one that will be applied to the resulting web feature layer.
Applying a definition query is equivalent to limiting rows (the Add filter option) when you define a hosted feature layer view.
Hide fields
In the Fields view for each map layer, uncheck the Visible option for fields that you don’t want in the web feature layer. Fields that are not visible in the source map layer will not be included in the web feature layer.
Marking fields not visible is equivalent to the Fields option you use when defining a hosted feature layer view.
Add or remove layers
Add feature classes or tables to or remove them from the map. Only the feature layers or tables that are present in the map when you publish will be included in the web feature layer.
Changing which layers are present in the map is equivalent to choosing which layers to include in a hosted feature layer view.
Set configuration details when you publish
As part of the publishing process, specify the desired editing settings and other important capabilities, such as enabling sync on the service so that the layer can be taken offline.
This is equivalent to the different settings you define for a hosted feature layer view after you create it.
Choose the appropriate audience
To ensure that each view of the data is available to the right people, share the web feature layer with the portal groups whose members need access to the web feature layer.
This is equivalent to sharing a hosted feature layer view with a specific audience.
An example scenario
To help you produce multiple “views” of the same source data to meet specific requirements, the scenario below describes how a GIS analyst working for a transit authority shares bus stop information with three different audiences. Each audience has different requirements for data access and editing.
The analyst, who has publishing privileges in the transit authority’s ArcGIS Enterprise organization, adds the bus stop feature class from an enterprise geodatabase and a related table to a map in ArcGIS Pro, configures the layer and table, and creates three web feature layers to meet the needs of three different audiences.
Web feature layer 1 – Bus stops, for in-house use
The first web feature layer that the analyst publishes will be used by most members of the ArcGIS Enterprise organization to view the bus stop locations and attributes. Only the analyst will edit the data through the web layer, so editing does not need to be enabled.
This web feature layer is analogous to a source hosted feature layer in the hosted feature layer view use case.
The following list summarizes the pertinent settings for this layer:
- In the map, all fields in the bus stops layer are visible.
- No definition query is needed because users need access to all the data.
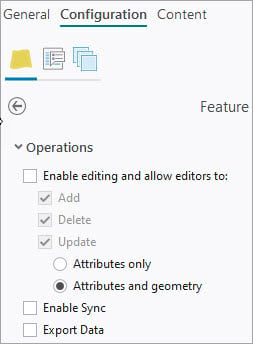
- Editing is not enabled for the web feature layer. The layer owner (the analyst) and organization administrators can edit the data in the web feature layer, but no other organization members can edit it.
- Sync is not enabled on the web feature layer because it is accessed only from computers on the internal network.
The following screenshot shows the editing and sync settings the analyst configures when publishing in ArcGIS Pro:
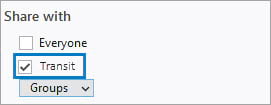
- The web feature layer is shared with the organization, allowing all members to view it.
As shown below, the analyst checks the box next to the Enterprise organization name (Transit) to share it. This is set on the Overview tab of the Share As Web Layer pane before publishing.
Web feature layer 2 – BusStopShelters, for the maintenance crew
Maintenance crew members will be painting the shelters at each bus stop. They need to know which bus stop locations have shelters. Although they don’t need to edit the layer, they do need to take the layer offline on their mobile devices so they can navigate to the appropriate bus stops while they are in the field. This requires a second web feature layer with specific settings to meet the maintenance crew’s needs.
The following steps provide details about specific settings, so you can replicate these steps with your own data.
In ArcGIS Pro, the analyst first adds a definition query to the bus stop layer in the map before publishing. This limits the layer to show only the features that have bus shelters (shelter='Y').
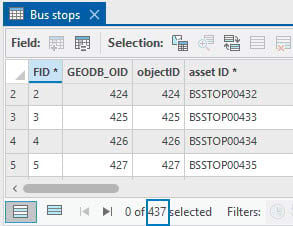
1. The analyst opens the attribute table for the layer to determine how many features are present before applying the definition query. (Right-click the layer and click Attribute Table.)
There are 437 features, as shown below.
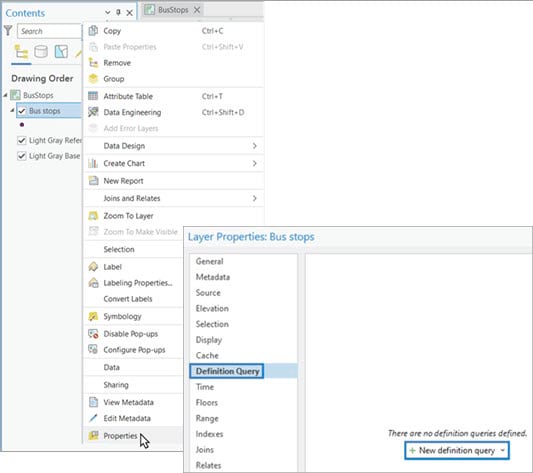
2. The analyst opens the bus stops layer’s properties to define the query. (Right-click the layer, click Properties > Definition Query > New definition query.)
3. The analyst uses the drop-down lists in the definition query pane to construct the query. Clicking Apply saves the query definition. With this definition query applied, only features that have a bus shelter will be available in the web feature layer.
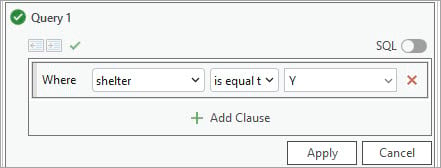
4. The analyst closes the layer properties dialog box and confirms that only the expected features are listed.
There are now 73 features in the layer and all have a bus shelter.
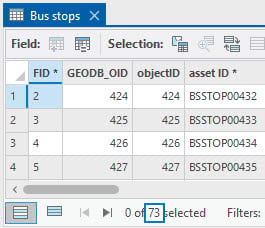
5. The analyst closes the attribute table and proceeds with layer configuration for the maintenance crew.
6. To simplify the attribute table and remove fields that the maintenance workers don’t need, the analyst hides some of the fields. The analyst opens Data Design > Fields from the Bus stops layer in the Contents pane in the map.
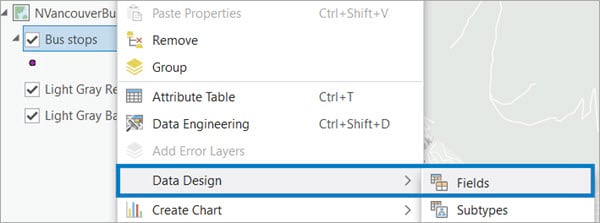
7. The analyst unchecks boxes in the Visible column to hide those fields. Hidden fields will not be included in the web feature layer.
In the following example, the analyst has hidden multiple fields that the maintenance crew members do not need.
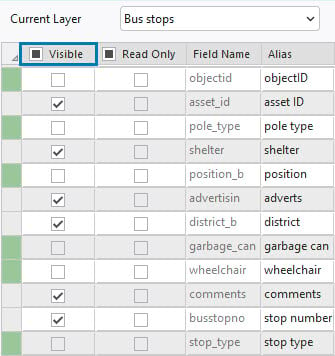
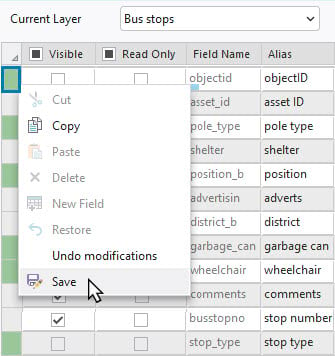
As shown above, fields with altered properties are marked green in the Fields view window to indicate changes were made.
8. To save these changes, the analyst right-clicks one of the green squares and clicks Save.
9. After saving the changes, the analyst closes the Fields view by clicking the X on the Fields tab.
Now that the map layer is configured to restrict which rows and fields are included, the analyst proceeds to publish the web feature layer for the maintenance crew.
10. The analyst disables editing but enables sync so that the maintenance crews can take the web feature layer offline.
11. The analyst chooses the maintenance group on the Overview tab of the Share As Web Layer pane. This provides access to only those group members.
12. The analyst publishes the second web feature layer.
Web feature layer 3 – BusStopInspections, for field inspections
Inspectors periodically assess the state of the infrastructure of each bus stop. They need to edit the bus stop information, including information in a related table that stores the bus stop inspection data. For this reason, the analyst configures and publishes a third feature layer to ArcGIS Enterprise to support the organization’s inspection workflows.
1. Information about inspections is stored in a table that is related to the bus stop feature class through a relationship class. That means the analyst must add the related inspection table (BusStopInspections) to the map.
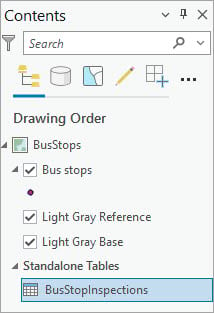
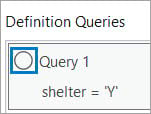
2. Inspectors will visit all bus stops. Therefore, the analyst clears the active definition query that limited the features to show only those with shelters. To do this, the analyst opens the layer properties and unchecks the query in the Definition Queries tab.
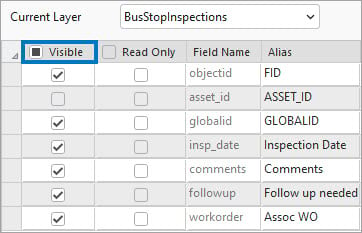
3. The inspection crew doesn’t need the asset_id field in the related inspection table, so the analyst hides that field using the same method as before.
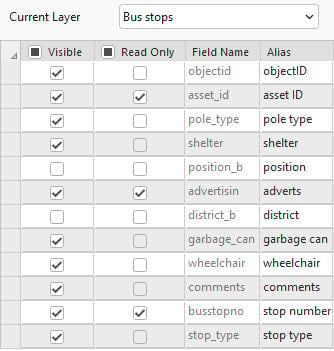
4. The inspectors will edit their web feature layer to record what inspections they perform and when. However, a few fields in the bus stop layer should not be edited by the inspection crews. To prevent edits from being made, the analyst checks the Read Only check box for those fields in the Fields view of the map layer. Additionally, the analyst makes some of the bus stop layer fields visible again for the inspection workers.
The screenshot below shows the read-only and hidden fields in the bus stops layer that the inspectors will use:
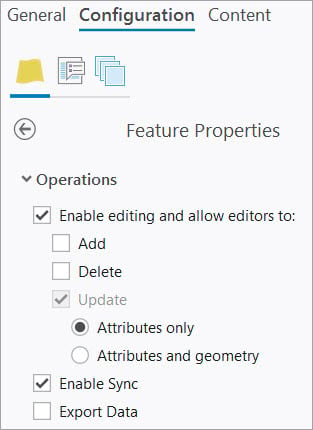
5. The inspectors check existing bus stops in the field, so they do not need to add or delete bus stop features. Therefore, the analyst configures the editing settings to allow only attribute updates. To support working with the layer offline, the analyst also enables sync.
6. Finally, the analyst shares the third web feature layer with the inspectors group and publishes the third web layer.
Results
The transit authority now has three separate web feature layer items. While all three layers reference the same source data in the enterprise geodatabase, each web feature layer contains a slightly altered view of the data, provides different functionality, and is shared with a different group of users.

Article Discussion: