The launch of the Convert Schema Report geoprocessing tool in ArcGIS Pro 3.3 changed the way you can share, design, and modify geodatabase schemas. Managing schemas can be a daunting task, but with this new tool, you can design a schema that suits your needs.
The Convert Schema Report tool offers a variety of functionalities, including the ability to seamlessly transfer reports between formats, upgrade them to the latest version, convert them into XML workspace documents, and most notably, transform edits made in a schema report into a new geodatabase. These advanced features provide you with enhanced flexibility in documenting and developing a schema.
This article covers the diverse uses of the Convert Schema Report geoprocessing tool and guides you through the process of making edits within the report to generate a geodatabase. It explains the tool’s capabilities and shares insights on maximizing its potential in ArcGIS Pro 3.3 and beyond.
To follow along with this blog, download the example schema report from ArcGIS Online by following this link.
Contents
- A quick history
- Converting from one format to another
- Converting to XML workspace document
- Edit the schema report
- 5 tips for successful conversion
A quick history
We introduced the Generate Schema Report geoprocessing tool in ArcGIS Pro 3.2, allowing users to document their geodatabases and capture intricate schemas in a user-friendly format. The response to this tool has been overwhelmingly positive, and we’re so excited to see it help users document their schemas efficiently.
From the inception of Generate Schema Report, we knew that many users wanted us to take this capability one step further. As mentioned on our feedback page, and in our recent Generate Schema Report blog post, users didn’t just want to document a schema, they wanted to control it. Users shared their desire to manipulate, rename, rearrange, and redefine a schema using the schema report. ArcGIS Pro 3.3 incorporates these requests in the new Convert Schema Report geoprocessing tool.
Converting from one format to another
Getting a schema report in the format you need is crucial for communicating your data. With Convert Schema Report, you can generate any report format on the fly from an existing report. The tool can change an existing JSON or XLSX schema report to another report format (PDF, HTML, JSON, or XLSX) or to an XML workspace document. With this capability, you can convert to JSON for simpler access from Python or to a PDF to share or print, without having to save every format when you create the original report. Convert Schema Report allows you to have the data you need in the format you need.
In addition to converting from one file type to another, Convert Schema Report also allows you to upgrade a report to the latest report formatting. As ArcGIS Pro continues to grow, the schema report will grow with it. When new features are added, older reports may start to look antiquated. Convert Schema Report keeps reports up to date by allowing you to convert a report from a past ArcGIS Pro release to match the report format produced by your current ArcGIS Pro release. This means that Convert Schema Report will keep existing reports ready for direct comparison with newly generated reports.
Converting to an XML workspace document
The ability to convert between report formats is useful, but you can also convert the report to a functional geodatabase. Convert Schema Report can convert a report to an XML workspace document, which opens a new pathway for designing a schema. With this ability, edits made in the report can be transformed into a new workspace without having to open ArcGIS Pro. Properties like class names, aliases, fields, subtypes, indexes, domains and spatial references can all be edited directly in the report. This means you can make bulk changes in the report, get approvals from your team on the changes, and then turn the approved report into a new geodatabase with all of your changes included. First, convert the report to an XML workspace document, and then import the xml document into a new workspace.
Editing the schema report
The ability to turn a Schema Report into an XML means new geodatabases can be created from a schema report. Let’s dig into a report, and step through making some basic schema edits with this workflow in mind. Clicking this link will automatically download a geodatabase schema report that we’ll use for the rest of this blog. The report was created by running the Generate Schema Report tool on the communications asset package designed by ESRI’s solutions team.
Let’s open the downloaded file, original_report.xlsx, and get started.
Editing feature class and table properties
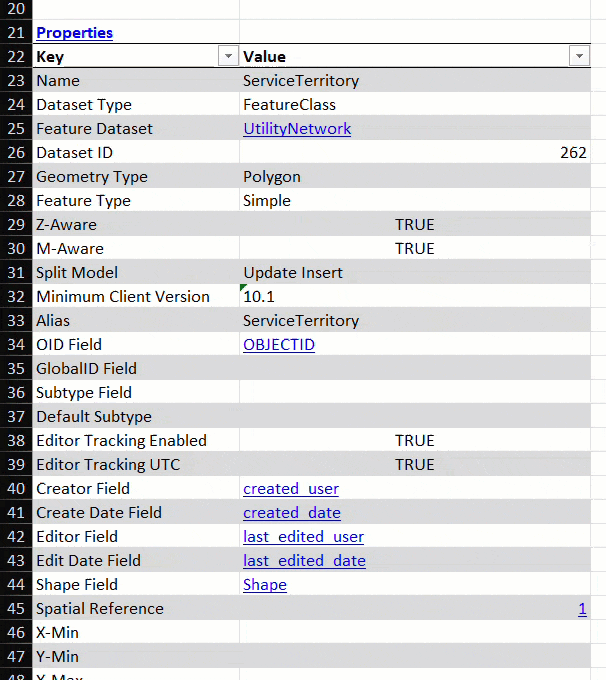
You can edit the properties of a feature class or table on each dataset’s individual worksheet. Open the report and navigate to the worksheet for the ServiceTerritory feature class. To do this, first make sure the table of contents worksheet is open. The ServiceTerritory feature class can be found in the datasets table in cell A79. Click the hyperlinked class name to navigate to the class’s worksheet.
This worksheet contains the schema information for the Service Territory class. Properties of the class can be edited in the properties table, which starts on row 22. Class properties like name, alias, and geometry type can be edited by typing a new value into the cell. The GIF below shows an edit the class alias, changing it from ServiceTerritory to Service Territories. You’ll also see the geometry type changed from polygon to point. Changing the fundamental properties of data must be done carefully. Changing the class geometry type from a polygon to point will save successfully, but may not produce a schema with valid associations or functionality when converted to a new geodatabase.
Edit Fields
Continue scrolling down the ServiceTerritory worksheet to the Fields table.
Field properties are edited in the same manner as the class properties, by typing a new value. All field properties in this table are editable. When changing the names of fields, references to the field must also be updated to maintain the reference. For instance, if the field is used as a key field in a relationship class, the name of the key field in the relationship class also must be updated to reflect changes made to the field name. It is recommended that you use the Excel find all shortcut (Ctrl+F) to locate all references to the field in the workbook. In the GIF below, the field name, alias, and nullability of the field named companyname are changed.
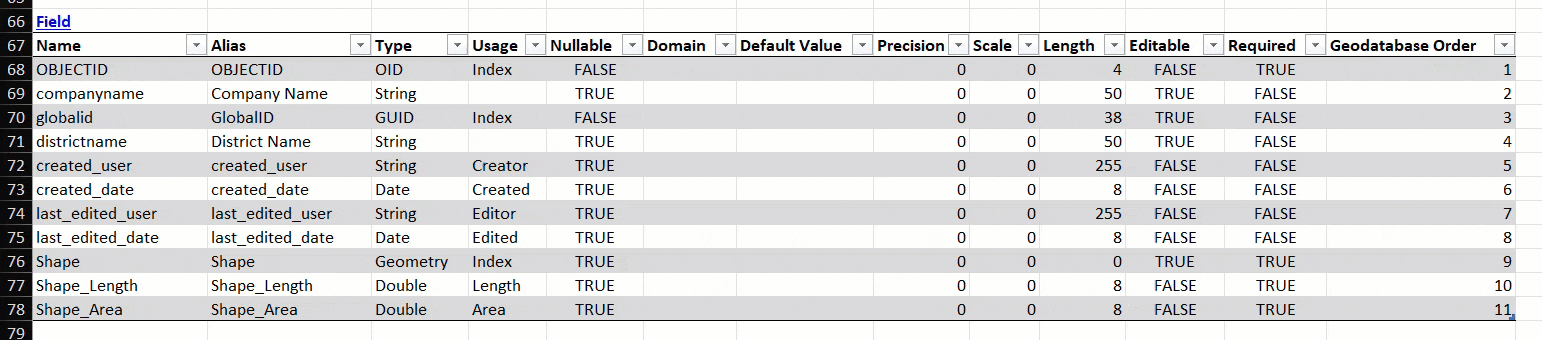
It’s important to note that not all edits are implementable. For instance, changing the precision and scale of fields will have no effect on the final schema if your target workspace is a file geodatabase. Since the file geodatabase has predetermined precision and scale for all numeric fields, these edits are ignored. Edits made within the schema report do not circumvent the boundaries of the geodatabase or add functionality that is not present.
Add and reorder fields
Rearranging fields in a table was a highly requested feature from many users. Editing the order of the rows in the fields table will alter the arrangement of the fields in the resulting XML. When reimporting the schema, fields are created in the visual order of the fields table, from the top down.
Rearranging fields can be achieved in two ways. You can cut and insert rows to reorder them, or you can sort the fields using the geodatabase order column. The geodatabase order field has no direct effect on the schema and only serves to sort the table. For instance, if you change the values in the geodatabase order field but do not sort the records in the table, the field order will be left unchanged in an XML output. Sorting is key to making this edit. Assigning numbers in the Geodatabase Order field will not result in a new field arrangement without it. This is true of tables throughout the report.
Adding new rows to the fields table allows new fields to be added to the schema. When adding a new row, make sure that all cells in the row are filled in to ensure successful conversion. Field attributes that are optional in ArcGIS Pro—such as alias, domain, and default value—are also optional in the table. All other fields are needed for successful field creation.
Edit subtypes
Subtypes and their configurations can also be edited from a class worksheet. Subtype codes, descriptions, default values, and domain assignments may be edited by typing new values in the respective cells.
Navigate back to the table of contents and locate the Communications Device class on row 92. Click the hyperlinked name in cell A92 to navigate to this dataset’s worksheet.
This class has multiple subtypes configured. Edit the descriptions or codes of subtypes by typing the new values into the appropriate column of the Subtype table. Below, the first subtype was renamed from “Unknown” to “Unknown Components”, and the subtype’s code was changed from 0 to 10.
Below the Subtype table is the Subtype Field Info table, which includes domain and default value assignments for each subtype. The values are linked to the subtype using the subtype’s code. When changing the code for a subtype in the Subtypes table, it’s necessary to also change the code value for the corresponding rows in the Subtype Field Info table so the values remain associated with the subtype.

Edit domains
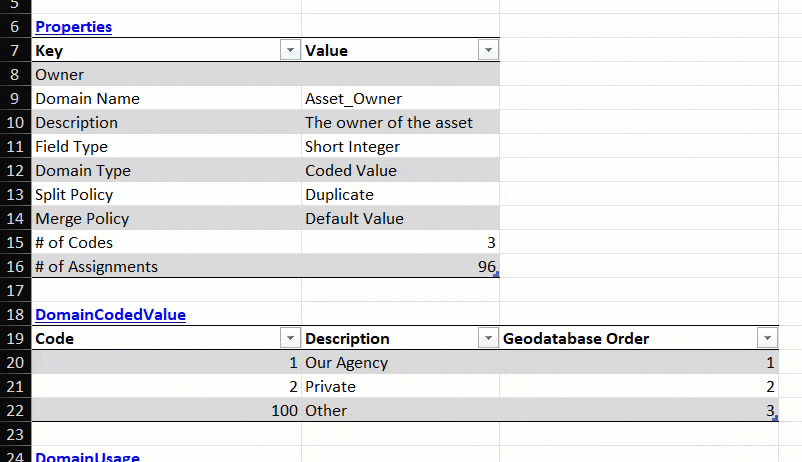
Additional geodatabase features like domains and spatial references also have individual worksheets you can edit. In the Subtype Field Info table in cell E154, click the hyperlink for the Asset_Owner domain to navigate to the domain’s worksheet.
In the domain worksheet pictured below, you can edit a domain’s properties, such as name, split policy, and the domain’s data type. You can also add domain values by inserting a row in the DomainCodedValue table.
Take extra care when editing the fundamental properties of data, such as its data type. Changing the data type of a domain requires updating the fields where the domain is assigned. For instance, when changing a text type domain to a short type, the fields assigned to this domain must also be updated to a short data type for the domain to successfully associate after converting to a geodatabase.
Edit spatial references
To finish up, let’s look at how to add and reassign spatial references.
Spatial reference assignments can be found in the properties table of any dataset’s worksheet or in the main table of contents. Navigate back to the table of contents and locate the ‘Utility Network’ dataset on row 76. Navigate to the dataset by clicking its name.
In the utility networks Properties table the Spatial Reference is listed as “1”.
Clicking the hyperlink brings you to the Spatial Reference worksheet, pictured below. Here we can see all spatial references present in our schema.
This utility network dataset is created with an unknown coordinate system, which you can see is stored in row two, with a unique ID value of 1.
I have included an additional feature class in this sample data with the WGS 1984 spatial reference. You can see the additional spatial reference on row 3 of the Spatial Reference worksheet, it is assigned to Unique ID number 2. Return to the Utility Network worksheet using your preferred method. To define the Spatial Reference of the Utility Network as WGS 1984, edit the value to match the unique ID of the desired spatial reference. In this case, we will change the 1 to a 2 in the spatial reference row of the properties table.
To add an additional coordinate system, add a new row, provide a new unique ID for the row, and copy the Esri well-known text of your preferred coordinate reference system into the well-know text column. The coordinate reference sheet uses the well-known text to define the coordinate reference system. Rows for new coordinate systems must contain a valid value for this cell. Values in the factory code column are for display only and will not affect the resulting spatial reference during conversion.

5 tips for successful conversion
With this power comes a dash of risk. Before you use this schema design workflow, there are a few points to keep in mind:
1. Schema reports lack the context of a geodatabase and cannot validate the schema
A schema report is not a geodatabase and isn’t able to validate whether edits you make will be successful. The report can’t validate against a destination workspace, identify dependencies, or check against rules or constraints imposed by your organization. For these reasons, it’s important to edit carefully, know the limitations of the destination workspace, and always edit a copy of the original schema report.
2. XML conversion supports reports at the geodatabase level only
In ArcGIS Pro 3.3, only reports generated at the geodatabase level produce a valid XML workspace document. Schema reports created from individual feature classes, tables, or feature datasets lack geodatabase level information required for a complete XML workspace document. In the coming release of ArcGIS Pro 3.4, Convert Schema Report has been enhanced to support converting reports produced from individual feature classes, tables, and feature datasets.
3. ‘Mega-sheets’ exist for navigability
Excel schema reports come with additional worksheets called mega-sheets. These sheets aggregate information onto a single worksheet for faster discovery and navigation using hyperlinks. The Field, Feature Class, and Relationship Class worksheets are some examples. These exist solely for navigation inside the workbook.
Edits made to rows in the mega-sheets will not be present in the output of the convert schema report geoprocessing tool.
4. When in doubt, fill it out
When adding rows to existing tables in the report, make sure that each cell in the rows you add has a value. When in doubt, check out similar tables in another worksheet for examples to ensure sufficient schema information.
5. Not all edits are implementable
Some edits will not apply when converting a schema report to a geodatabase, like scale or precision values for fields when importing to a file geodatabase. System-maintained fields, like OBJECTID, and some fields required by controller datasets will not reflect schema changes.
That’s a wrap!
We hope that these best practices help as you continue to explore how the Convert Schema Report geoprocessing tool can be used in your organization’s workflows. There are so many ways that this tool can improve your workflow, and we’re looking forward to hearing how you use it. Let us know your thoughts by leaving a comment on the Generate Schema Report community feedback post and share how this tool has helped you navigate the world of schema management and reporting.
Commenting is not enabled for this article.