ArcGIS Excalibur is a web-based imagery analysis application that provides easy-to-use tools for working with images and video, enabling users to conduct analysis and visualization for shared understanding and informed decision-making. It’s integrated directly into the ArcGIS System, meaning all collections, mensuration, and analysis are immediately available for dissemination and more in-depth geospatial analysis. Excalibur enables analysts or geospatial professionals to create content from video-derived sources through Excalibur projects which helps them to contribute to the larger system of record. Excalibur projects allow them to organize imagery, customize tools, and add instructions or attachments needed to a ready-to-use imagery analysis workflow.
Video analysis within Excalibur can be conducted on livestream or on-demand videos. In this introduction to video analysis within Excalibur, we’ll cover how to publish videos for analysis, how to search and discover locations of interest within videos, tools for analysis, as well as how to export and share.
Publish Video
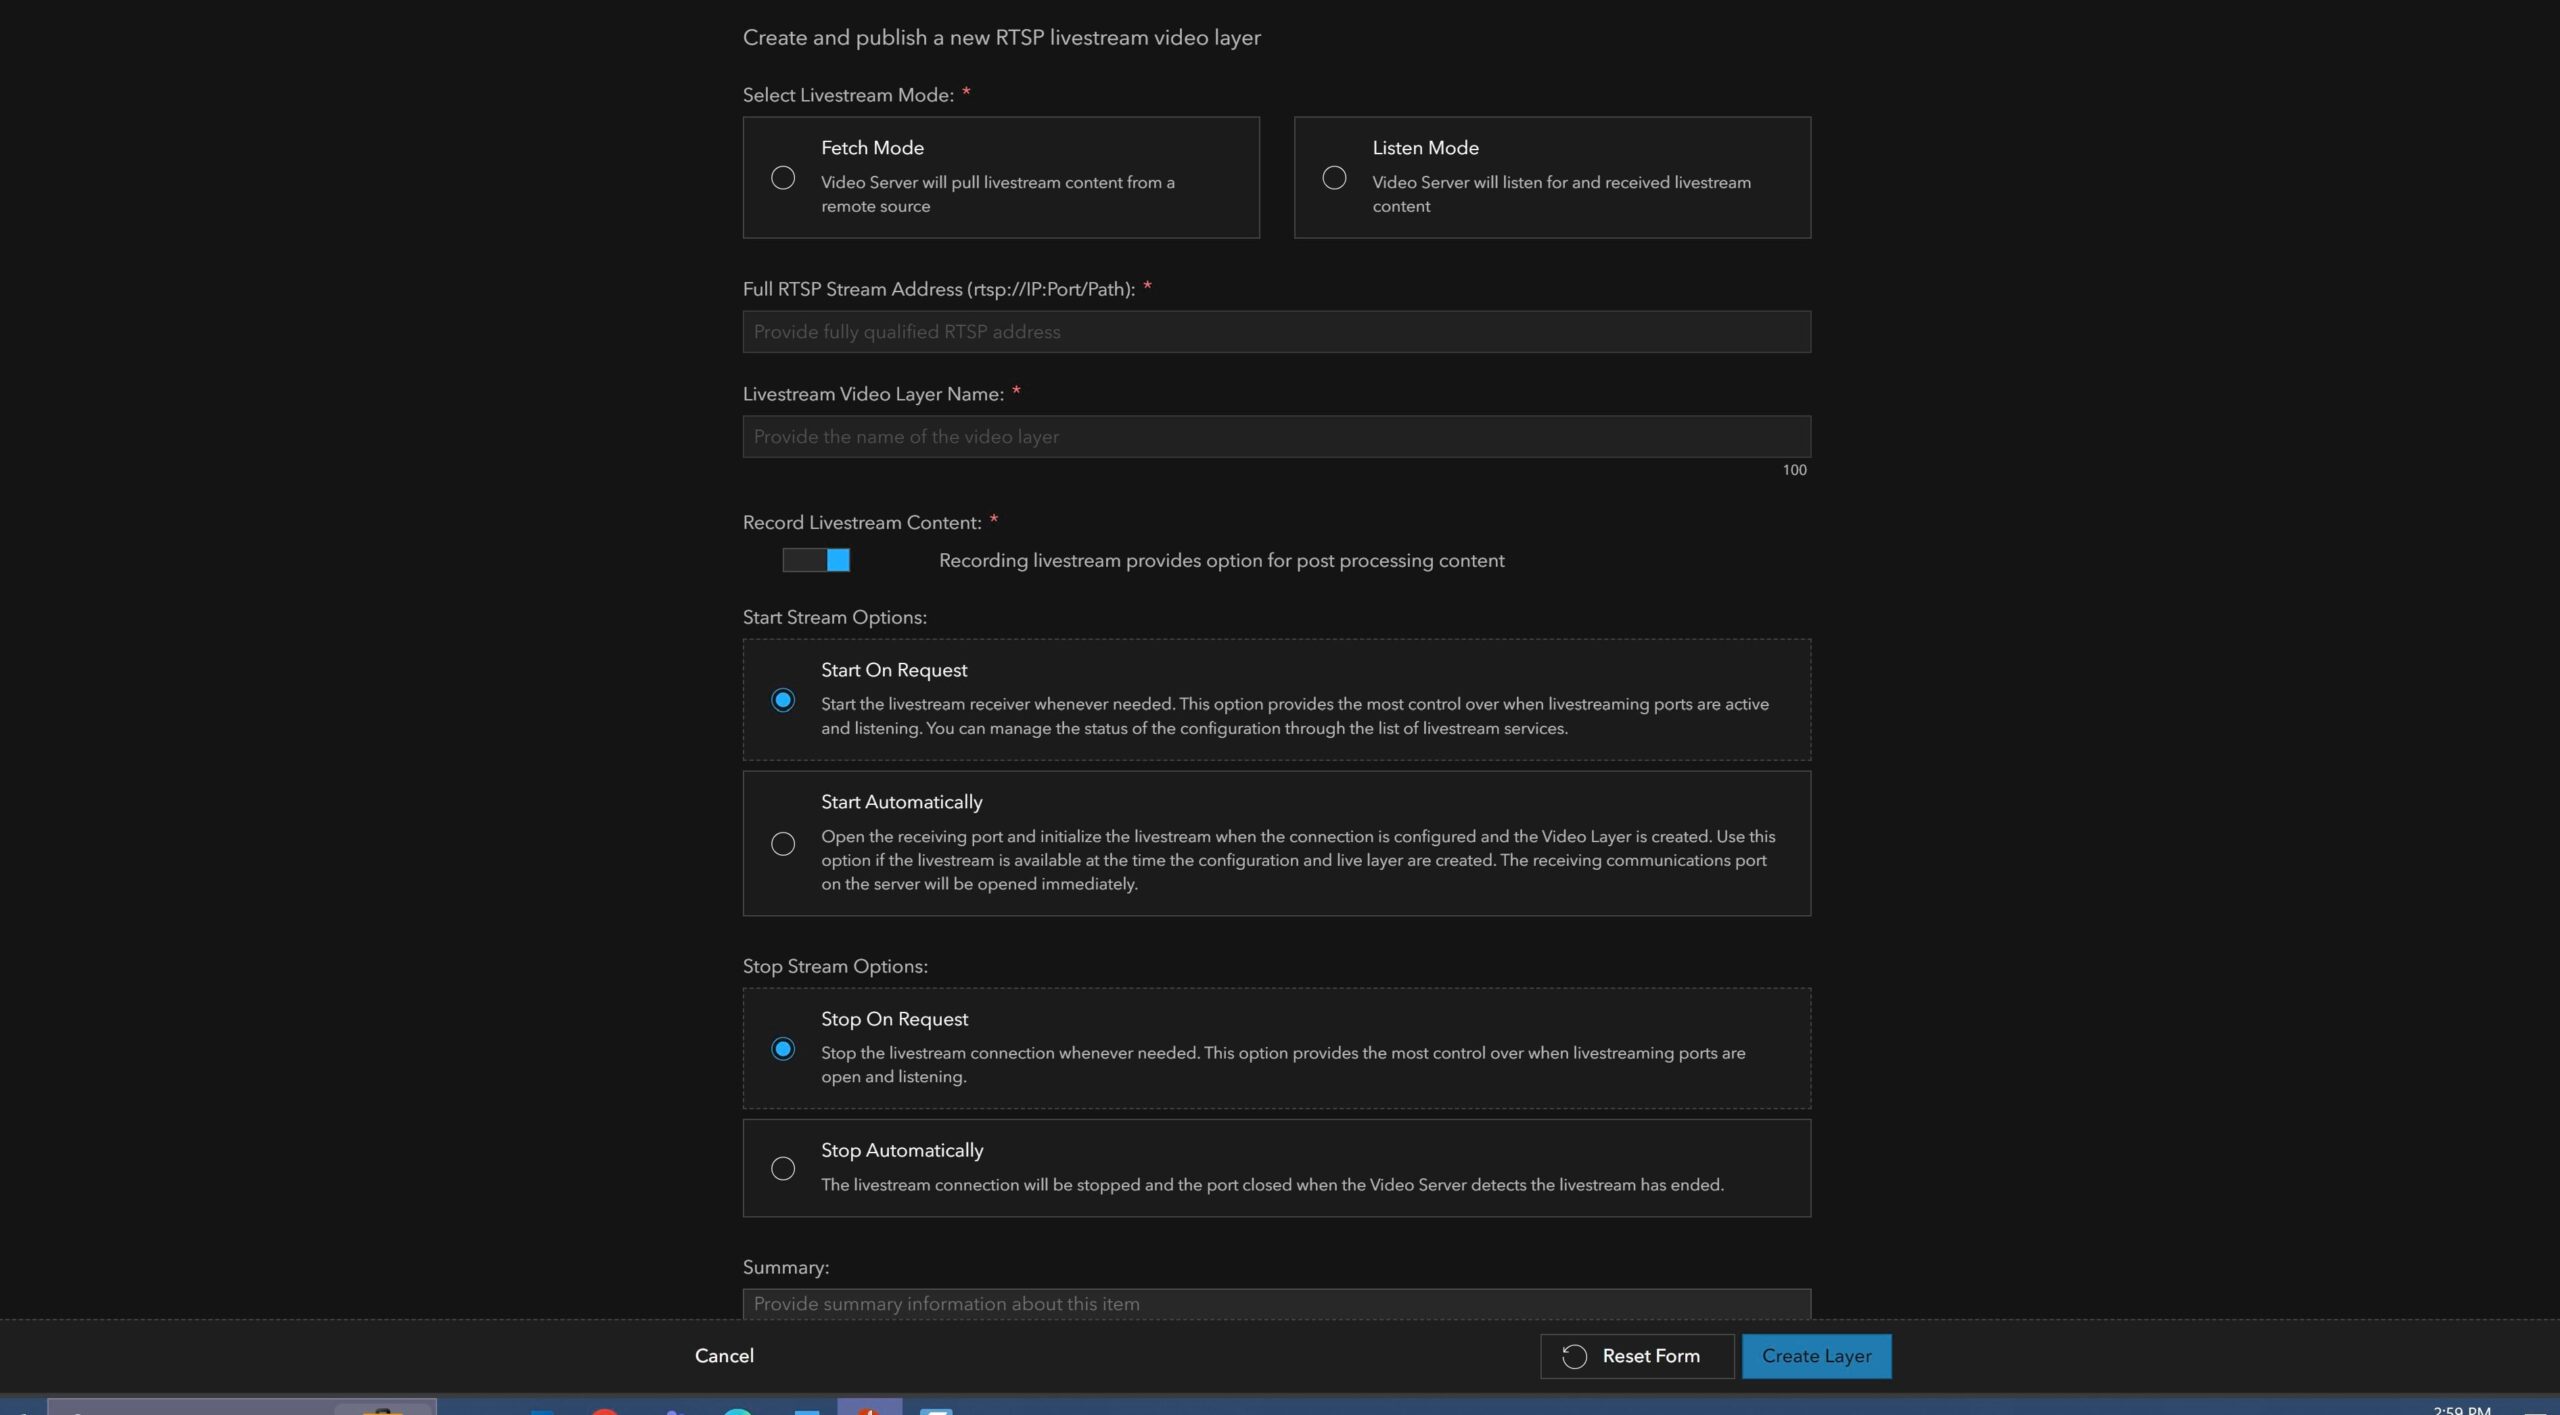
ArcGIS Excalibur empowers users to publish hosted video layers on demand from video files. You can also publish hosted live stream video layers from a url. To publish hosted video and live stream layers, you must have ArcGIS Video Server and the appropriate privileges to create, update, and delete video layers.
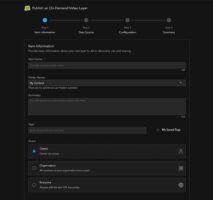
Complete the following steps to publish a hosted video layer:
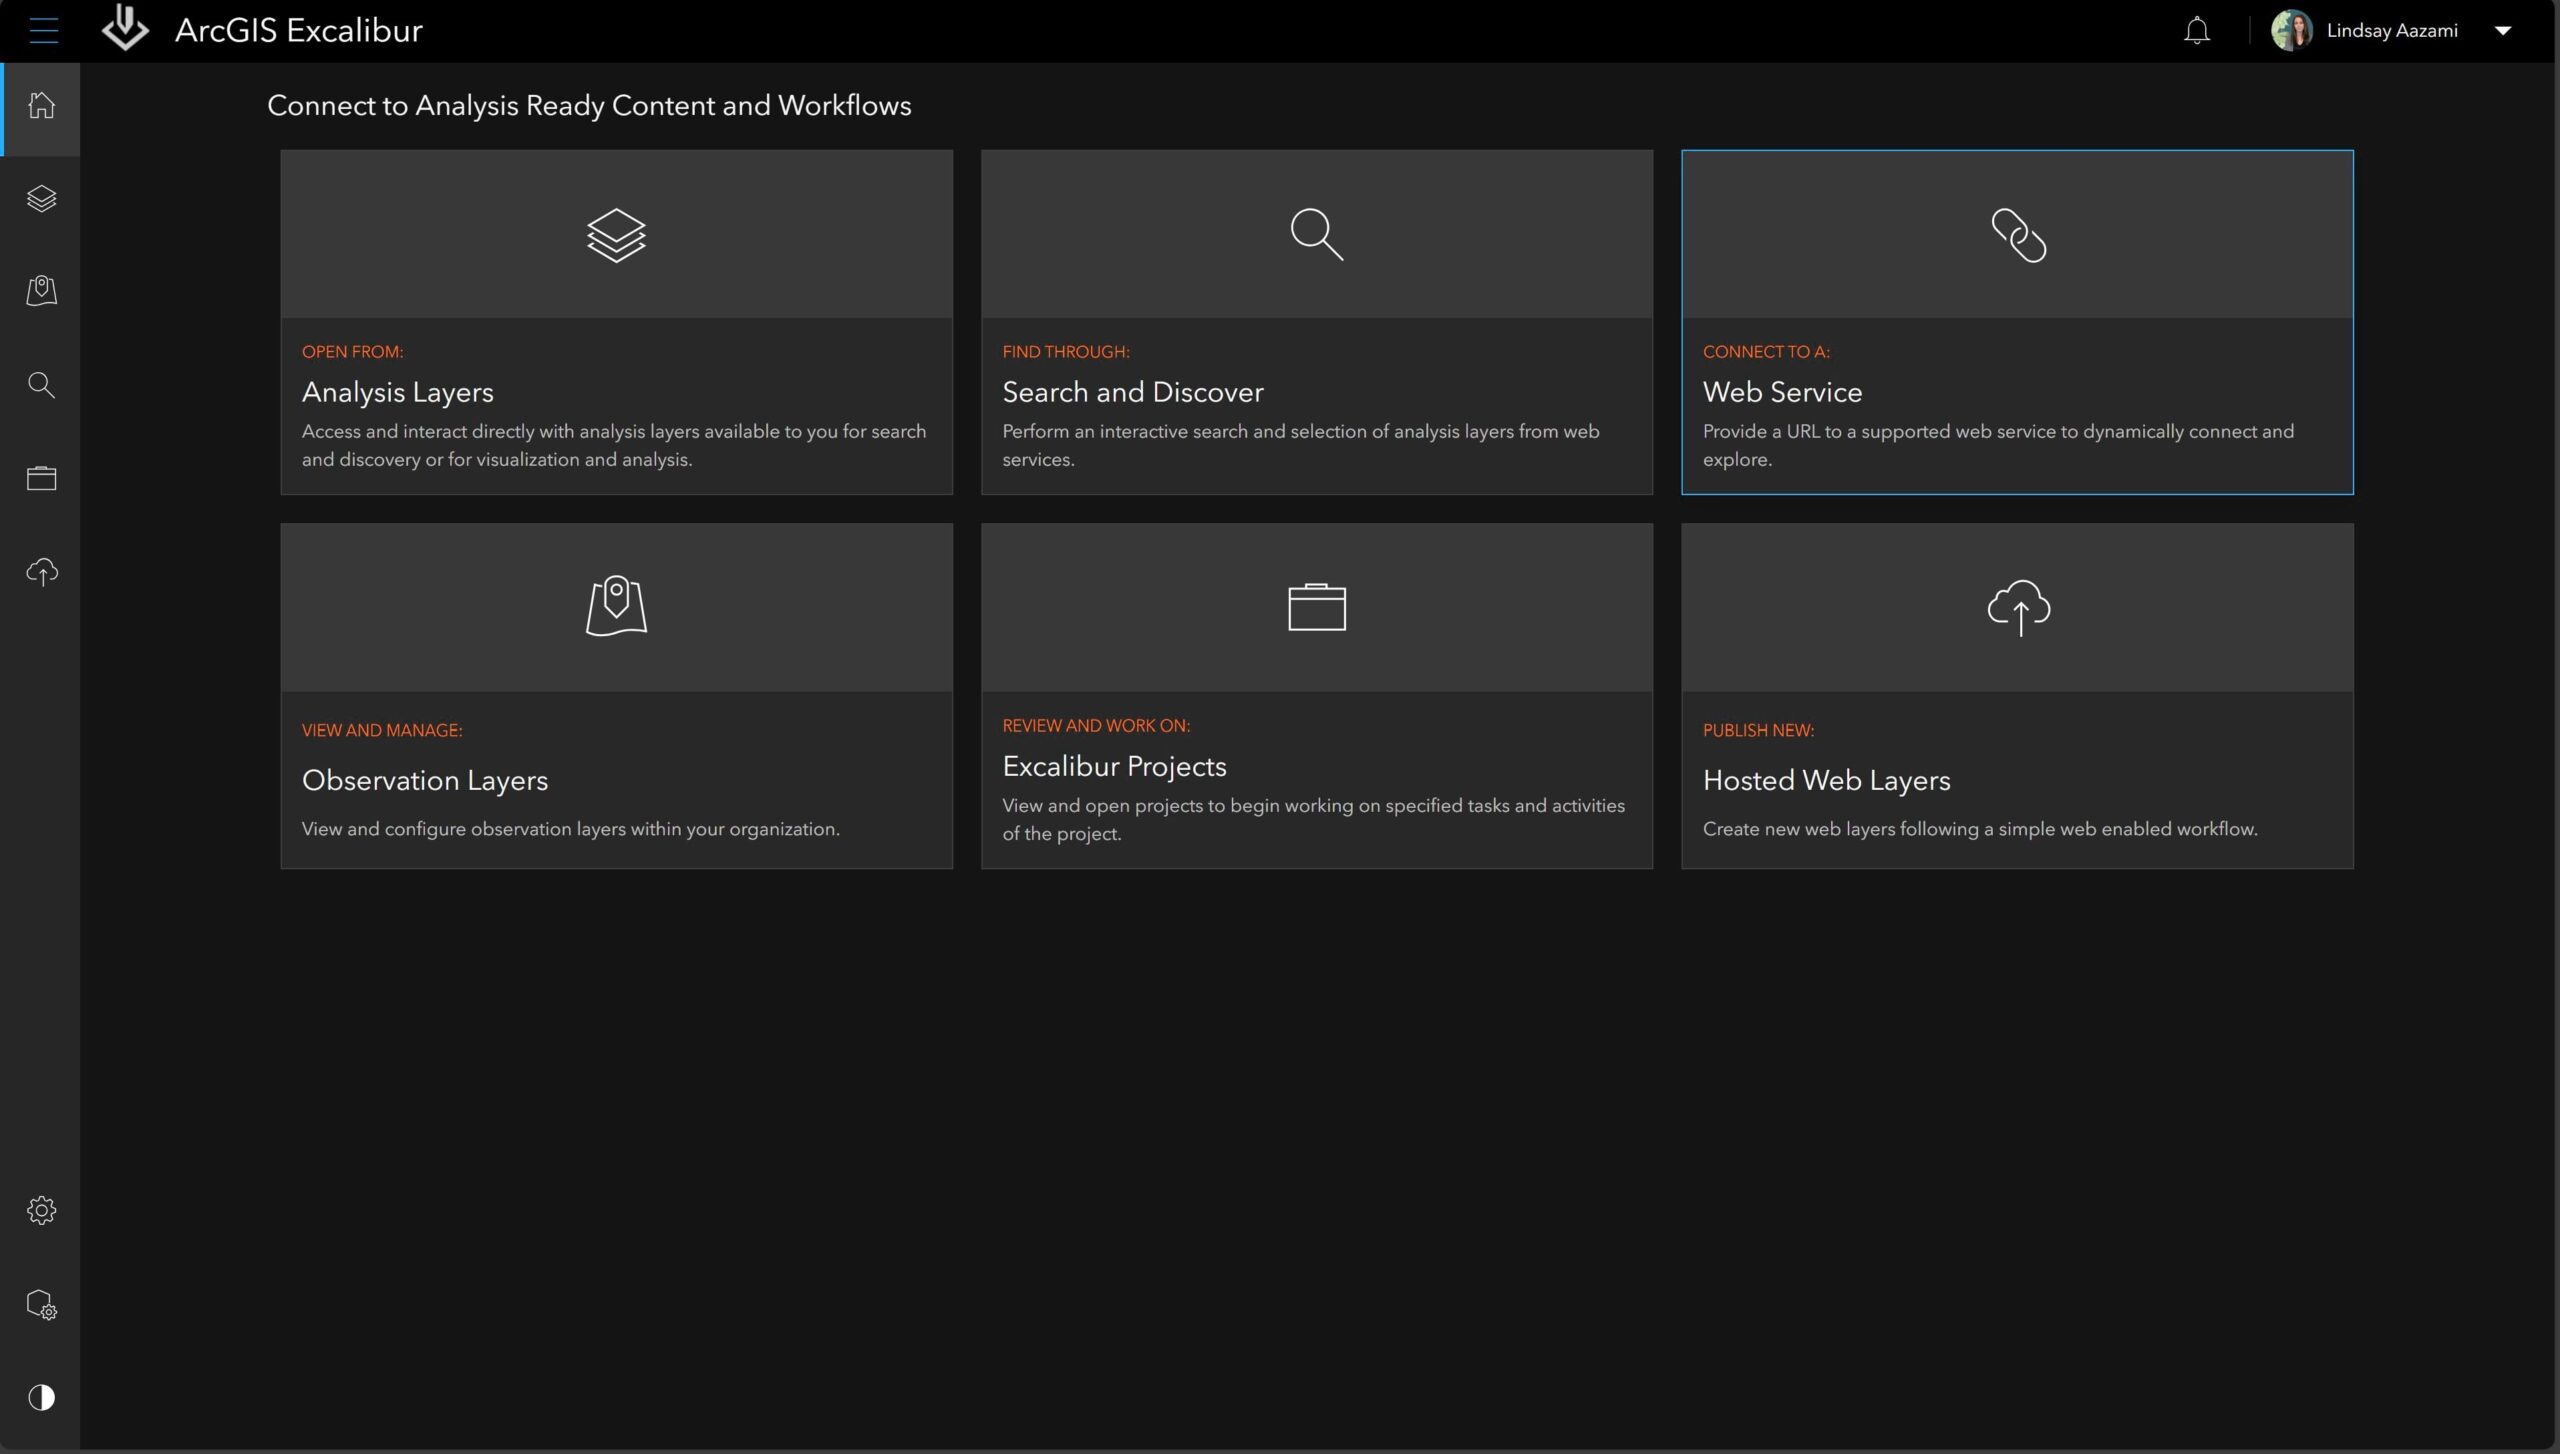
- On the ArcGIS Excalibur home page, click Publish New: Hosted Web Layers.
- Alternatively, from the left navigation menu, click Publish Layer.
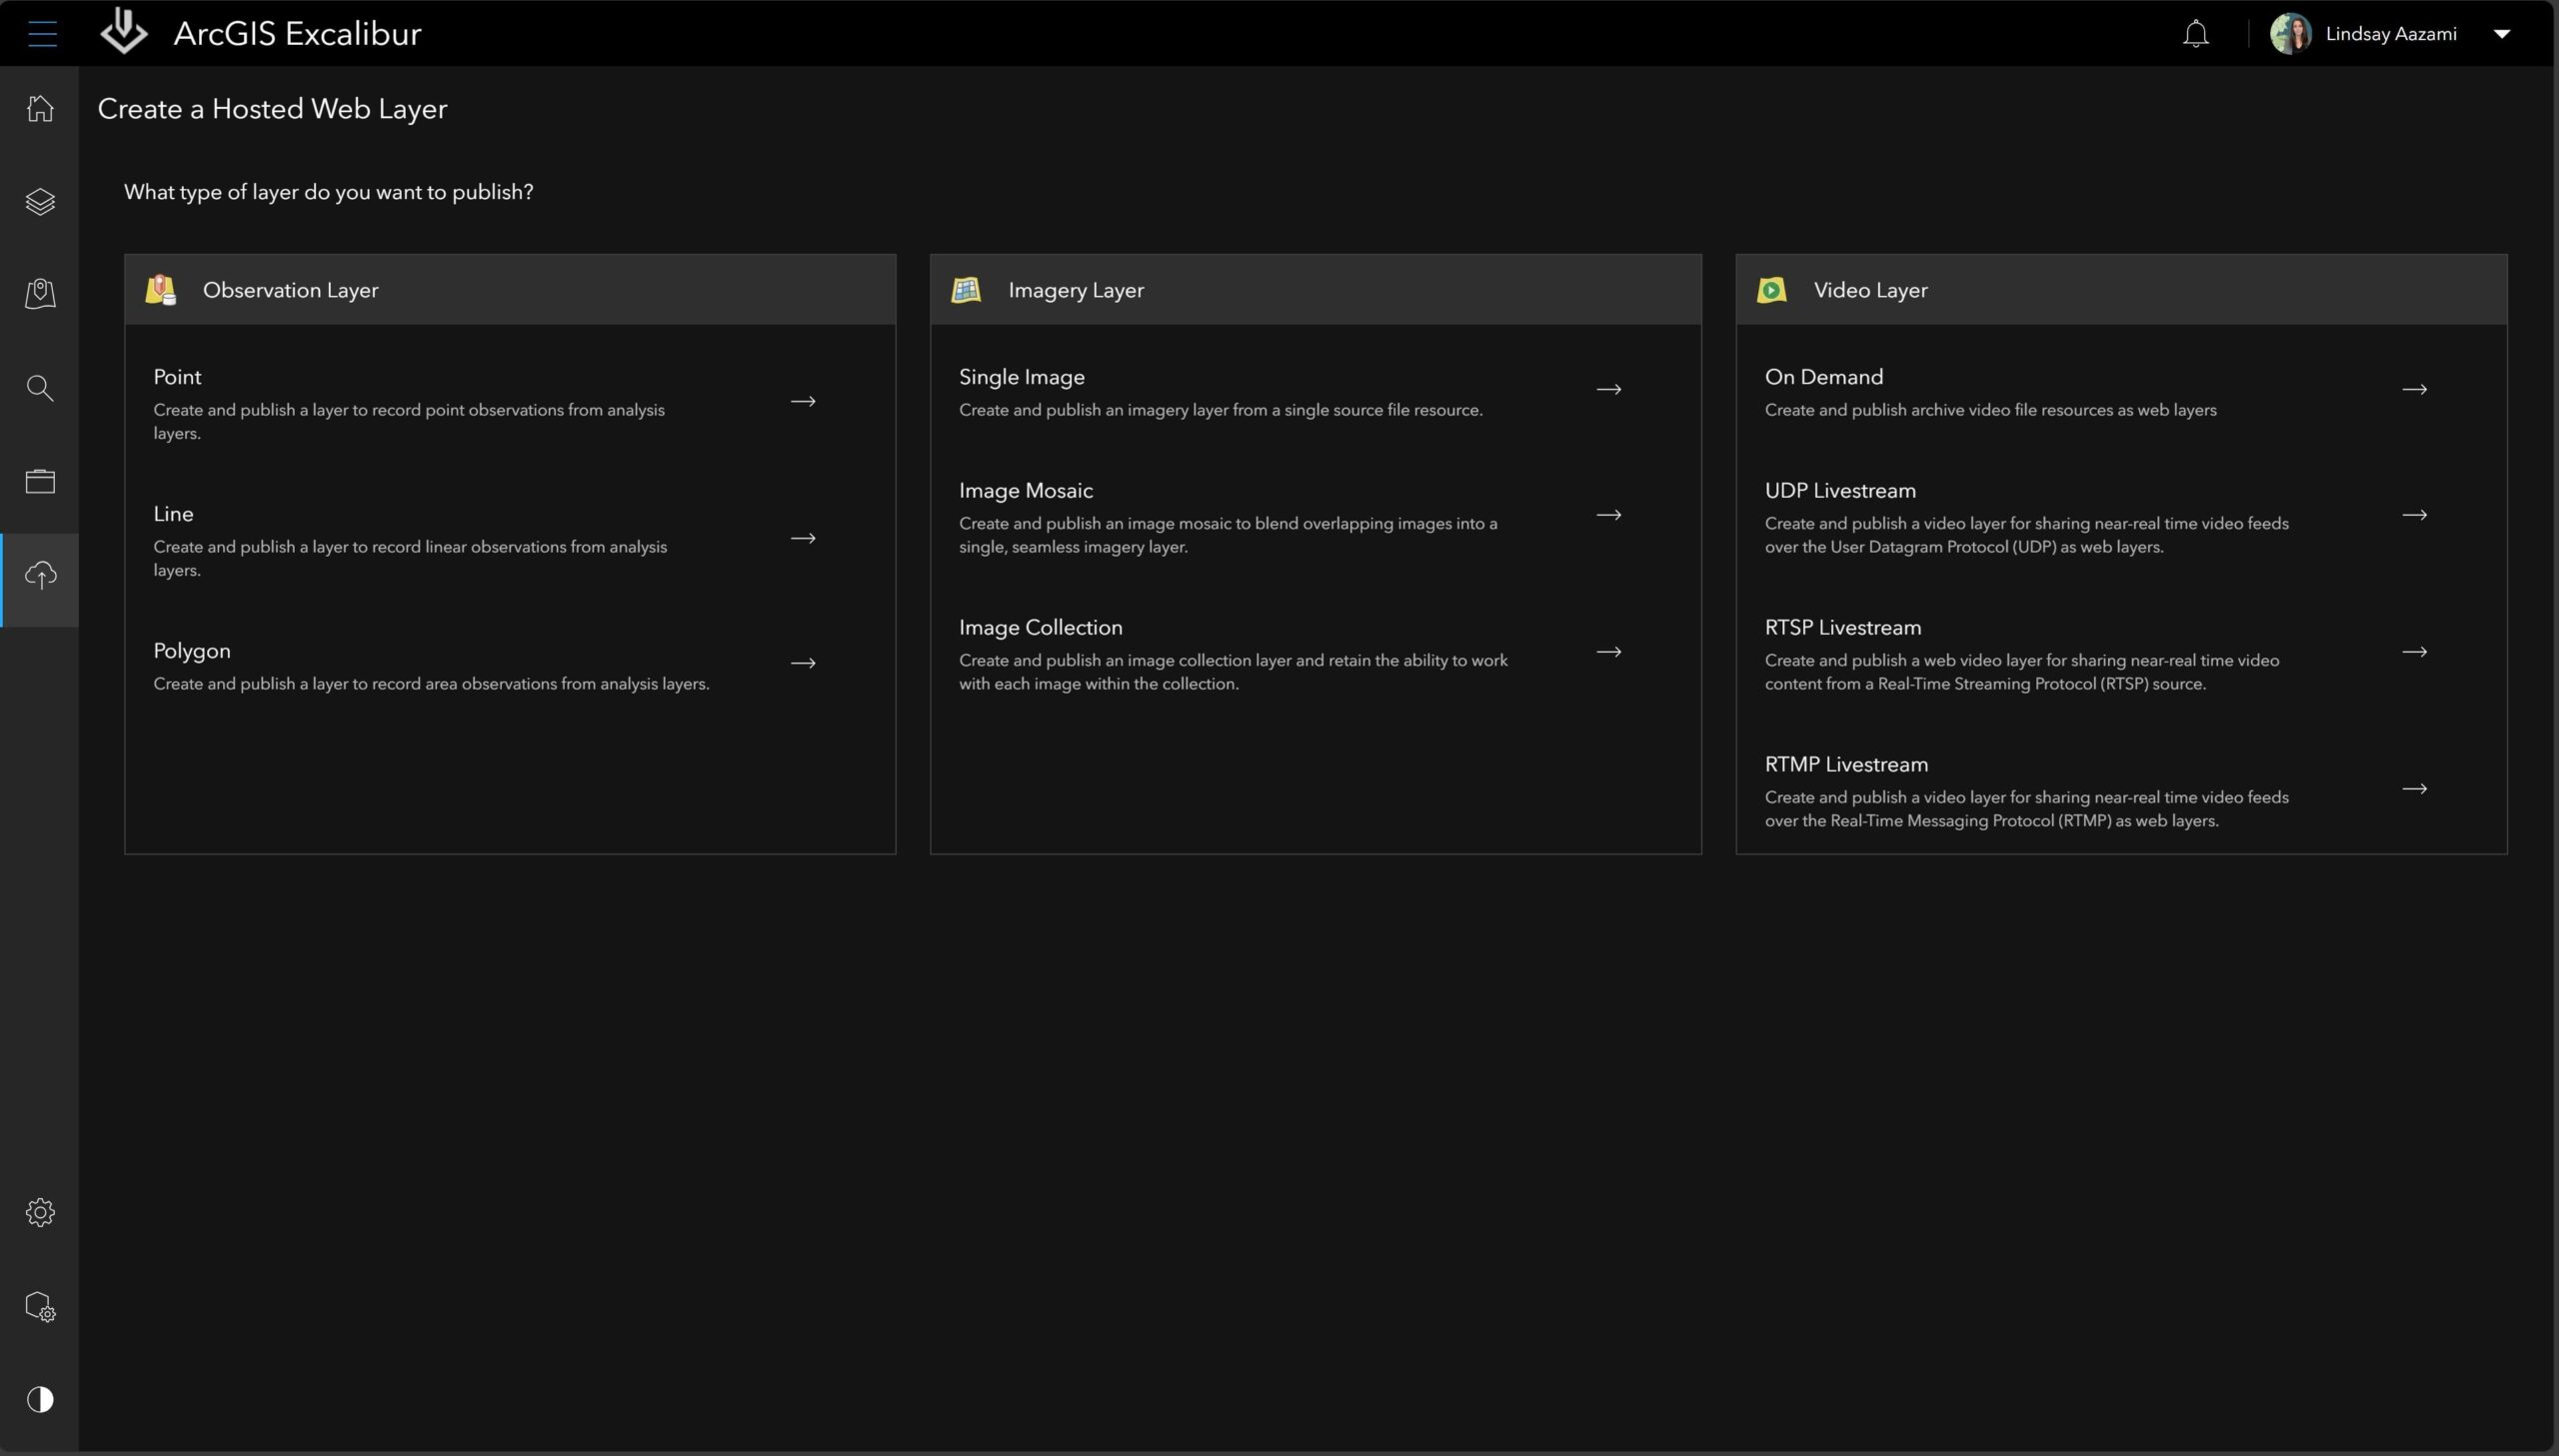
- In the Video Layer section, click On Demand.
- Configure a Layer Name.
- Choose the folder that the new layer will be created in.
- Optionally, provide a Summary that describes the layer.
- Configure Tags that describe the layer.
- Separate the terms with commas (for example, Federal land is considered one tag; Federal, land is considered two tags).
- Specify whether to share the layer across the organization or to specific groups.
- Click Next.
- Choose the Data Source and provide the data files and associated metadata files needed to publish your new layer. You can browse these files or drag-and-drop into the drop zone. Two publishing strategies are supported:
- Video Layer from a Single Video File—Create a video layer from a single video file containing the required metadata.
- Video Layer from a Video File and Metadata Files—Create a video layer from a collection of files containing video and sensor metadata information. Choose this option if the video file does not contain the required metadata.
- Click Clear All Files to start over.
- Click Next.
- Configure the video service name. The service name can be different than the portal item name for this layer. Service names cannot contain spaces and invalid characters.
- Additionally, configure the video layer by choosing one or more output video resolutions to use.
- When ArcGIS Video Server is installed and configured on an environment with GPU, videos can be published and encoded with multiple resolutions up to the source video resolution, but not above. If GPU is not enabled on the environment, the native resolution of the video is the only option available.
- Click Next.
- View a summary of your choices prior to establishing.
- Click Back to make any changes.
- Click Create Layer.
Search & Discover
Using the search functionality, you can perform an interactive search of locations of interest within video.
You can access Search and Discover from the following in ArcGIS Excalibur:
- On the ArcGIS Excalibur home page, click Find Through: Search and Discover.
- From anywhere in the application, click Search in the side menu.
Once the Search and Discover page is open, connect to an active layer to begin your search experience.
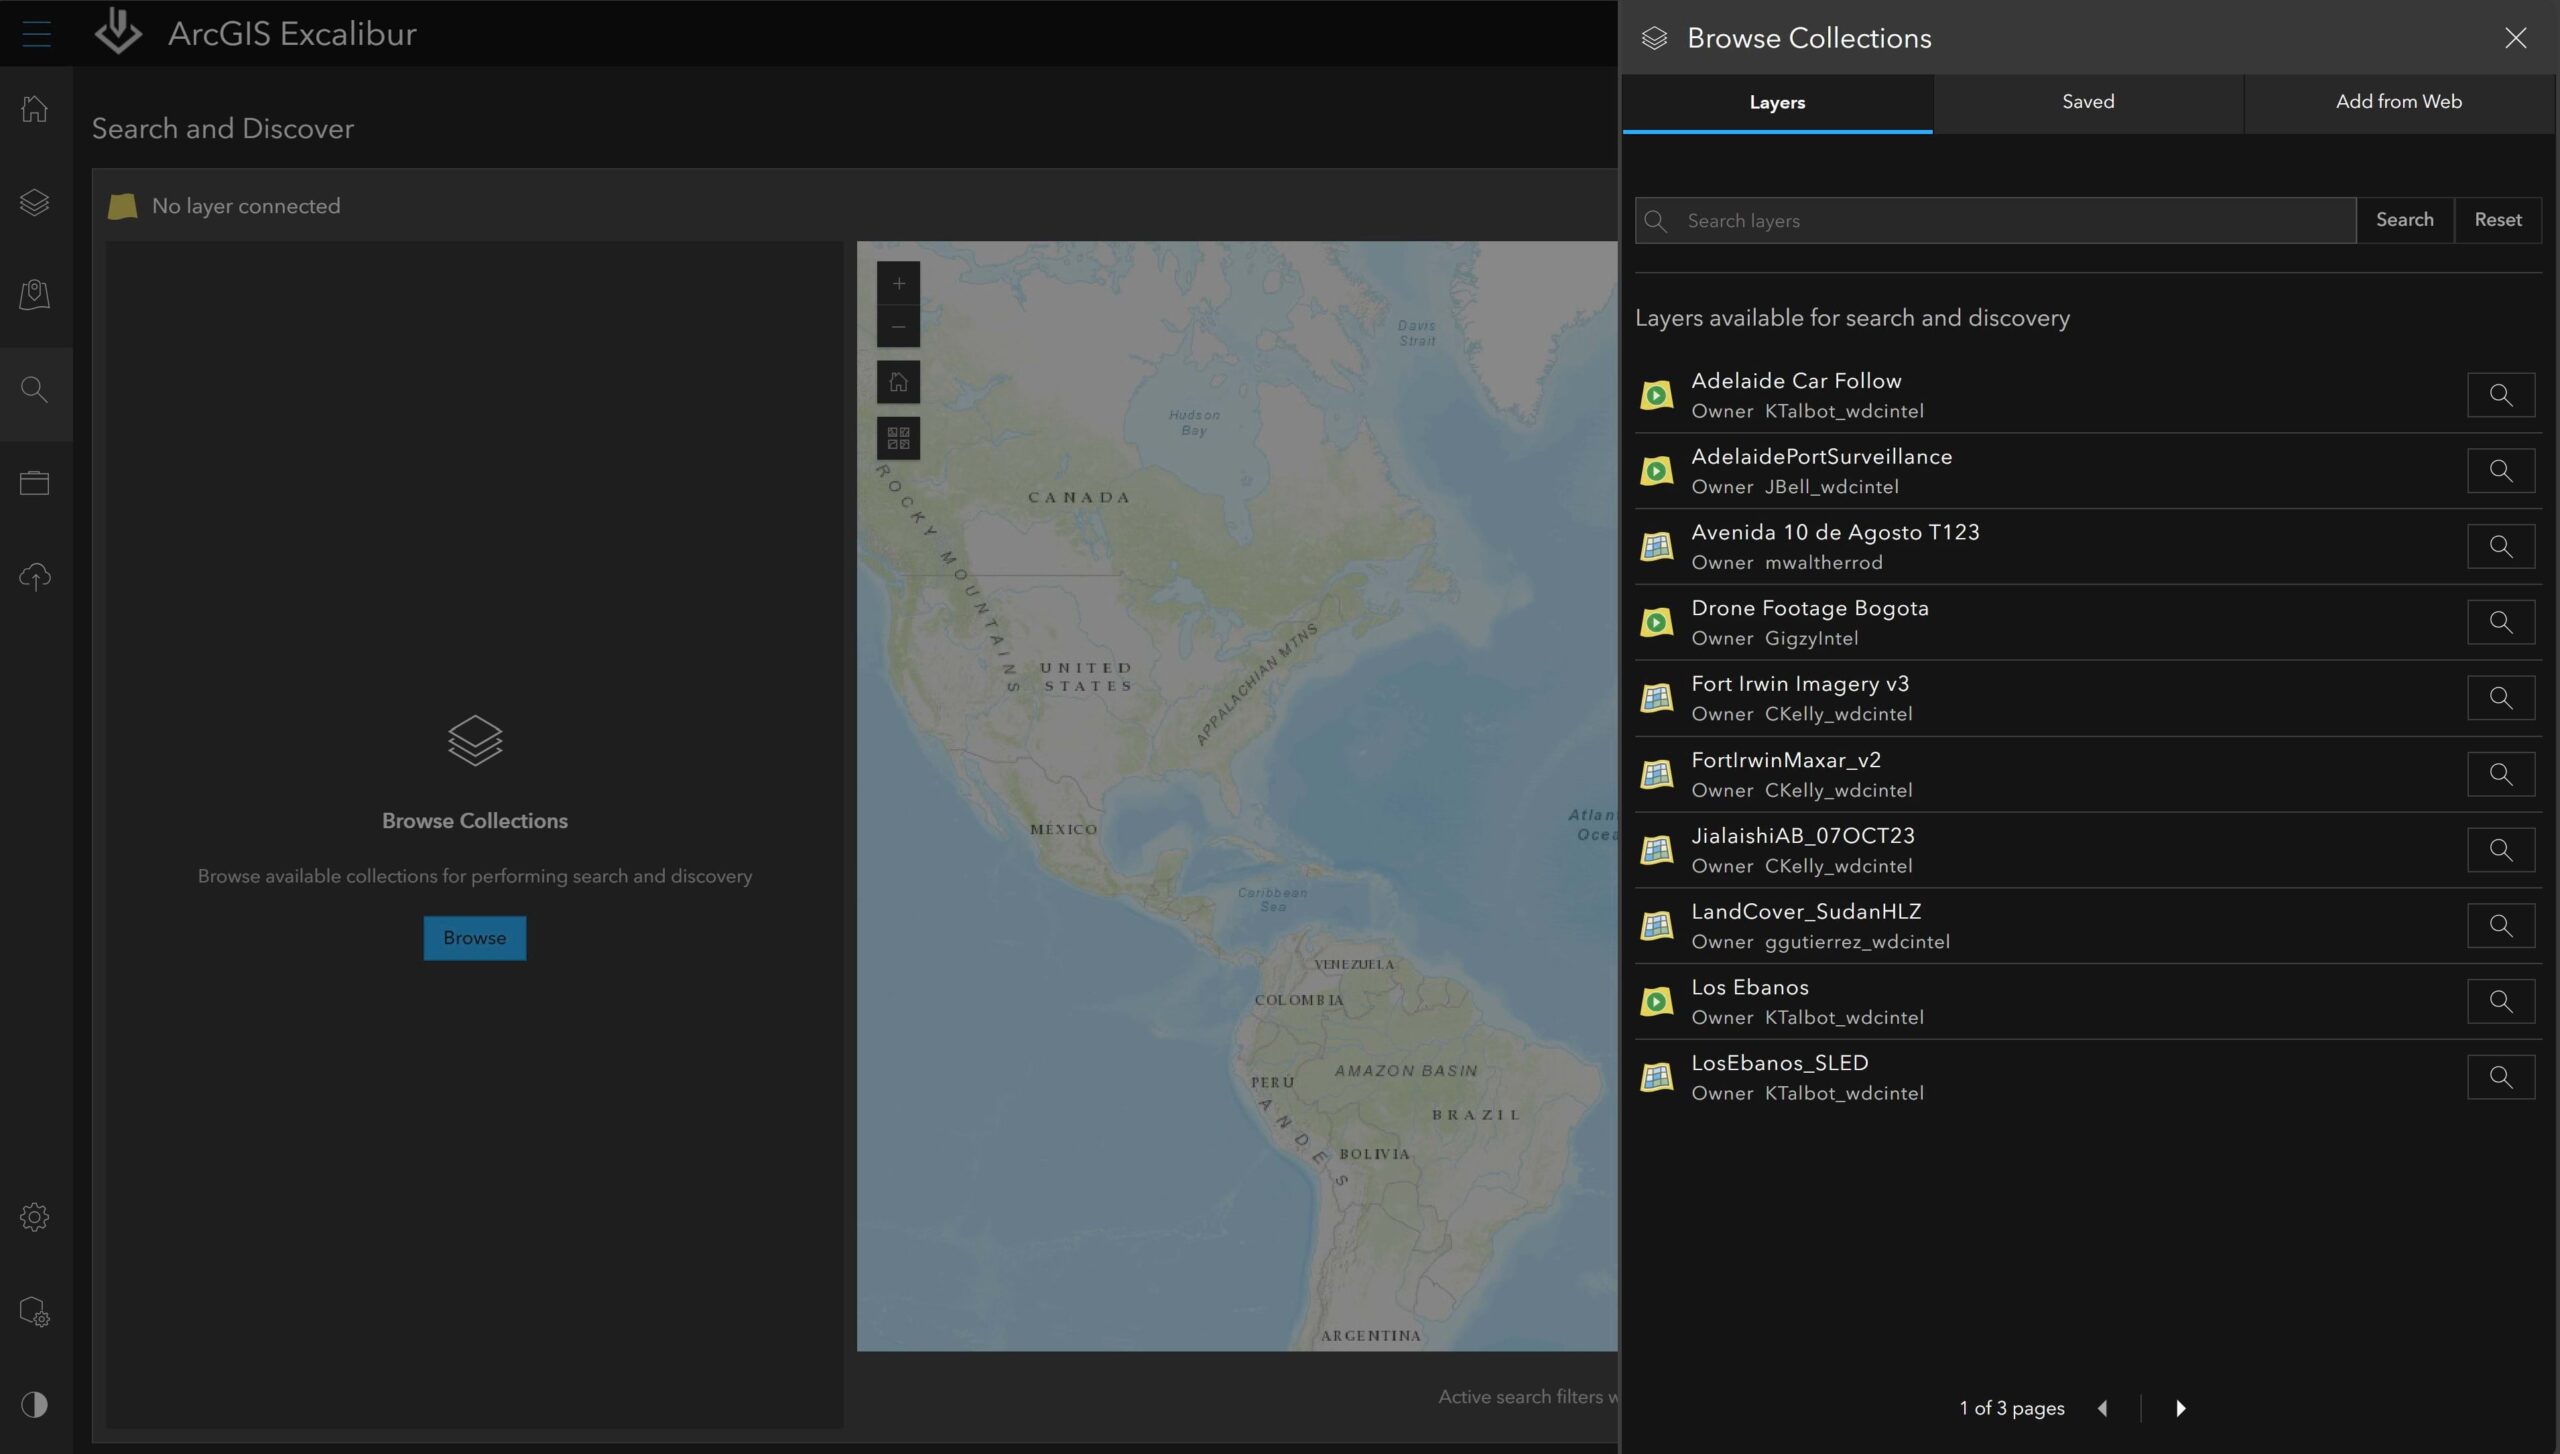
Before performing a search, an active layer must be set. A list of layers is available in the Collections panel located at the top of the search map. You can also use the Browse button to browse available layer collections to perform search and discovery if no layers have been connected yet.
To select an active layer, complete the following steps:
- Click Browse to open the Browse Collections panel.
- On the Layers tab, search for a specific layer using the search bar at the top of the layer list.
- Click Search to filter the list based on the name of the layer you entered.
- Connect to a layer from the Layers tab or the Add from Web tab by clicking the search button.
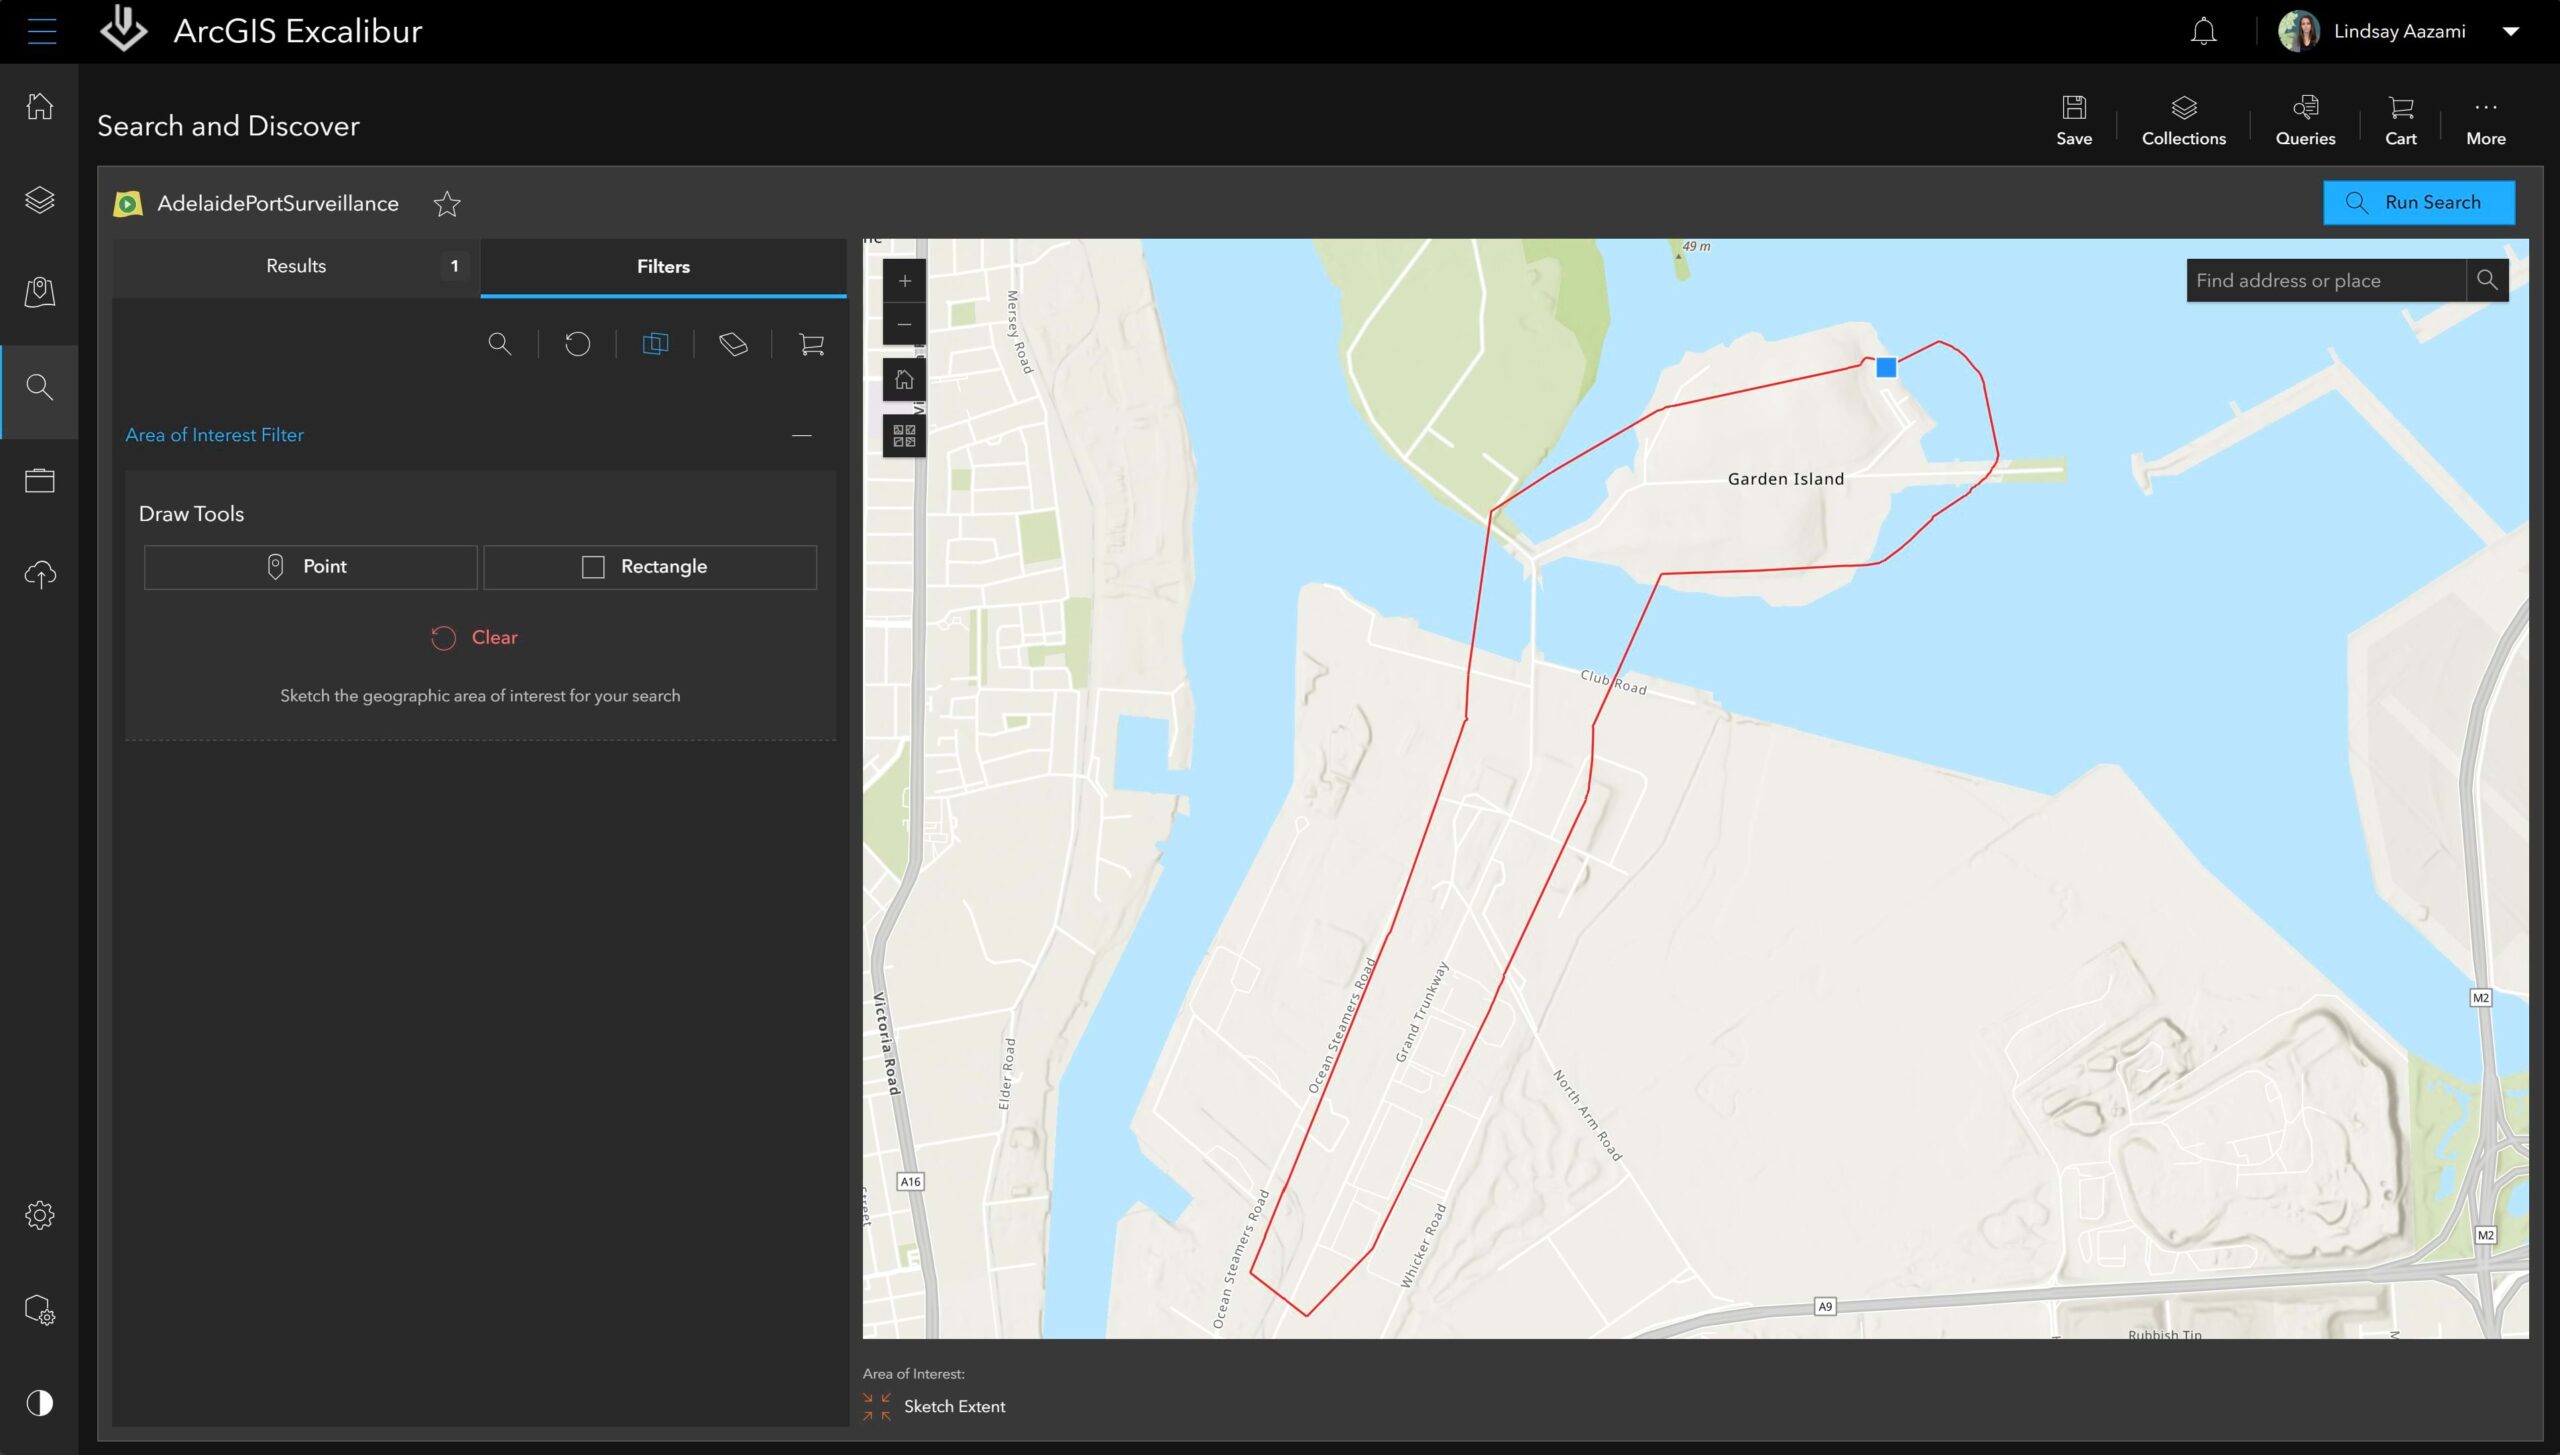
You can use the geometry tools on the Filters tab to discover video within a specific area of interest.
To apply an area of interest filter, complete the following steps:
- On the Filters tab, expand Area of Interest Filter.
- Click a geometry to search for imagery or video where the footprints intersect with the defined area of interest:
- Point—Click the map to drop a point.
- Rectangle—Click and drag the map to draw a rectangle.
- Once a geometry has been drawn on the map, click Run Search to perform a search based on the defined geometry.
When using an area of interest filter against a video layer, a list of markers is returned that identifies the number of times the specified location intersects with the video coverage and the duration of each marker. These markers will appear on the video player timeline when connecting to the Canvas view with the video layer.
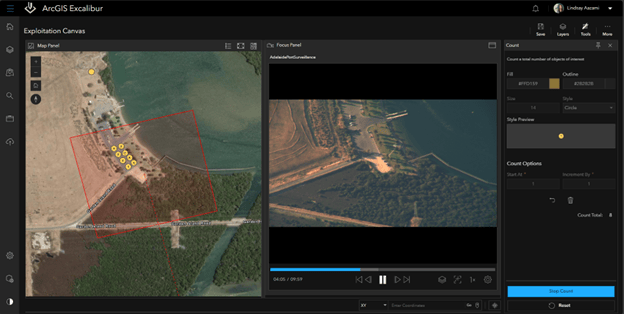
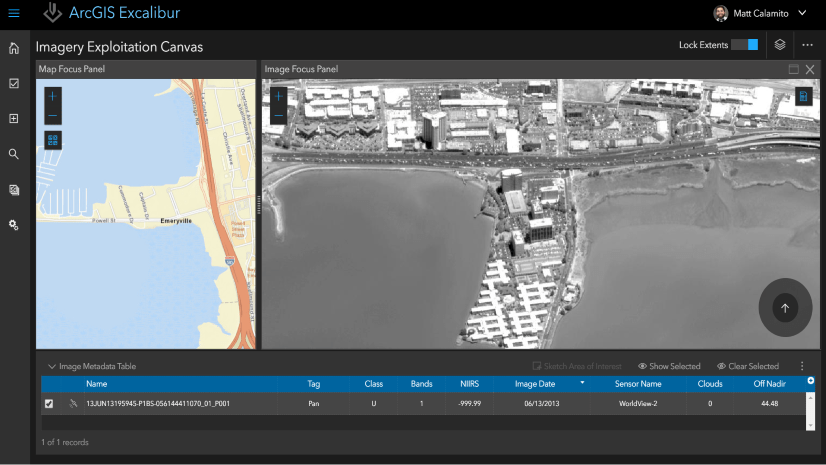
Analyze
You can use ArcGIS Excalibur to view and analyze video layers in the canvas. By default, the video is displayed in split view, which allows you to play a video while having geospatial context of what is being viewed. If the video being analyzed includes metadata such as heading, elevation, and azimuth among other characteristics then a footprint of the video and the look angle of the camera can be visualized on the reference map.
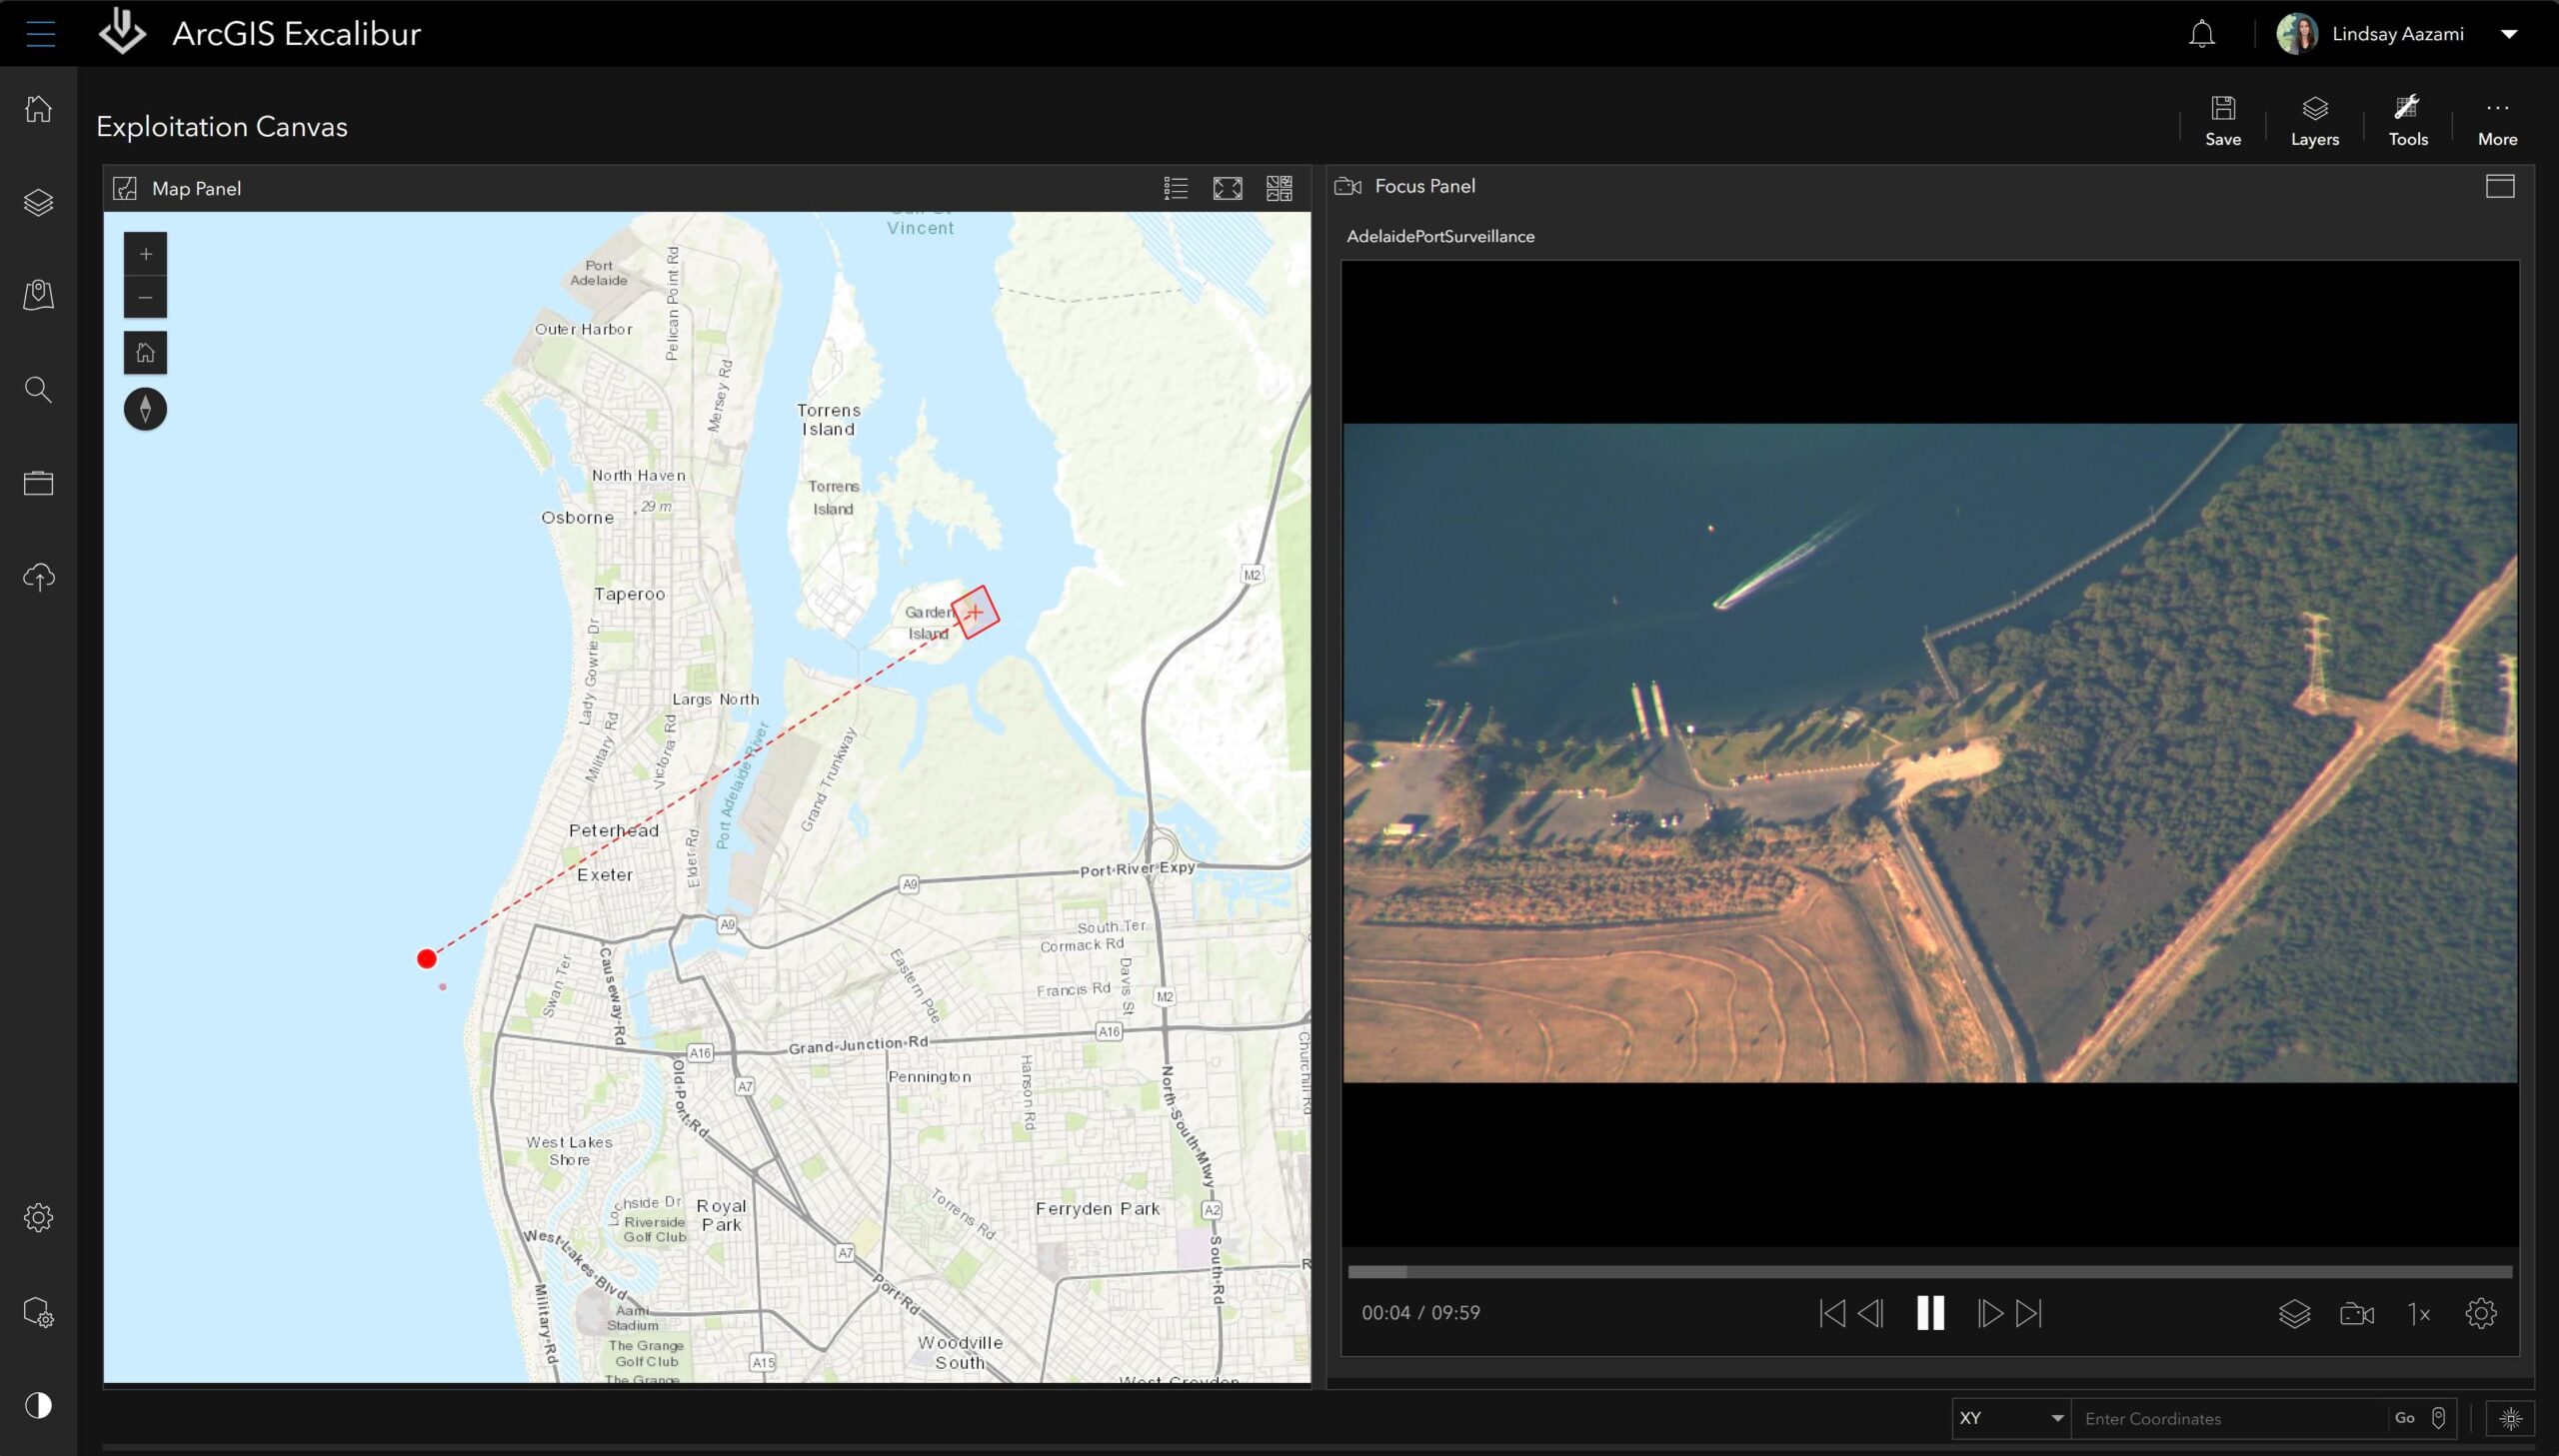
The Tools Panel allows you to view and use tools that work directly with the video in the canvas on the map panel.
Analysis tools — Highlight areas of interest through markup, labeling, and measurements.
- Mark Up – create simple graphics using text and shape elements to call attention to areas of interest.
- Count – count objects manually by marking each object with a number graphic. The Count tool places a point graphic where you click on the reference map and keeps a total count associated with each point graphic as it is added.
- Measure – measure horizontal and vertical distances, areas, and feature locations on the reference map.
Project tools — View instructions on what needs to be accomplished in an Excalibur project and use specific tools to help streamline your tasks.
- Instructions – defined when the project is created and can be viewed at any time while a project is open, including attachments or other supporting materials.
- Collect Observations – choose from a palette of defined icons to collect and record features.
- Edit Observations – select and edit individual or multiple observations at once, copy observations, or delete observations.
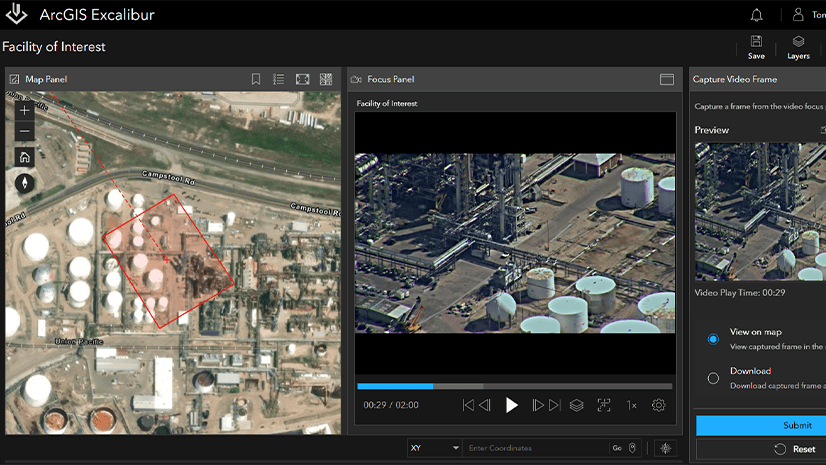
Export & Share
After working with your video, you can export an area of interest either as a report, a screenshot, or a clipped video for use in briefings and presentations.
The Capture Video Frame tool allows you to take a snapshot of the current frame being played in your video in the Focus Panel and either view that snapshot orthorectified in the Map Panel or can be downloaded it as a .jpeg file.
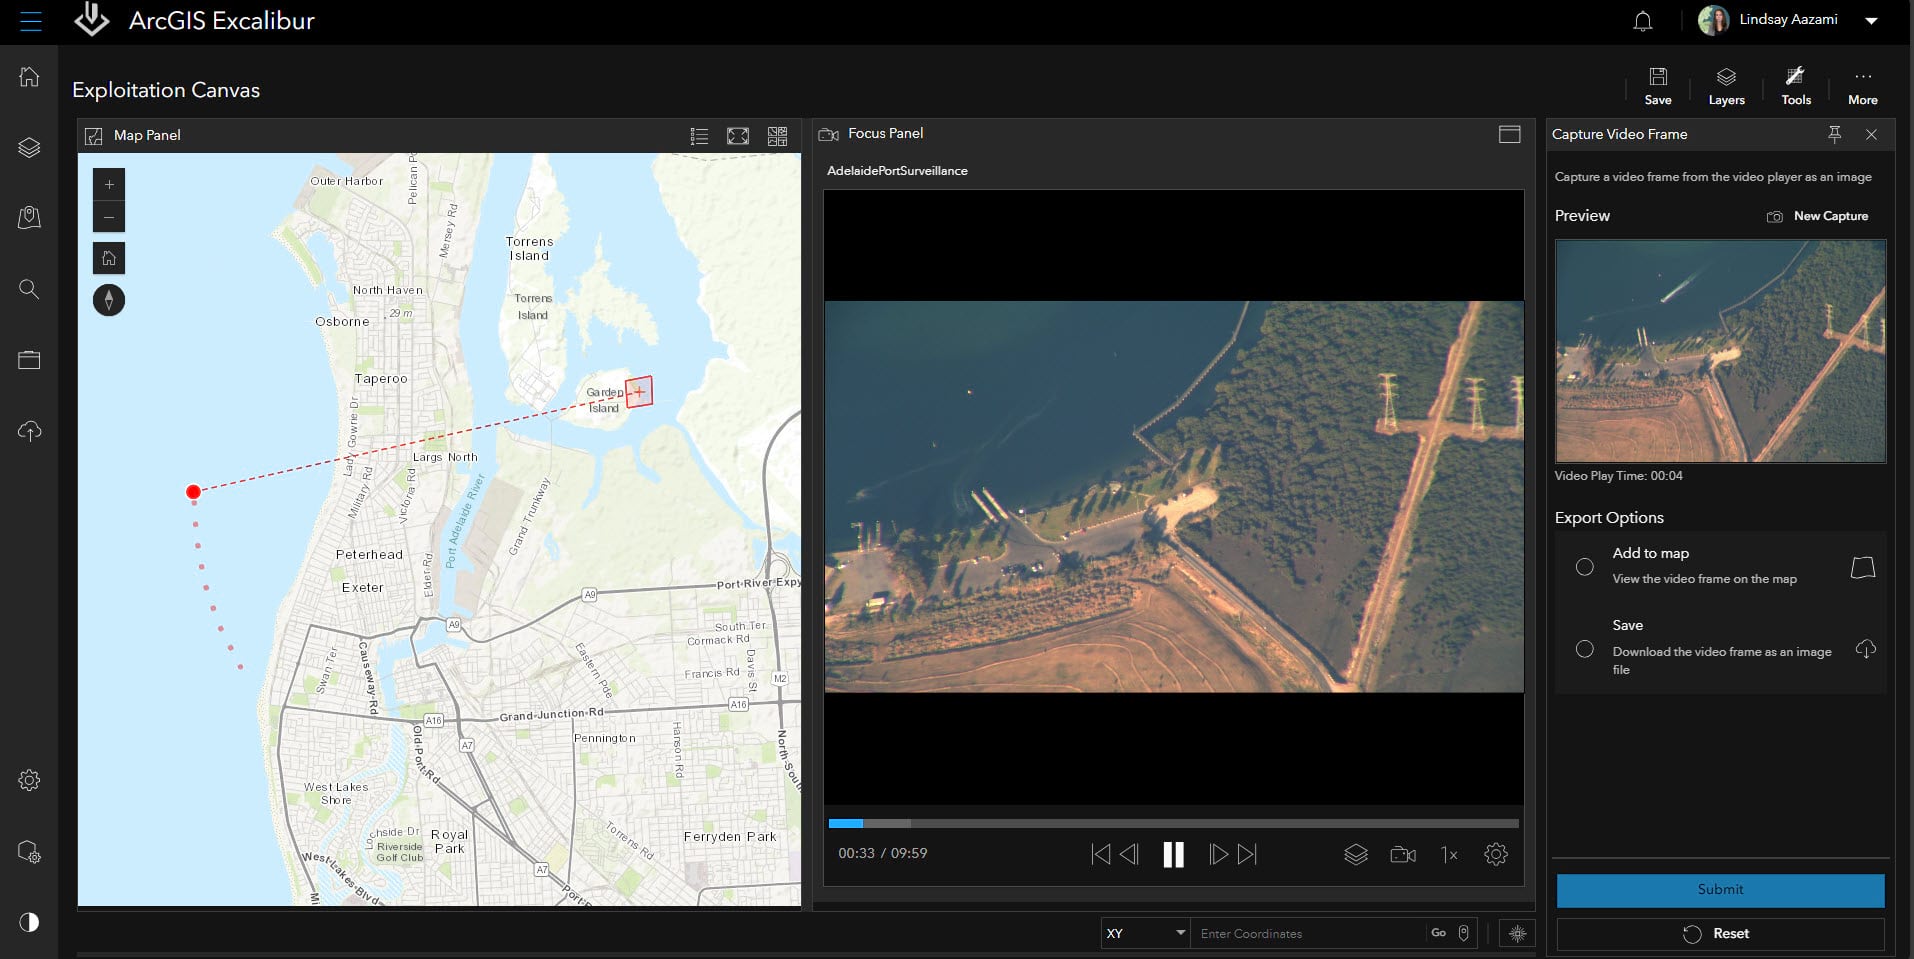
To view the captured video frame in the Map Panel, complete the following steps:
- Click the Tools menu in the canvas view.
- In the Export Tools list, click Capture Video Frame.
- Click Capture to capture the current video frame that is being displayed.
- To Download, ensure the Download option is selected and provide a unique file name
- Ensure the View on map option is selected.
- Click Submit.
By applying a captured video frame to the Map Panel, you can also use the analysis tools listed above to mark up, count or measure objects in the frame.
The Create Report tool generates a report to disseminate key information about a specific area through a Microsoft PowerPoint presentation. The tool allows you to define an area of interest and add any comments from an analysis, and then share with key stakeholders.
To create a report, complete the following steps:
- Click the Tools menu in the canvas.
- In the Export Tools list, click Create Report.
- Click Draw area to draw your area of interest in the Map Panel.
- Fill in the following information:
- Report Title
- Analyst Comments
- Report Filename (required)
- Click Create Report.
- The presentation file is available in your browser’s default download location, and the Upload Report option appears.
The Screenshot tool allows you to take a screenshot of an area of interest and view it in a new tab or save it to a location of your choosing. You can create a report from the Map Panel.
You can export an image by choosing one of the following:
- View—Open your defined area of interest as a .png file in a new browser tab.
- Download—Download your defined area of interest as a .png file to your computer.
- Click the Tools menu in the canvas view.
- In the Export Tools list, click Screenshot.
- Click Draw Area to draw your area of interest and to see a preview of your area.
- Select View or Download
- Click Submit.
Getting Started
ArcGIS Excalibur modernizes and enhances video-based workflows through intuitive experiences. These experiences allow you to publish, search for, discover, analyze video, and export video data in fully integrated workflows for video analytics.
ArcGIS Excalibur unifies traditionally separate geospatial and video-based views into a single view. This new experience allows you to work with video in the focus view for maximum analytic value while allowing full integration with authoritative geospatial reference layers available across ArcGIS.
To get started, visit the ArcGIS Excalibur and ArcGIS Video Server webpages and contact sales

Article Discussion: