Two new configurable apps for imagery, Imagery Viewer (beta) and Image Mask (beta), let you create your own custom imagery apps to explore, analyze, and share your imagery, no programming required.
To create a custom app, simply organize your imagery using a web map on ArcGIS Online, then create an app using your web map and the relevant configurable template. With Imagery Viewer, focus on making collections of imagery accessible so users can better visualize and interpret imagery layers through time and space. Configure it to view a single imagery layer, or to view two imagery layers using a swipe tool. With Image Mask, focus on calculating and masking change between two images. Both configurable apps also include tools for visualizing imagery layers (and non-imagery layers) from a web map, searching for imagery through time, navigation using bookmarks, editing feature layers, measurement, and more.
About Imagery Viewer (beta)
The Imagery Viewer configurable app lets users visualize and explore imagery through time and space. With Imagery Viewer, a wide variety of applications are possible:
- A farm manager might use Esri’s Landsat or NAIP image services to view and digitize field boundaries, then use that as input for Collector for ArcGIS or Operations Dashboard for ArcGIS.
- An oil company asset manager might review the latest imagery of their oil wells, noting any points of concern to alert workers in the field.
- An emergency response coordinator can use a swipe to visually compare pre- and post-disaster imagery and quickly triage areas that need assistance.
- An imagery provider can stand up a simple app for customers to review their customized image services and record feedback about image quality.
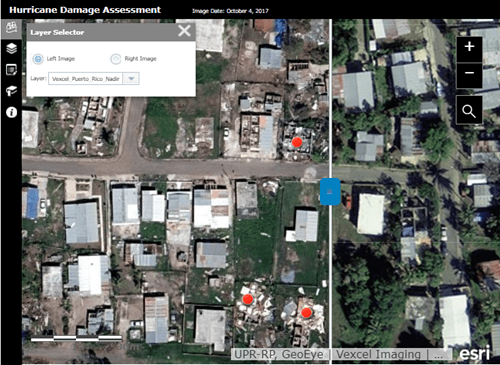
Check out a demo app, Hurricane Damage Assessment, to see how Imagery Viewer could have been used to crowdsource damage assessment in Puerto Rico after Hurricane Maria hit in September 2017. Navigate to regions of interest, compare pre- and post-hurricane imagery, and drop pins to identify damaged buildings (and see where others have already identified damaged structures).

About Image Mask (beta)
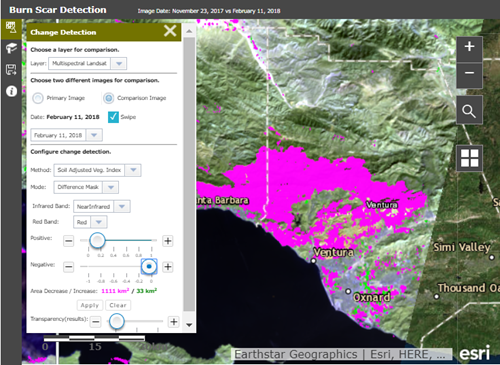
Image Mask focuses on comparing two images to identify and mask areas that have changed. App users can zoom to bookmarked areas of interest (or search for their own), select images to compare, then choose from a variety of change detection methods to produce results. The Change Detection tool will calculate one or more indexes—NDVI or SAVI to look at vegetation, a water index, or a burn index—then use various methods to highlight differences between them. Users can calculate difference images that show degrees of increase in green and decrease in magenta, or generate a mask of change using interactive thresholds.
Consider the following example applications of Image Mask:
- A farm manager might use drone imagery to compare NDVI, a measure of vegetation health, on two different dates in the growing season to estimate crop yield.
- An oil company asset manager might compare NDVI values before and after oil well development to evaluate the environmental impact on the area, using thresholds to focus on significant change.
- An emergency response coordinator could use changes in the water index to generate a mask of flooded areas to better deploy resources.
- A forestry company could use Landsat-derived NDVI to quantify the area affected by a fire or pine beetle infestation.
To see how Image Mask works, check out a demo app called Burn Scar Detection. Use bookmarks to zoom to fire locations, then based on the date of the fire (listed in the bookmark label), find imagery from right before and right after. By calculating the change between the two images, you can generate a mask that visualizes and quantifies the area affected.

Get Started
Ready to try making a configurable app yourself? Use the following steps to create your own custom imagery app:
- Create a web map on ArcGIS Online using free Living Atlas imagery or your own image services.
- Create an app using the Imagery Viewer or Image Mask app templates. Since these configurable apps are still in beta, they won’t be available with the rest of the app templates. To find them, make sure you’re logged in to ArcGIS Online; search for id:afc522b9915b420a8a9a78c77025f13e to find Imagery Viewer, or id:5686f283997745c0b271d1249a117d6c to find Image Mask; and make sure you uncheck “Only search in <My Org Name>”.
- Click on the configurable app’s title to go to the ArcGIS Online item, then click “Create a Web App,” enter a title and tags, and select your web map.
- Configure your app with the included suite of tools—you choose which tools belong in your app, and how you want them set up.
- Save and launch your app!
If you want to dive in faster, you can also start with the pre-configured web map we used to create the Burn Scar Detection app. Just navigate to the web map, save a copy to your own ArcGIS Online account, then follow the steps above to create a custom app.
If you’re interested in hosting your own configurable app or customizing the template, you can also download the code from the Imagery Viewer and Image Mask repos on GitHub.
Watch for an upcoming blog for a more detailed, step-by-step tutorial to walk you through the app-making process. In the meantime, don’t forget to check out the Imagery and Remote Sensing community on GeoNet to ask questions, make suggestions for improving future versions of the templates, and to show off your apps.

Commenting is not enabled for this article.