You may have heard of the term ‘contact tracing’ – and we’re going to hear about it a lot more in the coming weeks and months. But what exactly does contact tracing involve? Contact tracing involves contacting infected individuals to identify who they have been in contact with in the past. As GIS analysts we frequently analyze the positions of data in space and time. You might be wondering, could I apply proximity–based analysis to trace potential contacts event? The answer is yes.
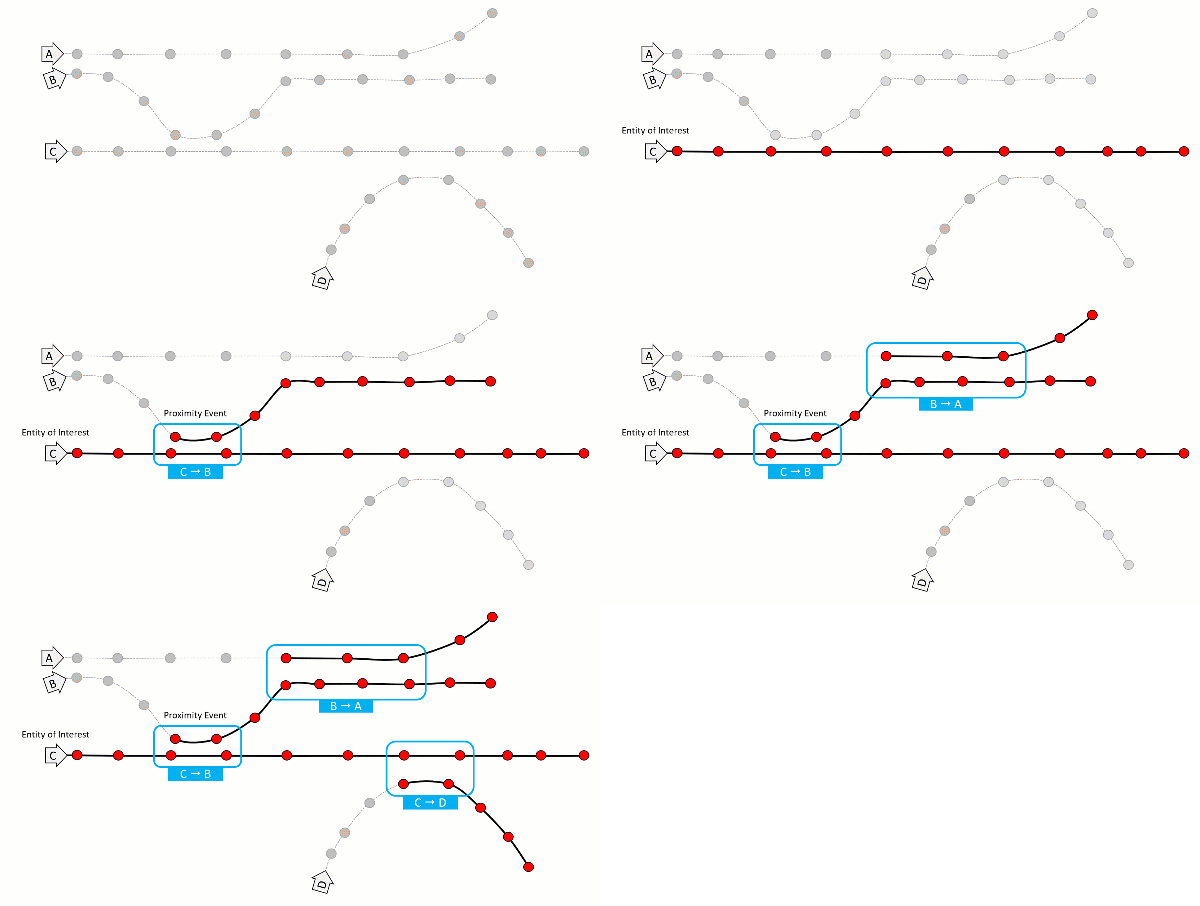
The GeoAnalytics software development team has created a new tool to trace proximity events– a tool we’re calling Proximity Tracing. This tool searches for when and where individual entities (for example, animals, people, vehicles, devices) are within a given proximity to other individuals in space and time – what we’re calling proximity events. Tracing potential proximity events can be applied to contact tracing – to help find potential contact events.
How to get the Proximity Tracing Tool
To get started with Proximity Tracing in ArcGIS Pro, download the toolbox here.
(Note Proximity Tracing requires ArcGIS Pro 2.5 or later).
The sample download includes:
- A toolbox with the Proximity Tracing tool.
- Documentation with tool instructions, along with explanations of tool parameters and outputs.
- A sample dataset and demo workflow. Here you can experiment and learn the tool without requiring your own dataset.
You can also run the Proximity Tracing tool using GeoAnalytics Server with ArcGIS Enterprise. Access the Proximity Tracing sample notebook here.
How to use the Proximity Tracing Tool
The Proximity Tracing tool analyzes point datasets of moving individual entities – each feature must have a location, time, and entity identifier. Here is an example of what that looks like using the sample data:
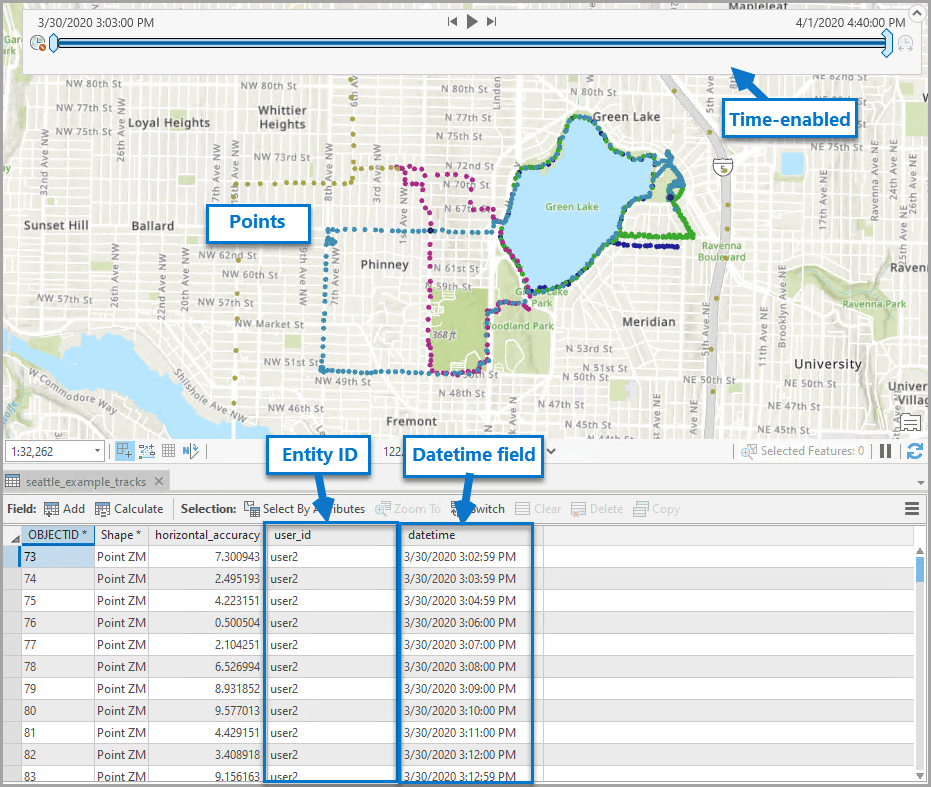
An identifier can be a string or numeric field – it serves to identify the entity you are tracing, for example a device ID or a name. It is important to note here that tracking individual people requires strict compliance with local and federal regulations and privacy laws. Please review this white paper which outlines best practices for tracking privacy.
Tool Parameters
To get started with Proximity Tracing, first add your point layer to the map in ArcGIS Pro and enable time). Now you’re ready to populate the tool parameters using the input layer.
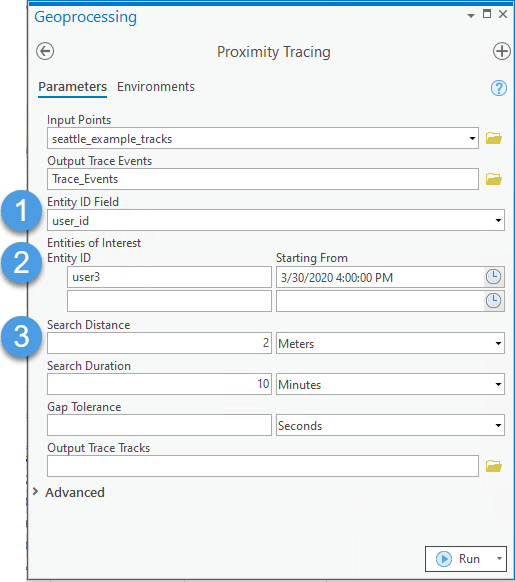
- Specify the Entity ID Field. This specifies the identifier for each entity.
- Specify the entities you’re tracing – this requires the unique ID (from the same field as step 1) and a starting time. The time is when you want to start recording proximity events. Jan 1st, 1970, is set as the default if no time is specified.
- Set the proximity parameters. Here you will set the spatial and temporal threshold that defines a proximity event – this will depend on how close in space and time you want to define ‘contact’, but also on the resolution of your data and the accuracy of your GPS.
Now you are ready to run the tool – just click Run.
The result shows a feature class representing the first proximity event for each defined entity. No feature is returned if your entity wasn’t downstream from an entity of interest. The attribute table will list the entities that were downstream of the entities of interest, given the parameters specified in the tool.
In addition to the above settings, you can also return an output of the trace tracks which shows all the features that were downstream of an event. This is very helpful for visualizing the locations over time. You can run the tool Reconstruct Tracks to make linear paths between the locations to help with visualization.
Lastly, there are two optional parameters that you can use to tune your proximity events:
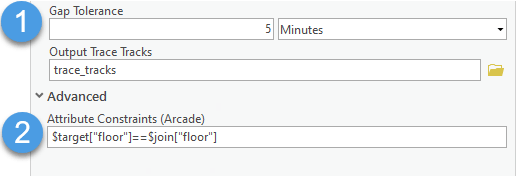
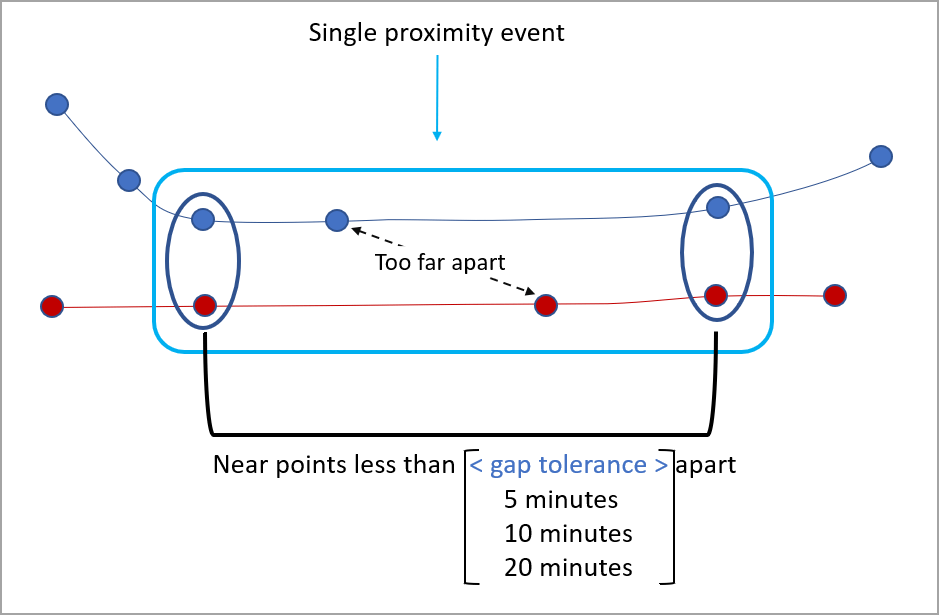
- Set a gap tolerance. This is for situations where you want to consider all events between two proximity events as a single sustained event, even if features between the proximity events were technically outside the proximity parameters. This may help correct for situations where GPS recordings are not synced in time despite originating from tracks that remained nearby (see Figure below). Gap tolerances will only modify the duration of event and won’t change if an event occurred.
- Set an attribute expression. An attribute expression lets you set additional requirements for a proximity event. For example, in a building with multiples levels, you may only want to Proximity Trace individuals that occupied the same level. Here a proximity event will have to satisfy the proximity parameters already defined while also having the same value for the level attribute. In this case we would add the additional expression $target[“level”] == $join[“level ”] to define this requirement.
You can learn more about how Location Intelligence Enhances COVID-19 Collaboration and read a white paper on Geographic Information Systems for Coronavirus Planning and Response. See the COVID-19 GIS Hub for location intelligence resources. The Coronavirus Response solutions page provides a collection of maps and apps that can be used by public health agencies to understand the virus’s impact and share information about the pandemic with your community.

Commenting is not enabled for this article.