Many organizations use a tiered model to deploy content in ArcGIS Enterprise. This means that before information is available in a production environment, it is first created in development and tested in staging. This tiered method helps provide a layer of quality assurance and approval before the content is available to a wider audience in production.
Some organizations use a single ArcGIS Enterprise environment and use separate groups for development, staging, and production. The groups typically have different sharing settings and members, based on who needs access and the tier the group represents.
Yet, some organizations use multiple ArcGIS Enterprise environments to separate these different tiers. For organizations who have separate environments, it can be challenging to move and manage content across environments. This is the scenario we will focus on in this blog, covering new operations that make it easier to move layers, maps, and apps as they move across environments. We will specifically focus on the export group content and import group content operations available in the ArcGIS REST API at ArcGIS Enterprise 10.8.1.
Scenario
Take an example scenario where you have developed a Web AppBuilder application which contains a web map and feature layers. You’ve added the app and all related items into a group in your development environment and are ready to test it in staging. To do so using these new operations, you would follow these steps:
- Step 1: Export the group contents to a package [development]
- Step 2: Add the package as an item [staging]
- Step 3: Import the contents of the package into a group [staging]
In diagram form, the workflow looks like this:
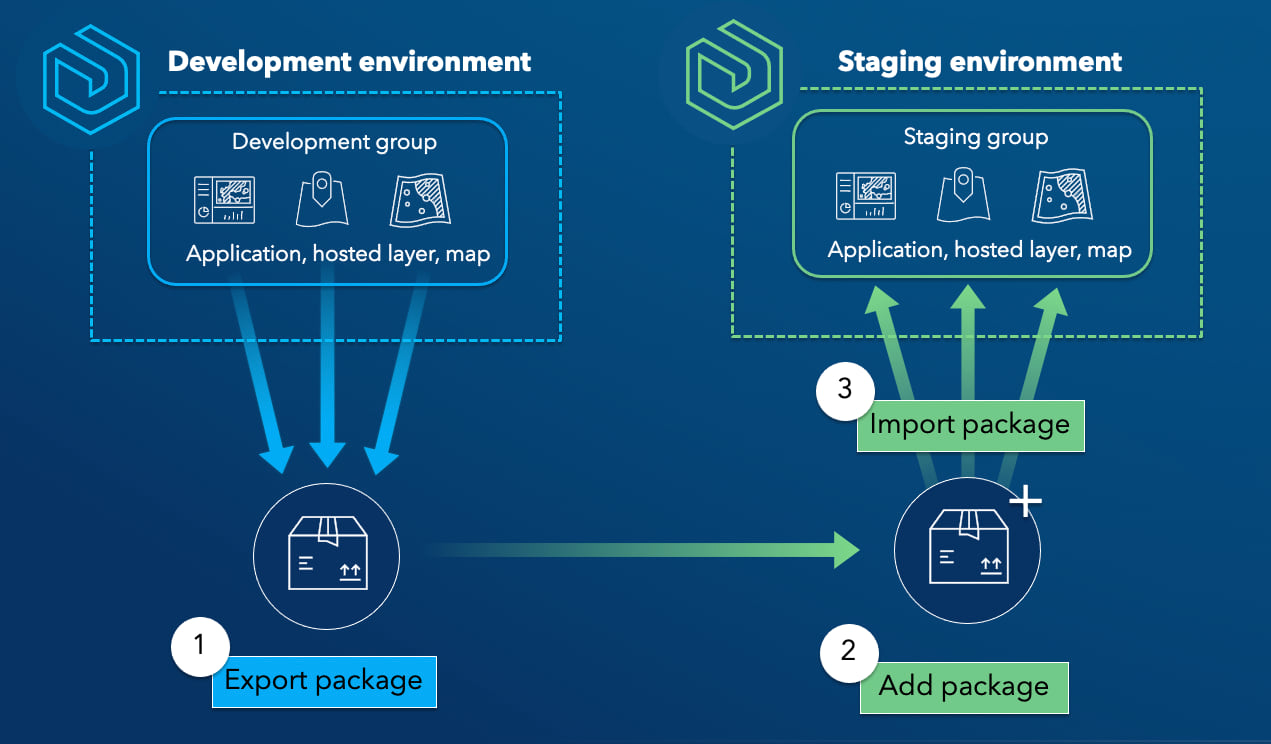
We will use this scenario in the workflow section of this blog. But first, let’s look at the prerequisites needed to achieve this.
Prerequisites
The prerequisites are relatively simple, ensuring you have the right setup and version of ArcGIS Enterprise. You’ll need:
- An ArcGIS Enterprise base deployment in each environment.
- A minimum of ArcGIS Enterprise 10.8.1 running in each environment.
- Administrative access to the ArcGIS Portal Directory (sometimes referred to as the sharing API).
- A group in the export environment that contains all items you wish to export
- A a group created in the import environment
It is also recommended that before you get started, your developers and administrators review the export group content and import group content help topics for additional information, including the list of currently supported items.
Workflow
Let’s use the Web AppBuilder workflow, mentioned above, and demonstrate how it works across a development and a staging environment, both using ArcGIS Enterprise 10.8.1.
Note: in brackets, we will include the environment where the actions are taking place, either [development] or [staging].
Step 1: Export the group contents to a package [development]
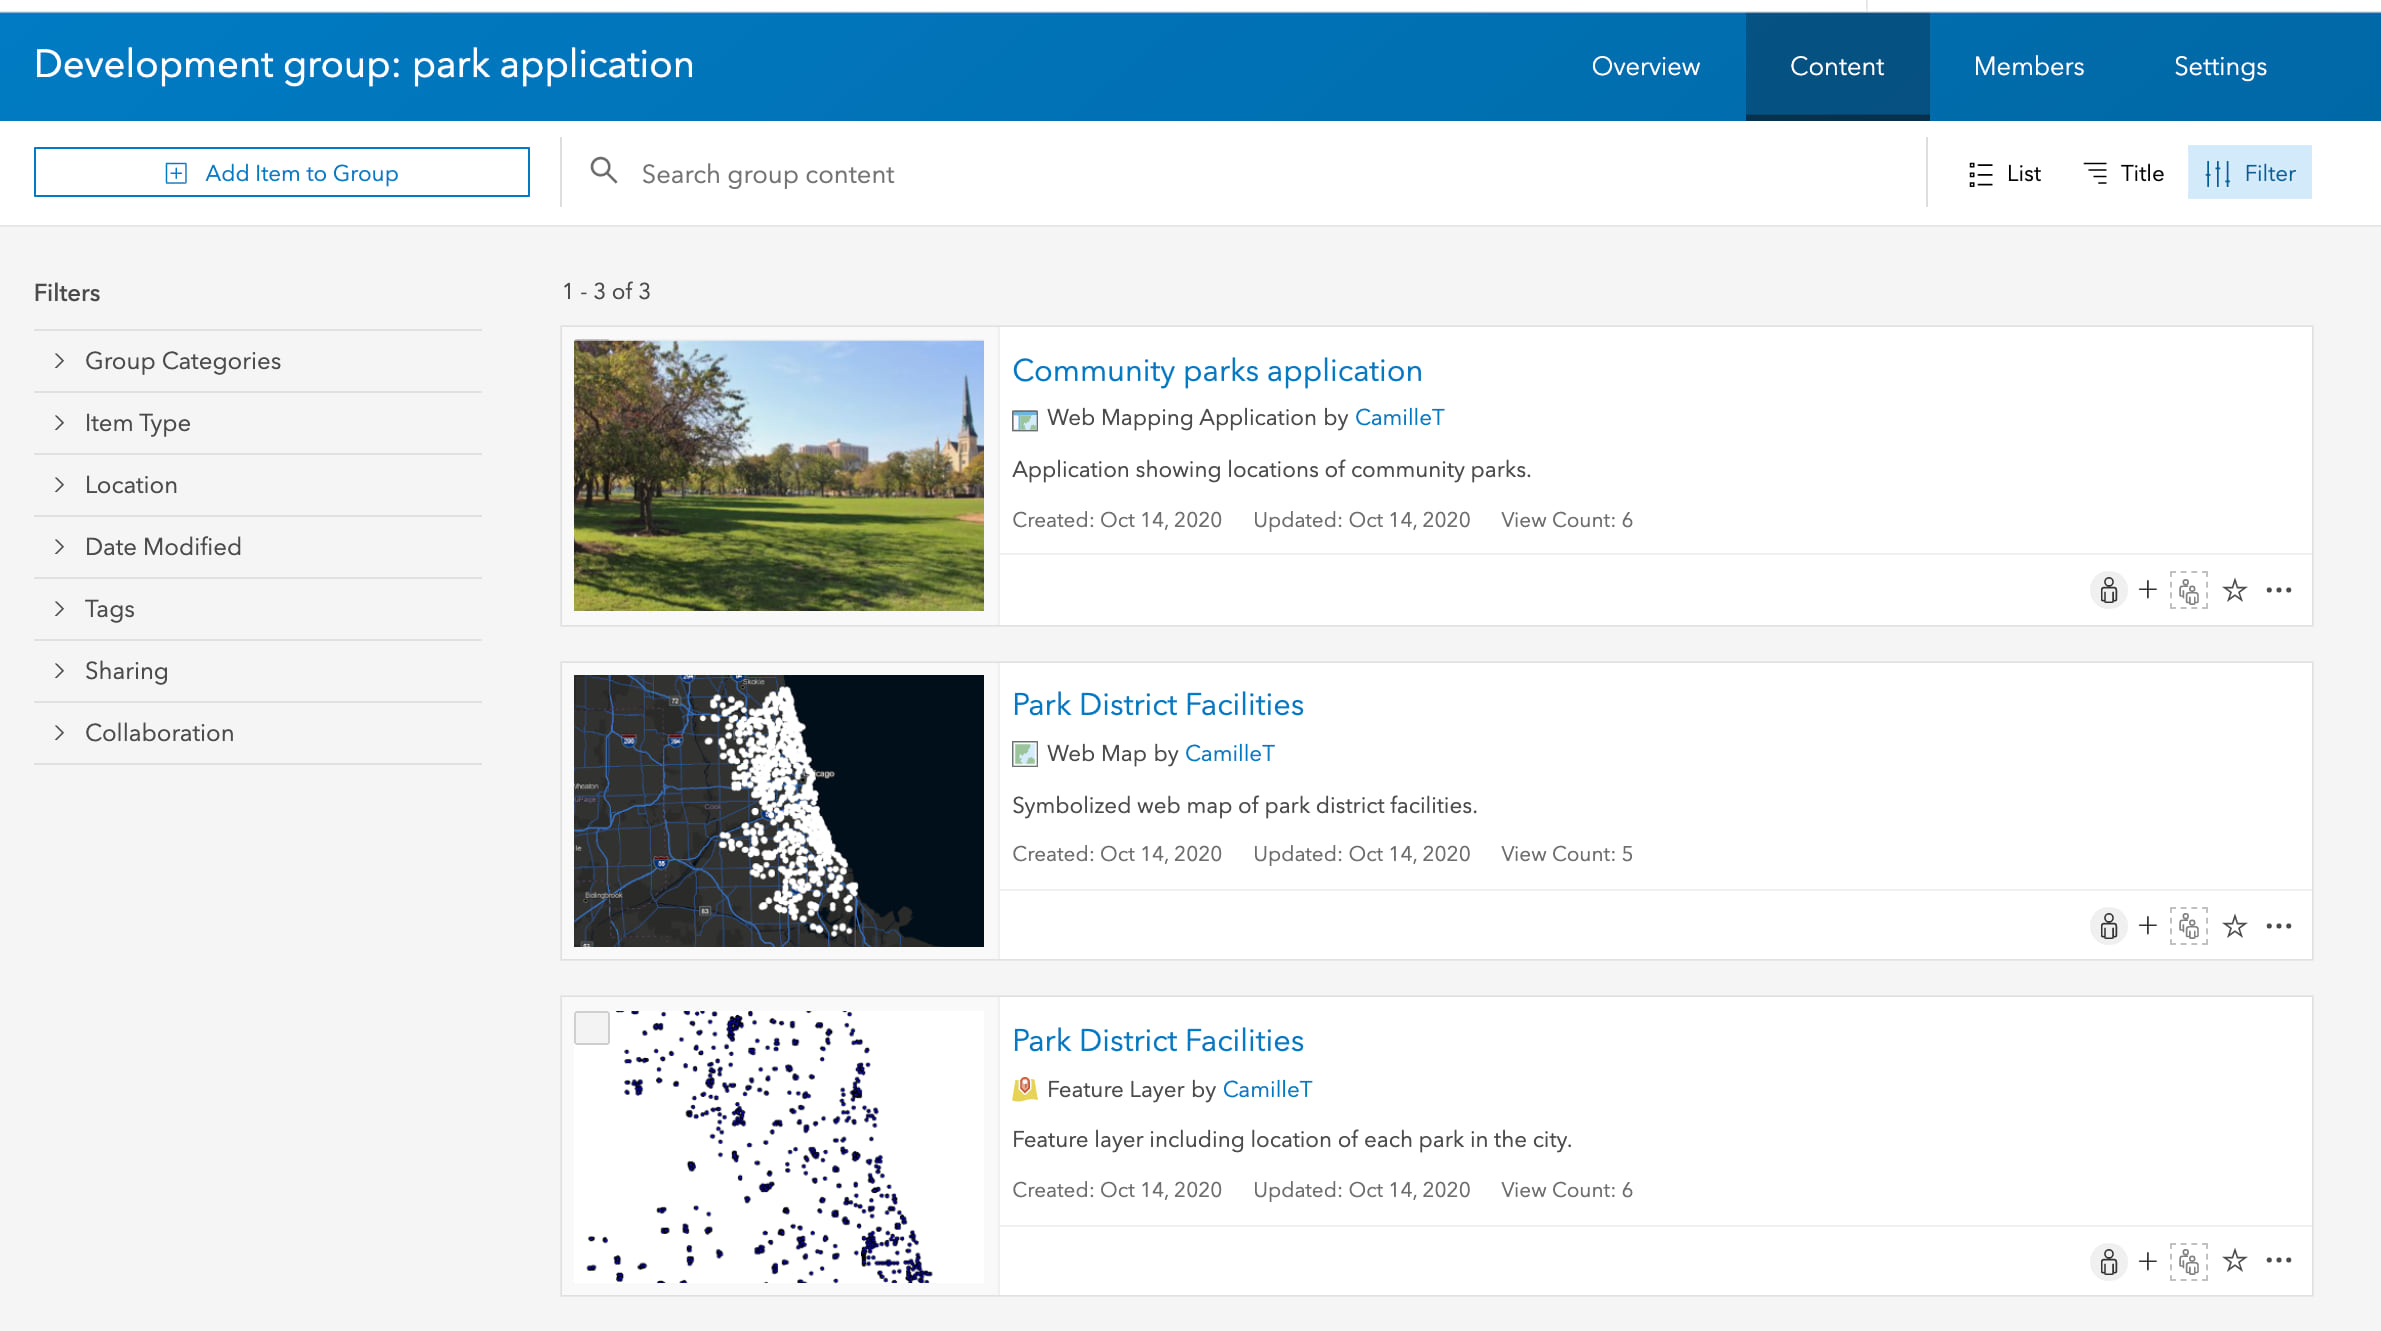
- The first step is to ensure that all items you wish to export are shared to a common group. Therefore, the web mapping application, the web map, and the hosted feature layer will need to be shared to the same group, as pictured below:
- Next, navigate to the ArcGIS Portal Directory (sometimes called the Sharing API) as an administrator. This is where these workflows take place. Access using the URL: https://webadaptorhost.domain.com/webadaptorname/sharing/rest.
- To export this content, in the ArcGIS Portal Directory, navigate to the group that contains the application, map, and layer. Then, navigate to the export operation to export the contents of this group as a package (.epk). An example path is included below:

- You will see there is an option to export all group items or a selection (the field ‘Item IDs of Select Items to Export’). Exporting a selection can be helpful if you would like to move a subset of the group. For example, if application has been updated, but the data and map are unchanged, you can choose to simply export the app without the other items.
- However, since this export needs to carry over the app, map, and layer, that field will remain blank so all items in the group are exported.
- Select ‘Export Group Items’ and a package (.epk) will automatically download. Times may vary based on the size of your data, but this demonstration data took under a minute to download.
- Note: the .epk contains item configurations such as JSON files, folders, and other supporting files for the contents of the group. If you are working with other administrators, you will need to share this .epk with them via email, file sharing site, etc. Be sure to keep the file zipped and all contents intact.
Step 2: Add the package as an item [staging]
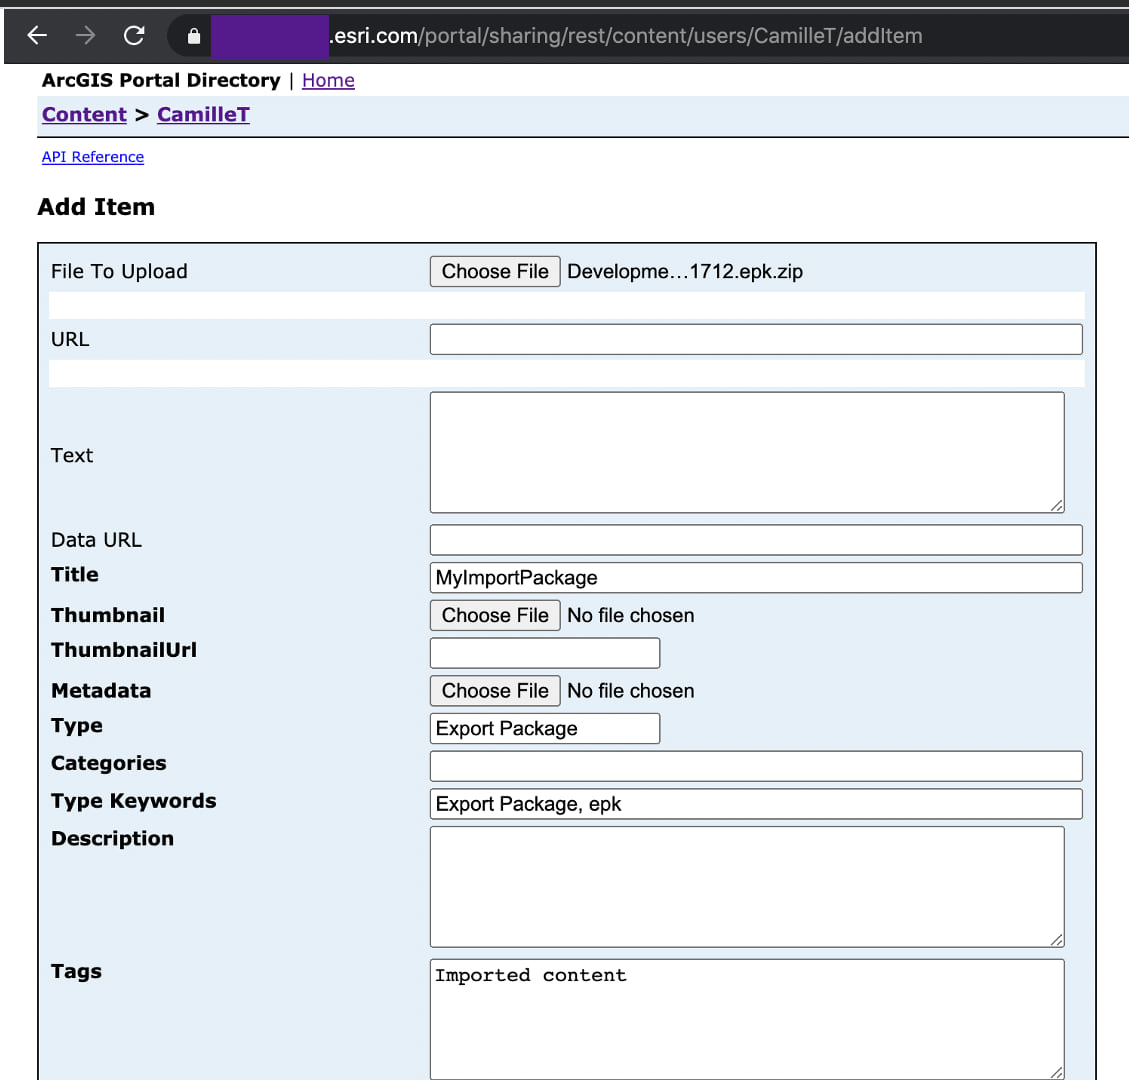
- In the staging environment, add the package as an item using the ArcGIS Portal Directory. This is a requirement to be able to import the contents coming up in step 3.
- Navigate to a user’s content and upload the .epk. Set a title, type, type keyword, and tag before adding the item:
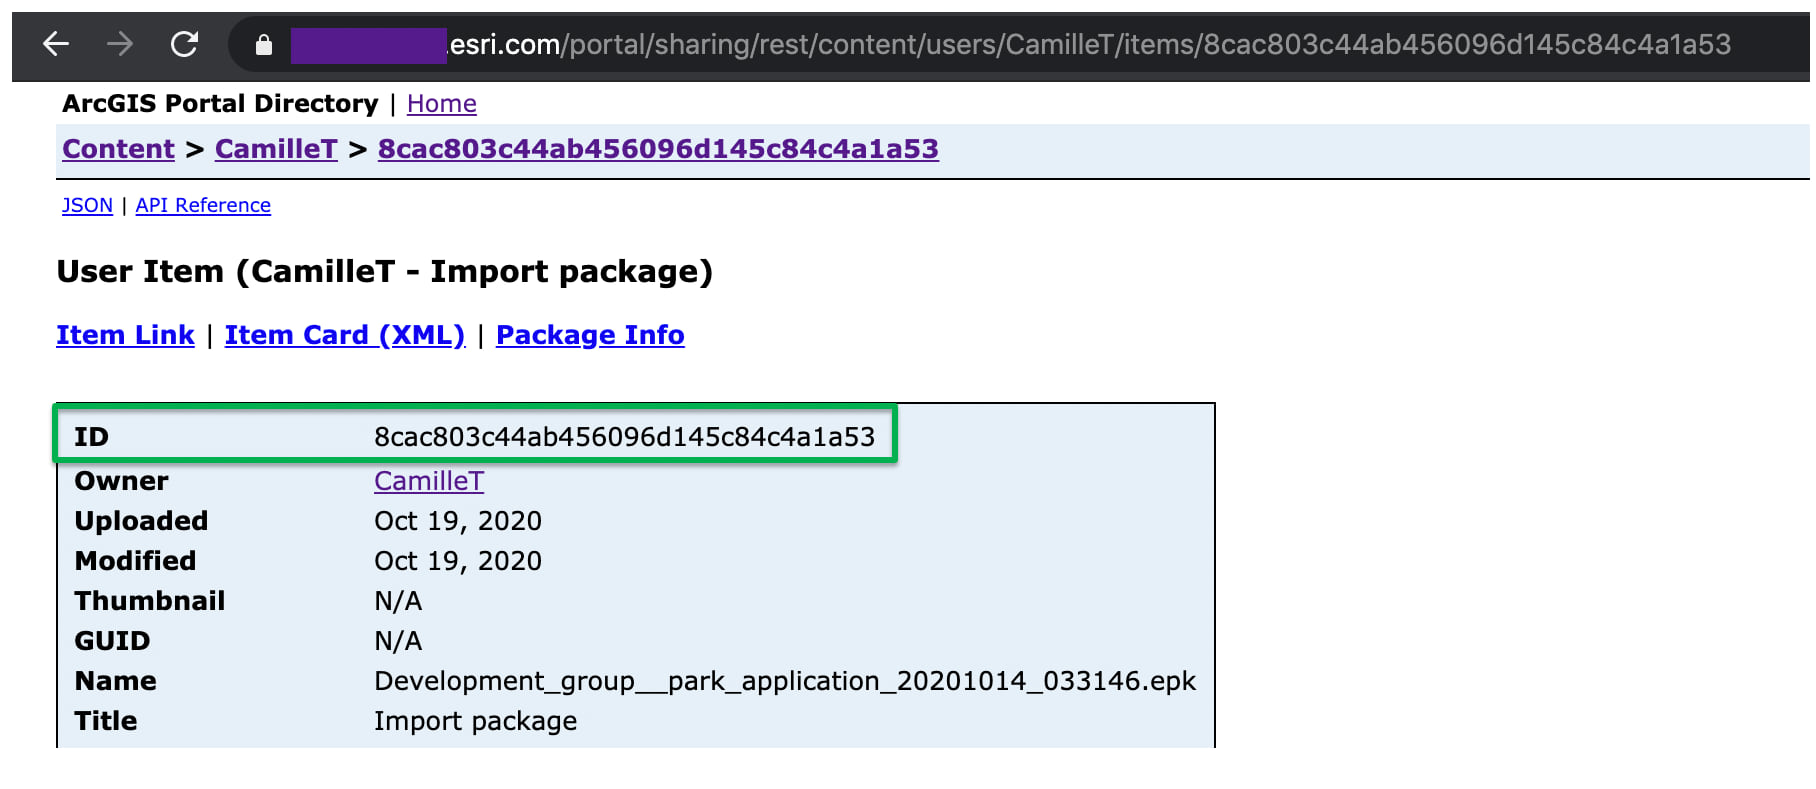
- Once the item has been created, be sure to save the item ID!
Step 3: Import the contents of the package into a group [staging]
- Remaining in the staging environment, it is time to import the contents of the .epk package that was just added. Until you do this step, the .epk will be an nondescript item in your portal contents (it will appear as a blank item with no item type or information).
- Importing the .epk will extract the items in the package (app, map, and layer) and publish them into a destination group in the staging environment. It will also remove the .epk package itself from your environment, including your portal content.
- When importing the .epk, you can import into an existing group or create a new group in advance for this purpose. The groups do not have to share any similarities between development, staging, or production.
- Navigate to the destination group in the REST API and select the operation ‘Import’. Use the item ID for the .epk saved in step 2:
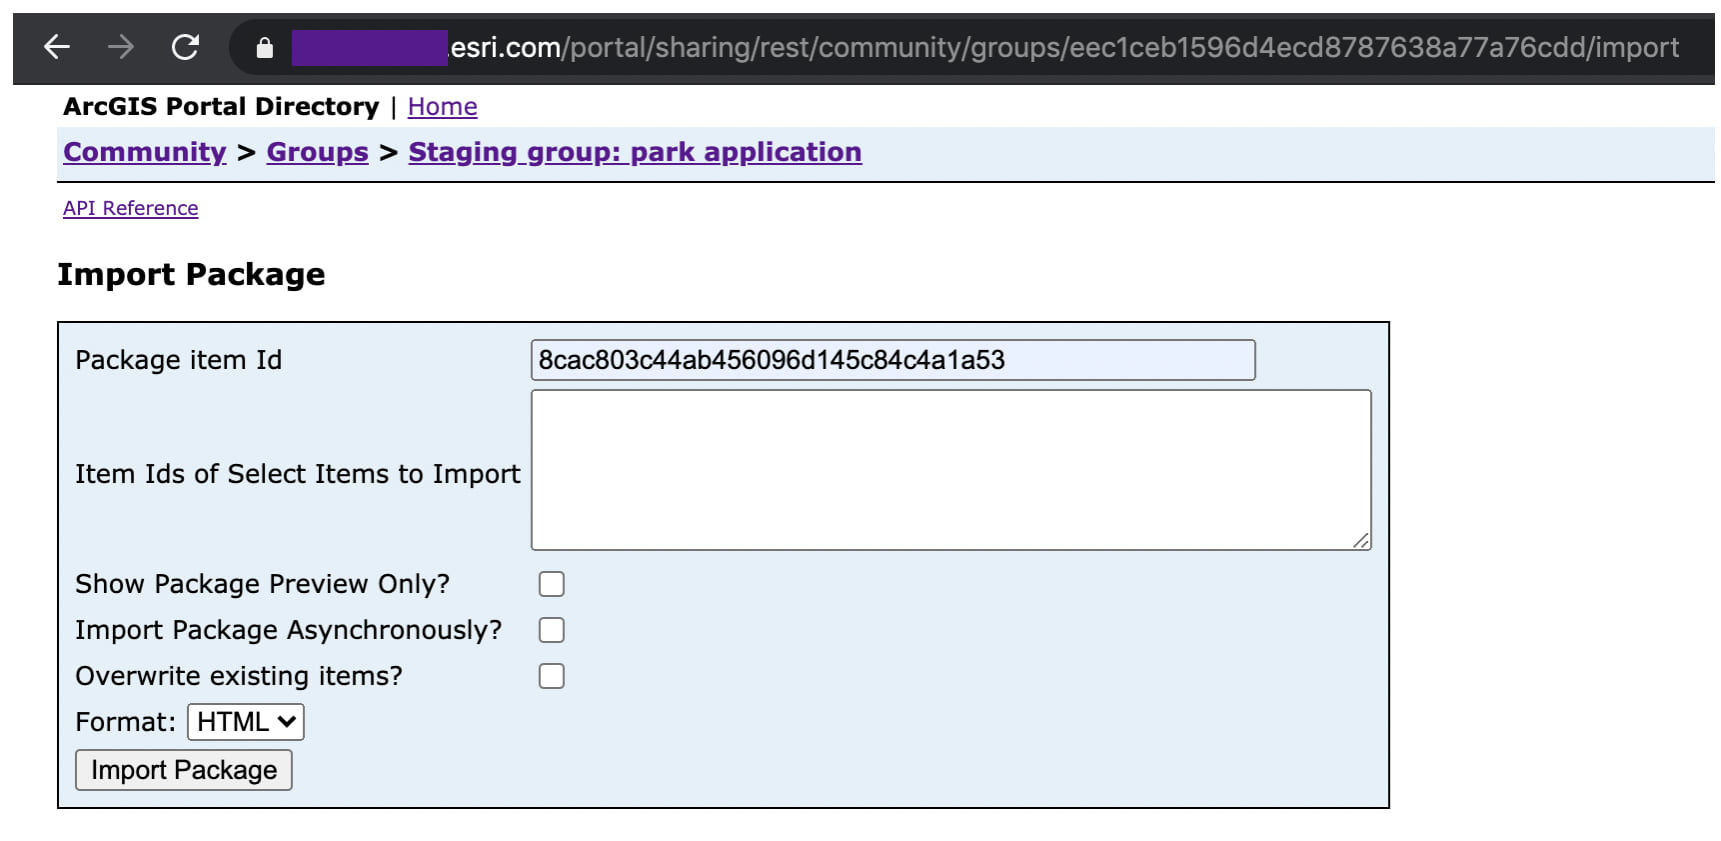
- The option ‘Show Package Preview Only?’ will display the contents of the package in a list view. The option ‘Overwrite Existing Items?’ will overwrite any existing items with the same item ID, which can be helpful when reimporting items like apps after they are changed in development.
- Select ‘Import Package’ and the app, map, and layer will be imported into the destination group. The .epk will be removed from the contents as it has now been extracted. A status update will display, and shows these items were imported:

- Now these items can be discovered, shared, edited, and used in the staging environment, shown below. The item IDs in staging will be the same as development. The user under which the .epk was imported will be the owner of the items, but it is possible to change the owner in the Enterprise portal.
- The same workflow can then be used to move the items into a production ArcGIS Enterprise environment when ready.
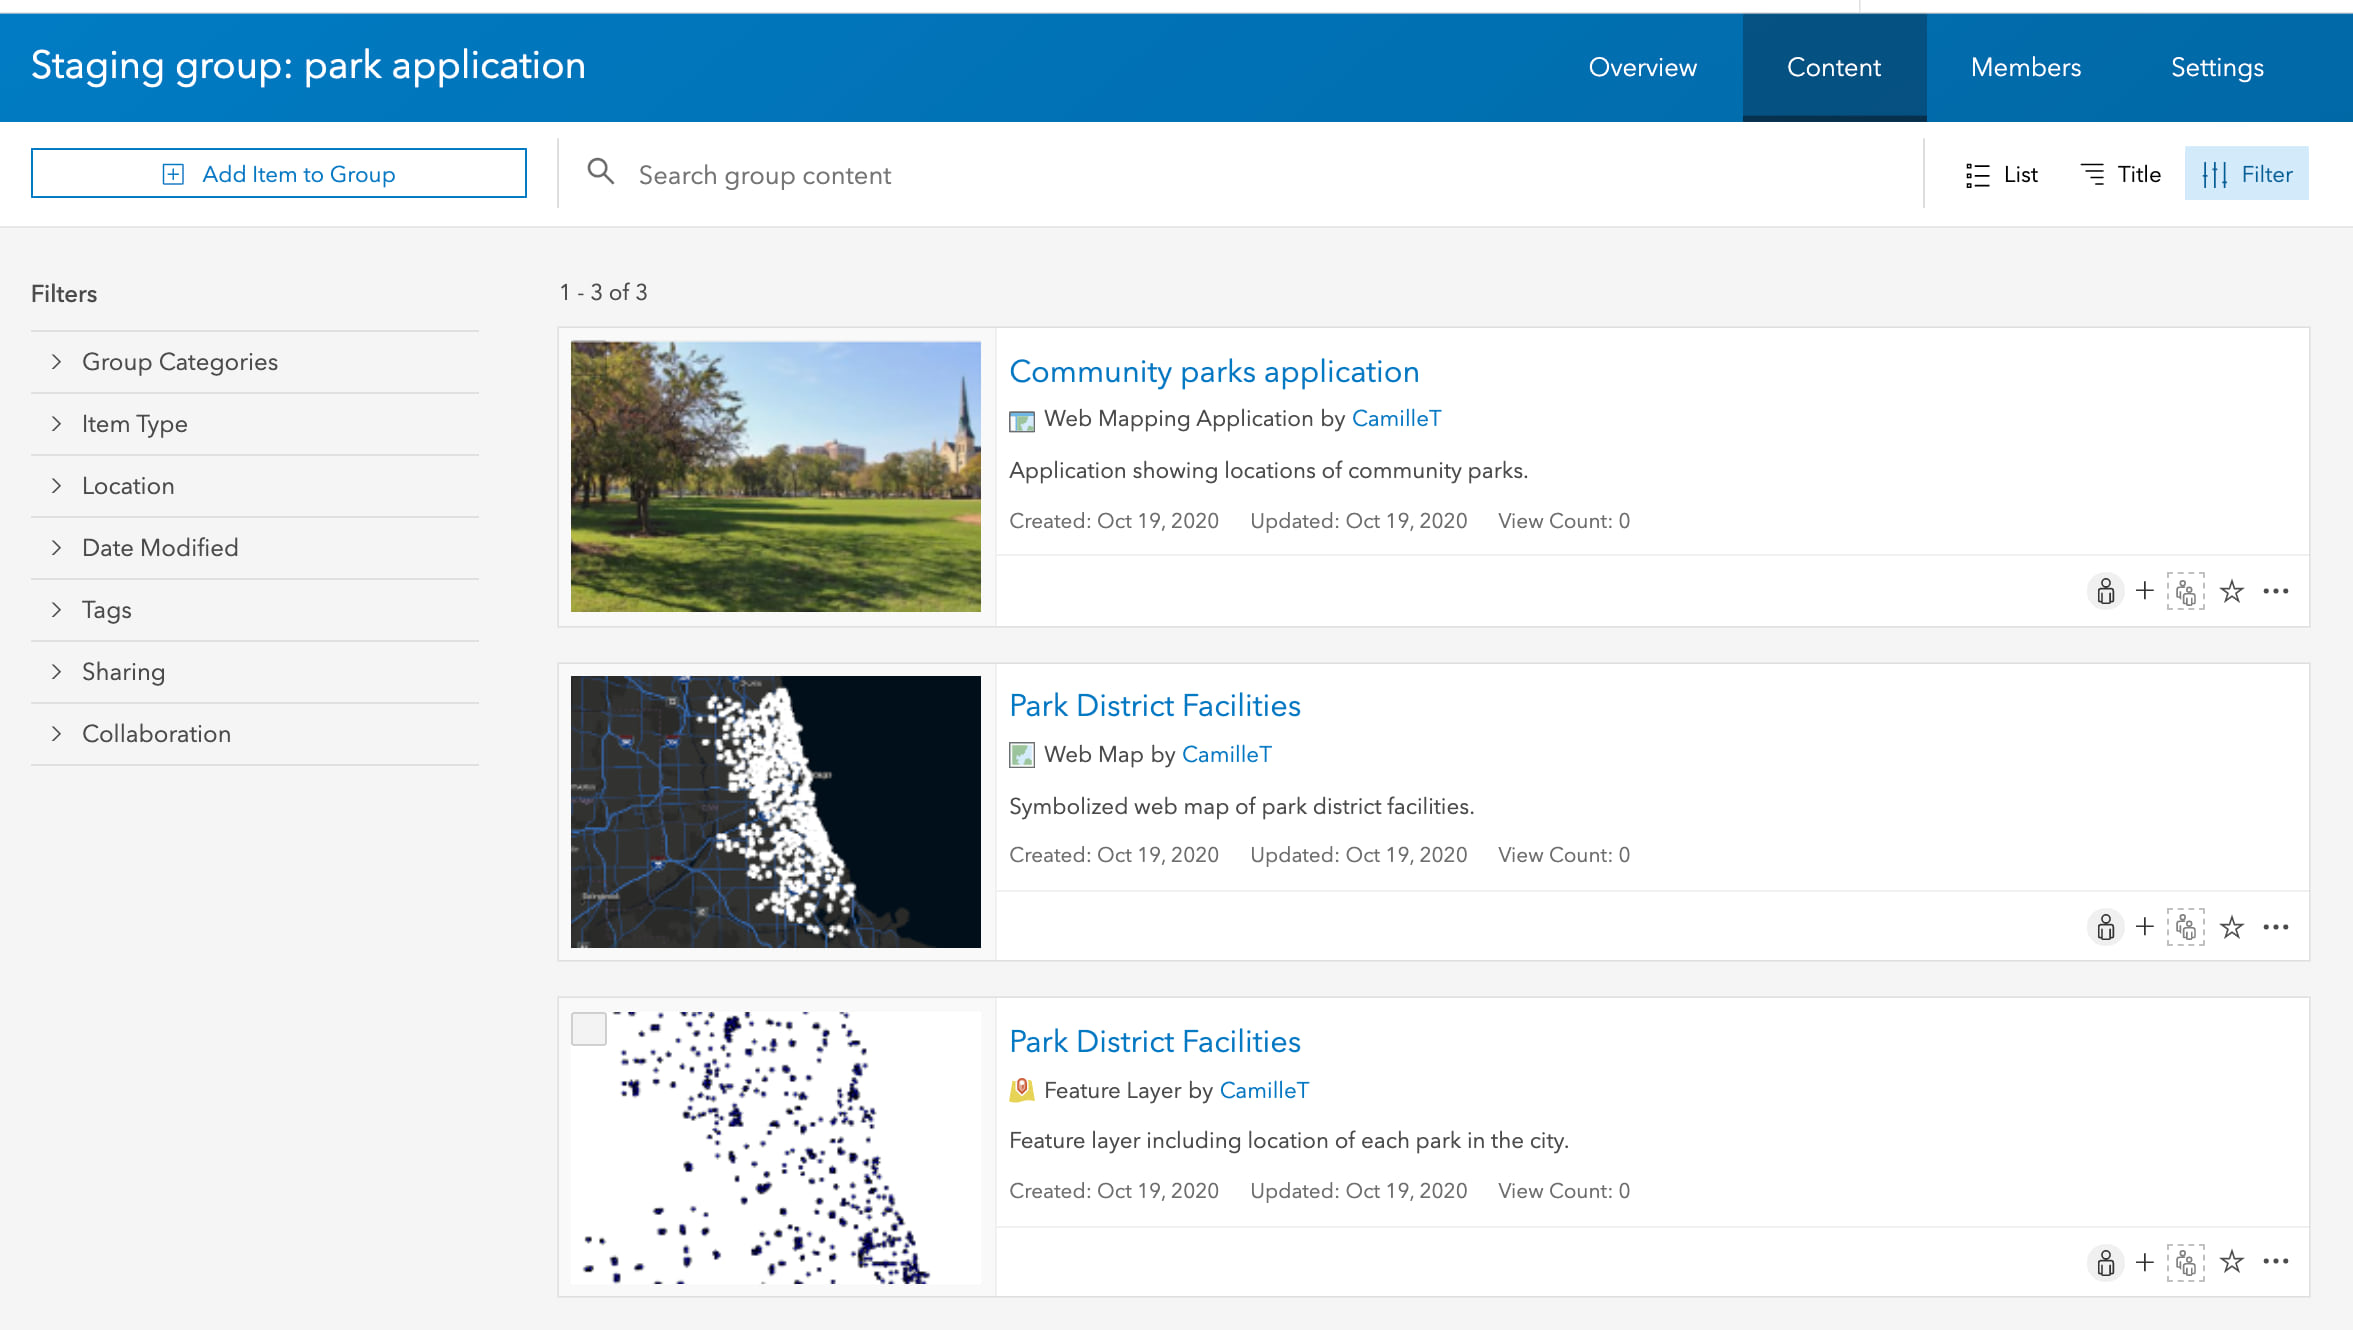
Let’s review the result. An application was created in the development environment and exported as an .epk package. That .epk package was then imported into the staging environment so that the hosted layer, web map, and application were all published to the staging environment. The item IDs remained the same across development and staging, allowing item references in the web map and Web AppBuilder application to be preserved. The web map in the staging environment correctly references the hosted feature layer that was published to staging and the application references the web map in staging as well. When opening the Web AppBuilder application in the staging environment, it will work successfully because it has been updated to use the feature layer and web map hosted in the staging environment.
Frequently asked questions
- Can this be scripted? Yes! We took the manual route in this blog to showcase each of the steps but it is possible to script these workflows using the ArcGIS API for Python’s GroupMigrationManager module. Here is a demo of how this can be accomplished using Python: Content Deployment Automation video.
- What are the supported item types? Are there size limits on items? The complete list of support item types and size limits can be found in the Export Group Content help topic.
- Is this be available for organizations who do not want to use scripting and APIs? Not at this time, but it is something we are evaluating. Let us know what your needs are around this in the comments!
- Are custom Web AppBuilder widgets supported? Similar to distributed collaboration, custom Web AppBuilder widgets are not supported as this tool does not support copying custom code across systems, as that requires additional administrative approval and configuration.
- Are there any special settings that need to be applied to my items in order to export? No, you do not need any specific settings on your items to use the export/import operations.
- What if I’m working with non-hosted layers like map services? Non-hosted layers, such as those published by reference from an enterprise geodatabase are not copied across environments. If you include a non-hosted layer in your web map or app, when you import it into the destination environment, it will reference the source URL.
- Can I use different versions of ArcGIS Enterprise for this workflow? Yes, but each environment must be using ArcGIS Enterprise 10.8.1 or greater. An import environment must be using the same same or greater version than the one that was used to export content. Functionality (and potentially application templates) will only be available at the version each environment is running.
- Do I need to set up distributed collaboration to move content using export/import? This is a frequent question as distributed collaboration includes many of the same concepts as export/import. However, you do not need to set up distributed collaboration to be able to run this workflow. These operations are meant for extracting content and moving it to another environment, not ongoing sharing and syncing content like distributed collaboration provides.
- How does this compare to webgisdr? The webgisdr tool backs up an entire ArcGIS Enterprise deployment as a precautionary measure when upgrading or in the event of a system failure. The export and import tools covered in this blog are meant to export select items from one environment so they can be moved to another – they are not intended to export entire systems and do not export groups, users, and settings.
- Can I use this between disconnected ArcGIS Enterprise deployments? Yes! You do not need to connect to other Enterprise deployments or be connected to the internet to use the export and import operations.
This concludes an example workflow for moving content across development and staging environments. The workflow would be the same when moving content to production, but for the sake of time, was not shown here.
Let us know if you have any questions below and we hope this helps with your enterprise workflows.


Article Discussion: