Now that we have a grasp of what the ArcGIS Python API is based on the first part of this blog post, let’s turn to the best practices for installing and using the API, particularly within other software products, such as ArcGIS Pro and Jupyter Notebooks.
First, we need to take a slight detour into Anaconda, conda, and how they relate to ArcGIS Pro and the ArcGIS API for Python.
Anaconda, conda, and ArcGIS Pro
Anaconda is a free and open source software package that bundles a Python install and a series of Python packages together with a user interface, allowing users to manage Python environments and packages.
Anaconda also includes conda, which is a package management and environment management system. Conda is also a back-end program that leverages and allows other programs, such as Anaconda and Pro, to manage multiple environments. Additionally, conda allows you to manage packages within each environment, ensures you have the most recent packages, and keeps track of package interdependence. For example, if arcpy requires a specific version of numpy, conda will make sure that you do not update numpy past that version. Thus, conda sits at the core of Anaconda and drives much of its functionality.
There is also a level of bundling between conda and Anancoda called Miniconda. Miniconda includes conda and the base install of Python, while Anaconda includes conda, the base install, an additional 150 modules, and a user interface.
Miniconda is installed with ArcGIS Pro although users will never interact directly with Miniconda, as it runs in the background of ArcGIS Pro.

Managing Python Environments
Now, I keep talking about managing environments. What do I mean by that? Simply, a “Python environment” is a folder on a computer that includes all the necessary files for running Python and any packages.
If you install ArcMap, the Python 2.7 environment is created in the C:\Python27\ArcGISXX folder by default. This is the only environment you can use with ArcMap and the ArcMap version of arcpy.
On the other hand, when you install ArcGIS Pro with Miniconda, a default Python environment called arcgispro-py3 will be created in the C:\Program Files\ArcGIS\Pro\bin\Python\envs folder, but you can have as many different environments as you want. You can also switch which environment ArcGIS Pro uses. This allows you to have different package combinations, which can be useful when handling conflicting package interdependencies (for example, two different packages may be using different versions of a third package).
This is particularly helpful when working with both ArcMap and ArcGIS Pro. Even if you didn’t manually install two versions of Python, you already have two different Python environments.
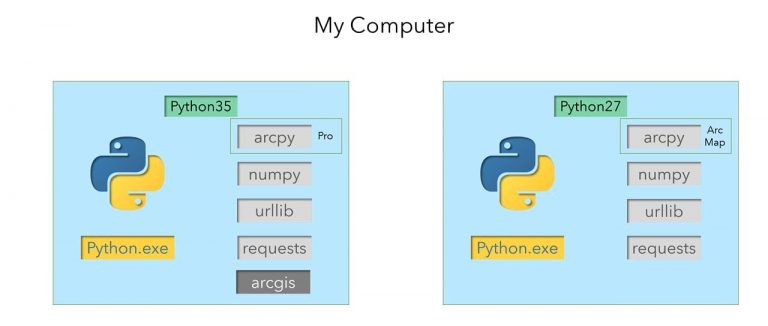
How do you ensure that the script or IDE you are working with knows which version of Python to use?
In the past, before conda, switching between different Python environments was challenging. To switch between different Python environments, you would need to either point each script individually to the correct environment or change the environmental variables (PATH or PYTHONPATH) that tell the computer where to look for the python.exe file. You would need to do this every time you change environments.
There are some problems with this workflow. Namely, it:
- Requires the user to know what they are doing when modifying path variables
- Affects all Python programs
- Can result in software issues, particularly if you have multiple programs using Python and multiple installs of Python
- Requires users to know what environments they have and where they are
- Means package installation depends on the user
- Does not have automatic or managed updates of packages; this can break package interdependencies
Conda solves all these problems:
- Users never have to change the system environments.
- Different programs can use different Python environments.
- There is a reduced chance that software will be affected, as users are no longer changing Python paths.
- ArcGIS Pro and Anaconda have intuitive interfaces for managing environments and packages.
- Conda tracks and updates package versions and prevents users from installing conflicting versions of interdependent packages.
To access conda functionality, you can use Anaconda, ArcGIS Pro, or the command prompt.
Anacoda
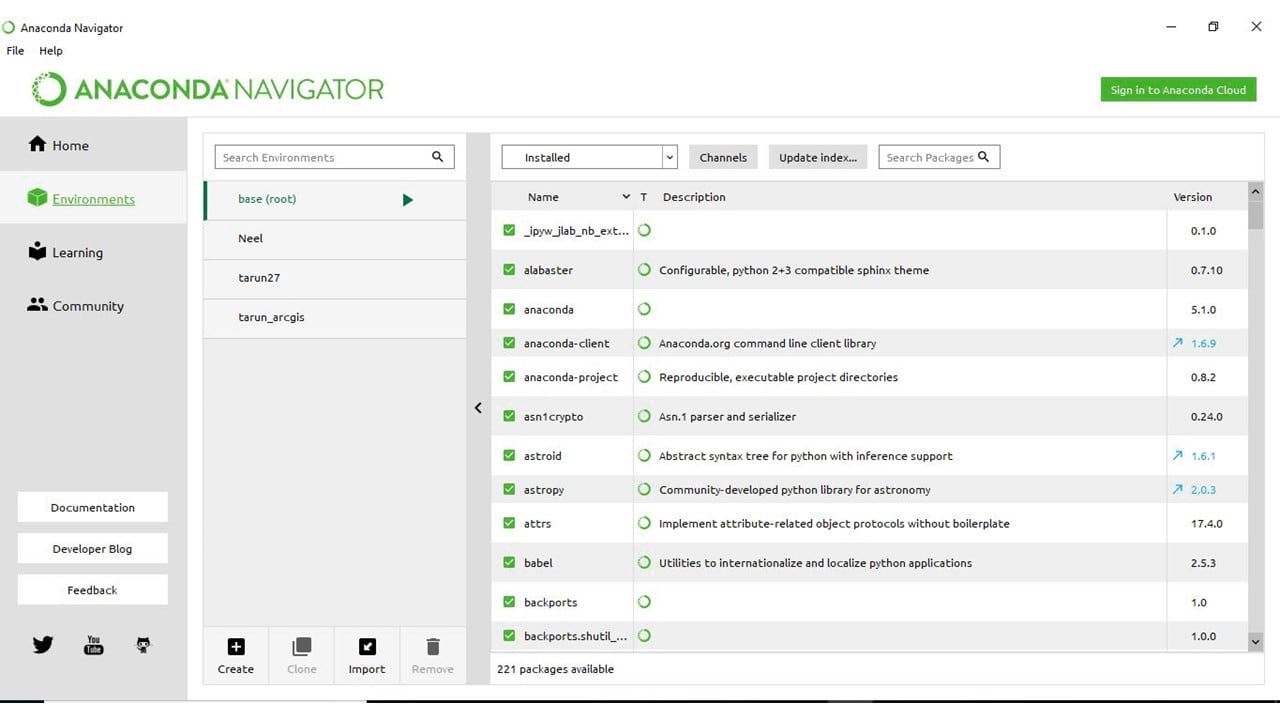
In Anaconda, the interface allows you to create, clone, import, and switch environments. Additionally, you can install, uninstall, and update packages.
One thing to note is that if you want to install the ArcGIS API for Python arcgis package in Anaconda, you would need to add the Esri Channel to Anaconda. Conda would then have access to the arcgis install and any package updates.
ArcGIS Pro
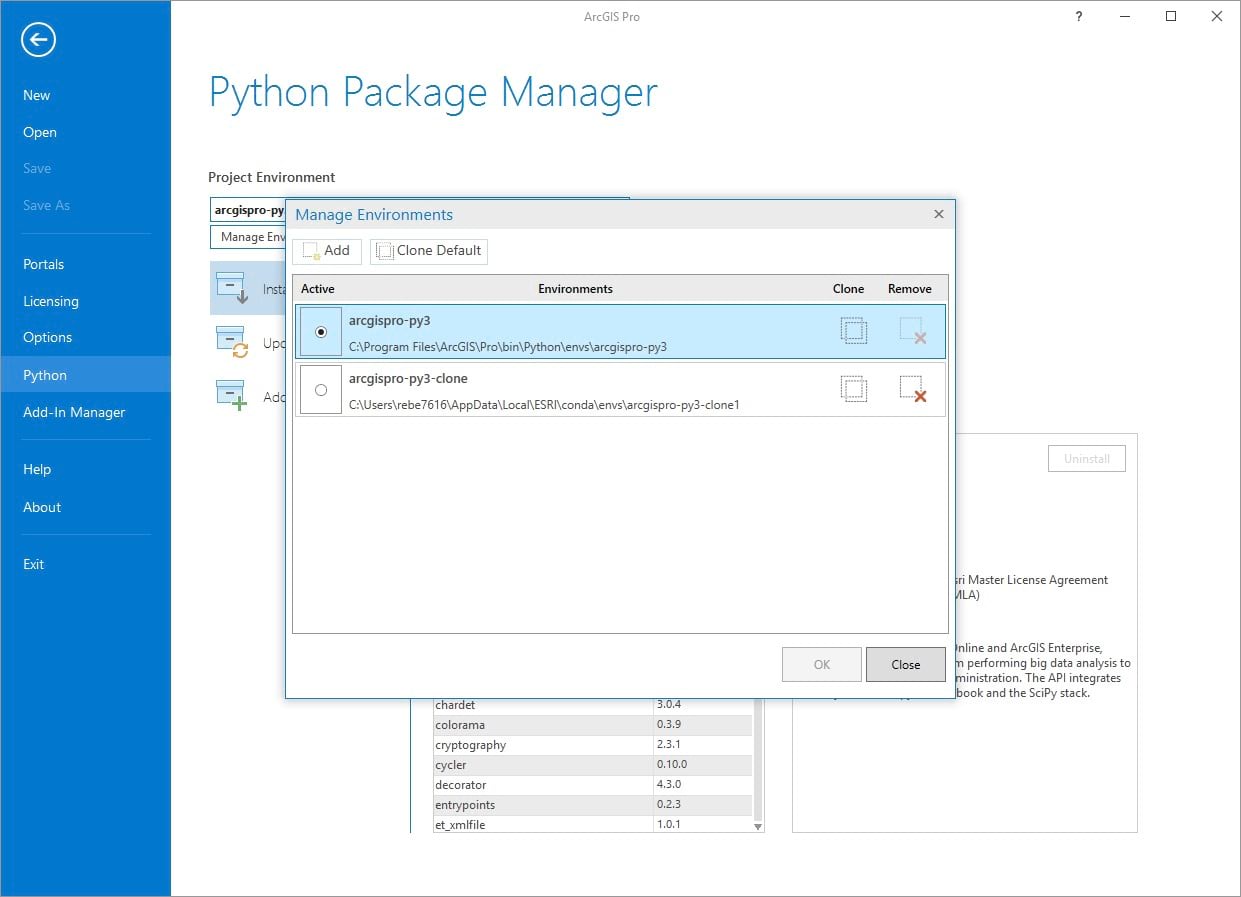
In ArcGIS Pro, you can go to Settings > Python (or About ArcGIS Pro > Python in earlier versions) and manage the packages and environments.
Here, you can see that I have two environments: the arcgispro-py3 and arcgispro-py3-clone1.
With ArcGIS Pro, the Esri Channel is added by default. However, there isn’t currently a method within ArcGIS Pro to add other channels.
Command Prompt
Lastly, you can access conda in the Command Prompt.
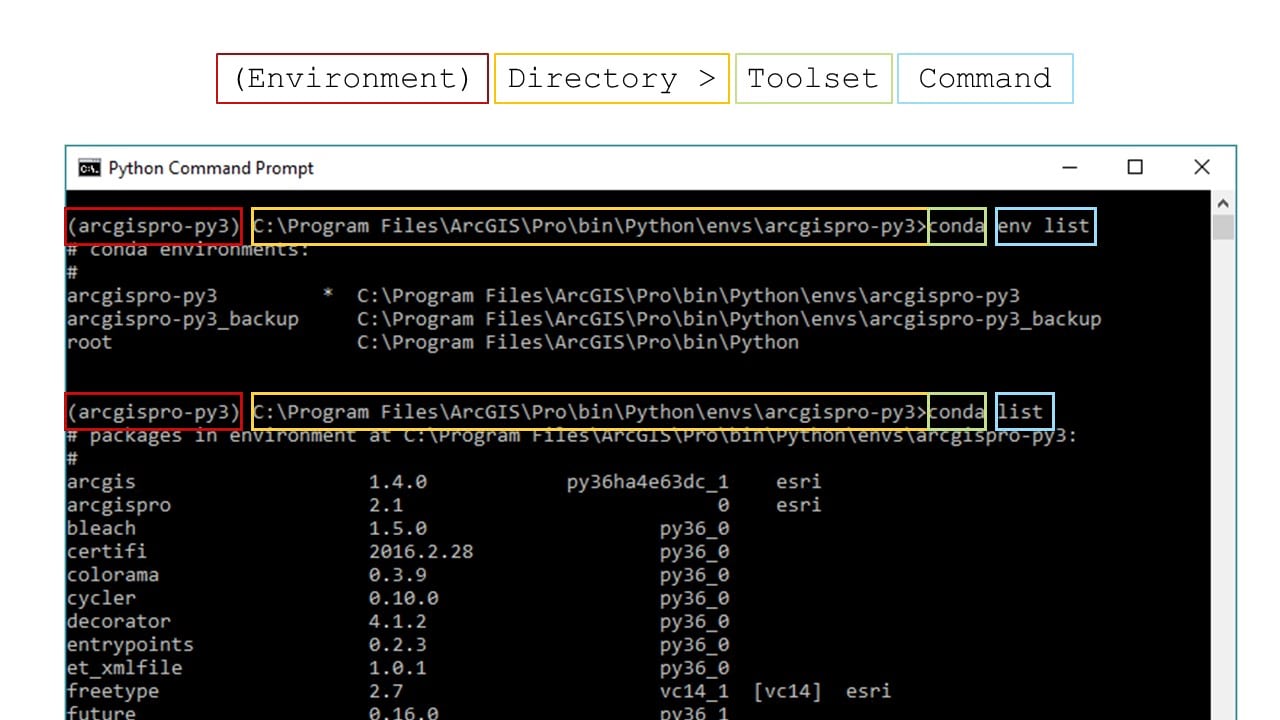
The easiest way to work with conda in the Command Prompt is to use the Python Command Prompt, which is installed with ArcGIS Pro. The Python Command Prompt is also the same as the regular command prompt, but already has the default environment and directory set up.
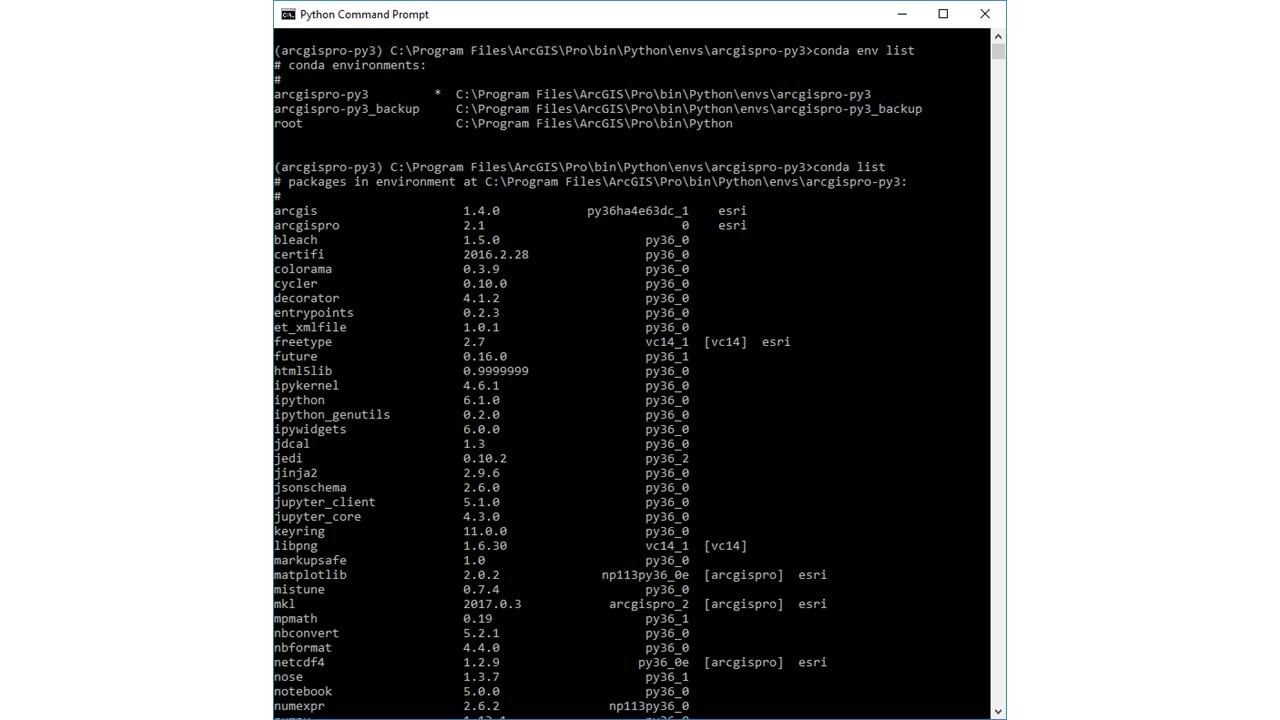
In the screenshot above, I requested the environment list and the package list. Within the Command Prompt, conda commands allow you to do the same management that you can do in the Anaconda or ArcGIS Pro user interface, but it does require knowing what those commands are.
To learn more about conda commands, check out the Conda Cheat Sheet here.
To dig a bit deeper into the Python Command Prompt, there are four parts to a command:
- The environment. This is the folder location of the python.exe and is at the beginning of the line in parentheses.
- The directory. This is the folder location where input files are searched and where output is saved.
- The toolset. This is the package being used to run the command.
- The command or what you are asking the package to do. The command may also include parameters.
You can see in the screenshot that we use the default ArcGIS Pro environment, but also the same folder as the directory. This need not be the case, and you can change the directory to save files in different locations.
So, when should I use Anaconda and when should I use ArcGIS Pro?
This depends on what you want to do. Esri usually recommends using ArcGIS Pro. The ArcGIS Pro installation of Miniconda is much smaller than a stand-alone Anaconda install and as of ArcGIS Pro 2.2, both the arcpy and arcgis packages are automatically installed. Prior to ArcGIS Pro 2.2, the Python API arcgis package must be installed. The arcpy package is only available through an ArcGIS installation.
One important thing to recognize is that depending on what you are doing, you may want either Anaconda or ArcGIS Pro—either is fine. However, it is not recommended that you have both Anaconda and ArcGIS Pro installed on a single machine as that will cause PATH issues, similar to having multiple Python installs without conda.
Conda and the ArcGIS API for Python
Now that we have dug deep into conda, how does it relate to the ArcGIS API for Python? Conda is not a requirement for the ArcGIS API for Python. However, using conda makes managing the arcgis package easier, particularly as the arcgis package updates several times a year and has multiple dependencies on other Python packages. Additionally, if you are using the ArcGIS API for Python in ArcGIS Pro, you use conda to manage all packages including the arcgis package.
IDEs
Lastly, let’s talk “Integrated Development Environments” or “IDEs”. What are IDEs?
Basically, IDEs are programs that allow you to both write and run scripts. They are very useful for debugging and usually include an autocomplete function to make writing scripts easier.
The ArcGIS API for Python can run in any Python 3.5 IDE. If you are using multiple environments, we recommend using an IDE that supports switching environments, such as Spyder or PyCharm.
That said, Jupyter Notebook is the recommended IDE for working with the ArcGIS API for Python. Jupyter Notebooks allow you to run Python codes interactively, visualize outputs (such as maps, charts, and tables), and easily share the scripts. When you install ArcGIS Pro or Anaconda, Jupyter Notebook will install, as well.
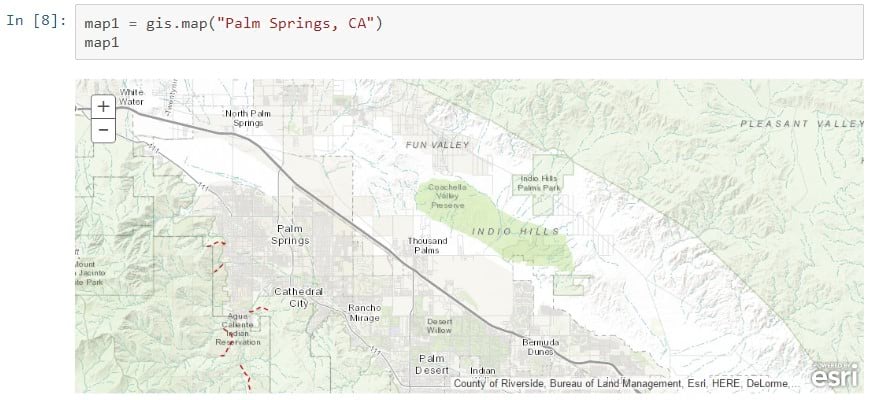
Jupyter Notebooks are also not Python-specific and support multiple languages, making them more useful for developers.
That’s it for the core concept of the ArcGIS API for Python! To sum up, there are many ways to work with the API, but to fully integrate with the ArcGIS Platform, Esri recommends using the Miniconda and Jupyter Notebook packages that come installed with ArcGIS Pro. Happy scripting!
Article Discussion: