ArcGIS Workforce is designed for dispatchers to create and assign work for mobile workers to complete in the field. Assignments are created in the Workforce web app, but mobile workers might notice work that needs to be done while they are in the field. By bringing ArcGIS Collector to your workflow, mobile workers will be able to create assignments in the field that will then appear in Workforce.
To get started, identify a Workforce project that requires mobile workers to have the ability to create assignments from the field. We’ll create a view of the assignments layer for the mobile workers, make a map, give mobile workers access, and then create assignments using Collector.
Create a view of the assignments layer
Creating a hosted feature layer view from the assignments layer limits the fields and types of data mobile workers see. This ensures they only edit the Workforce data you want them to. Navigate to the item page of the assignments layer and click Create View Layer.
For more information see Create hosted feature layer views in ArcGIS Online or Create hosted feature layer views in ArcGIS Enterprise.
Set the view definition
On the view layer’s item page, navigate to the Visualization tab. Click More Options  , then click Set View Definition. The Define Features and Define Fields options appear. These options allow you to customize the data mobile workers will see in the field.
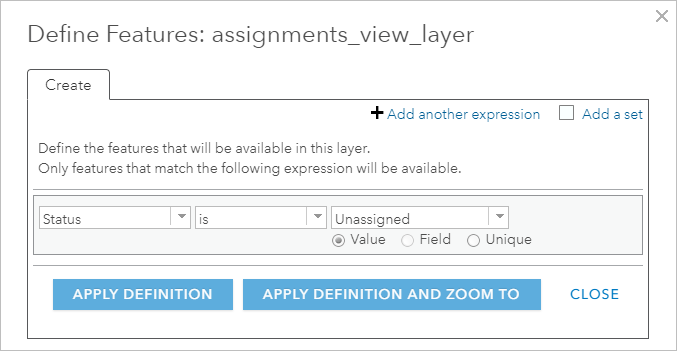
Click Define Features to only include assignments with a status of “Unassigned” and click Apply Definition.
Click Define Field to only include the following fields: OBJECTID, Description, Status, Priority, Assignment Type, Work Order ID, Due Date, GlobalID, Location, Creation Date, Creator, Edit Date, and Editor.
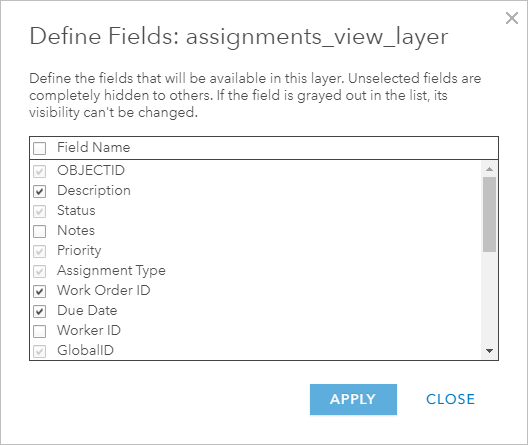
Note: Mobile workers might not need all the fields. You can choose to exclude Description, Priority, WorkOrderID, and Due Date.
Configure the pop-up
In the Visualization tab, click Configure Pop-up  . The pop-up defines the editing experience in Collector.
Update the Pop-up Title to show information meaningful to workers creating assignments. Include only the following fields and display them in this order so that required fields are first: Assignment Type, Location, Description, Priority, Due Date, and Work Order Id.
Uncheck both Display and Edit in Configure Attributes for each of the other fields to exclude them. Update the pop-up by clicking OK at the bottom of the panel and save your changes by clicking Save Layer.
Enable editing and sync
In the Settings tab, enable editing and configure editing permissions in the Feature Layer (hosted, view) Settings section.
In the Editing section, check Enable editing. Check Enable Sync if your mobile workers need to create assignments while working offline.
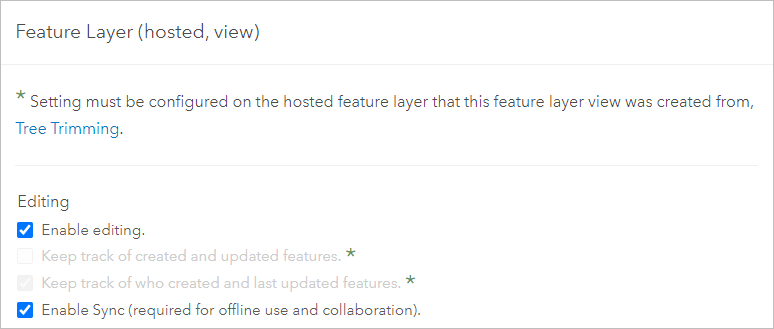
Additionally, check the following options:
- Under What kind of editing is allowed, accept the default option: Add, update, and delete features.
- Under What features can editors see, accept the default option: Editors can see all features. This will reduce the creation of duplicate assignments.
- Under What features can editors edit, check Editors can only edit their own features.
Save your changes.
Create a map for Collector
On the Overview tab of your assignments layer view’s item page, click the Open in Map Viewer drop-down menu and select Add to new map with full editing control.
A new map appears with the assignments layer view. Click Save, then Save As to save your map. Give it a meaningful title so your mobile workers know what map to use in Collector.
Next, you’ll edit the templates in the layer view so that mobile workers have what they need to create new assignments in the field.
Add a feature template for each assignment type
You’ll add a feature template to the “Unassigned” feature type for each assignment type in your project. You will need the GlobalID of each assignment type you want to add.
The GlobalId of an assignment type is located on the Data tab on the item page for the Assignment Types table. When looking at the Table, click the Options menu and click Show/Hide Columns. Select GlobalID to display this value for each assignment.
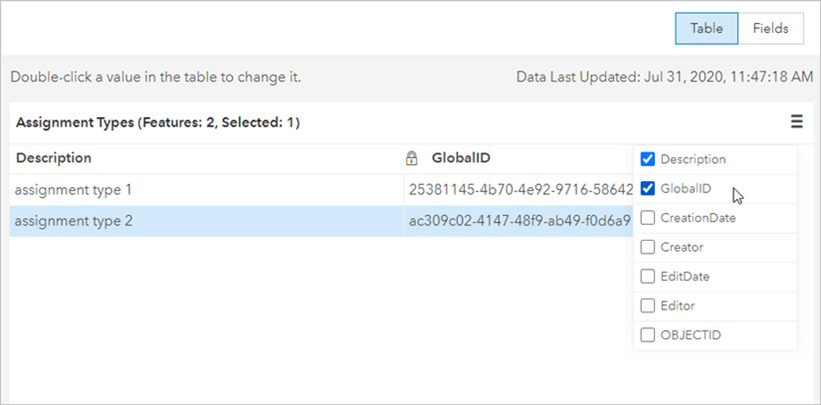
Copy the GlobalID for each assignment type that you want mobile workers to use when creating assignments in the field.
Back in your map, remove all the feature types and their templates other than the Unassigned feature type. Mobile workers should only create unassigned assignments. To remove feature types and templates, click Edit and click Manage at the bottom of the pane. Next to each feature type (other than Unassigned) click the arrow to open the menu and select Remove.
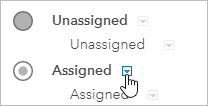
Next, add each assignment type as a new template for the Unassigned feature type. Click the arrow next to Unassigned and click New Template.
The Properties window appears. Give the template the same name as the assignment type in the Name field and use the GlobalID as the default value for the Assignment Type field.
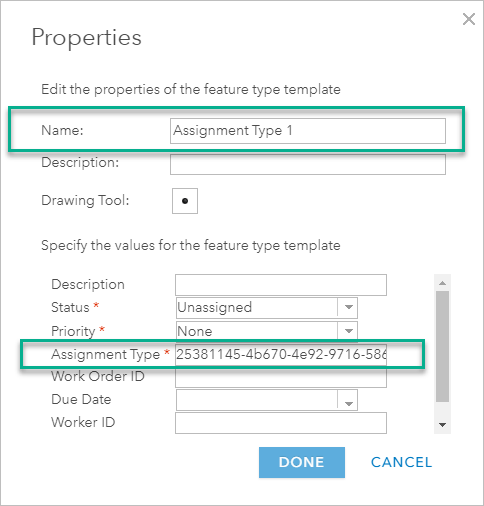
Click Done and repeat this process for each assignment type you want to add.
Include any other data in the map that the mobile workers might need when creating assignments. If mobile workers need to take the map offline, you’ll need to make sure you configure it for offline use. For more information, see Prepare for offline data collection.
Share the map with mobile workers
Share your new map and layer view with the mobile workers who need to use them.
If you want all mobile workers in your Workforce project to be able to create assignments in Collector, share the map with the group created with your Workforce project. If instead you want to provide only a subset of mobile workers with access to create assignments, create a new group for those members. Share the map you created and the layer view with the new group. For more information, see Create groups in ArcGIS Online or Create groups in ArcGIS Enterprise.
Create assignments in Collector
Mobile workers can open the new map in Collector and create assignments. While they won’t be able to use all the validation and user integration included in the Workforce web app, they can create unassigned assignments that will appear in Workforce. Here are some things to keep in mind:
- The mobile worker will need to provide an assignment type and location.
- With the view and pop-up customization, they can’t set a dispatcher ID. That’s ok, as the mobile worker might not be a dispatcher. It will be set by Workforce when the assignment is assigned through the web app.
- The mobile worker can include a photo or attachment to the assignment.
- Be careful when deleting assignments. It is permanent and not the same as closing them.
- Mobile workers can use a feature and Collect here to create an assignment at that feature; however, the assignment’s location field won’t be prepopulated with the feature’s pop-up title as it is in the Workforce web app.
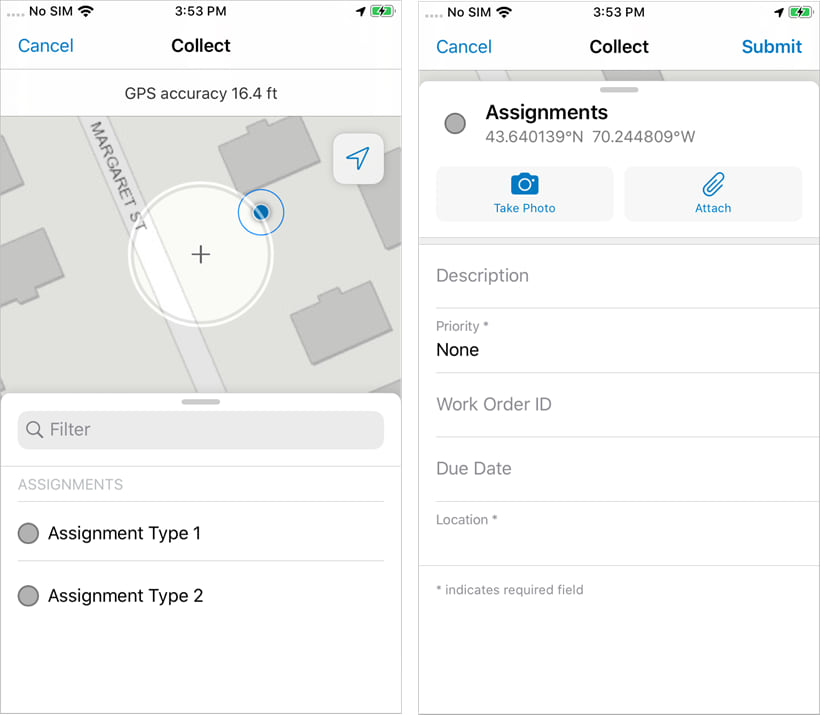
Now work that mobile workers notice in the field can be recorded and ready for assignment in Workforce.


Is there a way to assign a worker to the assignment from this? I can pick the assignment type on Collector with these steps, but can’t seem to assign it to a specific person on Collector.