Background
As an advanced user of ArcGIS Workflow Manager, you’re familiar with the web application and the capabilities within it that allow you to manage your organization’s work.
(As a side note, if you’re not familiar with ArcGIS Workflow Manager, this blog may be on the complex side. I’d highly recommend starting with our resources blog to learn more about the product.)
For many users, the web application is the only capability they need to manage their work. But if you’ve ever thought— I could really use a way to display more information, like on a dashboard— or— I like the information shown but I also need to bring in outside information and link that to my jobs in Workflow Manager to provide a broader picture of the work in my organization— this blog is for you. The blog will focus on how to create and use joined layer views from the Workflow Manager feature layer with information on use cases, and highlight potential issues for certain types of configurations. Let’s jump in!
Some Basics on Hosted Feature Layer Views
Database views are stored queries that select data from the tables you specify in the view definition. Views in the ArcGIS ecosystem are divided into two main types: those that are created in enterprise geodatabases that are customer managed and those that are created in ArcGIS Data Store, referred to as feature layer views or hosted feature layer views, which are managed by ArcGIS. We’ll be focusing on the latter in this blog.
A feature layer view is a separate item that references the original source data. Edits made to the original layers are reflected in the custom view. The bonus to having the view set up as its own item is that there are additional settings that can be applied to control access to the data. Workflow Manager makes use of feature layer views in its own system data. Part of the workflow item feature services are created when a user creates a workflow item. The biggest difference between the feature layer views created by Workflow Manager and one that a user might create is that the settings for Workflow Manager feature layer views are managed by Workflow Manager and alterations to those settings are not supported. Altering settings on the Workflow Manager feature layer and feature layer views can lead to unexpected behavior.
Using Workflow Manager Feature Layer Views
Workflow Manager makes use of two different feature layer views as part of its system data. While it may be tempting to use these when building out custom dashboards and applications, we advise you not to do this. Instead, create your own views based on the system layers and use those instead. This ensures there will not be any possibility of accidental data changes or corruption of the Workflow Manager system data.
With each release of Workflow Manager, new functionality and bug fixes can result in schema changes to the Workflow Manager system data. This is expected and backwards compatibility is not guaranteed when working with your own views based on Workflow Manager system data. Therefore, it’s possible that custom views may need to be rebuilt and/or custom applications updated from release to release. The Workflow Manager team documents changes for workflow item versions.
Lastly, at the 11.3 release of Workflow Manager, a bug was introduced where the Create View Layer option was not available for Workflow Items that were upgraded from an earlier version. This bug also exists in the 11.4 release as well. Patches have been created to resolve this issue.
Creating a Joined View Layer on the Workflow Manager Feature Layer
Now that we understand why this functionality is useful, let’s dive into the technical details of how to create a joined hosted feature layer view. It’s important to note that the process to create a view layer based on the Workflow Manager feature layer is the same as creating a view layer from any Portal feature layer, whether in ArcGIS Enterprise or ArcGIS Online.
We’ll begin by determining what our needs are for this view layer and our end goal. In this case, we’d like to view job comments and associate other job information in a dashboard. To accomplish this, we’ll work with the jobs table and the jobComments table in the Workflow Manager feature layer. We can join these tables using the job_id field in each table.


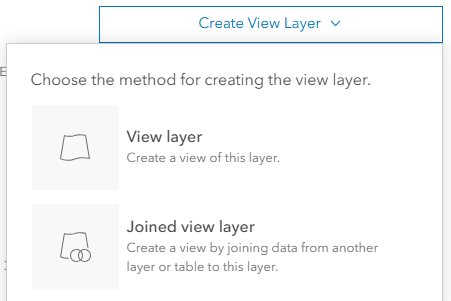
Now that we’ve determined our end goal and the tables and join fields, we can create a joined hosted feature layer view from the Workflow Manager feature layer.
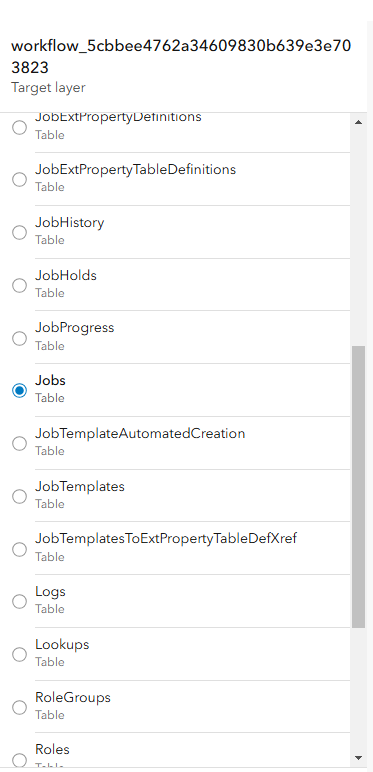
We’ll choose the jobs table as the target layer.
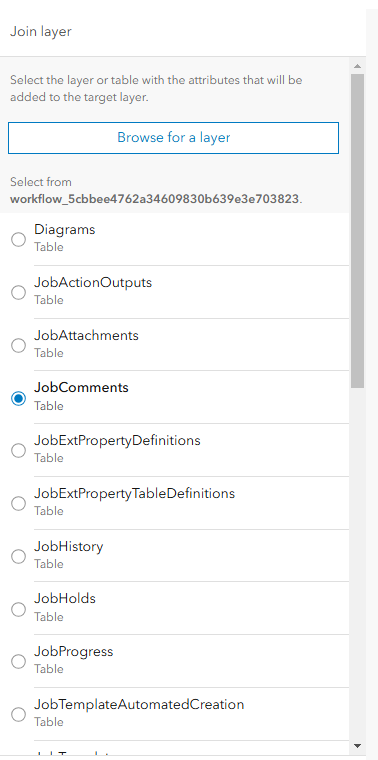
And we’ll choose the jobComments table as the join layer.
As mentioned, our target and join fields will be the job_id field from each table.

We’ll keep the rest of the join settings as default. We won’t go into detail on the different types of views and options available when creating views as part of this blog, but there is information and documentation available on these subjects. We’ll then give our view layer a name and other information as needed to create it.
Once created, we can check the table of our new view layer to ensure everything joined as expected. In this case, we see fields from the jobs table and the jobComments table combined together in our view layer. As a note, some jobs may have multiple comments which will result in multiple joined records for a single job ID. This is expected and is not an indication of a problem.


When a joined view is created from the Workflow Manager hosted feature layer, it sets the sourceSchemaChangesAllowed feature layer attribute to false. Workflow Manager relies on this attribute to be set to true to perform operations, such as creating or updating extended property tables, importing a workflow configuration, or upgrading a workflow item. If set to false, these operations will fail, so an additional step must be completed.
To get started, first verify that the attribute is set to false. A Portal Administrator or the item owner can perform this using the following URLs:
- ArcGIS Enterprise:
- https://webadaptorhost.domain.com/server/rest/services/Hosted/workflow_<workflowItemId>FeatureServer?f=pjson
- ArcGIS Online:
- https://services.arcgis.com/<orgId>/ArcGIS/rest/services/workflow_<workflowItemId>/FeatureServer?f=pjson&token=<accessToken>
Next, use a REST client, such as Postman, to send a POST request to the joined view’s Update Definition endpoint. Use the following information to build your request:
- Method: POST
- URL:
- ArcGIS Enterprise: https://webadaptorhost.esri.com/server/rest/admin/services/Hosted/<view name>/FeatureServer/updateDefinition
- ArcGIS Online: https://services.arcgis.com/<orgId>/ArcGIS/rest/admin/services/<view name>/FeatureServer/updateDefinition
- Request Parameters:
- updateDefinition: {“sourceSchemaChangesAllowed” : true}
- f: json
- Authorization: Bearer token
- URL:
Lastly, verify that sourceSchemaChangesAllowed attribute has been set to true in your workflow feature layer.
Once we’re done with those steps, we can use our new view as a source in our dashboard.

More on Dashboards
Now that we have the basics covered, how else could you use these layers to aggregate and display information? Continuing with dashboards, we can get a lot more complex than our simple example.

Data expressions can be used to join two tables together or join attributes from a table to a layer. This example documentation details how you could combine vaccination details by manufacturer. In Workflow Manager, this could be used to display things like job details with the latest job comment or job notes for that job. Or better, display job details with extended properties information for a seamless graph or list view.
Other Use Cases
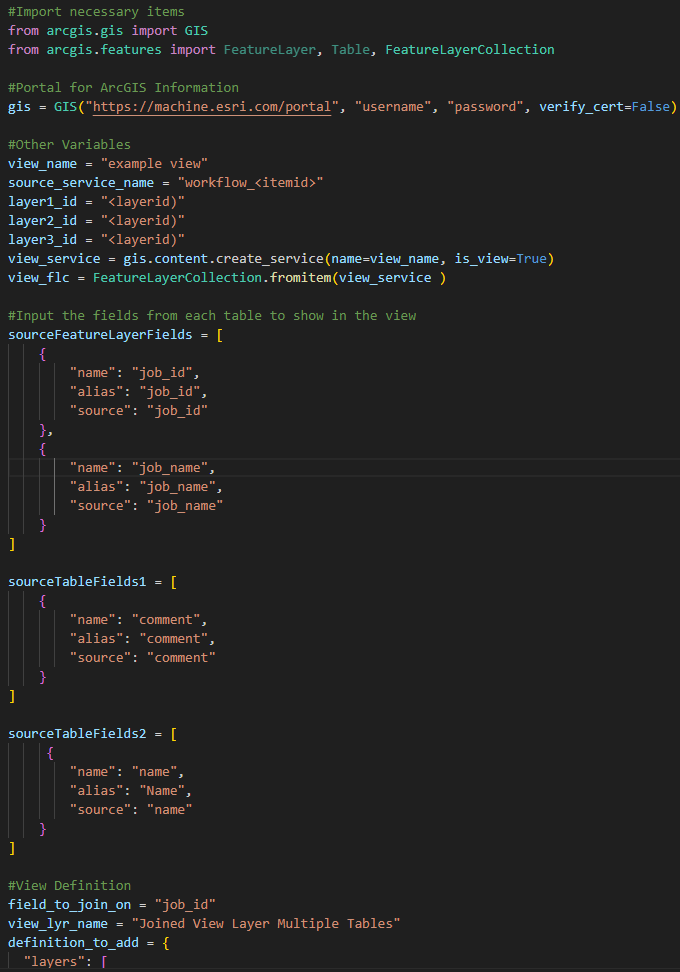
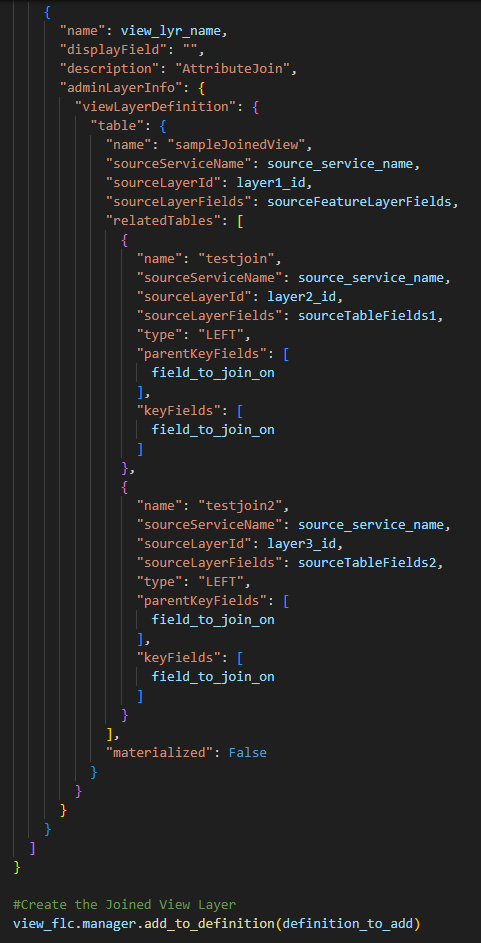
We discussed how to create a joined view layer through Portal, but what if we need to create a view with more than two layers? That isn’t possible through Portal, but it is possible using the Python API. In this example, multiple related tables could be added in the view layer definition.
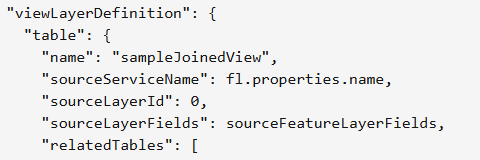
This could be used to add in multiple extended properties tables to a view layer with the jobs table, or add in multiple Workflow Manager tables, such as the jobs table, with the jobComments table and an extended properties table to display this information as one list or graph in a dashboard.
If you’d like an example script to get started with your own joined view layer with multiple join tables, take a look at the Python script below. This script joins the jobs table with the job comments table and an extended properties table. In this example, we’re pulling in the job ID and job name fields from the jobs table, the comment field from the job comments table, and the name field from an extended properties table.
And we can see the end result below.

Closing Out
We’ve covered a lot of information here. We discussed basics on hosted feature layer views and discussed why it’s important to create your own views based on Workflow Manager system data instead of using the default views. We went through the process of creating a joined view layer and details to consider after creation. Finally, we went over some other use cases where hosted feature layer views are used. Hosted feature layer views are a valuable tool to extend the capabilities of reporting and visualization in ArcGIS Workflow Manager.
If you want to learn more about ArcGIS Workflow Manager, you can check out our Resources for ArcGIS Workflow Manager blog to connect with us and discover everything you can do with Workflow Manager.

Article Discussion: