
Since the initial release of ArcGIS Utility Network in 2018, Esri has provided users with industry-specific data models, called Utility Network Foundations. These industry models for electric, gas, water, sanitary sewer, stormwater, communications, and district energy are fully configured to support each industry’s specific network information management needs and have been very successful in helping utilities around the world take full advantage of the capabilities of ArcGIS Utility Network.
As successful as these projects were, customers and partners have continuously pushed for additional options for implementation that minimize the changes to a utility’s existing schema, and make the process easier, while still allowing them to leverage the capabilities of ArcGIS Utility Network. Esri has worked hard to respond to this feedback; releasing simpler data models, providing tools to streamline migrations, and making it easier to extend models with your own requirements.
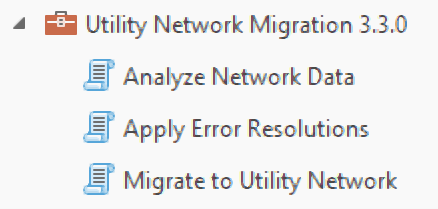
Today marks another major milestone in that journey with the first release of the Migration toolset. These tools allow customers to migrate their data into a base utility network model as quickly and simply as possible, while also minimizing the amount of change required. This process gives customers with modest requirements a clearer path forward and allows any organization that manages geospatial data to quickly migrate their data to a utility network to evaluate data quality.
This article shows how to use the new Migrate To Utility Network tool. You can find a complete guide to all these tools and their surrounding workflows, including discussions of the migration process, on the Esri Community site. This migration tool creates and loads data to a utility network based on the classes and fields of your existing GIS features. This model is unique to your organization and is not based on or related to any of the Utility Network Foundation data models. The initial utility network created by the tool is very simple, capable of supporting basic editing and tracing workflows. More advanced capabilities of the utility network specific to your requirements can be progressively configured over time, when you want them.
Building your utility network

Instead of relying on a pre-defined model for each industry, these tools create a utility network model based on your current classes, fields, relationships, and annotations. This model provides the same topological capabilities as a geometric network, in terms of editing and tracing, but doesn’t include any configuration for the more advanced capabilities available for utility networks like associations, non-spatial objects, or network diagrams.
The new migration tool is used to create these models and is designed to migrate any Esri point, line, or polygon feature class in a geodatabase into a utility network dataset that can then be configured to meet your needs (see the Building your Utility Network article on the Esri Community site for more information). Later this year, a wizard will be released for this tool that allows customers using a geometric network to prepopulate this tool using their geometric network. With either approach this tool allows users to create their organization-specific utility network with just a few minutes of configuration. The models produced by this tool are much simpler and have fewer capabilities than the Utility Network Foundations provided by Esri, since they reflect your data as it exists today.
If this sounds like what you want, then I encourage you to read on to learn more about how to get started using these new tools. You will also learn what additional activities you can expect to have after running these tools.
Migrating to a utility network
To perform this streamlined migration, you will use the new Migrate To Utility Network tool included in the Utility Network Migration toolset. This tool will convert any collection of Esri feature classes into a utility network with a minimal amount of input. The tool requires you to provide some basic inputs to run, including where you want to place the migrated data, what you want things named, and whether you want to include related data:
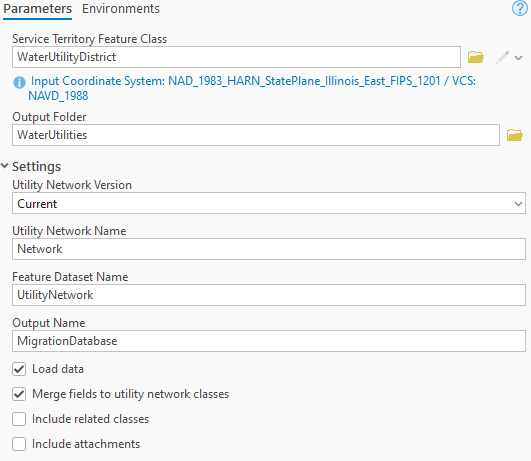
Including related data and attachments is a common requirement for many utilities. This allows the tool to migrate important information like inspection history, annotations, and dimensioning features.
Once the basic settings have been populated most of the work involves populating the mapping section of the form. This is where you specify which features you want to migrate into your utility network, and how you want them to behave in that network.

The first thing you must determine is what types of data your network will represent. In the utility network, these “types” are called domain networks. Each domain network has three properties:
- Name – The name you want for the domain network. This name will be prefixed for all network classes in this domain.
- Subnetwork Controller Type – When you perform an upstream or downstream tracing, do resources originate from a point in your network (source) or do resources flow to a point in your network (sink).
- Tier Definition – In a hierarchical network, features can belong to subnetworks in multiple tiers like a distribution system and a pressure zone. In a partitioned network, each feature only belongs to a subnetwork in a single tier, like an electrical circuit.
Remember that the utility network and domain networks you define are unique to your database and do not inherit any configuration from the Utility Network Foundations. However, here are some guidelines for how different industries typically configure their domain networks
- Communication – Communication networks are source-based networks. Any port on an active device can act as a subnetwork controller. Subnetworks are used to model the circuit between the ports on two pieces of equipment.
- Electric – Electric networks are source-based networks. Distribution networks use circuit breakers as subnetwork controllers for each feeder. Power transformers inside a substation are also considered subnetwork controllers for all equipment at that voltage within the substation. Transmission networks use the substation equipment on either end of a transmission line as subnetwork controllers to manage tracing the transmission line. Learn more about electric utility networks.
- Gas – Gas networks are source-based networks. All the gas sources for a common area, such as custody transfer meters and interconnects, are used as sources for a gas system. Creating pressure zones requires additional configurations that will be discussed in a subsequent article, so any pressure regulation equipment or stations should not be configured as controllers initially. Learn more about gas and pipeline utility networks.
- Stormwater – Stormwater networks are sink-based networks. Outfalls act as subnetwork controllers for a watershed area. If multiple outfalls share a common watershed area, then their subnetwork name should be the name of that common watershed area. A subsequent article will show you how to configure your utility network to subdivide your watershed area into separate catchments. Learn more about stormwater utility networks.
- Wastewater – Wastewater networks are sink-based networks. The wastewater treatment plant, or other sinks, within your network should act as the subnetwork controllers for your sewershed area. A subsequent article will show you how to configure your utility network to model individual subbasins. Learn more about wastewater utility networks.
- Water – Water networks are source-based networks. Water sources such as water treatment plants, wells, reservoirs, and system interconnects are used as sources for a water system. Creating pressure zones requires additional configurations that will be discussed in a subsequent article, so any pressure regulation equipment or pumps should not be configured as controllers initially. Learn more about water utility networks.
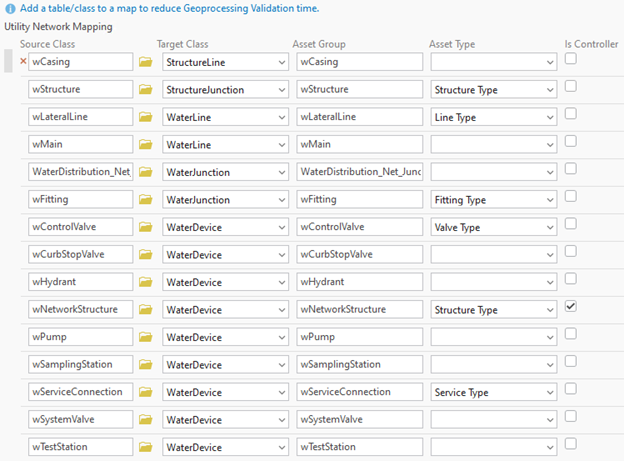
Once you’ve configured your domain networks, you’re ready to define your mappings. This is the collection of geodatabase feature classes you want to turn into utility network feature classes. To do this you must specify how you want the class to behave in the utility network by populating the following properties:
- Source Class – The feature class you want to migrate to the utility network.
- Target Class – The network class that the source features will be migrated to. This is determined by the geometry type and purpose of the features in the source class.
- Asset Group – This will be the name of the subtype (also known as asset group) that will be created for this feature class in your network. This is auto populated with the Source Class name but can be changed as needed. Multiple Source Classes cannot be migrated to the same Target Class and Asset Group.
- Asset Type (optional) – A field that can be used to differentiate between different types of features within this class. The coded values or subtype codes associated with this field are used to define the asset types for this asset group in the target class. If your source class contains subtypes, you should select the subtype field.
- Is Controller – This defines whether features in this asset group are allowed to participate as sources or sinks in the network. If some features in the source class have a source/sink ancillary role and belong to a geometric network, then only those types of features will be configured to be subnetwork controllers.
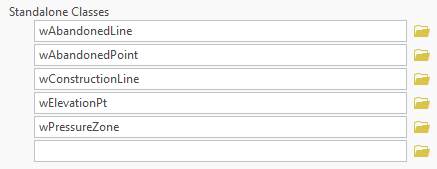
Finally, if you have any additional feature classes or tables you would like to include in the new utility network database, but will not participate in the network itself, you can include them in the standalone classes section of the dialog tool.
Once you populate the tool with your mappings, click Run and the tool will migrate your data to a new mobile geodatabase using the configuration you’ve provided.
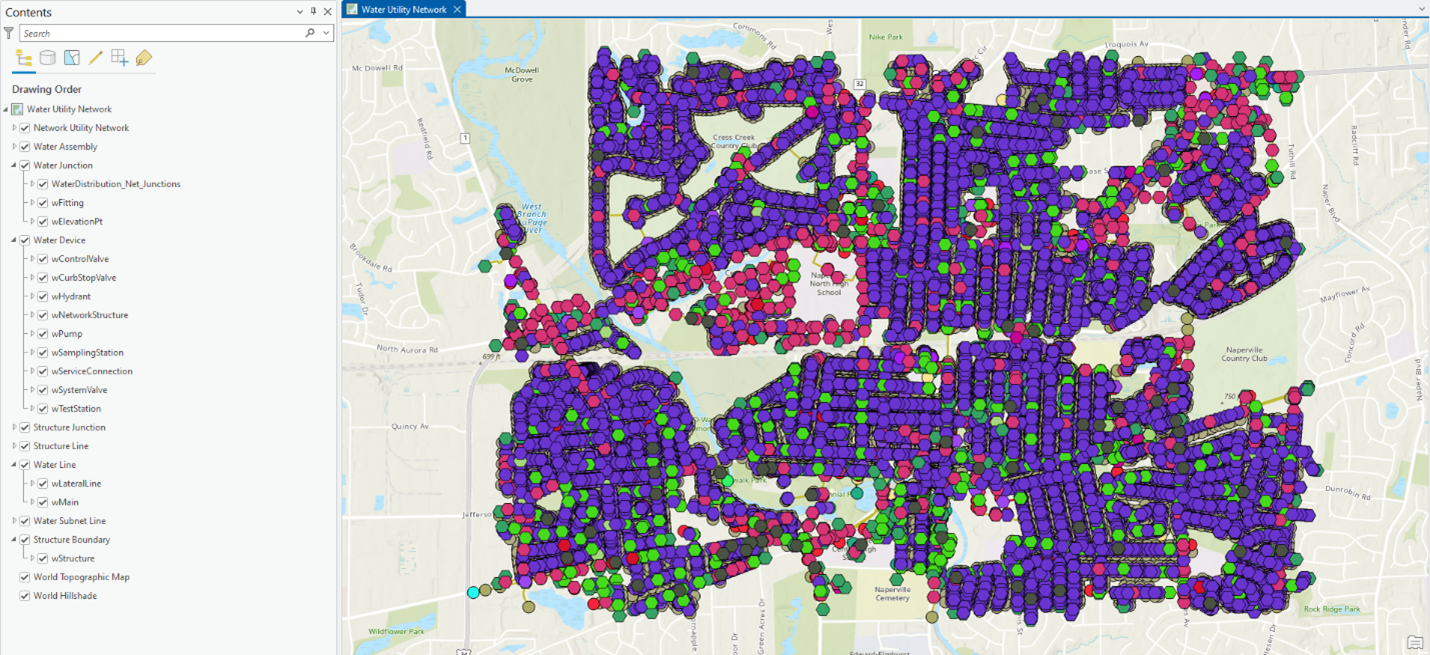
Migrating your data is just the first step in the process. You still need to work through any data quality issues, adjust the model to suit any business requirements you have, and begin testing your organization’s workflows using the new model. You can find examples and resources supporting these activities on the Esri Community site.
Frequently Asked Questions
How do I access the Migration toolset?
The Migration toolset can be found under the Utility Network toolbox in ArcGIS Pro 3.5. Customers who using ArcGIS Pro 3.3 can access a standalone version of the tools compatible with ArcGIS Pro 3.3 on the Esri Community site.
Does the Migration toolset require any additional licenses?
All the tools in the toolbox can be run using an ArcGIS Pro Standard or Advanced license (3.3 or earlier) or ArcGIS Pro Professional or Professional Plus license (3.4 or later).
What licenses are required to work with the utility network?
The mobile geodatabase output from the Migrate To Utility Network tool can be edited and configured using an ArcGIS Pro Standard license. Working with a utility network in a mobile or file geodatabase does not require an Advanced Editing user type extension (or ArcGIS Utility Network user type extension when working with ArcGIS Enterprise 11.1 and earlier).
You will need an ArcGIS Utility Network user type extension (11.1 or earlier) or Advanced Editing user type extension (11.2 or later) only if you plan to deploy the utility network to ArcGIS Enterprise. For a full list of licensing requirements for different capabilities of ArcGIS Enterprise and Utility Network, refer to the ArcGIS Enterprise Functionality Matrix.
How do I decide which approach or data model to use?
If you aren’t certain which model or approach to use, please reach out to your account manager. You can find some key talking points in the Choosing the right model for you article.
How much time will it take to run this tool?
The first run of the tool takes longer because you need to determine how the tool should be configured to migrate your source data. Once the tool is configured, it typically completes in less than an hour for small and medium-sized datasets. The tool takes longer to run on larger datasets, datasets with many classes, or datasets with many relationship classes.
How do I rerun the migration to get a newer database?
When you run the Migrate to Utility Network tool it creates a data loading workspace in addition to the new geodatabase. This allows you to rerun the data migration whenever you’d like using the Data Loading toolset.
If you want to make changes to your migration, you can use the geoprocessing history pane to open the Migrate To Utility Network tool with the same parameters you originally configured. You can then make any desired adjustments and rerun the tool to create a new database with a different data model and configuration.
For more information on this workflow, read the Migrating to the Utility Network article.
Once I’ve migrated my data to the utility network, can I change my model to a Utility Network Foundation later?
The utility network dataset created by the Migrate To Utility Network tool and the Utility Network Foundations have the same potential capabilities. The difference is in the data models and configuration of each network. If you decide later to switch to using a Utility Network Foundation, you will need to migrate your data to the data model used by your desired utility network foundation.
Conclusion

Many customers looking to benefit from the full capabilities of a utility network will continue to pursue implementing Utility Network Foundations to support their advanced network information management system requirements. Regardless of the approach you take these or the size of your organization, these tools make it easier for you get your data into a utility network
Read the Get started with the Migration Toolset article to learn how to access the Migration Toolset along with all the documentation surrounding the new tools and their workflows. If you have any questions, be sure to ask them on the ArcGIS Utility Network channel on the Esri Community Site! You can not only ask questions there, but you can download these tools and find additional resources covering topics like configuring your own model and data migration.


Very exciting tools! I’m looking forward to testing them out