Many urban planning efforts need to adapt to changing circumstances. Read this blog post to learn how to use ArcGIS Urban to embrace change in urban planning:
- Edit a plan’s study area.
- Update the existing conditions.
- Copy parcels between scenarios.
Implement a hypothetical planning scenario
A city’s planning department identified an area in a neighborhood with a considerable potential for densification. Now, they envision transforming the area into a highly livable mixed-use neighborhood. Redeveloping the mentioned area will alleviate the city’s housing shortage and contribute to the city’s goal of reducing urban sprawl.
During the planning process, it becomes apparent that a developer plans to rebuild several parcels adjacent to the city’s transformation study area. Consequently, the developer and the planning department agree to include the parcels in the city’s study area. This allows for a holistic view and the coordination of the two planning efforts.
Let’s see how you can implement the outlined scenario with Urban.
Expand the study area
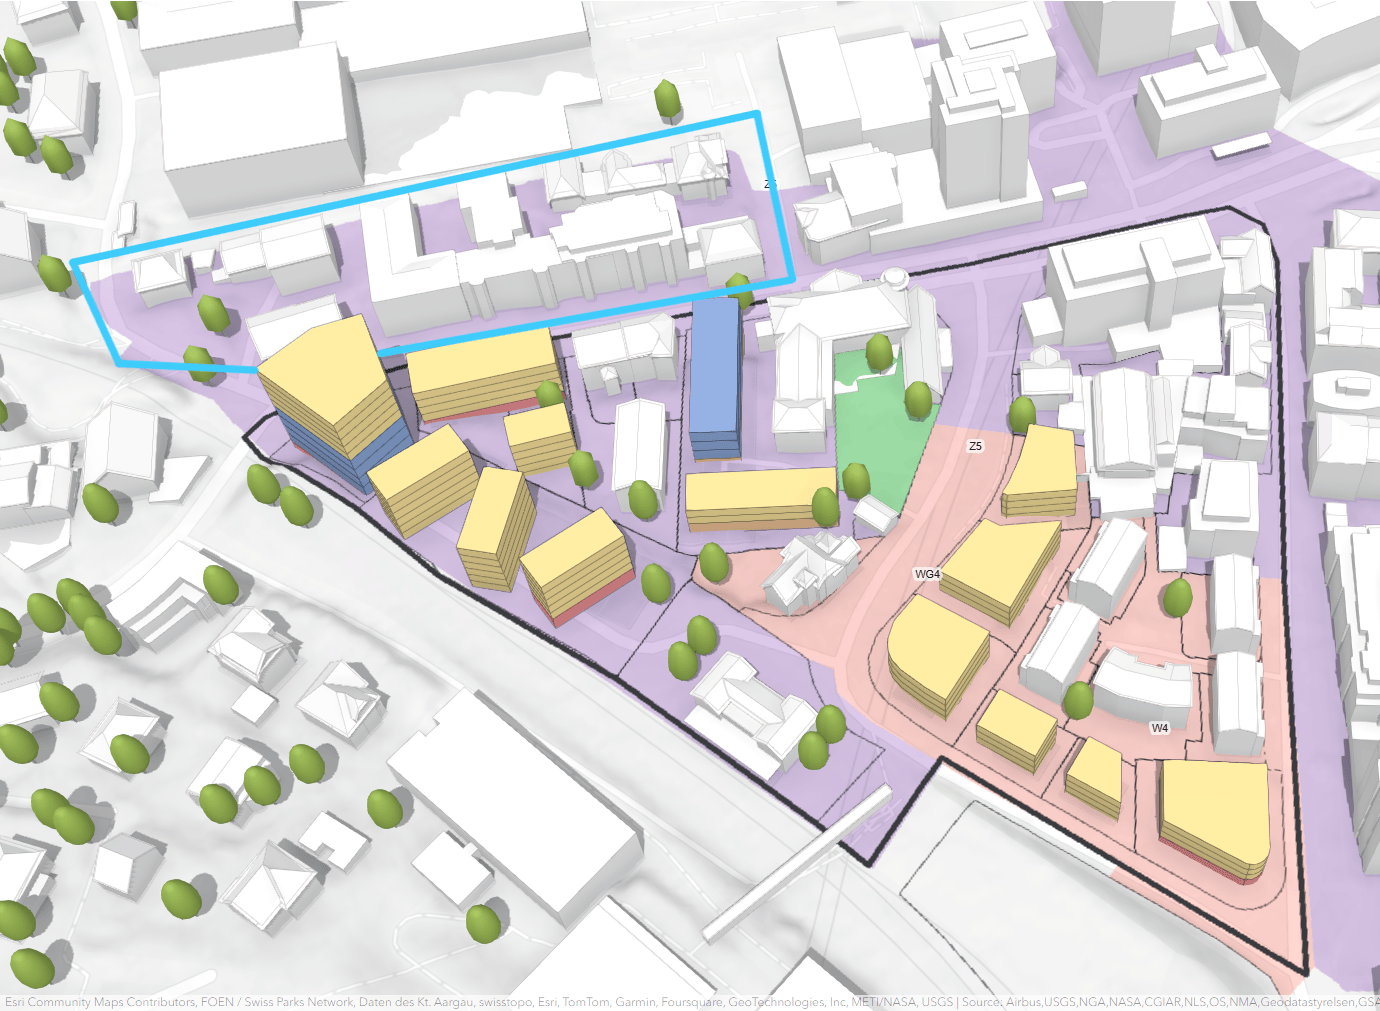
Image yourself as the urban planner in this scenario. You already designed a future development scenario for the transformation plan. Now, you want to expand the city’s plan study area to include the developer’s parcels. The blue rectangle below depicts the location of the developer’s parcels.

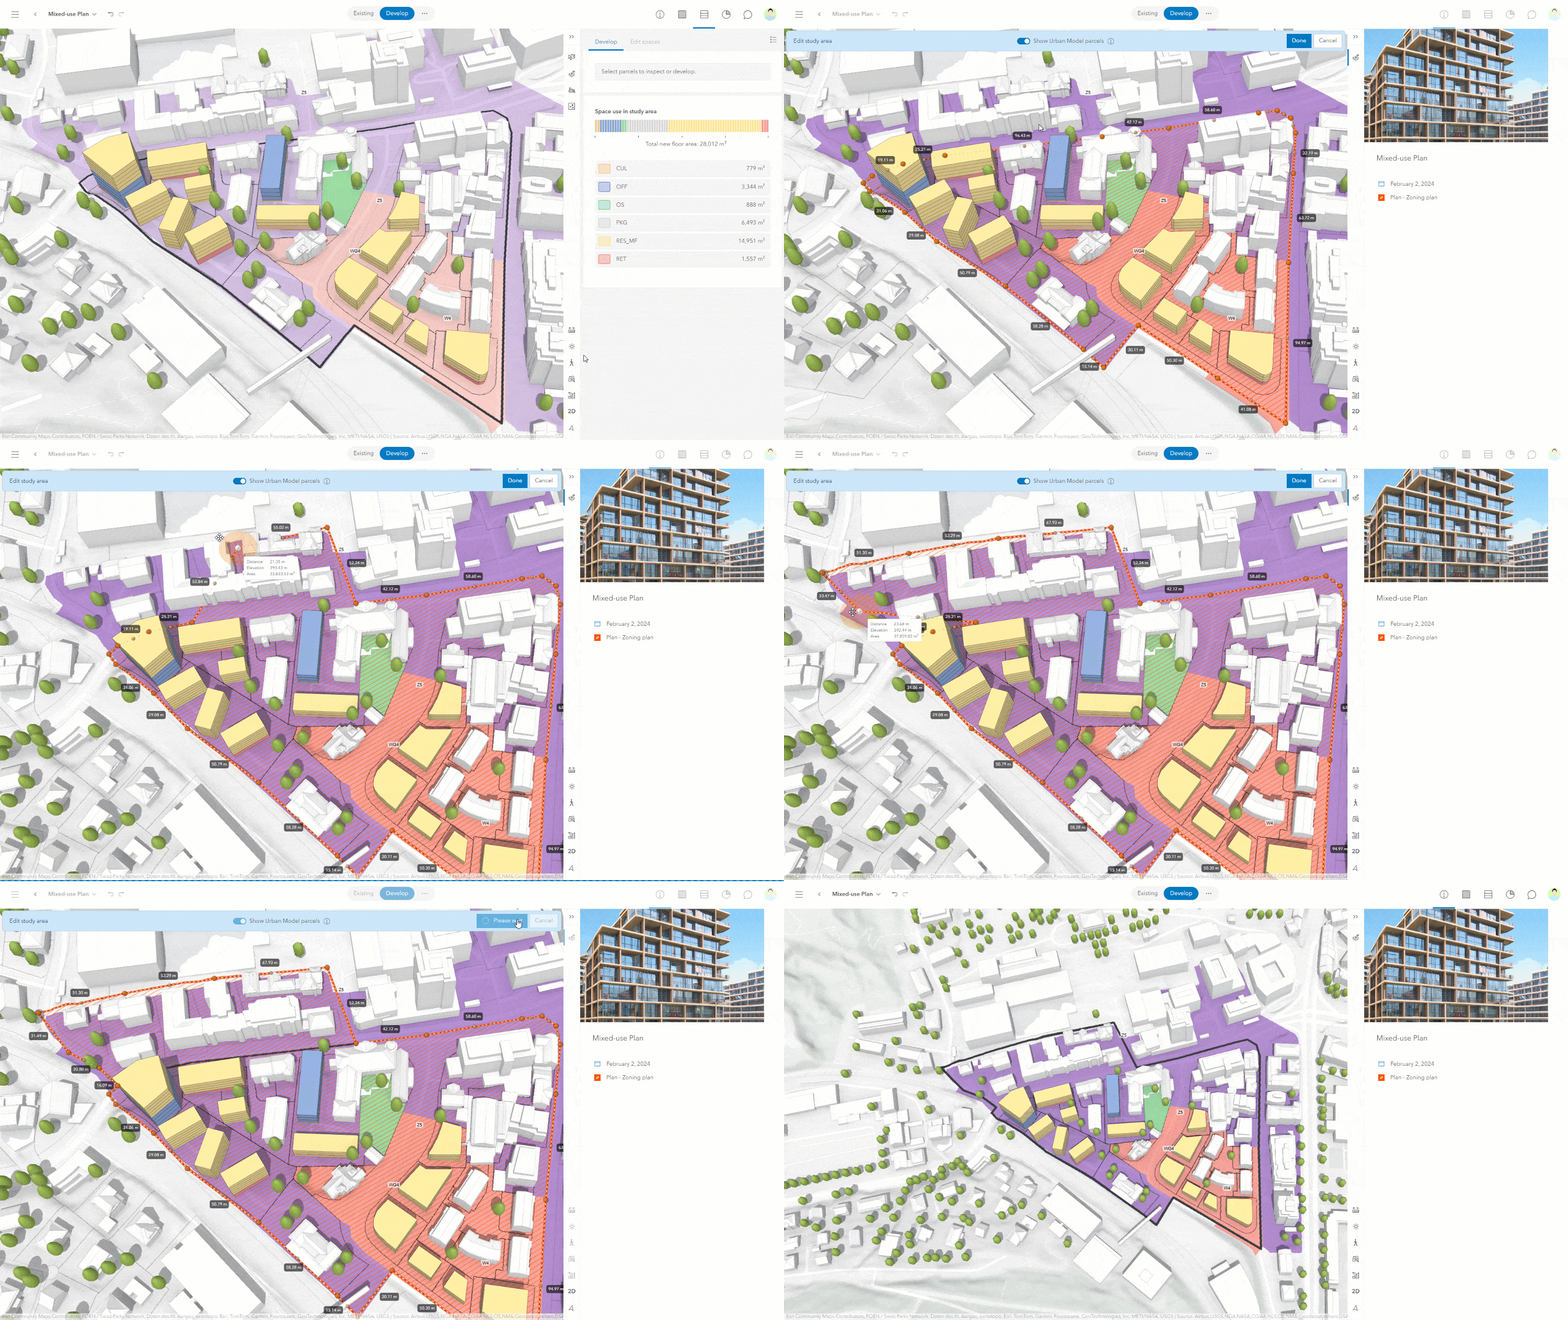
First, you need to expand the study area of the existing plan to include the developer’s parcels:
- Open the plan.
- Open the Details side panel.
- Open the Edit study area tool.
- Display the Urban Model parcels.
- Edit the plan study area to include the developer’s parcels completely.
- Click Done to confirm your edits.

As a result, our updated study area now includes the area of the developer’s parcels. However, it does not yet include the actual parcel geometries.
Updating the parcels in an existing plan
Next, we want to import the developer’s parcels to our plan with the expanded study area. You can update and import new parcels to an existing plan in two steps:
- Update the parcels in the existing scenario.
- Copy a selection of parcels from the existing to your future development scenario.
Update the existing scenario
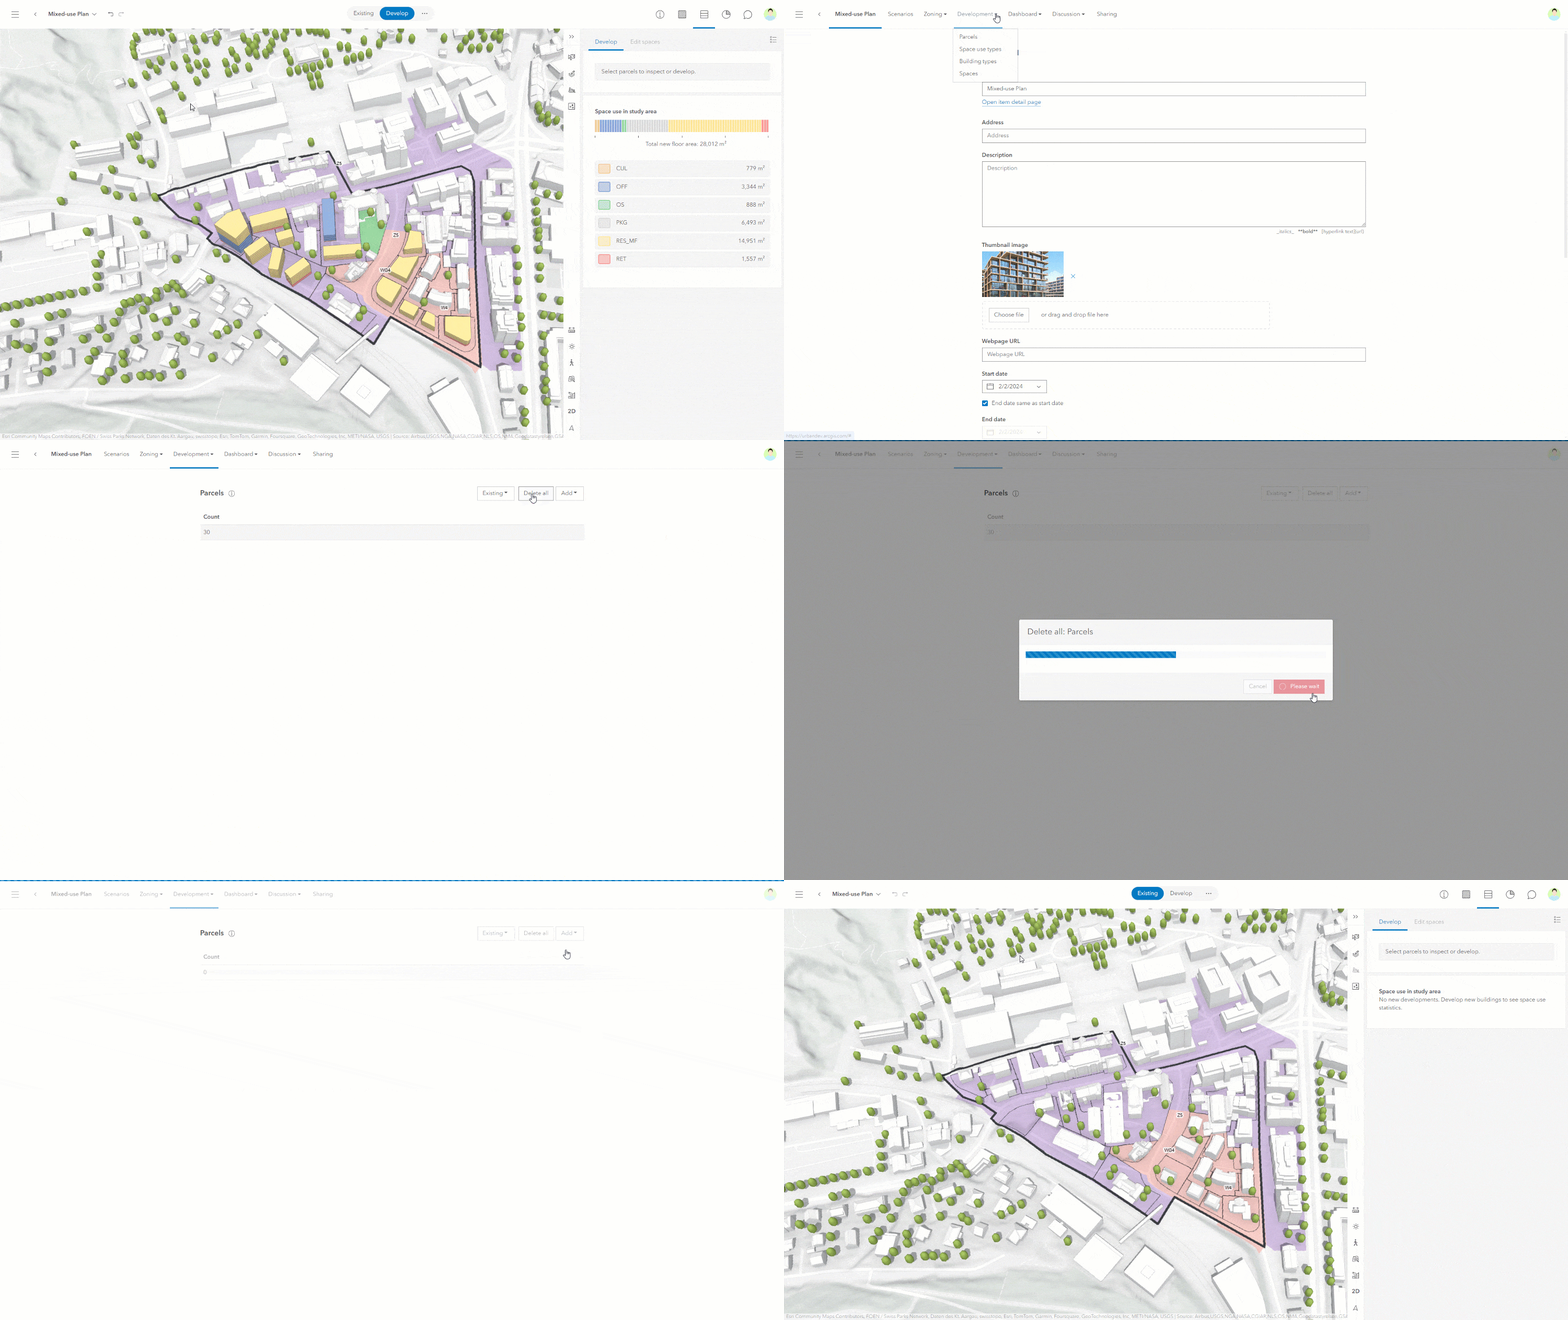
Each plan in Urban includes an Existing scenario reflecting the current situation. The new “Import parcels from Urban Model” feature makes it easy for you to update the Existing scenario:
- Open the plan configuration.
- Select Parcels from the Development drop-down menu.
- Select the Existing scenario.
- Delete all the parcels in the Existing scenario.
- Click Add > From Urban Model to import the parcels within the (now expanded) study area from the urban database.
- Exit the plan configuration. Finally, you will see that the existing scenario includes the developer’s parcels.

Copy parcels from the existing scenario to your design scenario
Eventually, you want to include the developer’s parcels in your development scenario. You can easily achieve this by copying them from the Existing scenario to the development scenario:
- In the Existing scenario, select the parcels you want to copy. Use the advanced selection tools or CTRL-click in the scene view to select multiple parcels.
- Open the Edit parcels toolbar.
- Select the Copy parcels to scenario tool.
- Select the target scenario to which to copy the parcels.
- Choose how Urban should handle overlaps if the copied parcels overlap with parcels in the target scenario. You can choose between Preserve and Replace.
Select Preserve because you don’t want your existing design proposal to change.
Check out the documentation about copying parcels for more details. - Click OK.
- See the copied parcels in the target scenario highlighted.

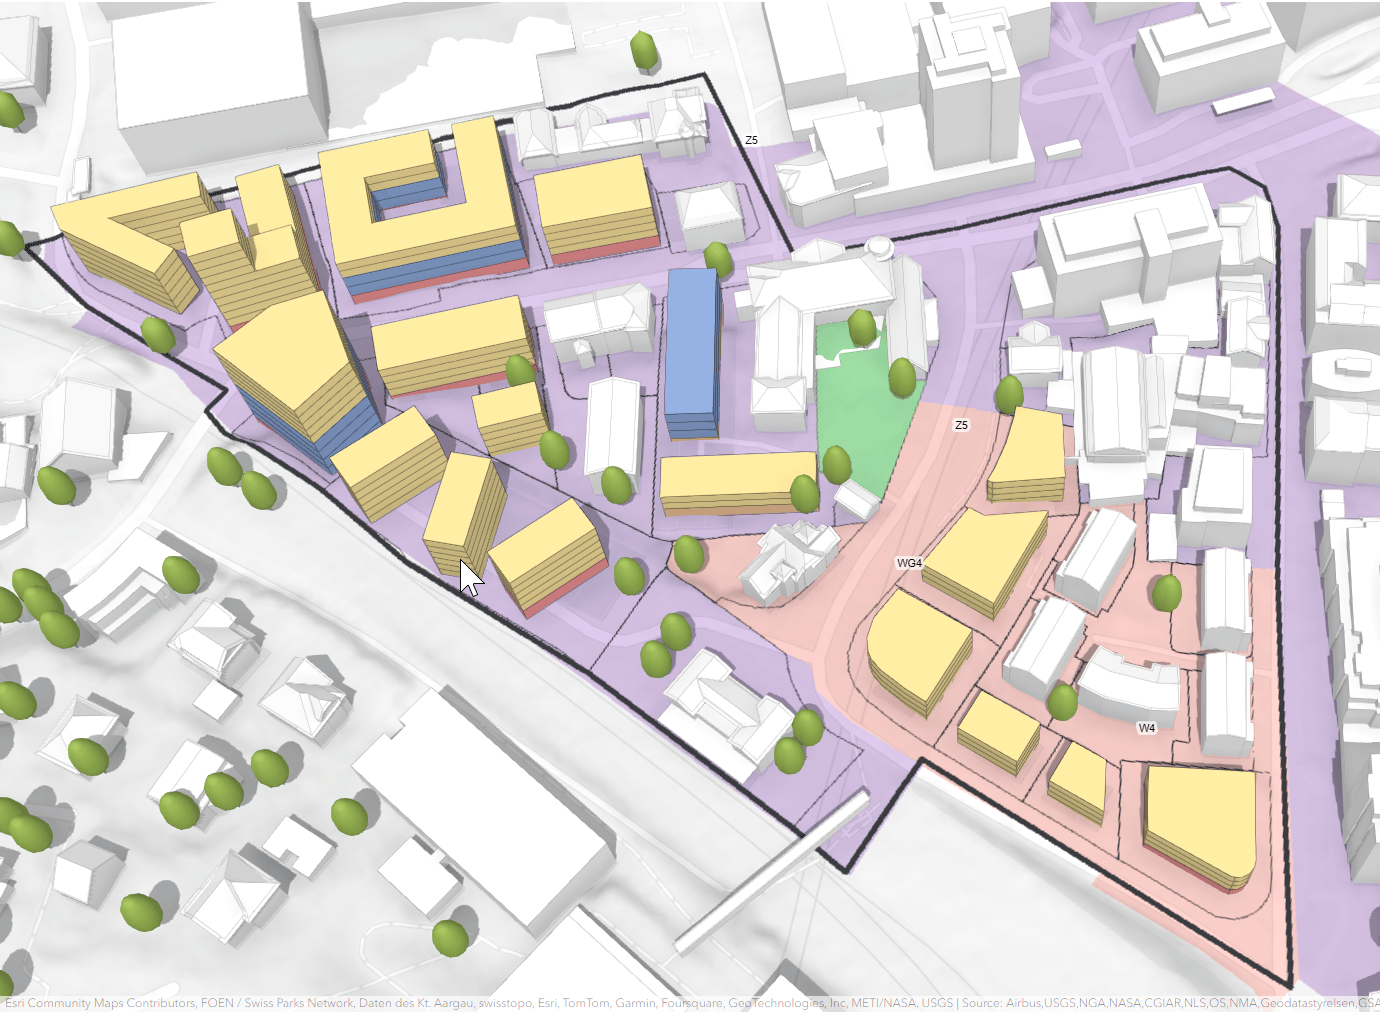
You have now successfully expanded the plan’s study area and updated the Existing and development scenarios to include the developer’s parcels. At this point, the plan is ready to include both the city’s and developers’ design proposals. It now provides a holistic view of the planned developments within the updated study area, as shown in the image below.

Key takeaways
Planning processes are often uncertain and depend on changing circumstances. That is why the February 2024 release of Urban introduces new tools to meet the needs of such living plans. You can now modify the study area of existing plans, import parcels from the Urban Model to plan scenarios and copy parcels between scenarios. The blog post describes a best practice for this workflow.
Frequently asked questions
Q: Why are two separate steps required to update the parcels after expanding the study area?
The two steps allow you to specify which parcels should become part of your design scenario. In addition, you don’t risk accidentally deleting proposed buildings from your design scenarios.
Urban doesn’t allow for incremental data updates in scenarios. For this reason, you need to delete all parcels from a scenario before importing new ones. Because proposed developments are always linked to a parcel, you risk losing proposed developments by deleting all parcels from a design scenario. The existing scenario never contains proposed developments. Therefore it is safest to use the existing scenario for bringing in updates.
Q: What happens with parcels and developments when I shrink the study area?
Parcels and developments outside the study area remain visible in the scene view. However, they are not included in the space use legend in the development mode. They are also ignored for the metric calculations reported in the dashboard mode. If parcels are outside the study area, you’ll see a warning icon in both modes. As you hover over this item, the parcels outside the study area will be highlighted in the scene view.
Q: Can I also import zoning boundaries from the Urban Model system of record?
This is not yet possible with the current version of Urban. We might add this feature in the future.
Q: What happens when I copy a parcel with a proposed development from one scenario to another?
The proposed development is copied to the target scenario together with its associated parcel.
Q: What happens if the copied parcels overlap with parcels in the target scenario?
You can choose from two options on how overlap in the target scenario should be handled:
- Preserve: This preserves all parcels in the target scenario. The copied parcels will be clipped if necessary.
- Replace: This removes parcels from the target scenario to make the copied parcels fit.


Article Discussion: