Note: This blog article covers the classic Esri Story Maps which are in mature support and scheduled to be retired in late 2025. Story authors are strongly encouraged to use the new ArcGIS StoryMaps to create stories.
For more information about transitioning to the new StoryMaps, see ArcGIS StoryMaps resources. For more information about the transition from classic Esri Story Maps to the new ArcGIS StoryMaps, see Esri Story Maps: Now in mature support.

Flickr is a very popular photo sharing site with many millions of users. One of its features is an album, letting you organize photos by category or theme. Album contents can be viewed using auto-slideshow mode, or click-to-advance. Follow these steps to add Flickr albums to your Story Maps.
Step 1: Open your Flickr photo album
Login to your Flickr account, and click Albums to view your available photo albums. Choose one of your albums by clicking the cover photo:

Step 2: Open the album in show mode
Click to open the album as described in Step 1, and at the end of the URL displayed add “/show” and hit Enter from your keyboard. This opens your album in auto-advance mode.
Step 3: Grab the embed HTML
In the upper right of the slideshow click Share, then click Copy to clipboard under Grab the embed HTML:
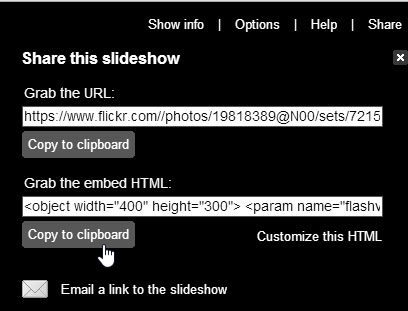
Note – you must be logged in to Flickr and the owner of the album to see this option.
Step 4: Make a simple web page using the embed HTML
Flickr prevents you from directly embedding the slideshow. To get around this, create a simple web page by pasting the embed HTML from above between opening and closing HTML tags (<html> and </html>), and save it as a .html file. You can center and fill the slideshow by changing the width and height attributes, as indicated below:
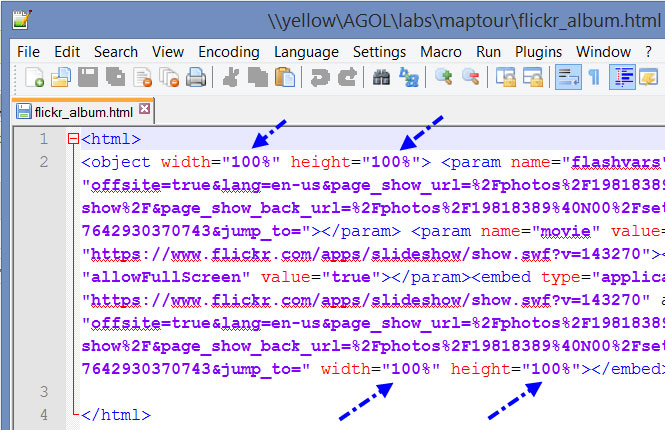
Copy the HTML document to a publicly accessible URL location, such as your web server or other hosting service.
Step 5: Add the Flickr slideshow to your Story Map
Your HTML document can be added to any Story Map that accepts a web page. Follow the instructions below to insert the Flickr album into the story map app you’ve chosen.
Story Map Journal
1. Add a new section and click Web page.
2. Paste the URL for the HTML document you created in Step 4 above into the Webpage URL input.
3. Click Configure
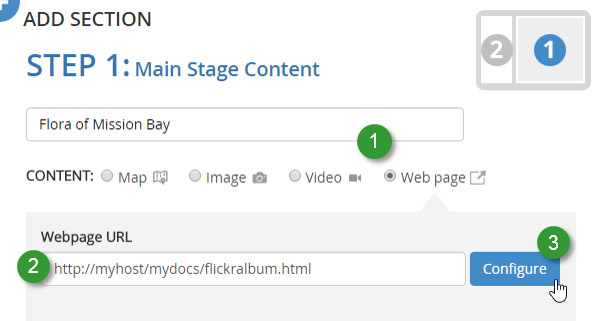
4. Choose Stretch (the album will not distort).
5. Click Next.
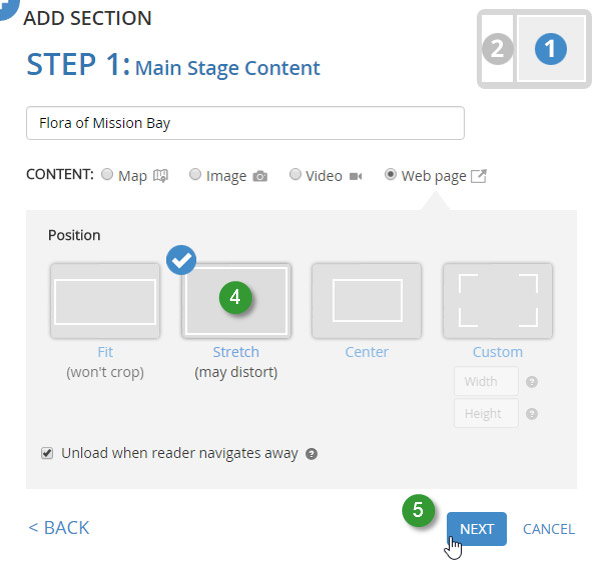
Make other changes as desired. When finished save your Story Map Journal.
Story Map Series
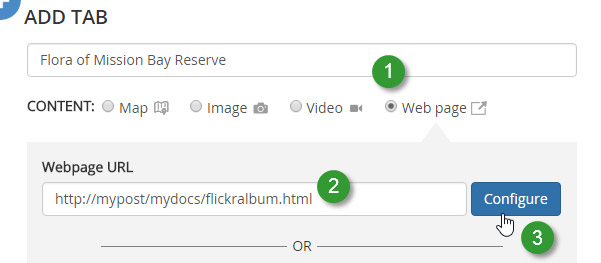
1. In a new tab, bullet, or entry click Web page.
2. Paste the URL for the HTML document you created in Step 4 above into the Webpage URL input.
3. Click Configure.
4. Choose Stretch (the album will not distort).
5. Click Add.
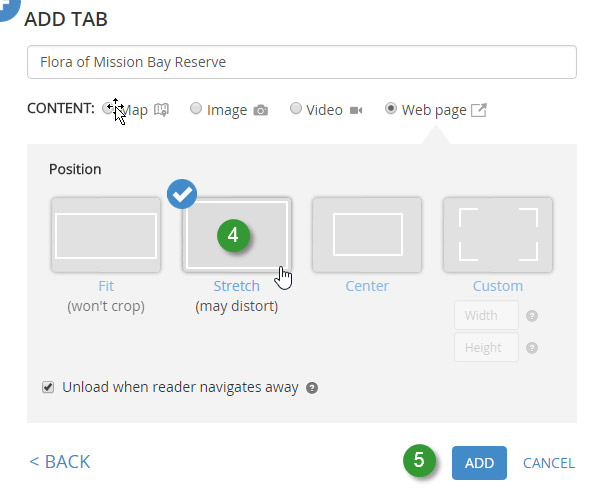
Make other changes as desired. When finished save your Story Map Series.
Story Map Tour
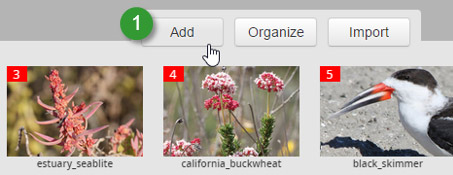
1. Open your map tour in builder mode, and click Add to add a new tour point.
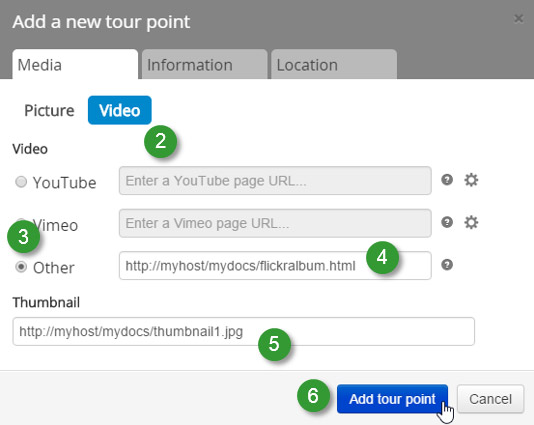
2. On the Media tab of Add a new tour point, click Video.
3. Choose Other.
4. Paste the URL for the web page you created in Step 4 above into the Other input.
5. Add a thumbnail of your choosing.
6. Click Add Tour Point.
Add information about the new stop, set the location, and make other changes as desired. When finished save your Story Map Tour.
View your story map
You’ve now successfully added a Flickr album slideshow to your story map. You can view the slideshow in full screen mode by clicking the full screen option in Flickr, and can toggle from album auto-play to click-to-advance.
Tips:
Less is more, use Flickr albums minimally. Story Maps already enable you to add individual photos from Flickr, so use albums only when they enhance your story, and keep the number of photos in your albums to a minimum.
For more information
For more information see the Story Maps website and view details provided for each Story Map app.


Commenting is not enabled for this article.