Note: This blog article covers the classic Esri Story Maps which are in mature support and scheduled to be retired in late 2025. Story authors are strongly encouraged to use the new ArcGIS StoryMaps to create stories.
For more information about transitioning to the new StoryMaps, see ArcGIS StoryMaps resources. For more information about the transition from classic Esri Story Maps to the new ArcGIS StoryMaps, see Esri Story Maps: Now in mature support.

PowerPoint is the standard when it comes to presentations. PowerPoint slides can also be useful additions to your Story Map, providing an introduction, additional context, interesting graphics, and more.
One use case is when making a presentation that requires you to toggle back and forth from a PowerPoint presentation to a map or an app. The transitions between them can be awkward and jarring, and it may be beneficial to just add your PowerPoint slides to your story map and make your presentation using a single app – your story map that includes your PowerPoint slides.
Whether you’re just adding an image or two from a PowerPoint slide for a title or context, or are creating a complete presentation, here’s how to add PowerPoint images to your stories.
Examples
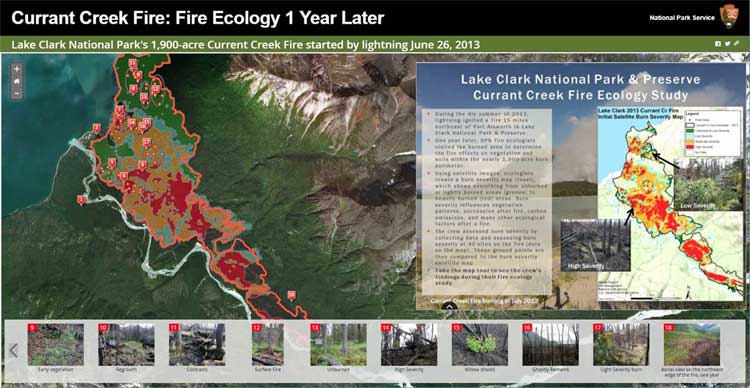
This Story Map Tour uses an image from a PowerPoint slide as the introduction for the Tour.

Shown below is a PowerPoint slide in a Story Map Series, bulleted layout, that was used for a presentation.

See Using Story Maps instead of PowerPoint.
Turn your PowerPoint slides into images
A PowerPoint slide can’t be added directly to a story map, they must be captured or exported first, and then added to your story map. There are two options to save a slide as a graphic – export from PowerPoint, or use a graphics program to capture the slide.
In PowerPoint, go the to File tab and click Save As

then choose JPEG or PNG as the Save as type.

PowerPoint provides the option to save individual slides, or all slides in your presentation.

A second option is to use a graphics program to capture and save the desired slides.
Tip: Keep your slides in the same dimensions and aspect ratio for best results.
Add the slides to your Story Map
The easiest and best way to add the slide images to your Story Map is to add them from your local drives where you’ve exported them. When using this method, the images are automatically resized and optimized, and stored within your story map when using Story Map Series, Story Map Journal, and Story Map Cascade.
Story Map Tour supports local files via uploading them to your ArcGIS account. Your images will optimized and stored as a pair of attachments in a feature layer for each point in your tour, one attachment for the featured image and another for the thumbnail. Since you are creating a feature layer, Publisher or similar privileges are required.
Optionally you can place the slides at a location where they can be accessed via a URL. There are lots of options; your own server, Box, Flickr, Google Photos, your ArcGIS Online account, and more. Ensure that you are obtaining the full permalink URL directly to the slide (and that they are not displayed in a viewer), and that the slide will not be inadvertently deleted.
For more information, and for step-by-step instructions for each Story Map, see Add images from your local drives to your Story Maps.
More information
For more information see the following topics at the Story Maps website.
- Story Map Tour overview
- Story Map Tour tutorial
- Story Map Series overview
- Story Map Series tutorial
- Story Map Journal overview
- Story Map Journal tutorial
- Story Map Cascade overview
- Story Map Cascade tutorial
For more information about the new StoryMaps, see ArcGIS StoryMaps resources.
This post was originally published August 14, 2015, and has been updated.

Commenting is not enabled for this article.