Mountain lions need room to roam, and the rugged mountains northwest of Los Angeles provide this protected species the space it needs to hunt and breed. To identify habitats suitable to the mountain lions’ needs, you’ll use a Raster Function Templates (RFTs) to weight several criteria and create a suitability raster. RFTs are fast and easy ways to process rasters that apply processing directly to each pixel on the fly without modifying the original raster or taking up storage space.
In this blog, you’ll save a RFT from ArcGIS Online and edit it to produce a suitability raster for mountain lion habitats. This RFT was built based on the model in the Build a Model to Connect Mountain Lion Habitats Learn lesson.
1. Download the Mountain Lion project zip file.
2. Unzip the data to your C drive.
This data folder contains a geodatabase with data you’ll use in the raster functions template. The raster functions template is based on the model that is built in this lesson- for more information about each dataset and the wildlife corridor issue in general, you can reference the Build a Model to Connect Mountain Lion Habitats Learn lesson.
3. Double-click the Mountain_Lion_Corridors.aprx file to open ArcGIS Pro.
Now that you have the data you need, you’ll open the raster function template (RFT). RFTs can be published to ArcGIS Online and added to multiple projects for use. Raster functions can be helpful as they are calculated on the fly and allow you to make continuous tweaks to your model.
4. In the Mountain_Lion_Corridors project, on the ribbon, click the View tab and choose Catalog Pane.
5. In the Catalog pane, click the Portal tab and choose All Portal. Search for the Mountain Lion Suitability raster function template. If necessary, add the search term owner:Learn_ArcGIS.
6. Right-click Mountain Lion Suitability RFT and choose Open Raster Function.
When opened, the Parameters tab of the RFT looks like geoprocessing tool. This RFT was written so that the model only needs four inputs. The rest of the functions in the chain are dependent on the output of the previous calculation. As you can see in the tool, the RFT requires four inputs that will help determine what is most important to a mountain lion when choosing a habitat.
| Suitability Considerations | Input layer | Weight |
| Far from roads | Roads feature class | 20% |
| Minimally developed land | Protected Status | 25% |
| Rugged terrain | Elevation (Terrain DEM) | 25% |
| Dense land cover | Land Cover (NLCD) | 30% |
Mountain lions tend to avoid people, as they scare away prey and can be dangerous. Roads are dangerous for mountain lions, and serve as a proxy for development. Protected status is another measure of this; state parks, national forests, etc. tend to be minimally developed, and will stay that way, making them not only ideal for mountain lions, but also attractive to conservationists trying to spend the least amount of money on a potential wildlife corridor. Rugged terrain and dense landcover both help mountain lions stalk prey, like deer, coyotes, feral pigs, and other small animals.
In order to edit the template, you’ll need to save it to your project. Once saved, you can change the parameters, add more functions, etc. The changes will be saved locally, so you can re-run the template as many times as you want without pulling it from the portal each time you need it.
7. At the bottom of the Raster Functions pane, click the Create new layer menu and choose Save As.

8. In the Save As pane, for Category, make sure Custom is selected.
Saving the RFT as a custom function template will allow you to open it in other projects without pulling it off the portal each time.
9. Click OK.
The RFT is now available in the Custom tab of the Raster Functions pane. Before you run the RFT, you want to look at the input data needed.
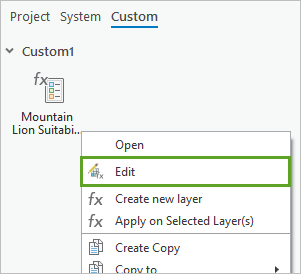
10. On the Custom tab, right-click Mountain Lion Suitability and choose Edit.

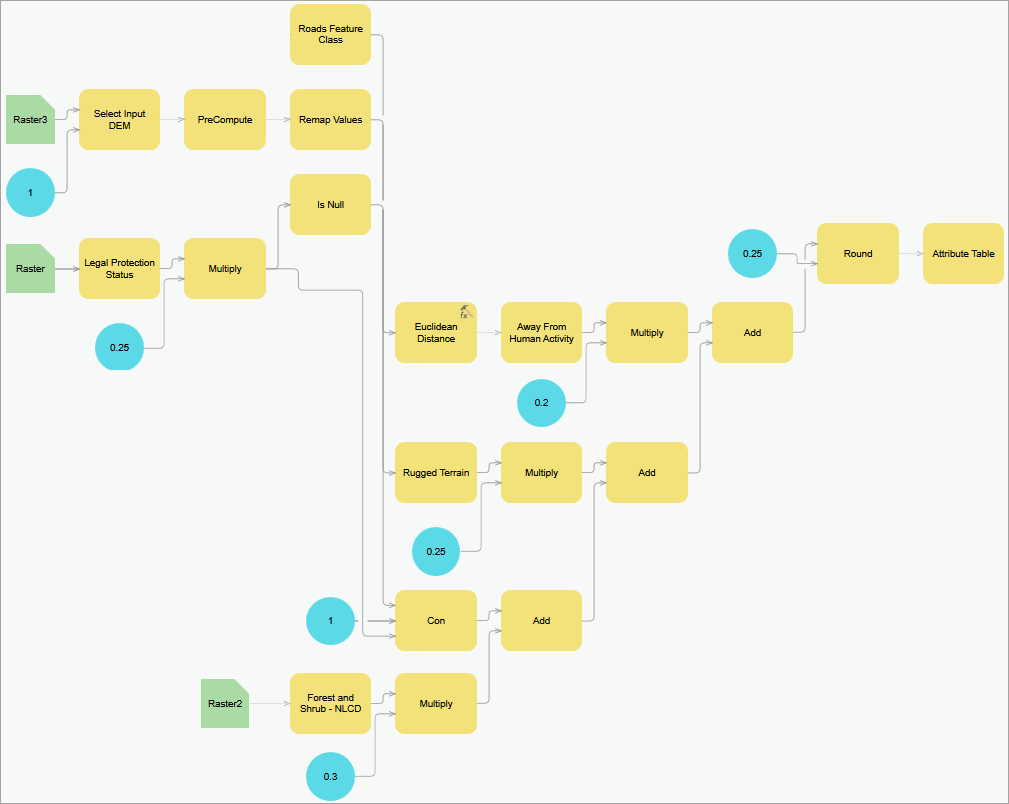
The Raster Functions Editor pane opens.

Note: Your model may be formatted differently. The inputs will remain constant.
Raster variables (your input layers) are in green boxes. Constants (weights) are in blue circles, and raster functions are in yellow boxes. For more information about how the RFT transforms and combines the data, refer to the Build a Suitability Model lesson.
11. In the Raster Function pane, click the Mountain Lion Suitability RFT to reopen the RFT Properties.
The first input is the Roads Feature Class. Notice that this is not a raster yet- the first function it is passed through is the Rasterize Features function.
12. In the RFT Editor, double-click Roads Feature Class.
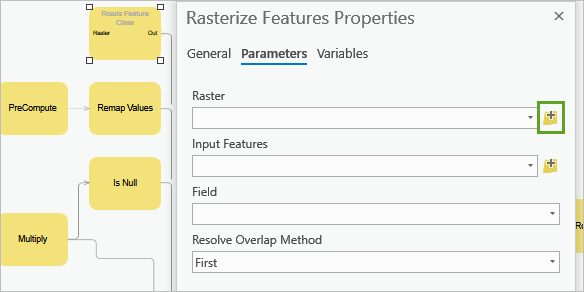
In the Rasterize Features Properties window, note that the tool inputs require the roads feature class as well as a raster layer to define cell size and extent.
13. In the Rasterize Features Properties window, for Raster, click Browse.

14. In the Input Dataset window, browse to C:\Mountain_Lion_Corridors, or where you unzipped the lesson data. Open the Mountain_Lion_Corridors geodatabase and choose Protected_Status.
This raster has no effect on the roads layer itself; it only determines the cell size and extent of the output. You’ll still need to set the Input Features in the Raster Functions pane.
15. In the Rasterize Features Properties window, click OK.
The Protected Status raster is added as the input raster to Roads Feature Class. Notice that this input is blue- that means it is a constant input. If you want to rerun the RFT, you’ll need to make sure the data is accessible from the same file path or edit the template to point to a new input.
16. In the Editor pane, click Save to save your edits to the template.
17. In the Raster Functions pane, if necessary, click Mountain Lion Suitability RFT in the Custom gallery to open the template Properties.
18. For Roads Feature Class, click Browse and choose Roads from the Mountain_Lion_Corridors For Field, choose ROAD_CL.
19. For the rest of the inputs, select the following from the Mountain_Lion_Corridors geodatabase:
- Select Input DEM: Elevation
- Legal Protection Status: Protected_Status
- Forest and Shrub – NLCD: Land_Cover
Note: You can also use services from the Living Atlas as inputs to these functions. For example, for the Input DEM, you could browse to the Terrain imagery layer in the Living Atlas.
20. Click Create new layer.
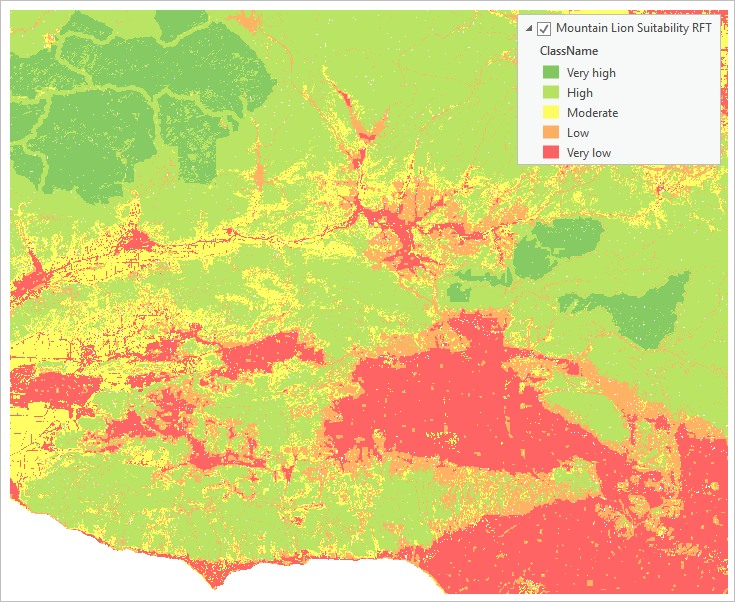
When the RFT finishes running, a suitability raster will be added to the map.

In this model, areas in dark green are most suitable for mountain lions and areas in red are least suitable. The majority of the areas in red here align with human development in the San Fernando Valley and Los Angeles.
21. In the Catalog pane, browse to the Mountain_Lion_Corridors geodatabase and drag the Core_Mountain_Lion_Habitats layer onto the map.
The established mountain lion habitats align with your calculations, and based on the output of your suitability surface, you may be able to suggest habitat areas to extend protections to.
If you want to edit template parameters, such as weights or raster inputs, you can edit the RFT in the Editor pane and rerun the RFT as many times as you want. Make sure to save the edits each time.


Commenting is not enabled for this article.