By Rajinder Nagi, Esri Cartographic Product Engineer
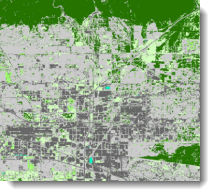
In a previous blog entry, we discussed how you can use Landsat image services in ArcMap to see the change over time. In this blog entry, we dive further into Landsat image services and describe how you can create thematic land cover maps which can then be used for analyses, such as land cover change detection.
The image classification process involves conversion of multi-band raster imagery into a single-band raster with a number of categorical classes that relate to different types of land cover.
There are two primary ways to classify a multi-band raster image; supervised and unsupervised classification. Using the supervised classification method, an image is classified using spectral signatures (i.e., reflectance values) obtained from training samples (polygons that represent distinct sample areas of the different land cover types to be classified). These samples are collected by you, the image analyst, to classify the image. With the unsupervised classification method, the software finds the spectral classes (or clusters) in the multi-band image without the analyst’s intervention, thus being unsupervised. Once the clusters are found, you then need to identify what the cluster represents (e.g., water, bare earth, dry soil, etc…)
In this blog entry, we explain how to use the Landsat image services with supervised classification method to create a land cover map. If you want to follow along, you can download the zip file we created for you to try this out yourself.
To start, open the Landsat_SupervisedClassification.mxd in the zip file, which has TM_Multispectral_2000 image service (4, 3, 2 band combination) and an area of interest (AOI) polygon already added to the Table of Contents. The image service contains data for whole world and in this case we want to focus on small area of interest. So we added an AOI polygon feature class to the Table of Contents and zoomed into the area that we want to map. This is the extent that is shown in ArcMap when you open the .mxd.
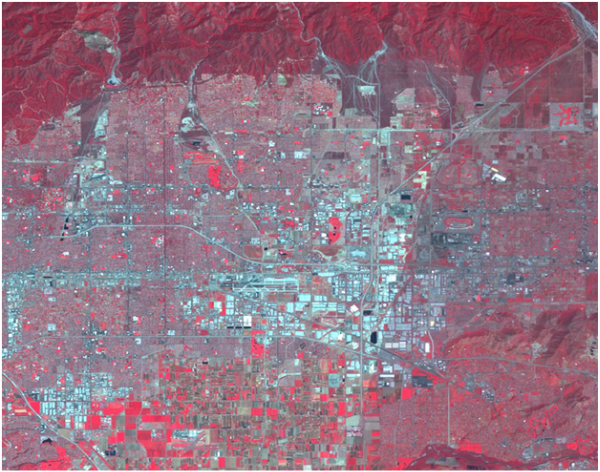
Figure 1. The LandsatGLSTM_Multispectral_2000 image. Bands 4, 3, and 2 are displayed rendering a color infrared image
After enabling the Spatial Analyst extension, you can add the Image Classification toolbar to your ArcMap interface (you will need a Spatial Analyst license to use the toolbar). The Image Classification toolbar provides a user-friendly environment for creating training samples and signature files. A signature file records the spectral signatures of different classes across a series of bands) for supervised classification. It also serves as a central location for performing both supervised classification and unsupervised classification using ArcGIS Spatial Analyst.
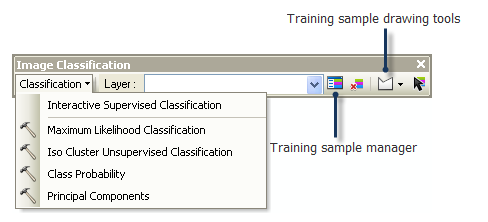
Figure 2. The Image Classification toolbar
On this toolbar, to the right of the Layer drop down box is the Training Sample Manager icon ![]() . When you click this, it opens the Training Sample Manager (figure 3). This is the mechanism for managing training samples to edit the class names or values, merge and split classes, delete classes, change display colors, load and save training samples, evaluate training samples, and create signature files.
. When you click this, it opens the Training Sample Manager (figure 3). This is the mechanism for managing training samples to edit the class names or values, merge and split classes, delete classes, change display colors, load and save training samples, evaluate training samples, and create signature files.
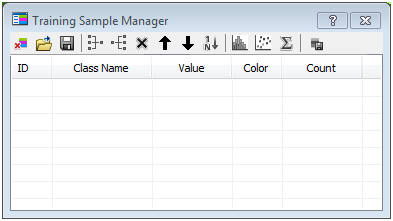
Figure 3. The Training Sample Manager
Using the Training sample drawing tools ![]() (figure 1), you can collect the training samples for your area of interest.
(figure 1), you can collect the training samples for your area of interest.
Adding the area of interest (AOI) polygon to ArcMap helps you focus on the area within the image that you want to classify. Refer to this ArcGIS online help topic, Creating training samples to follow the step-by-step instructions for collecting the training samples.
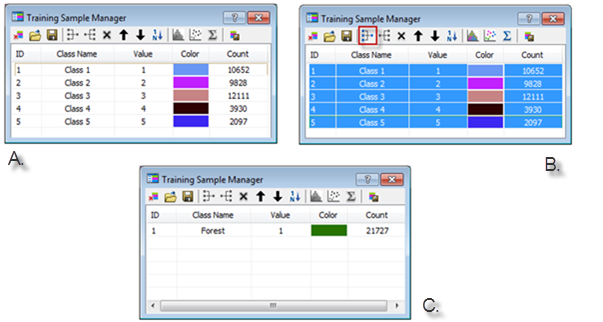
Figure 4. In my example, I took 5 samples that I thought represented forest (A). Each sample shows up as a separate class (B) but I want them all to be forest so I have to use the Merge function to make them one class, to call it forest and to assign it a color of green. The same process would be repeated for the other land cover classes you want to create (C).
Collect a few training samples for each of the classes you want to classify. Then use the Merge tool ![]() to merge the samples for each class. Provide a relevant class name and select a color to represent the class. In our example, we first collected samples for forest and named the class “Forest” and chose a dark green to represent the class. We repeated this process for the additional classes shown in Figure 5.
to merge the samples for each class. Provide a relevant class name and select a color to represent the class. In our example, we first collected samples for forest and named the class “Forest” and chose a dark green to represent the class. We repeated this process for the additional classes shown in Figure 5.
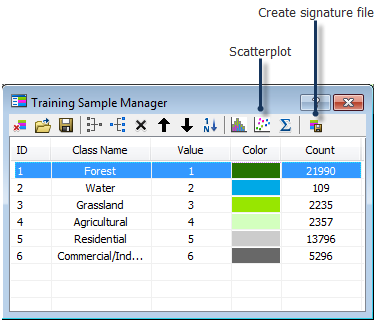
Figure 5. The classes that were created using training samples
Once you are done collecting training samples, click the Create Signature File icon ![]() on the Training Sample Manager to save the signature file to your local hard disk. You will use this in supervised classification at later stage. To make sure that the classes represented by the training samples are distinguishable, their spectral characteristics need to be checked.
on the Training Sample Manager to save the signature file to your local hard disk. You will use this in supervised classification at later stage. To make sure that the classes represented by the training samples are distinguishable, their spectral characteristics need to be checked.
You’ll use the scatterplots to compare the multiple training samples for each unique band combination of the image layer (in this case we will use band 4 3 2 unique combinations). A scatterplot allows you to see the separability and distribution of your training samples. If the training samples represent truly different classes, their scatterplots should not overlap. To view a scatterplot in ArcGIS, you can use the Scatterplots window. Select all the classes in the Training Sample Manager window and then click the Scatterplot icon ![]() on the Training Manager toolbar to create a scatterplot of all the classes you created (figure 6).
on the Training Manager toolbar to create a scatterplot of all the classes you created (figure 6).
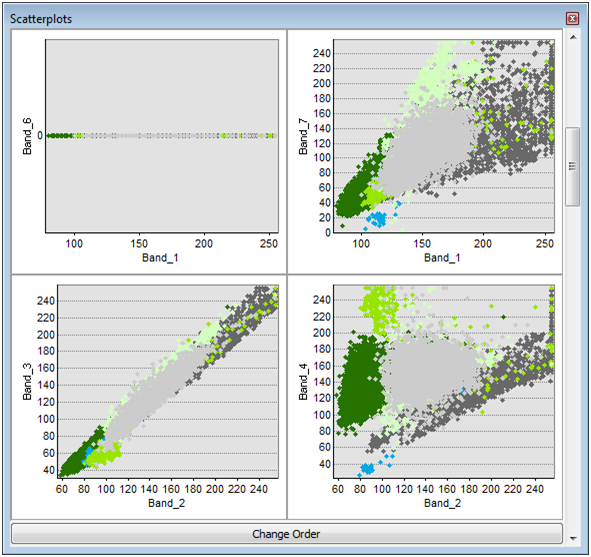
Figure 6. Scatterplots showing distribution of the training samples for all the classes we created
Using the scatterplots, analyze the quality of the training samples – you can determine that the samples you chose represent distinct classes if they do not overlap in the scatterplot.
Once you have selected distinct training samples, you can go ahead and classify the image. For this example, use the Maximum Likelihood method for supervised classification. Based on the maximum likelihood probability theory, this method assigns each pixel to one of the different classes based on the means and variances of the class signatures (stored in the signature file you saved earlier). The tool is accessible from the Image Classification toolbar as well as in the Multivariate toolset in the Spatial Analyst toolbox of Arc Toolbox. On the toolbar, you can select Maximum Likelihood when you click the Classification drop down (figure 7).
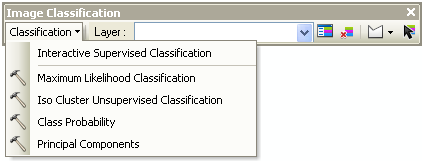
Figure 7. The Maximum Likelihood Classification tool can be accessed via the Image Classification toolbar
The parameters we used for this tool are shown in figure 8. Since you are using Landsat image services for the extent of the entire world, but you only want to classify the data for the selected area of interest, it’s very important to provide the processing extent in this step. This is done by clicking the Environments button on the bottom of the Maximum Likelihood Classification tool window.
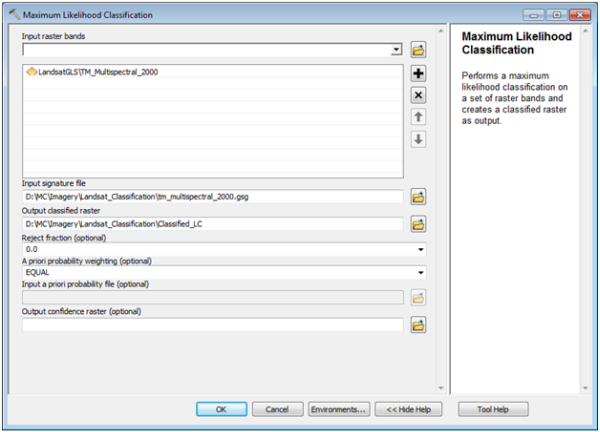
Figure 8. The Maximum Likelihood Classification tool and the Environments button at the bottom that allows you to set the processing extent
Click the down arrow next to Processing Extent. Set this to be the same as your area of interest feature class.
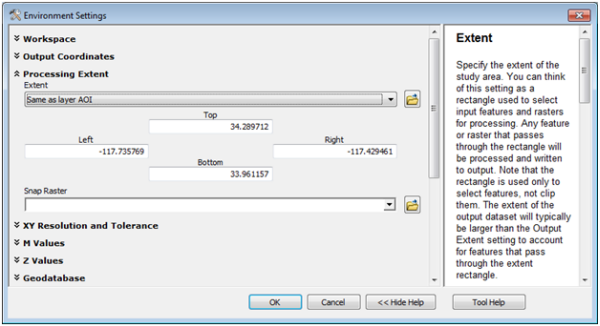
Figure 9. The Environment Settings dialog can be used to set the processing extent to only your area of interest
Once you’ve set the processing extent and the rest of the parameters, you can go ahead and run the tool. This will generate a classified image like the one shown in figure 10 – a land cover image based on the training samples selected earlier and then classified using the maximum likelihood method.
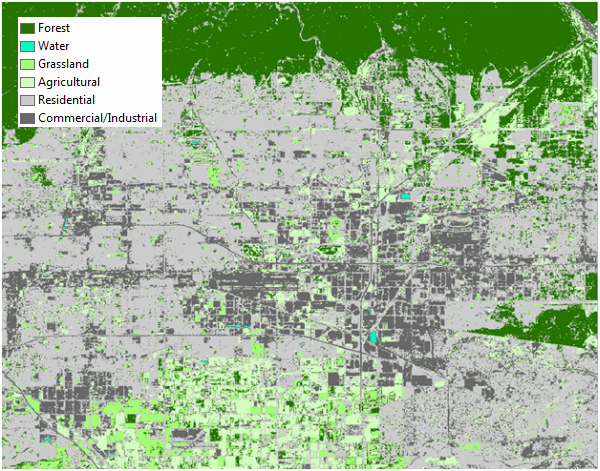
Figure 10. The classified image resulting from use of the Maximum Likelihood Classification method with the training samples collected produces a land cover map
In this blog entry, you learned how you can use Landsat image services to create a land cover map of your area of interest.
The classified image that you created may have some misclassified cells which gives “salt and pepper” appearance. To improve the classification, you may want to reclassify these misclassified cells to a class or cluster that is immediately surrounding them. The most commonly used techniques to clean up the classified image include filtering, smoothing class boundaries, and removing small isolated regions. We won’t go into detail about them here, but you can read about them in the online help topic titled Processing classified output.
Note: In this example, training samples were collected based on visual interpretation of the image; no ground truth was done to verify the results because the sole purpose was to show how you can use the Landsat image services in ArcMap. For your applications, you will want to check the results by comparing the classified data with information gathered on the ground or from other reliable sources.
Second Note: The methods described above are best employed when you have ArcGIS 10 with Service Pack 2 installed.
Update (06/01/2011): Esri announces the ArcGIS 10 SP2 (Desktop) Landsat Image Services Raster Patch. This patch addresses the issues that occur in ArcGIS Desktop 10.0 Service Pack 2 when consuming landsat image services. It is recommended to download and install this patch before trying above methods.
Further Reading:
- What is image classification?
- Essential image classification vocabulary
- Geoprocessing Blog: Image Classification toolbar introduced at ArcGIS 10
- How Maximum Likelihood Classification works
Thanks to Aileen Buckley, Mapping Center Lead, for her help with this blog entry!

Article Discussion: