This article is the first in a multi-part topic about using, analyzing, and visualizing datetime data in intelligence analysis. This first part will introduce you to some concepts, help solve common data preparation issues, and walk you through time-enabling layers.
Some initial concepts
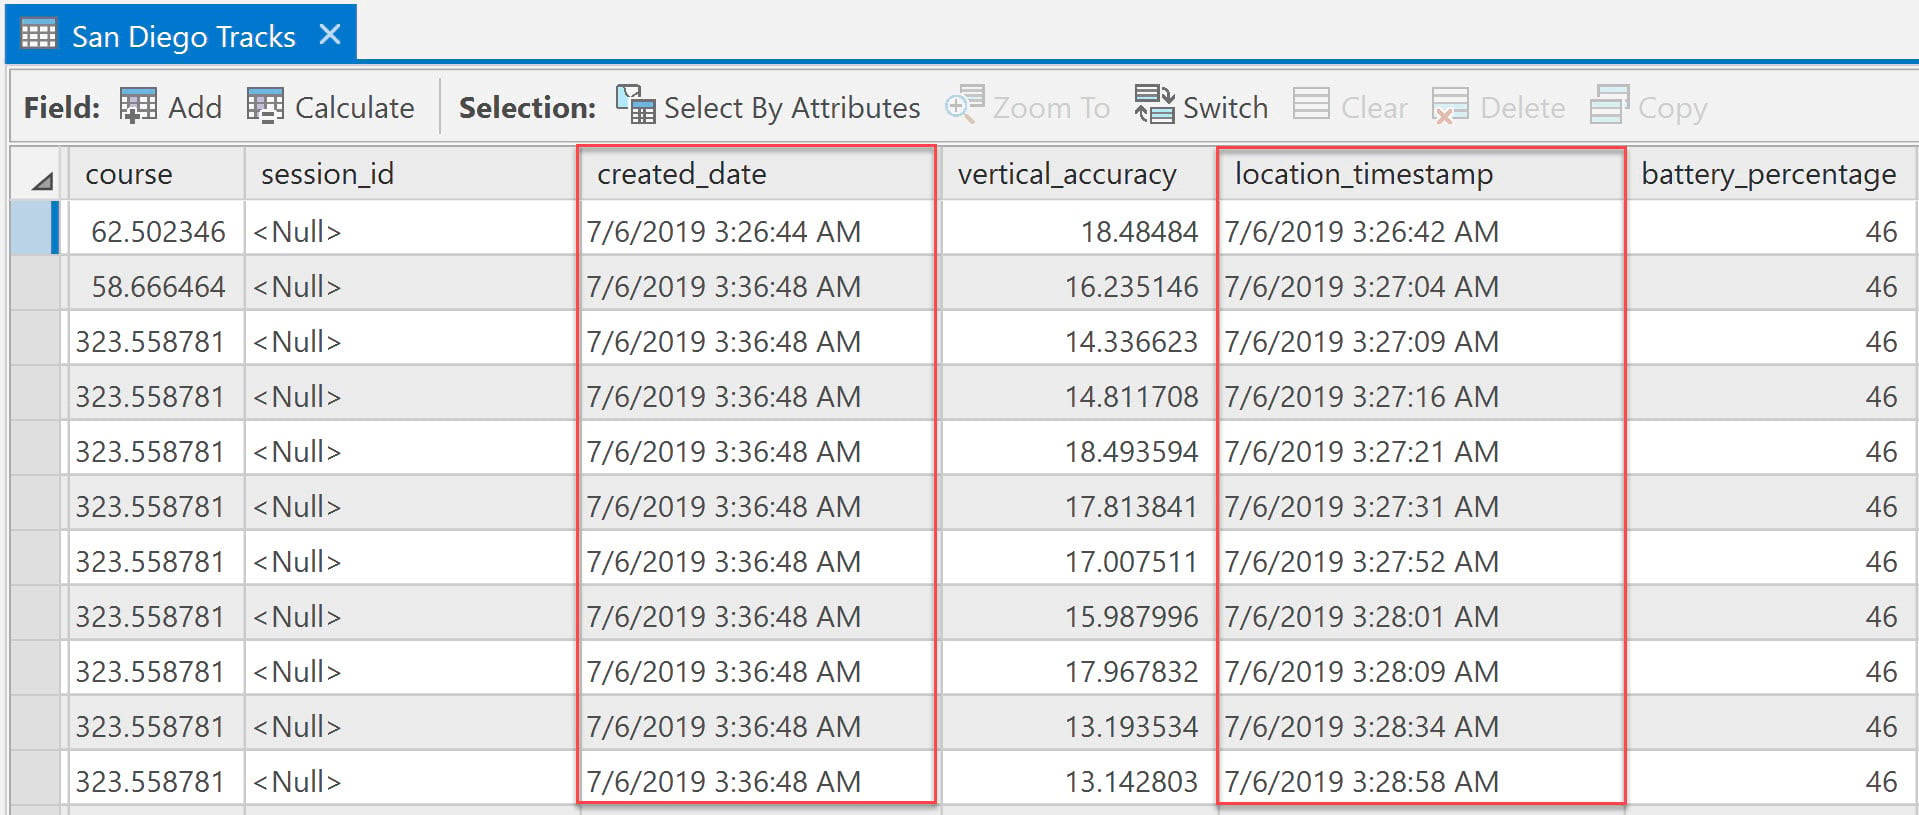
It is not uncommon to receive intelligence data from a vendor or other source that includes one or more fields of date, time, or both. These fields might be a sensor log time stamp, when a report was submitted, when a feature was last edited, or when an event is planned to start and end. The values in these fields may contain both a date and a time or just one of the two, or date and time may be separated into two different fields. In this section, you will learn some concepts of how dates and times are patterned and the possible variations you might come across.

Date fields typically provide the year, month, and date of month, but not necessarily in that order. And I say “typically” because there are many ways to describe a date. . This is often referred to as the Julian date, but it is more correctly the ordinal date. You will also see a typical date pattern in the United States as 6/8/2020 for June 8, 2020. Elsewhere, including many countries in Europe, you will see the pattern 8/6/2020 for the same date. There are also many national and international standards for specifying dates, such as International Organization for Standardization (ISO) 8601, “ Additionally, since the beginning of computing, dates have been changed for storage efficiency—specifically, Unix time (or POSIX time), which is the number of seconds since January 1, 1970. Using the previous example of June 8, 2020, Unix time would be 1591574400. Representing a date as the number of seconds in Unix time blurs the lines between date and time.
Time fields also have their share of different representation patterns. You will find they are shared in a typical layout of hours, minutes, and seconds. But like with dates, the formatting can vary significantly. Some common variations in time use a 12-hour or 24-hour clock, time zone definition differences, or even number of seconds since midnight. You will find a typical time pattern in the United States as 1:45:22 PM, meaning one forty-five and twenty-two seconds in the afternoon. A 24-hour clock uses the same pattern, but a different number range for hours, with 13:45:22 meaning thirteen forty-five and twenty-two seconds (and sometimes as thirteen hundred forty-five). Combining date and time gives you a more complete way to sequence events that happened in the past, are happening now, or will happen in the future. ArcGIS Pro supports several datetime format patterns. Later in this article, you will learn a few methods for converting datetime from other format patterns.
A few of the supported datetime format patterns are as follows:
- YYYY/MM/DD
- YYYY-MM-DD
- YYYY/MM/DD hh:mm:ss
- YYYY/MM/DD hh:mm:ss.s
- YYYY-MM-DD hh:mm:ss.s
Y = year, M = month, D = day, h = hour, m = minute, s = second
Typical data will contain event information as either single datetime events or two datetime range events. Single-date events store a single datetime field representing when something occurred. You might store a datetime of when a record was last updated, or when a device was at a specific x,y location. Datetime range events have two dates for the start datetime and the ending datetime. These are events that have a duration, which means they last for a certain period of time. For example, if you are scheduling a meeting that starts at 8:00 a.m. and ends at 10:00 a.m., it lasts two hours.
Preparing data for datetime fields
While the example datetime format patterns listed above are the target format used by ArcGIS, this isn’t necessarily the pattern in which time will be stored in your source data. To time-enable these fields, you will need to convert the field into a supported format. This section will discuss common issues in preparing datetime fields for use in ArcGIS.
What if my datetimes are in a string field?
In addition to date field types, both string and numeric fields are supported. If you find that the field doesn’t translate nicely or is in a different format, you can use some of the methods below to convert the field to a new datetime field type to fit a new format pattern. Specifically, the Convert Time Field tool will work.
What if my date is in one field and times are in another field?
It is not uncommon to have a date stored in one field and a corresponding time stored in a separate field. These can be used independently, but it is a better practice to store them in the same field. Any of the visualizations or analysis done individually can be done on the combined field. You can concatenate the two fields into a single field using the Add Field and Calculate Field geoprocessing tools. Say you have a datefield and a separate timefield. To combine them, do the following:
- Create a new field with Add Field of type DATE.
- Use Calculate Field to combine the two fields into the new field with an expression such as the following:
datetime.datetime.strptime(“{} {}”.format(!datefield!, !timefield!), “%Y/%m/%d %H:%M:%S”)
This expression uses a Python library datetime to read the incoming datefield and timefield and pass them out in a supported format. The format patterns can be configured to output several options, but not all are supported by ArcGIS Pro.
| ArcGIS Pro pattern | Python datetime format pattern |
| YYYY/MM/DD | datetime.datetime.strptime(“{} {}”.format(!datefield!, !timefield!), “%Y/%m/%d”) |
| YYYY-MM-DD | datetime.datetime.strptime(“{} {}”.format(!datefield!, !timefield!), “%Y-%m-%d”) |
| YYYY/MM/DD hh:mm:ss | datetime.datetime.strptime(“{} {}”.format(!datefield!, !timefield!), “%Y/%m/%d %H:%M:%S”) |
| YYYY-MM-DD hh:mm:ss | datetime.datetime.strptime(“{} {}”.format(!datefield!, !timefield!), “%Y-%m-%d %H:%M:%S”) |
What if my datetimes are in a different format?
This question gets a bit more complicated, because the first thing you need to know is what format they are in right now. At best, you should be able to find the field definition in the data vendor’s metadata, describing the datetime pattern used. But at the worst, you might have to review possible patterns and see if any of them fit what you have. With this in mind, there are a few tools in ArcGIS Pro to help.
- Use the Convert Time Field tool to convert string or numeric fields using a known input format and an output format.
- Use Add Field and then Calculate Field for more complex conversions. You can use the expression in Calculate Field to do more custom processing on the input datetime formatting using the Python datetime The documentation for Calculate Field Examples (https://pro.arcgis.com/en/pro-app/tool-reference/data-management/calculate-field-examples.htm) gives a few cases of what types of conversions can be done.
- Calculate Field also supports Arcade, which has additional capabilities for working with datetime data (https://developers.arcgis.com/arcade/function-reference/date_functions/).
What if my datetimes are in a different time zone?
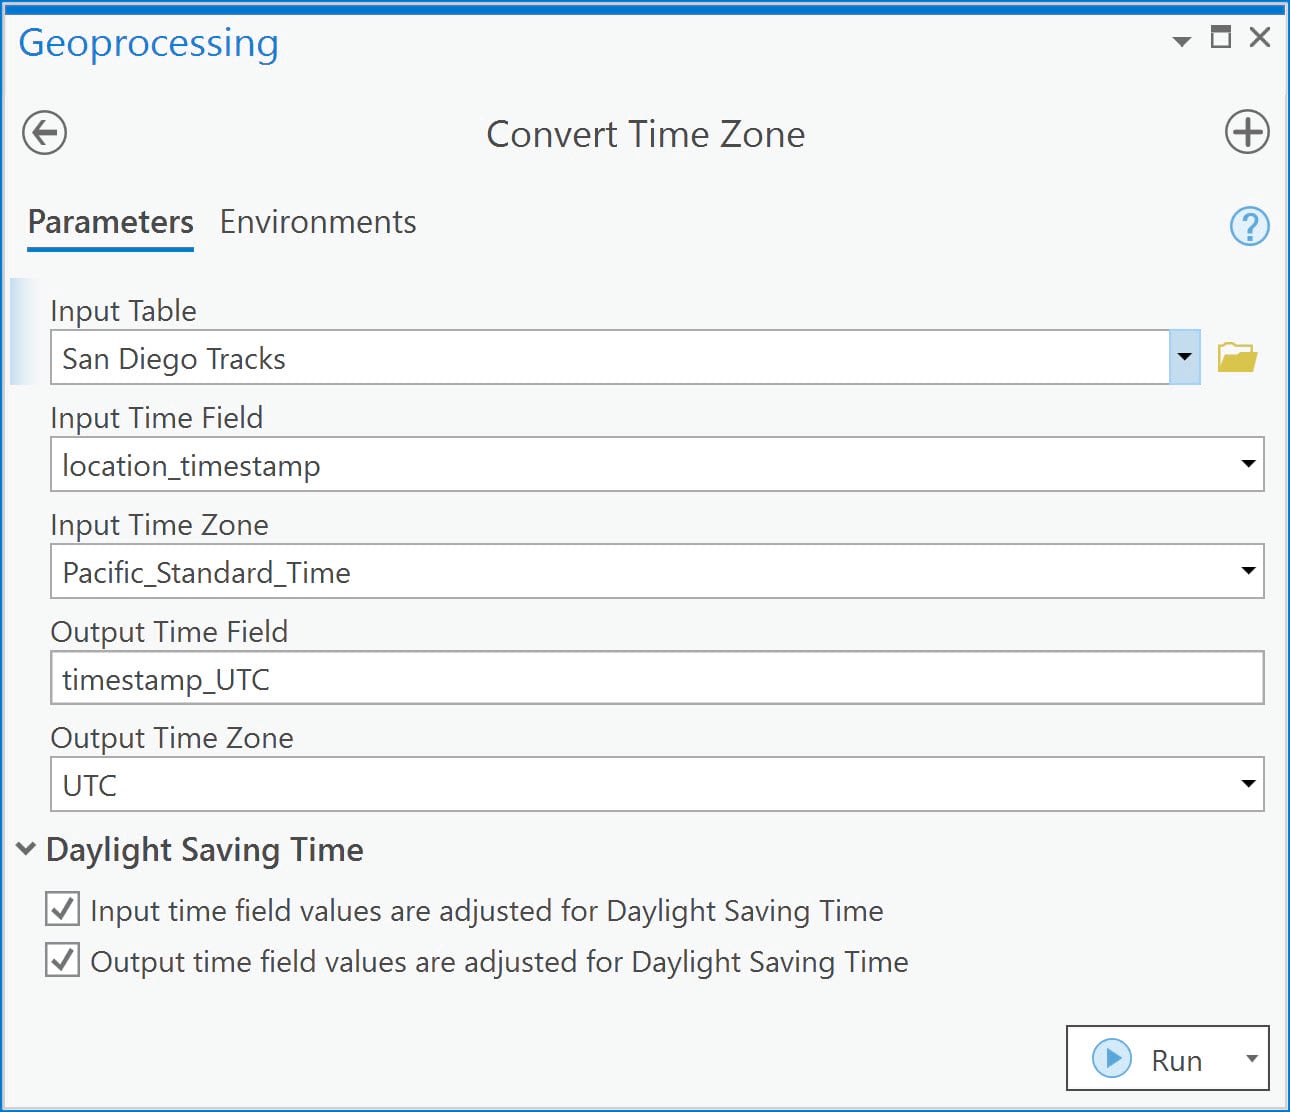
If you have datetime data that was collected with time values in a different time zone—for example, data logged in the Pacific time zone from data collected on the East Coast may have a 3-hour difference—use Convert Time Zone to correct the time zone difference. You will need to specify the origin and destination time zones as well as options for daylight saving time.

Time layers in ArcGIS Pro Intelligence
You now have datetime data formatted into a supported format. Now what? The next step is to set which datetime fields ArcGIS Pro Intelligence will use for the time slider, timeline, and some geoprocessing tools. This is essentially what is called time-enabling your data in ArcGIS Pro Intelligence. Since features or tables can have many datetime fields, you must specify which one (or ones) to use for a specific layer. If your layer has more datetime fields you need to represent in a map (three or more), you will need to add the dataset to the map for each single datetime or pair of start-end ranges you want to visualize.
To enable time on a layer in ArcGIS Pro Intelligence, do the following:
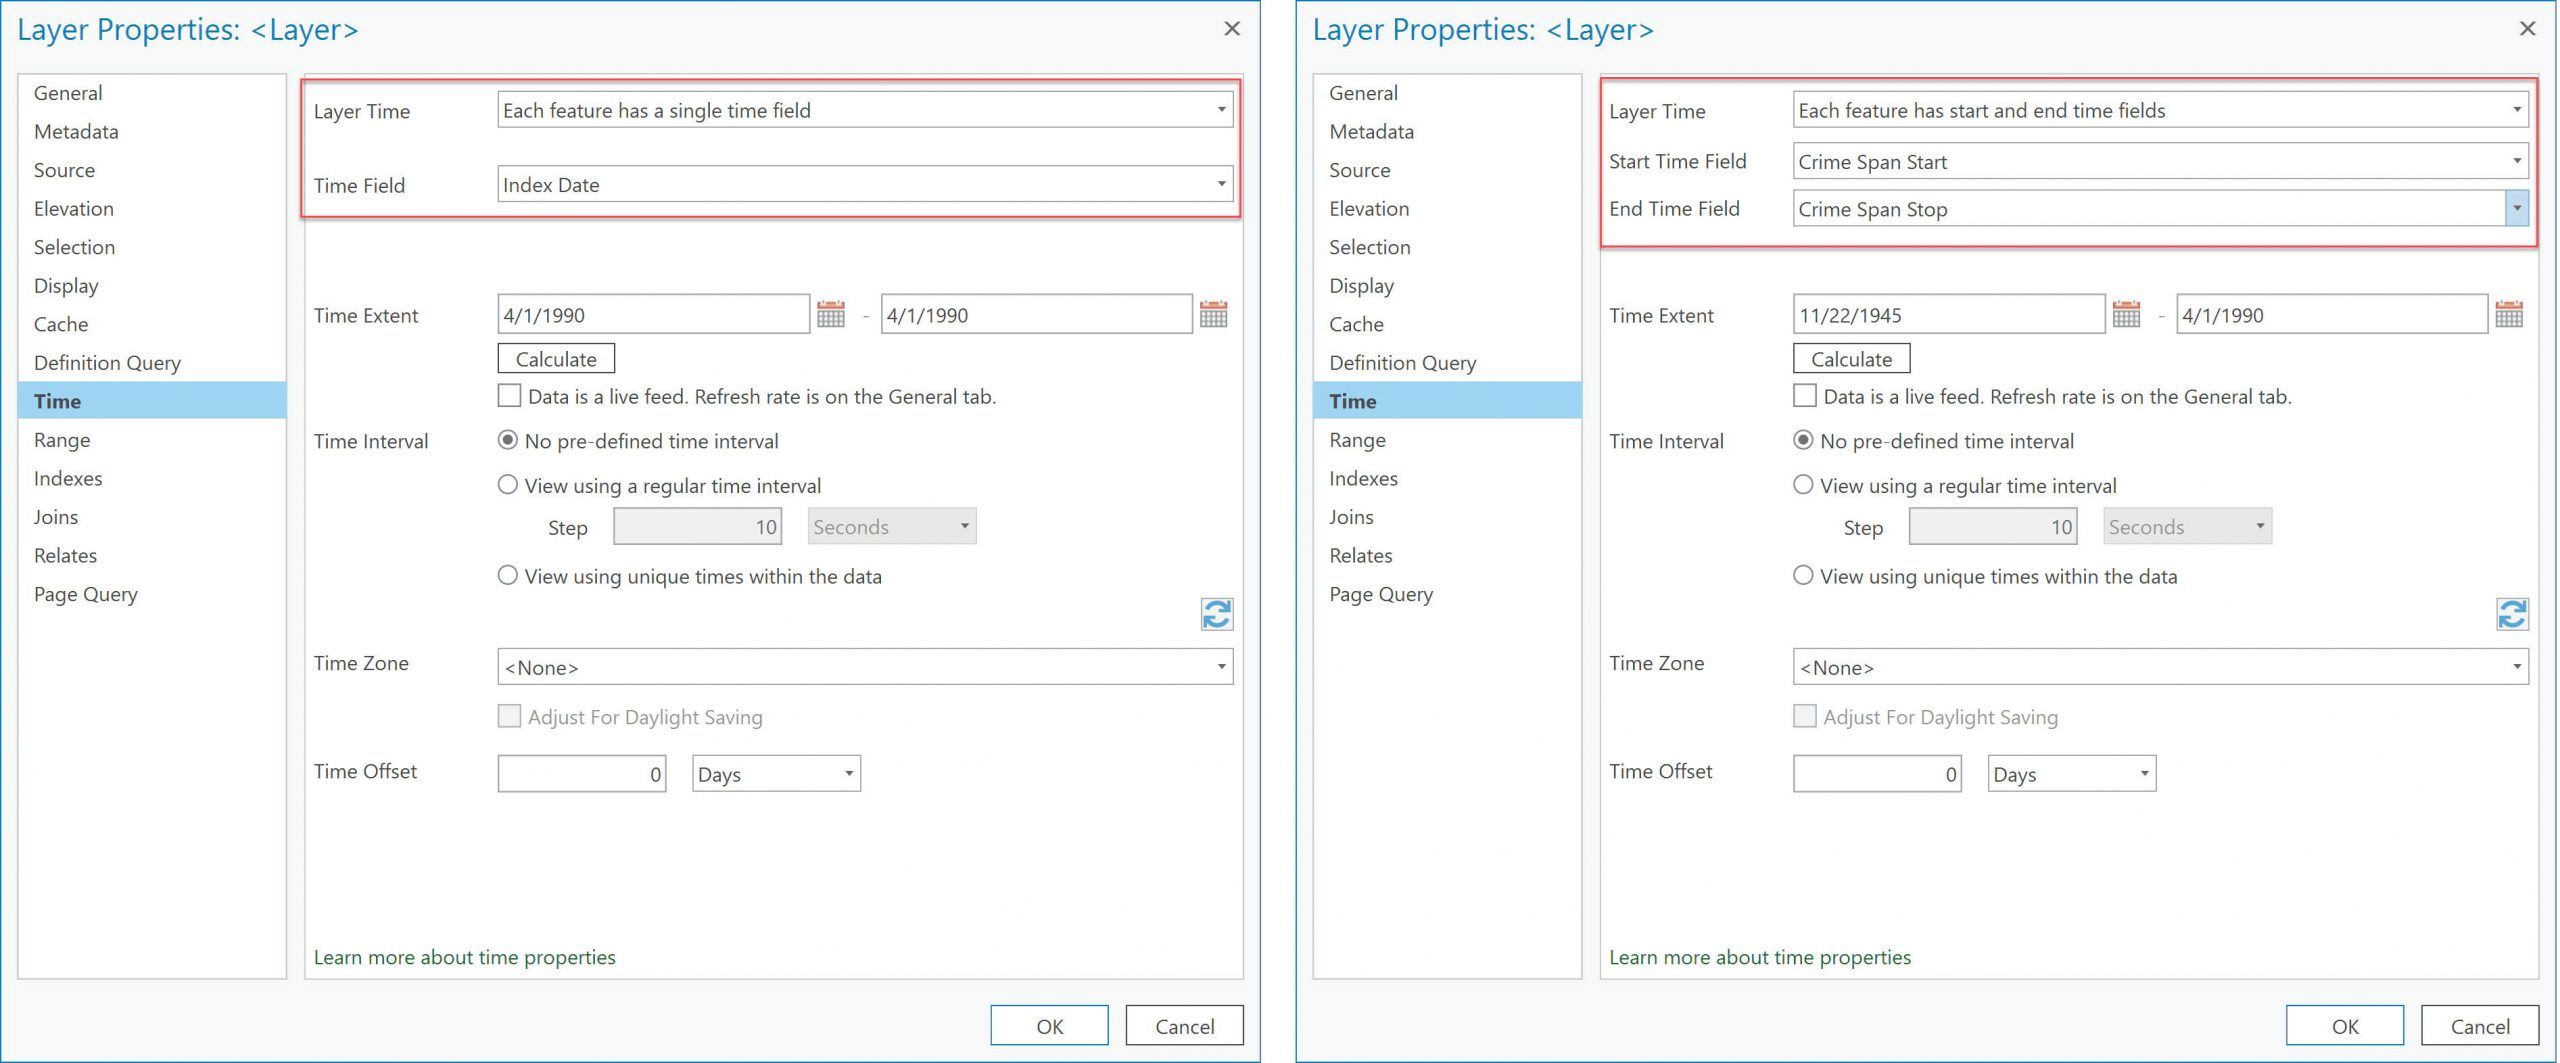
- Right-click the layer in Contents and select Time Properties.
- For Layer Time, select Each feature has a single time field or Each feature has start and end time fields.
- Select fields for Time Field, or Start Time Field and End Time Field.
- Optionally, select a Time Extent to modify the overall start and end time for the layer, or select Calculate to automatically set the earliest and latest times.

Your layer is time-enabled, and the time slider should be active on the map (as denoted by the Time button in the upper right corner of the map). The time slider and timeline will be covered in a later part of this article.
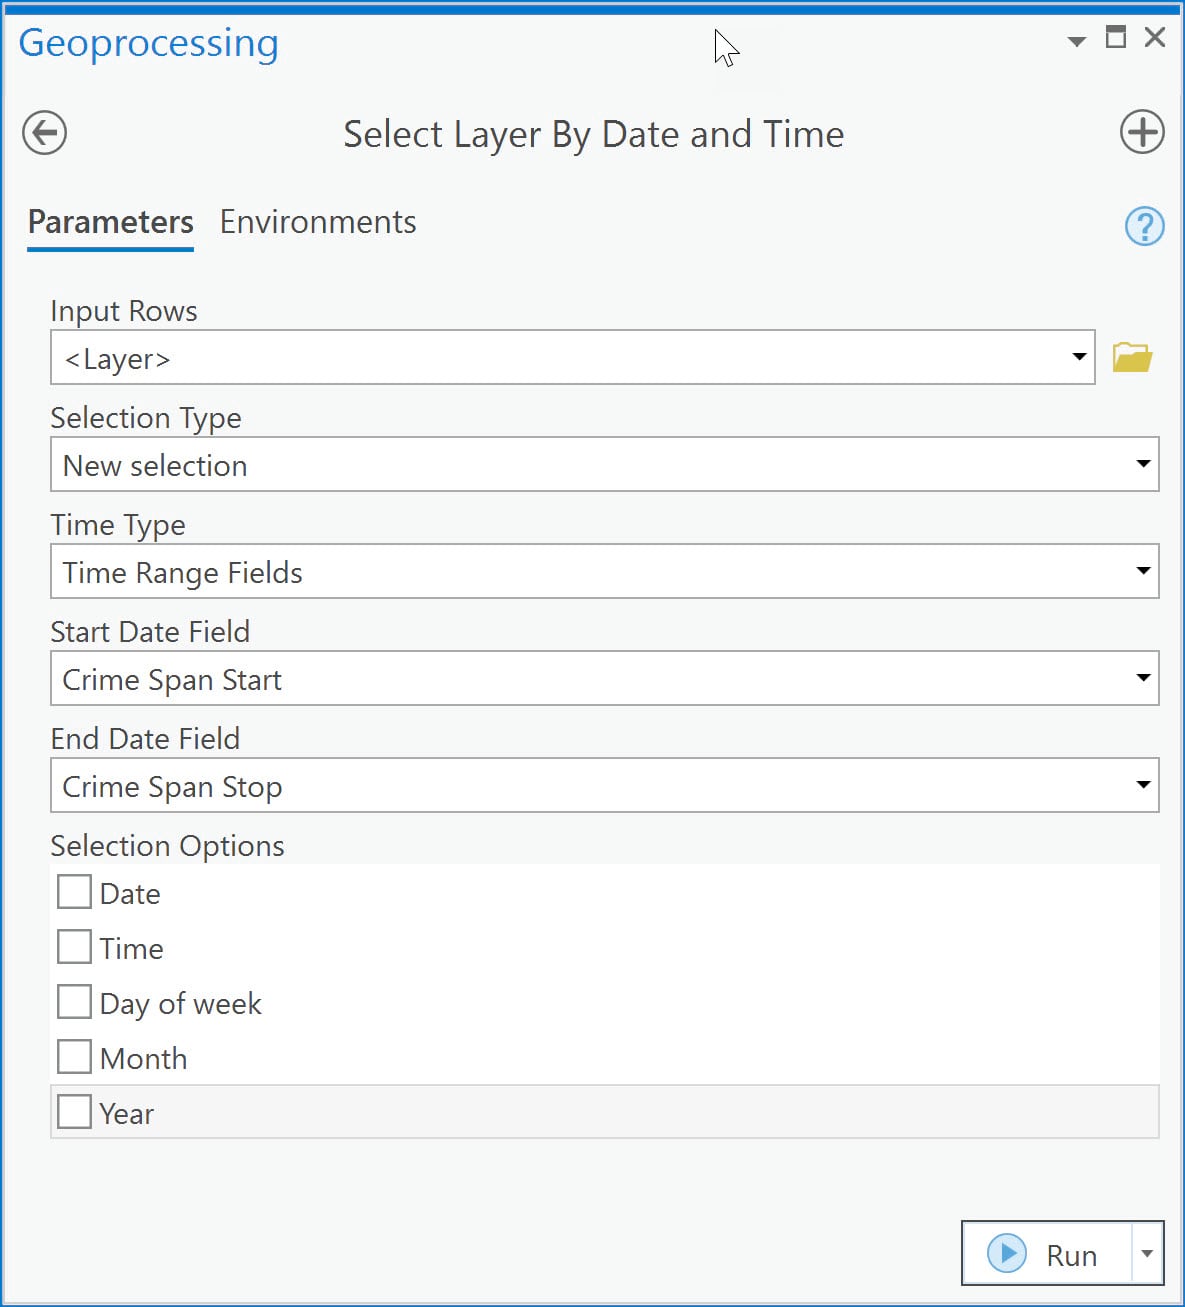
With a time-enabled layer, one thing you can start doing immediately is selecting features in your layer using the datetime fields. One helpful tool is Select Layer By Date and Time. With Select Layer By Date and Time, you can use the datetime fields to make advanced datetime queries. For example, you can do the following:
- Select events that happened between 12/4/2018 and 12/9/2018.
- Select events that happened in the last 4 days (from today).
- Select events that happened between 9:23 a.m. and 3:17 p.m.
- Select events that happened on a Thursday and Friday.
- Select events in 2016.
This tool is part of the Crime Analysis and Safety Tools toolbox in ArcGIS Pro. To make it easier for you to find them in ArcGIS Pro Intelligence, these tools are located on the Map tab under Select By.

- Select your Input Rows and choose either a single time field or time range start and end fields.
- The Selection Options section allows you to choose one or more ways to select datetime options:
- Date–Choose a single date or date range. You have a nice calendar picker option here as well.
- Time–Choose a starting time and ending time.
- Day of Week–Choose the day or days of the week.
- Month–Choose the month or months.
- Year–Choose one year or a list of years (separated by commas).
Conclusion
In this part of the article, you learned about the formats of date and time fields and different patterns they can take. You also learned methods for fixing common problems using different tools and libraries. And finally, you learned how to enable time on your map layers and make some basic selections using datetime options. In the next part, you will take time-enabled layers and track-like data and analyze the data to look for patterns. For this you will use the Movement tools found in ArcGIS Pro Intelligence in the Intelligence toolbox.
Relevant Links
- Date fields: https://pro.arcgis.com/en/pro-app/help/data/tables/date-fields.htm
- Convert Time Field (tool): https://pro.arcgis.com/en/pro-app/tool-reference/data-management/convert-time-field.htm
- Convert string or numeric time values into date format: https://pro.arcgis.com/en/pro-app/help/mapping/time/convert-string-or-numeric-time-values-into-data-format.htm
- Add Field (Data Management): https://pro.arcgis.com/en/pro-app/tool-reference/data-management/add-field.htm
- Calculate Field (Data Management): https://pro.arcgis.com/en/pro-app/tool-reference/data-management/calculate-field.htm
- Convert Time Zone (Data Management): https://pro.arcgis.com/en/pro-app/tool-reference/data-management/convert-timezone.htm
- Set the time properties on data: https://pro.arcgis.com/en/pro-app/help/mapping/time/set-the-time-properties-on-data.htm
- Select Layer By Date and Time: https://pro.arcgis.com/en/pro-app/tool-reference/crime-analysis/select-layer-by-date-and-time.htm
- Apply a time offset to data: https://pro.arcgis.com/en/pro-app/help/mapping/time/apply-a-time-offset-on-data.htm
- Wikipedia: ISO 8601: https://en.wikipedia.org/wiki/ISO_8601
- Temporal data: https://pro.arcgis.com/en/pro-app/help/mapping/time/temporal-data.htm
- Set the time properties on data: https://pro.arcgis.com/en/pro-app/help/mapping/time/set-the-time-properties-on-data.htm
- Supported field formats: https://pro.arcgis.com/en/pro-app/help/mapping/time/supported-field-formats.htm
- ISO 8601:2004: https://www.iso.org/standard/40874.html
- Wikipedia: Unix time: https://en.wikipedia.org/wiki/Unix_time


Article Discussion: