Once upon a time, creating reality scans was a privilege of professionals with expensive equipment. With the evolution of smartphones, the field of 3D scanning transformed and mobile scans are now at our fingertips. Of course, phones will not replace professional 3D scanners. Their simplicity, however, makes them a powerful alternative when scanning easily accessible and up-to-room-size objects. GPS technology has followed a similar path from expensive devices made for professionals to standard features on smartphones. Today it is possible to use both technologies together, creating georeferenced 3D models in minutes.
You can take the scanning process to the next level by placing real-world objects that you scanned as models in their geographic context. It not only allows us to display the scans in their actual location but also to use them with other capabilities like ArcGIS StoryMaps or 360 VR.
I had the chance to use 3D mobile scanning in practice during my internship project at the Esri R&D Center Zurich where we develop the 3D web technology for the ArcGIS platform. The project focused on presenting urban art installations as an example for scanning and was also a great way for me to explore a new city both virtually and physically. The scanning process itself makes you notice more details but being able to examine models from every possible angle in web scenes is even more exciting. I’ll explain how to create the models, prepare the layer to store them and create a custom app to display them. I hope I can inspire you to create more workflows with your own scans!

Mobile scanning with iPhone and Android phones
To start, you need to install a mobile app that will turn your phone into a powerful 3D scanner. Although many applications appear similar at the first glance, they use different techniques and sensors in the process. Your options depend on whether you’re using iOS or Android and whether you’re looking for a free or paid solution. The good news is that there are more and more of them, so everyone can find an app for their needs and make the most out of the scanning process.
The app that I’ve used the most is Scaniverse. While it previously required a LiDAR scanner, it now works on all recent iOS devices with plans to release an Android version in the future. The 3D scanning process is similar to taking photos. First you need to select a size of the object you want to scan to optimize range and resolution. The preview on the screen displays the scanning progress with stripes that help to cover areas that haven’t been scanned. It’s important to move smoothly during the process and ensure good lighting. Your scan doesn’t have to be perfect, as the app can fill in small gaps and allows you to edit the scan using the Crop tool to remove undesirable parts. The result can be exported in various mesh formats (FBX, OBJ, GLB, USDZ, and STL), as well as in point cloud formats (PLY and LAS).
Two other popular options are Kiri Engine and Luma AI. Kiri Engine is a cloud-based app that utilizes photogrammetry and advanced AI for processing results. Luma AI, on the other hand, uses Neural Radiance Fields (NeRF) to create realistic models without high-resolution cameras. Kiri Engine is available on both iPhone and Android, while Luma AI support only iPhone for now with expansion plans for Android.

Preparing the 3D Object Scene Layer
Once you’ve exported the scans, you’re ready to combine them with other data in ArcGIS! To showcase the model, you need an editable 3D Object Scene Layer. For more information you can go to: Create a 3D object feature class—ArcGIS Pro or follow the simplified instructions at the bottom of the page.
Creating a custom web app to explore the 3D models
Existing street art platforms provide information about the art and its location, but they do not utilize 3D technology. In contrast, 3D model platforms allow users to add their models and preview them, but they lack further categorization and positioning. This custom app, created with ArcGIS Maps SDK for JavaScript, could fill the gap and enable users to combine those capabilities. It could help artists and city authorities to promote art and help tourists and citizens to explore it. Although designed for urban art, the app’s main components could be useful in any scenario that involves presenting 3D scans.
Uploading models
To allow users to include scanned objects in the application, it was necessary to implement an upload functionality. This provides a convenient way to integrate models into the web scene.
The upload can be done using an Editor widget or with a custom implementation using the applyEdits method. This way, the mesh can be edited, deleted, or added to the 3D Object Scene Layer at any desired point within the application (for example, on click or after adding features to another layer).

As part of the project, we aimed to determine the extent to which mobile browsers with limited capabilities can handle complex 3D meshes. Therefore, the workflow was split into two parts: first, uploading the model on a mobile phone using a 2D map to provide location, and then editing the model using the Editor widget on a desktop. The model is preselected and located in the center of the scene, and its position, orientation, and scale can be adjusted.

After saving the changes, the scene’s screenshot is created using the takeScreenshot method. It is then added as an attachment to the FeatureLayer and used as a thumbnail for the cards. Furthermore, the camera position is saved in JSON format and added as an attribute to the FeatureLayer. This attribute is used to position the view after the user flies to the model. This approach ensures the best initial angle and prevents the model from being hidden behind buildings. The model is now ready to be explored on the main map. You can check out the whole process of uploading models in the demo below.
Exploring models
While a realistic 3D representation of the scene is a powerful way to explore the city, it can also be overwhelming and navigating the scene can be challenging. To help the user focus on the urban art, I’ve implemented several guiding mechanisms and evaluated various design choices. For example, while the upload and placement of the models uses a satellite basemap to improve accuracy, for exploration the scene uses a dark basemap and buildings with sketched edges that share colors with the starry sky. This simplification and toned-down colors allow the colorful art to stand out. The increased field of view makes the experience more immersive and gives users a broader perspective.
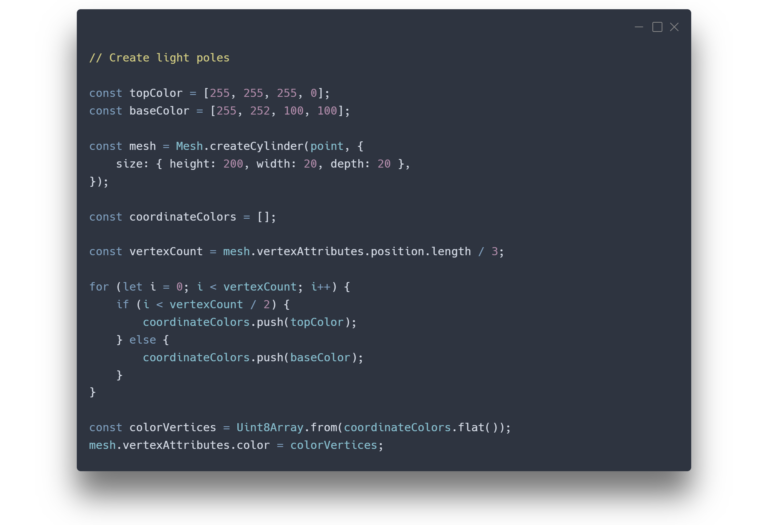
I’ve also added light beams that match the night theme to help locate the models around the scene, as some of them are hidden between buildings. Additionally, users can explore models using cards that display a picture of the model. All three elements – models, light beams, and cards – are interconnected, helping to explore the art. Hovering over a card, animates the corresponding light beam as you can see in the code example, while clicking on a card takes the user to the model.
To implement these features, I used three different layers. They share a common ID for the same model, allowing for integration and interaction between them. The FeatureLayer was used to store images and attributes, the GraphicLayer to enhance the visualization with light poles and the models are stored in the SceneLayer.
Summary
It is hard to believe that such realistic scenes can be created using devices straight from our pockets. Technology progress has not only made it affordable but also easily accessible without requiring special training. The field of mobile 3D scanning is expected to experience growth in the coming years as users increasingly appreciate its benefits. Mobile 3D scans are yet another story on the ever-evolving nature of GIS, but isn’t that what makes it so exciting? Hopefully, your head is already full of examples on how to integrate mobile scans with ArcGIS to be useful in your field and we can’t wait to see the results!

Article Discussion: