MDM (Mobile Device Management) is an industry term for the administration of mobile devices, such as smartphones, tablet computers and laptops. MDM is usually implemented with the use of a third-party product that has management features for particular vendors of mobile devices
There are several MDM Environments available to implement. Not all MDM solutions are alike. They have similar concepts and capabilities, but often use different terms that are specific to their own solution.
You can find the steps involved in configuring different aspects of MDM and how the ArcGIS Business Analyst mobile application can be configured for App Config using MDM. We have taken AirWatch, one of the most popular MDM environments as an example below.
Add a new user
- Sign into AirWatch Console as an Administrator
- Navigate to the Accounts tab
- Select Users
- Select List View
- Select Add
- Select Add User

Add User - In the General tab, complete the required basic user information, select Basic Access for User Role.
- Optionally, select the Advanced tab and complete additional user information.
- Select Save to save only the new user. Or,
- select Save and Add Device to save the new user and proceed to the Add Device page.
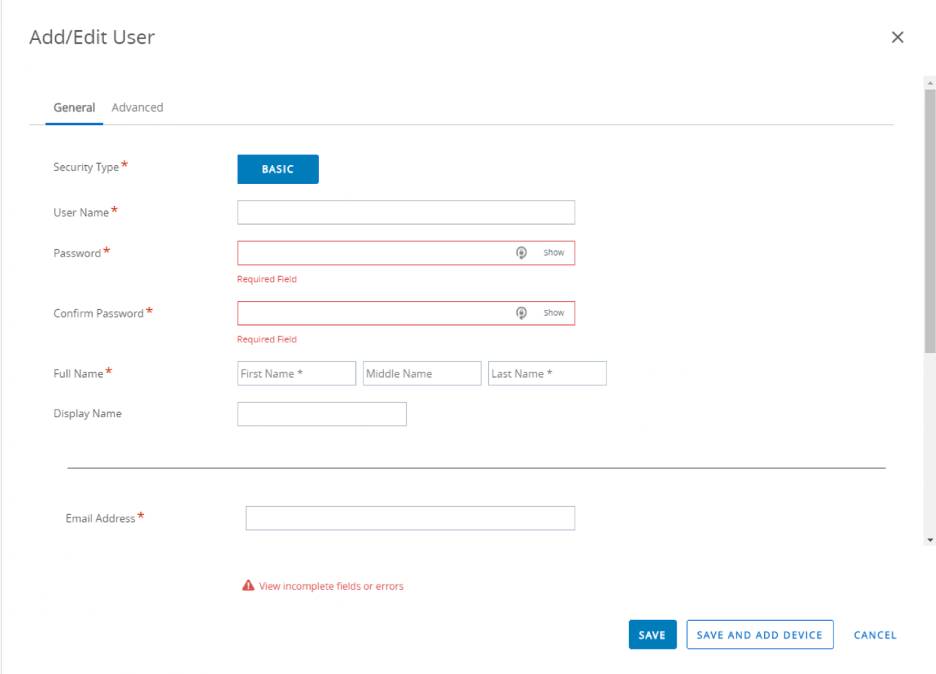
Add/Edit User
AirWatch VMware Docs:
https://docs.vmware.com/en/VMware-Workspace-ONE-UEM/1912/UEM_ConsoleBasics/GUID-AWT-CREATEBASICUSERACCOUNTS.html
Add a new Device
- Sign into AirWatch Console as an Administrator
- Navigate to the Devices tab
- Select List View
- Select Add Device

Add Device - In the User tab, selecting an existing User and complete all required fields.
- Enter the Users email address in the Messaging tab to send an email alert.
- Select Save to save the add device request for that user.
AirWatch VMware Docs: https://docs.vmware.com/en/VMware-Workspace-ONE-UEM/1912/UEM_Managing_Devices/GUID-AWT-ADDADEVICEFROMLISTVIEW.html
Enroll an iOS Device via Intelligent Hub app
- Download and install the AirWatch Intelligent Hub app, click on the appstore link on https://GetWSONE.com
- Open the AirWatch Intelligent Hub app
- Enter the Server address: techp.awmdm.com
- Enter the Group ID
- Enter your AirWatch Username and Password
- Select Next
- Select Allow
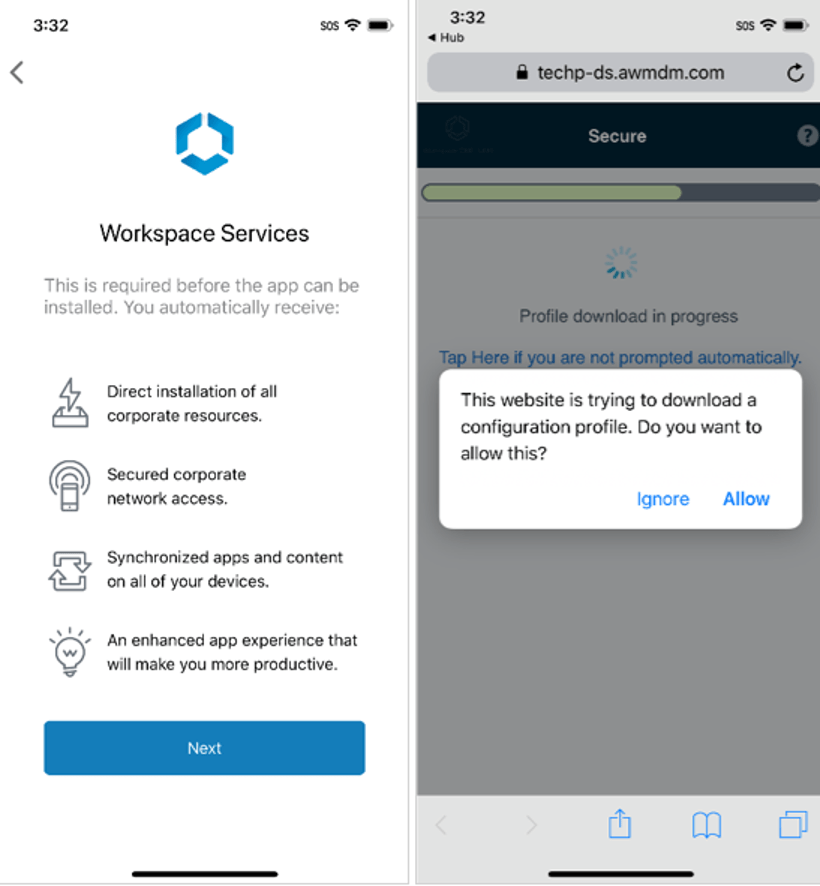
Intelligent Hub 1 - Select Close and if required select Continue
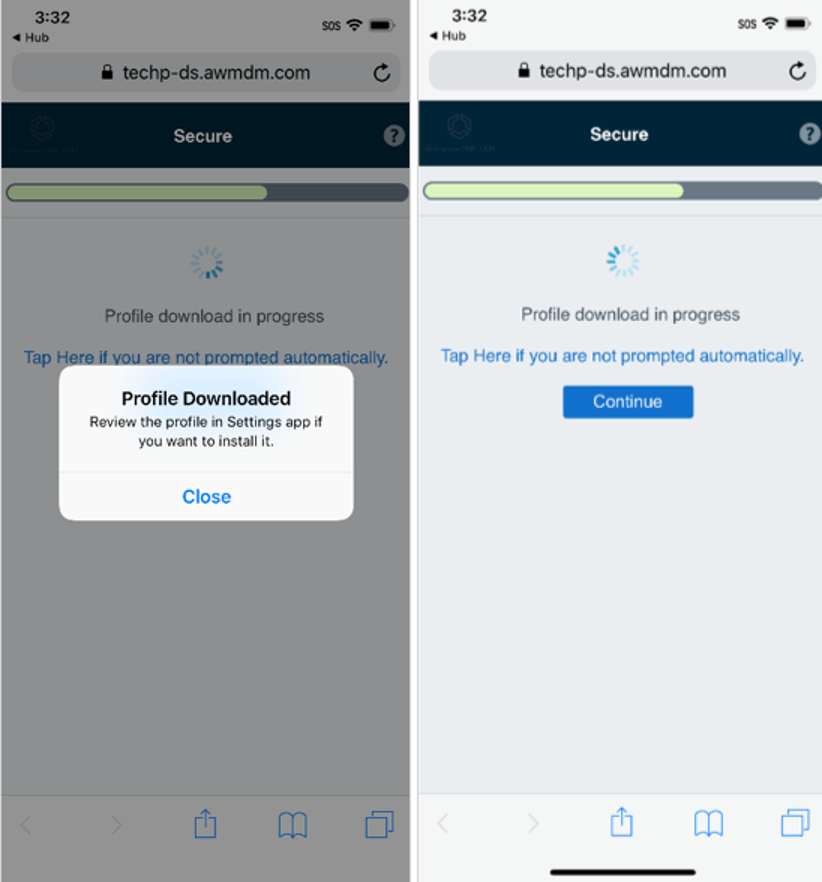
Intelligent Hub 2 - Select Open Settings
- Navigate to General > Profiles > Workspace Services
- Select the Workspace Services profile
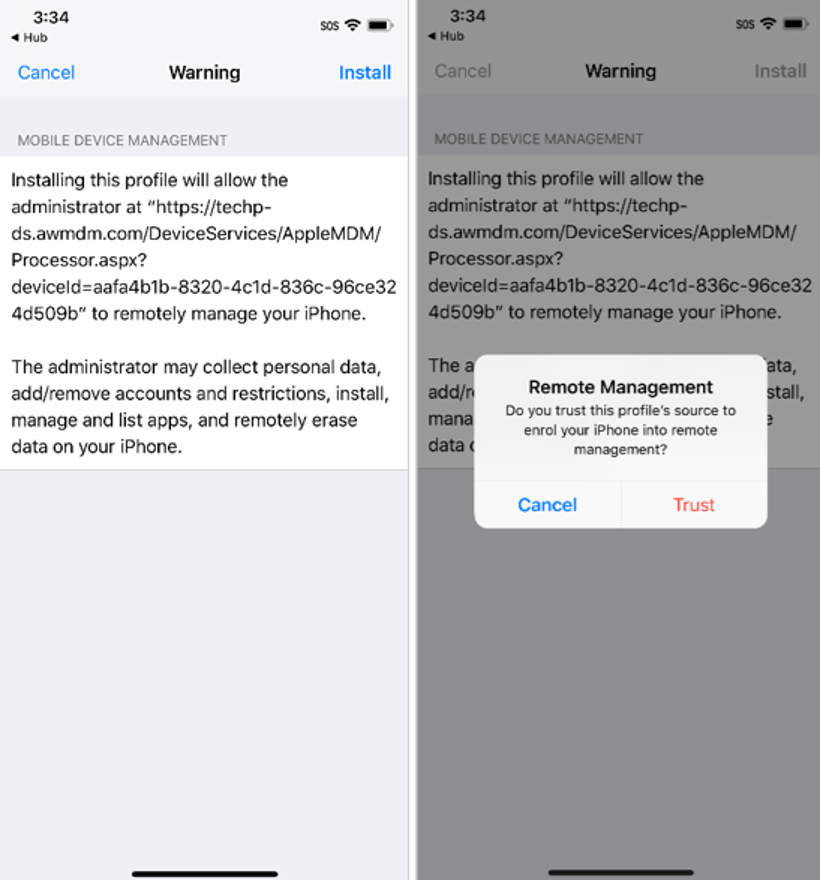
- Select Install to install the profile
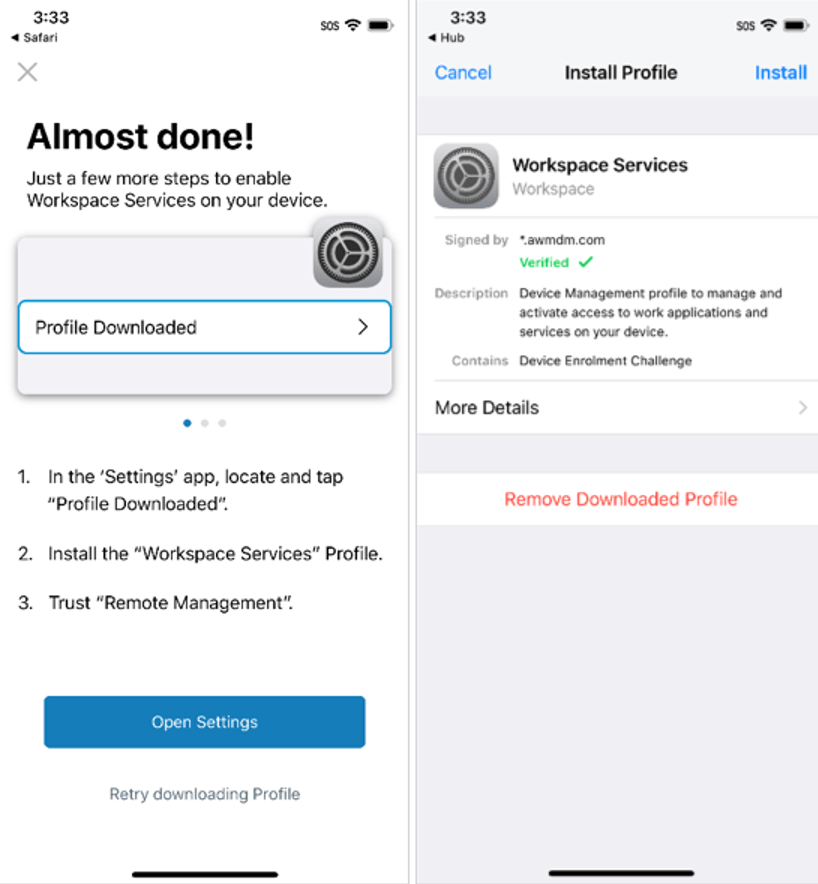
Intelligent Hub 3 - Select Install on the warning message
- Select Trust to accept remote management
- Select Done to close the Install profile setting
- Select Done to close the install process window
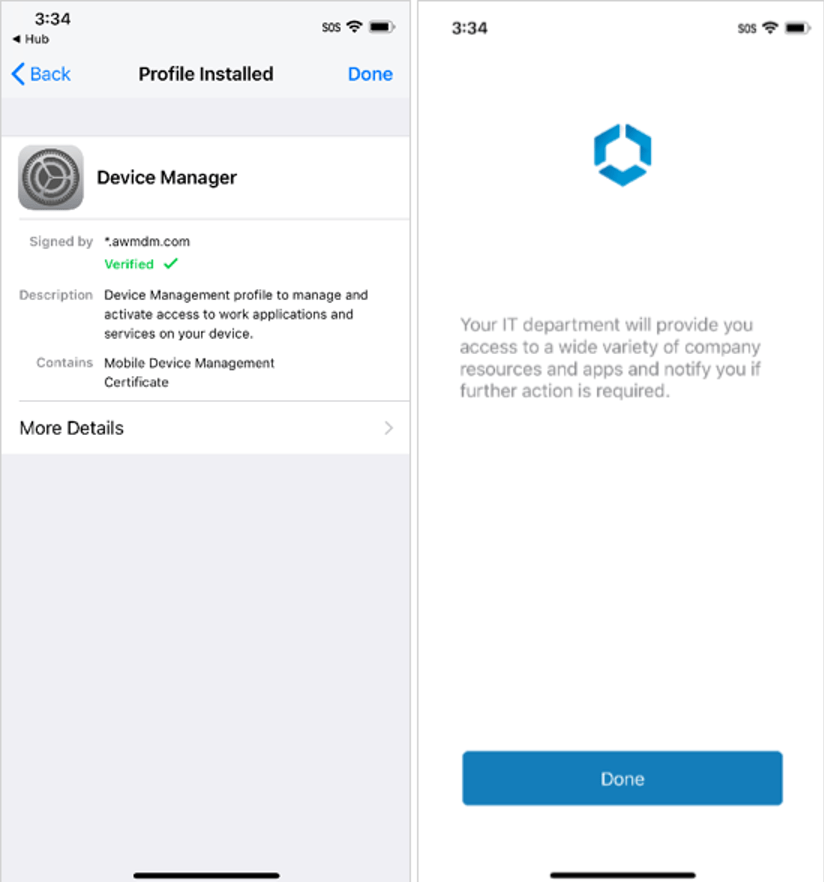
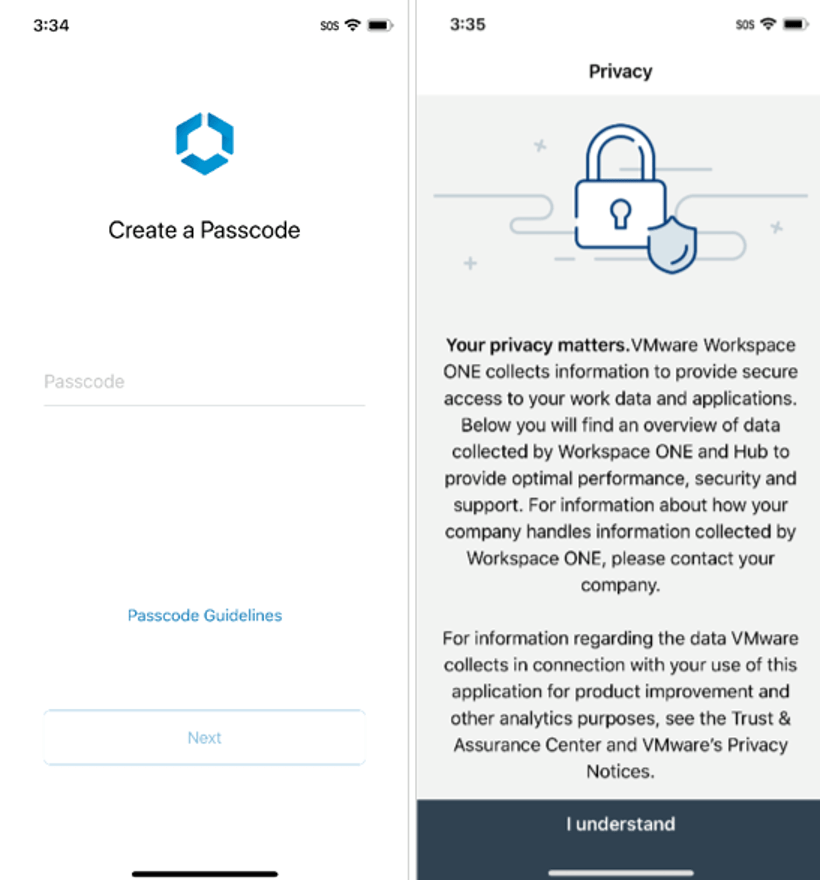
Intelligent Hub 5 - The AirWatch Intelligent Hub will open
- Create a Passcode and re-enter Passcode
- Select I understand
Intelligent Hub 6 - Select I agree
- Check the user account is added and device is enrolled
- AirWatch Catalog should now be installed on the Home page
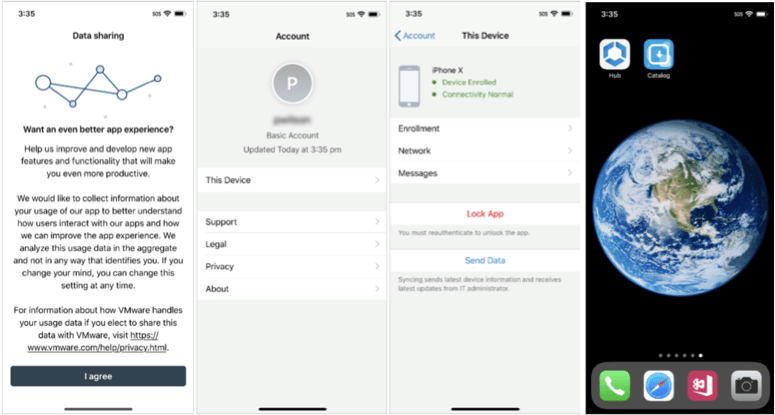
AirWatch Catalog
23. Open AirWatch Catalog to see available apps and install the app from there
AirWatch VMware Docs:
https://docs.vmware.com/en/VMware-AirWatch/9.3/vmware-airwatch-guides-93/GUID-AW93-AirWatch_Agent_Overview.html
Create an Assignment Group
- Sign into AirWatch Console as an Administrator
- Navigate to the Groups & Settings tab
- Select Assignment Groups under Groups
- Select Add Smart Group
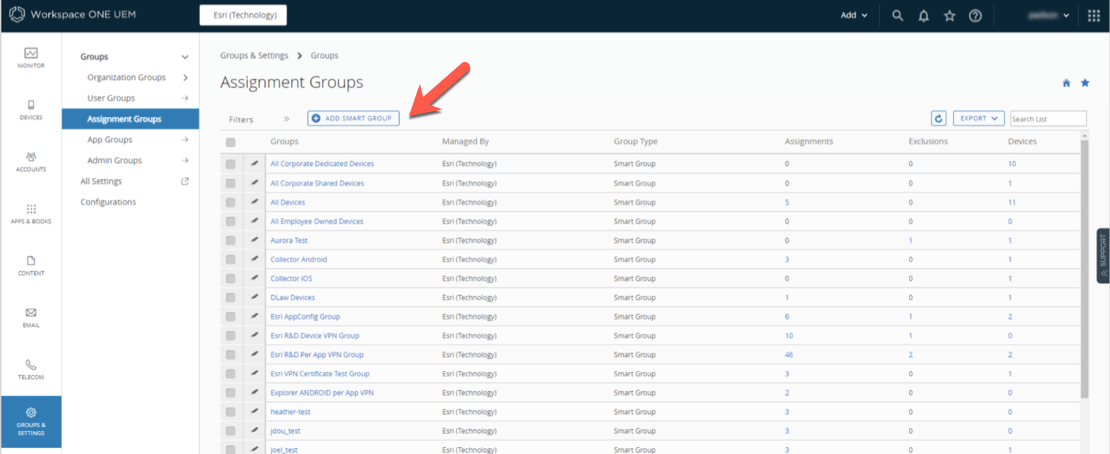
Add Smart Group - Enter a Name for the new group
- Choose a group Type (Criteria / Devices or Users)
For better control and testing purposes, if only specific users and/or devices are needed to be added to a group, select the Devices or Users option - Select the Device or User from the drop-down list of already added devices and users
- Select Add to add that device or user to the group.
- Select Save to save changes to the new smart group
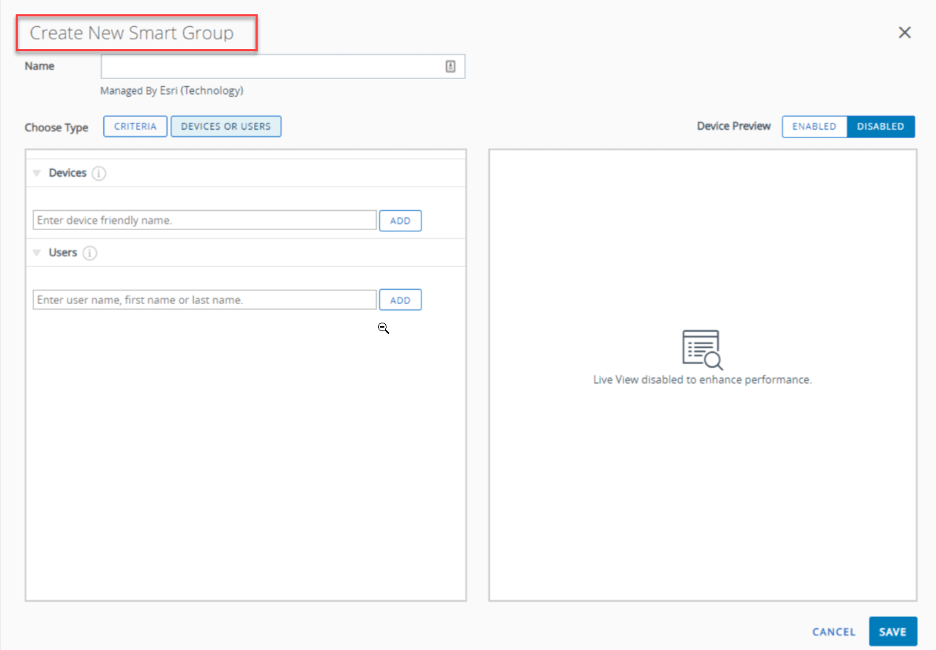
Create Smart Group
AirWatch VMware Docs:
- Assignment Groups: https://docs.vmware.com/en/VMware-Workspace-ONE-UEM/1912/UEM_ConsoleBasics/GUID-AWT-ASSIGNMENTGROUPSOVERVIEW.html
- Smart Groups: https://docs.vmware.com/en/VMware-Workspace-ONE-UEM/1912/UEM_ConsoleBasics/GUID-AWT-SMARTGROUPSOVERVIEW.html
Create a Device Profile
- Sign into AirWatch Console as an Administrator
- Navigate to the Devices tab
- Select Profiles & Resources
- Select Profiles
- Select Add
- Select Add Profile
- Select a Platform to create the new profile
- On the General tab, enter a Name and other optional information
- Select a Smart group to assign the Profile to (devices and/or users)
- Other than these General settings, need to set at least one more additional Payload from the left catagories, e.g. Lock Screen Message
- Select Save and Publish to save the new profile and assign to selected devices and/or users
AirWatch VMware Docs:
https://docs.vmware.com/en/VMware-Workspace-ONE-UEM/1912/UEM_Managing_Devices/GUID-AWT-DEVICEPROFILESOVERVIEW.html
Add a Public Application
- Sign into AirWatch Console as an Administrator
- Navigate to the Apps & Books tab
- Select Native
- Select Public

Add Application - Select Add Application
- Select the Platform and enter an app Name to search from App Store
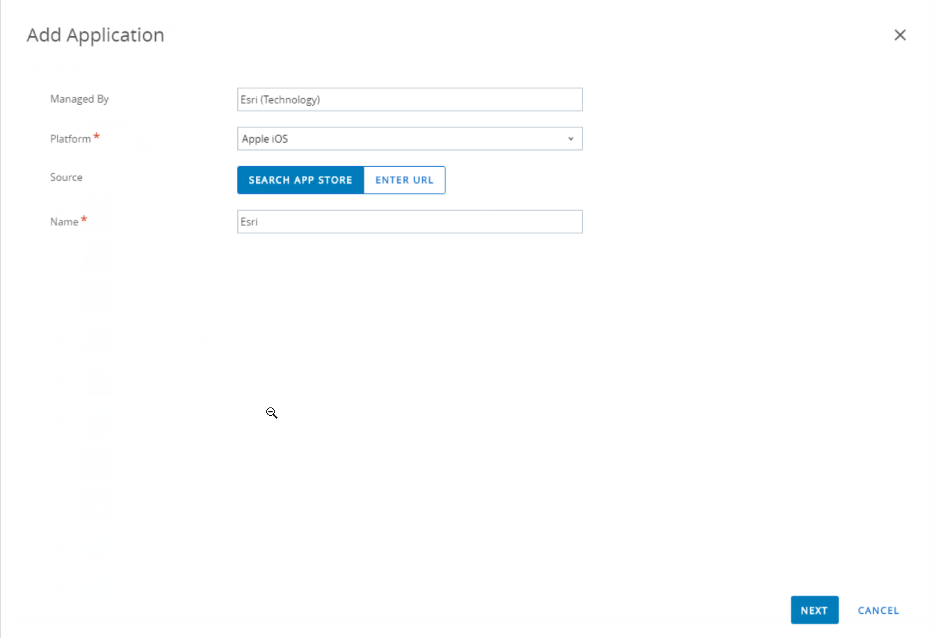
Add Application 1 - Select the desired app from the App Store list by selecting the Select button
- Complete the additional information if required on the Details, Terms of Use and SDK tabs
- Select Save & Assign to save the app to the Public app list and assign to devices and users
- Select Add Assignment on the Assignments tab
- Select the Assignment Groups to assign this app to
- Select the App Delivery Method
- Set the required Policies for the app by enabling options and setting parameters
- Select Add to save the new assignment
- Select Save and Publish to save the new assignments for the current app
- Review Assigned Devices and select Publish to assign the app to listed devices
AirWatch VMware Docs:
Add AppConfig (portalURL) setting to an Application
- Sign into AirWatch Console as an Administrator
- Navigate to the Apps & Books tab
- Select Native
- Select the Internal or Public tab
- Select an existing Application oradd a new application via Add Application
- On the application summary page, select the Assignment tab
- Select Assign to modify or add a new assignment
- Select Add Assignment or select an existing assignment to Edit
- Select the Assignment Groups to assign this app to
- Select the App Delivery Method
- Enable Application Configuration to configure AppConfig settings
- Enter the Configuration Key of “portalURL”
- Select Value Type of “String”
- Enter the Configuration Value of “https://myportal.com/portal”
- Add additional supported AppConfig settings for the app if available using the Add button
- Select Add to save the new assignment
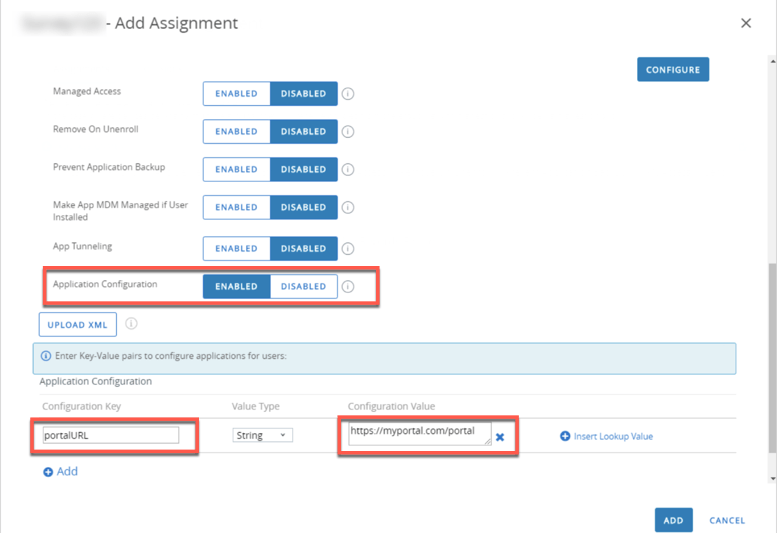
App Config - Check the Assignment has Send Configuration Enabled (tick mark)
- Select Save and Publish to save the new assignments for the current app
- Review Assigned Devices and select Publishto assign the app to listed devices
AirWatch VMware Docs:
https://docs.vmware.com/en/VMware-Workspace-ONE-UEM/1912/Application_Management/GUID-AWT-FLEX-DPLYMNT-ADD.html
Now open your Business Analyst Mobile app that you just installed from AirWatch Catalog app and see that you do not have to enter the url for an enterprise account which you have just configured via AirWatch. You can change this url at any point of time in your AirWatch console and restart the mobile app to get that reflected.

Article Discussion: