If you’re an avid user of ArcGIS StoryMaps, then you’re no stranger to the dance of maps and layers that is known as map choreography. However, the same techniques used to guide readers through a map can also be applied to images to achieve image choreography. After all, what are maps but images of geographies? When applied effectively, these image sequences have the potential to capture your readers and immerse them in the visual world of your story.
This post covers the seemingly endless creative opportunities for image choreography in visual storytelling. First, we’ll start with some context about image choreography and how it can be implemented in ArcGIS StoryMaps. Then, we’ll dive into some creative examples that use media layers in Map Viewer and share the steps used to author them. If media layers and their uses within ArcGIS StoryMaps are new to you, check out this post for a primer on the treasure trove of possibilities that await.
Image choreography
Much like its map-based relative, image choreography involves creating a series of interconnected images arranged in a sequence. As readers navigate through the story, the images are presented one after another, often accompanied by relevant written narration.
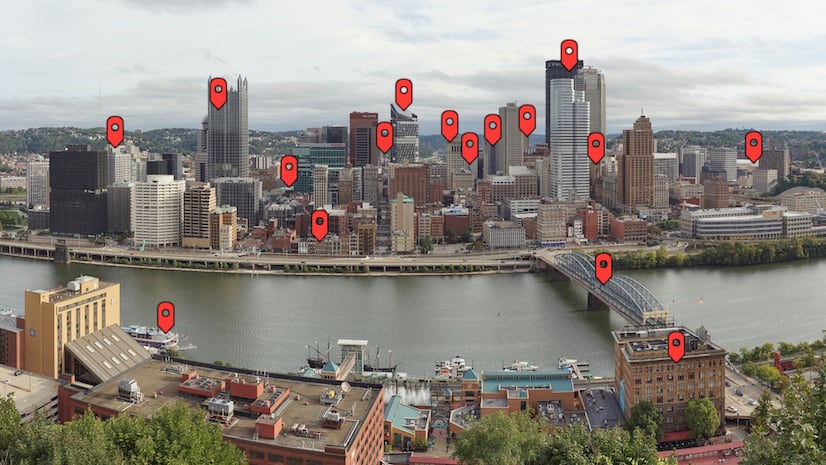
In its most basic form, image choreography can be created by placing images in the media panel of a sidecar. For instance, in the Building for tomorrow story, a series of identical photos with various highlights and annotations were used in a sidecar to introduce the reader to Toronto’s skyline and call attention to the amount of construction and locations of interest.

However, using media layers in Map Viewer to create image choreography offers several advantages. For instance, like other map layers in Map Viewer, media layers can be toggled on or off, use effects, and take advantage of blend modes. Additionally, as we change the focal point of our image throughout our choreographed sequence, the panning and zooming of the underlying map create a subtle motion which adds a dynamic visual effect.

Aside from the novel dynamic effects, these features make image choreography well-suited for taking readers on an engaging visual journey through a series of images. In breaking the journey into a sequence, the images build upon each other while maintaining continuity, reducing the cognitive load and increasing the visual impact of each image. Panning, zooming, and toggling layers of your sequence also give the reader the superpowers of X-ray vision and magnification, allowing them to take in all the image details through guided exploration. So, when your narrative features an inanimate central character, be it a spacecraft, an animal habitat, or an architectural marvel, image choreography can help you peel back the layers and give your readers a peek inside.
Creating magic with media layers
If you’re intrigued, getting started with image choreography with map layers is as simple as uploading an image to a Map Viewer. Here’s a basic step-by-step approach:
- In Map Viewer, click Add media layer
- Upload your desired image
- Position or resize the image as required
- Click Update and close to save your changes
Like map choreography, once you add the map to a sidecar in ArcGIS StoryMaps, you’ll choreograph your media layers:
- Use a sidecar block to create a map-focused slide
- Add a sidecar block to your story
- Add the map with your images to the media panel in the initial slide
- Configure the media layers’ appearance as desired
- Provide some descriptive text in the narrative panel to accompany the map
- Create a second slide
- Duplicate the initial slide
- Adjust the position or visibility of the media layers
- Modify the narrative text accordingly
- Repeat the process until your sequence is complete
From there, your imagination is the only limit. For all more details on uploading media layers to Map Viewer, check out the documentation, and for a refresher on constructing map choreography, be sure to read this post or watch this video.
Examples
Now that we’ve covered some technical bits let’s get creative with examples! As mentioned, there are infinite creative uses for media layers and image choreography, and while this isn’t an exhaustive list, I hope it will inspire your next story idea.
Each of the examples below has been included in this collection. They contain a more detailed demonstration of their construction and links to the behind-the-scenes maps.
Linear scrolling
The timeline block is a great way to organize events, steps, or rankings sequentially within a story, but what if your content relies heavily on the related visuals? Image choreography with media layers can give your visuals the center stage they deserve. In addition, the panning of the map between slides adds dynamic motion.

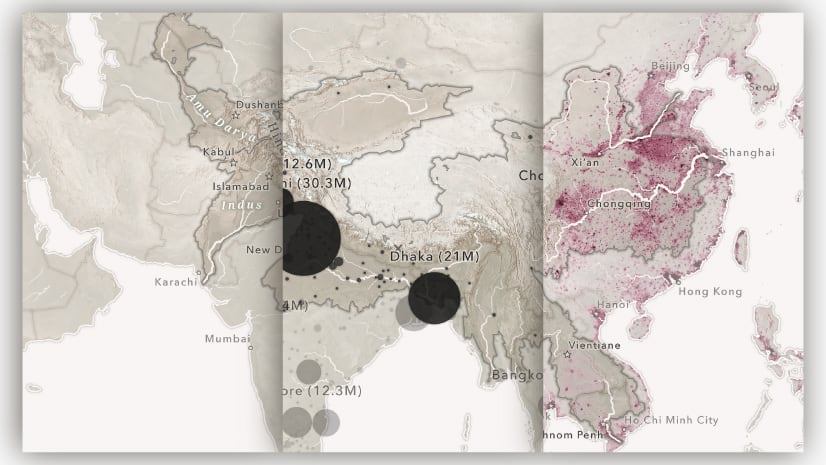
To achieve this effect, arrange your images as media layers along a common line of latitude or longitude. Then, when configuring the sidecar slides in your story, pan the map along your chosen direction until the sequential image comes into the map extent.
Bonus: This technique isn’t limited to configuring images for each slide. Adding a layer as a backdrop can further enhance the effect. In the example below, a blue gradient serves as an ocean backdrop to the featured creature on each slide and subtlety darkens to convey the depths to which the reader has plunged as they read.

Cutaways
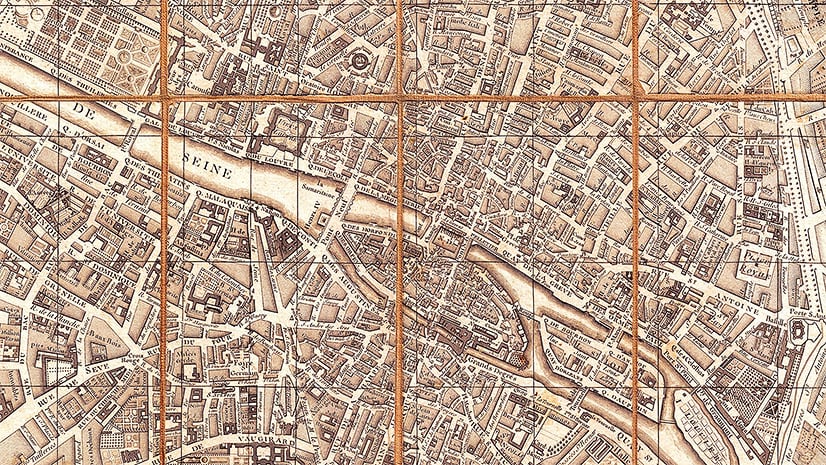
If you’re like me and crave the exploded-view books of my youth where you could peel back the outer layers of a spacecraft, take a slice out of a city street, or reveal the skull of a beaver, then image choreography might be for you. Cutaway illustrations or cross-sections can be an effective visual storytelling tool. By disassembling things from the world around us and understanding their components and relationships, we can understand how they function together to make up the whole.

To create your cutaway, it’s recommended that you compose your series of photographs, illustrations, or scenes before building your image choreography. In creating each layer or element separately, you ensure that when it comes time to choreograph the cutaway in a sidecar, you can selectively control the visibility of your cutaway views to reveal the inside of your chosen subject.
Bonus: As you peel back the layers of your cutaway image, zooming into the area of interest helps direct your reader’s focus. While zooming in, using a transparent or darkened version of the original image as a background allows readers to retain the context for the focal area within the larger whole.

Tips, tricks, and best practices
As with any technique, a handful of tips and tricks will help you get the most out of media layer image choreography. Here are some essential tips to help you get started:
- Hide the basemap: With image choreography, you likely don’t need the basemap getting in the way. To clean up the visuals, turn off the basemap layer visibility within your map.
- Use a background color: Setting a background color in the Map properties of Map Viewer can help it blend with your images or seamlessly match the background of your story.
- Take advantage of blend mode and effects: Experiment with blend modes and effects to see how they might be used to mask out or draw attention to specific areas of your images.
- Use Sketch layers:Whether you need to annotate an image, highlight a portion of an illustration, or create an additional visual element within your composition, Sketch layers are a quick and easy way to add editable markup to your images.
- Turn off the scalebar: When your media layer images are added to your story, feel free to remove the scalebar if there’s no map in sight.
- Create media actions: Image choreography isn’t limited to the transitions between sidecar slides. Since the images are media layers in a map, you can use map actions within a sidecar to trigger visibility, change extents, or swap the media out entirely using media actions.
- Pixel perfect alignment: If your cutaway imagery requires pixel-perfect precision, composing your imagery layers with identical dimensions will allow you to align them perfectly as media layers by referencing the coordinates of the pin locations in Side-by-side mode. Check out the ‘Further refine your work: Side-by-Side Mode’ section in this post.
- Be mindful of motion: Map choreography best practices also apply to image choreography, be mindful of what you change between each slide of your image choreography sequence. Changing focal point, extent, and imagery all at once can disorient or confuse your readers.


Article Discussion: