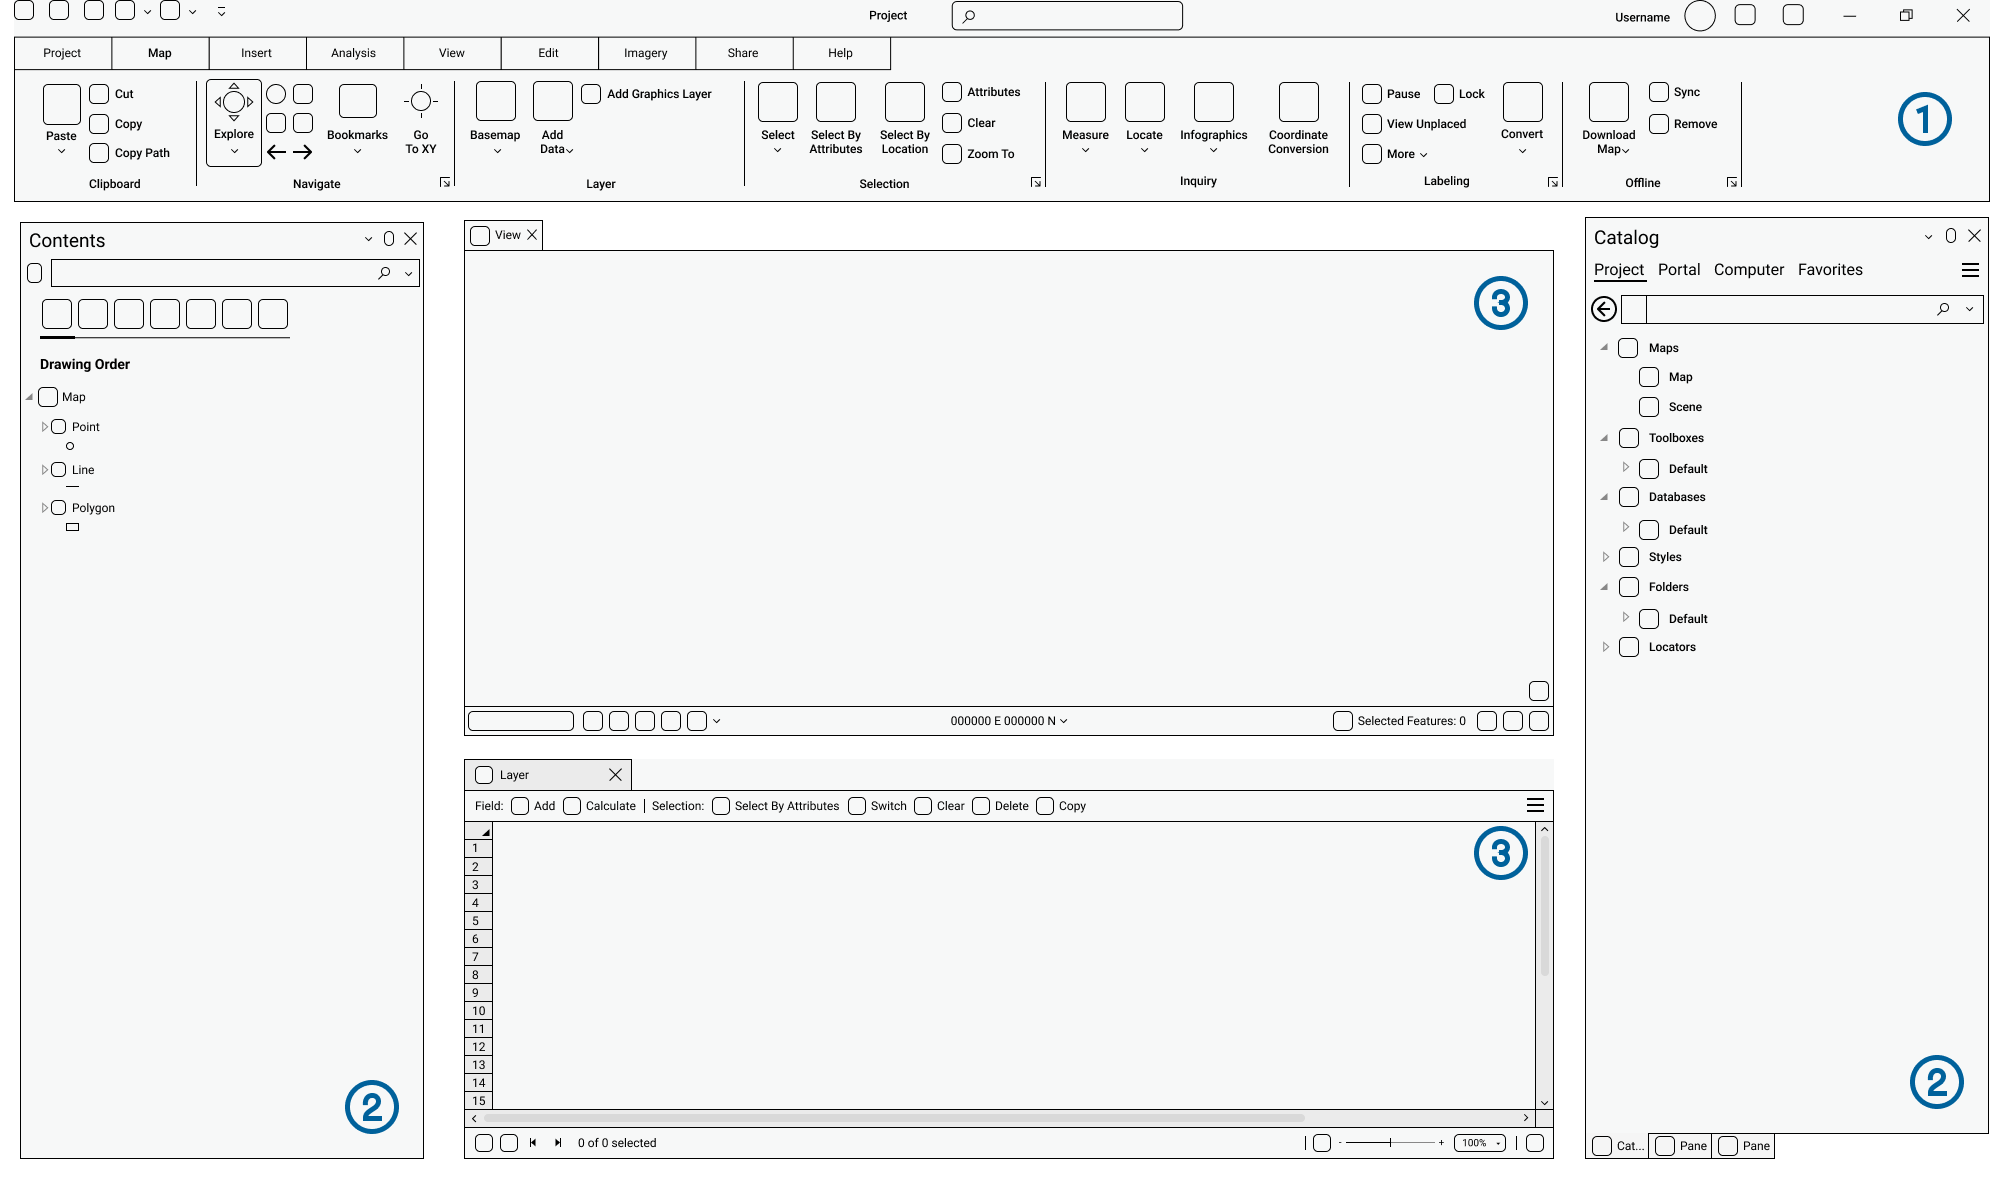
The ArcGIS Pro user interface is made up of three key components:
1. The Ribbon is at the top of the application and is made up of core tabs and contextual tabs. Tabs host groups of controls that support a similar functional purpose, like the Map tab which contains controls for manipulating the Map View or the Analysis tab which contains controls for analytical purposes.
2. Panes can act like modeless dialogs that allow user interaction without blocking actions in other parts of the application. They can be docked at the top, bottom, left or right of the application and multiple panes can be stacked in the same area. Navigation within Panes happens through icon tabs, text tabs, and burger menus.
3. Views are windows for viewing and working with a representation of your data, like the Catalog View, the Map View or the Table View. A project can have many views open at the same time, but only one is active.

The past few releases of ArcGIS Pro have made improvements to the experience of working with these three components, enabling you to be more productive in your day-to-day work.
Read more to learn how you can leverage these enhancements today!
A simplified ribbon
Let’s start at the top (get it?) with the ribbon. If you’re the kind of person who is looking to squeeze every last inch out of your monitor to maximize your map (or layout, or table…) view, hopefully you’re familiar with the fact that it is possible to minimize the ribbon. Do that by right-clicking a tab and choosing Minimize the Ribbon. Or if you’re really crafty, you may have discovered that you can double-click a tab to minimize or expand the ribbon.

While that gives you the extra screen space you’re looking for (good), it also builds in extra clicks to access commands (not good). Beginning in ArcGIS Pro 3.4 (Q4 2024), there is a Simplified Ribbon option that declutters your workspace by providing a slim view of the ribbon with recognizable icons to choose from while giving your views that extra real estate.

Improved pane management
Panes can act like a modeless dialog that sits atop the application window, or can be docked at the top, bottom, left or right of the application; multiple panes can be docked in the same area. By default, if the initial Pane placement is not modified, newly opened Panes are stacked on top of the Catalog Pane – docked on the right of the application.
Our users on Esri Community let us know that, as they moved through their day-to-day workflows, the number of Panes would build up quite fast. This would result in the Pane tab names becoming truncated to the first letter of the name, and an overall unproductive experience when trying to identify and close tabs.
Your panes might end up looking like this, or even worse!

With the ArcGIS Pro 3.4 release, we introduced icons corresponding to each Pane in the application allowing them to be easily recognized and differentiated from one another. The name will continue to show as long as the number of Panes doesn’t necessitate truncating the label beyond the first letter.

See the difference?! When I want to switch to the Print Layout or Export Layout panes, I can quickly see what I need without having to make the stacked panes wider, or hover over each letter and wait for the screentip to tell me which pane it is (or more realistically just madly click through them all).
To compliment the icons, we also introduced an overflow menu listing all open panes on a vertical list as well as new tab management options in the context menu. The “Close Others” option will close all tabs in that immediate tab group except the active tab while the “Close Tab Group” will close all tabs in that immediate tab group including the active tab.

Custom pane sets
When you open ArcGIS Pro for the first time, the Contents Pane is open and docked on the left of the application, while the Catalog Pane is open and docked on the right. As you work throughout the day, you likely open and close Panes as described above. Or you may end up with a number of stacked panes and you find that you want to switch to a familiar setup for the task at hand.

To support this quick switching, past versions of ArcGIS Pro have provided three pre-built pane sets – Mapping, Editing, and Geoprocessing – under the Reset Panes split button. The reset panes workflow served primarily to get from a jumble of ad hoc panes to a cleaner state.
But what about switching to a familiar set of panes that you like to have open when working with layouts?
Or having your favorite panes available when labeling?

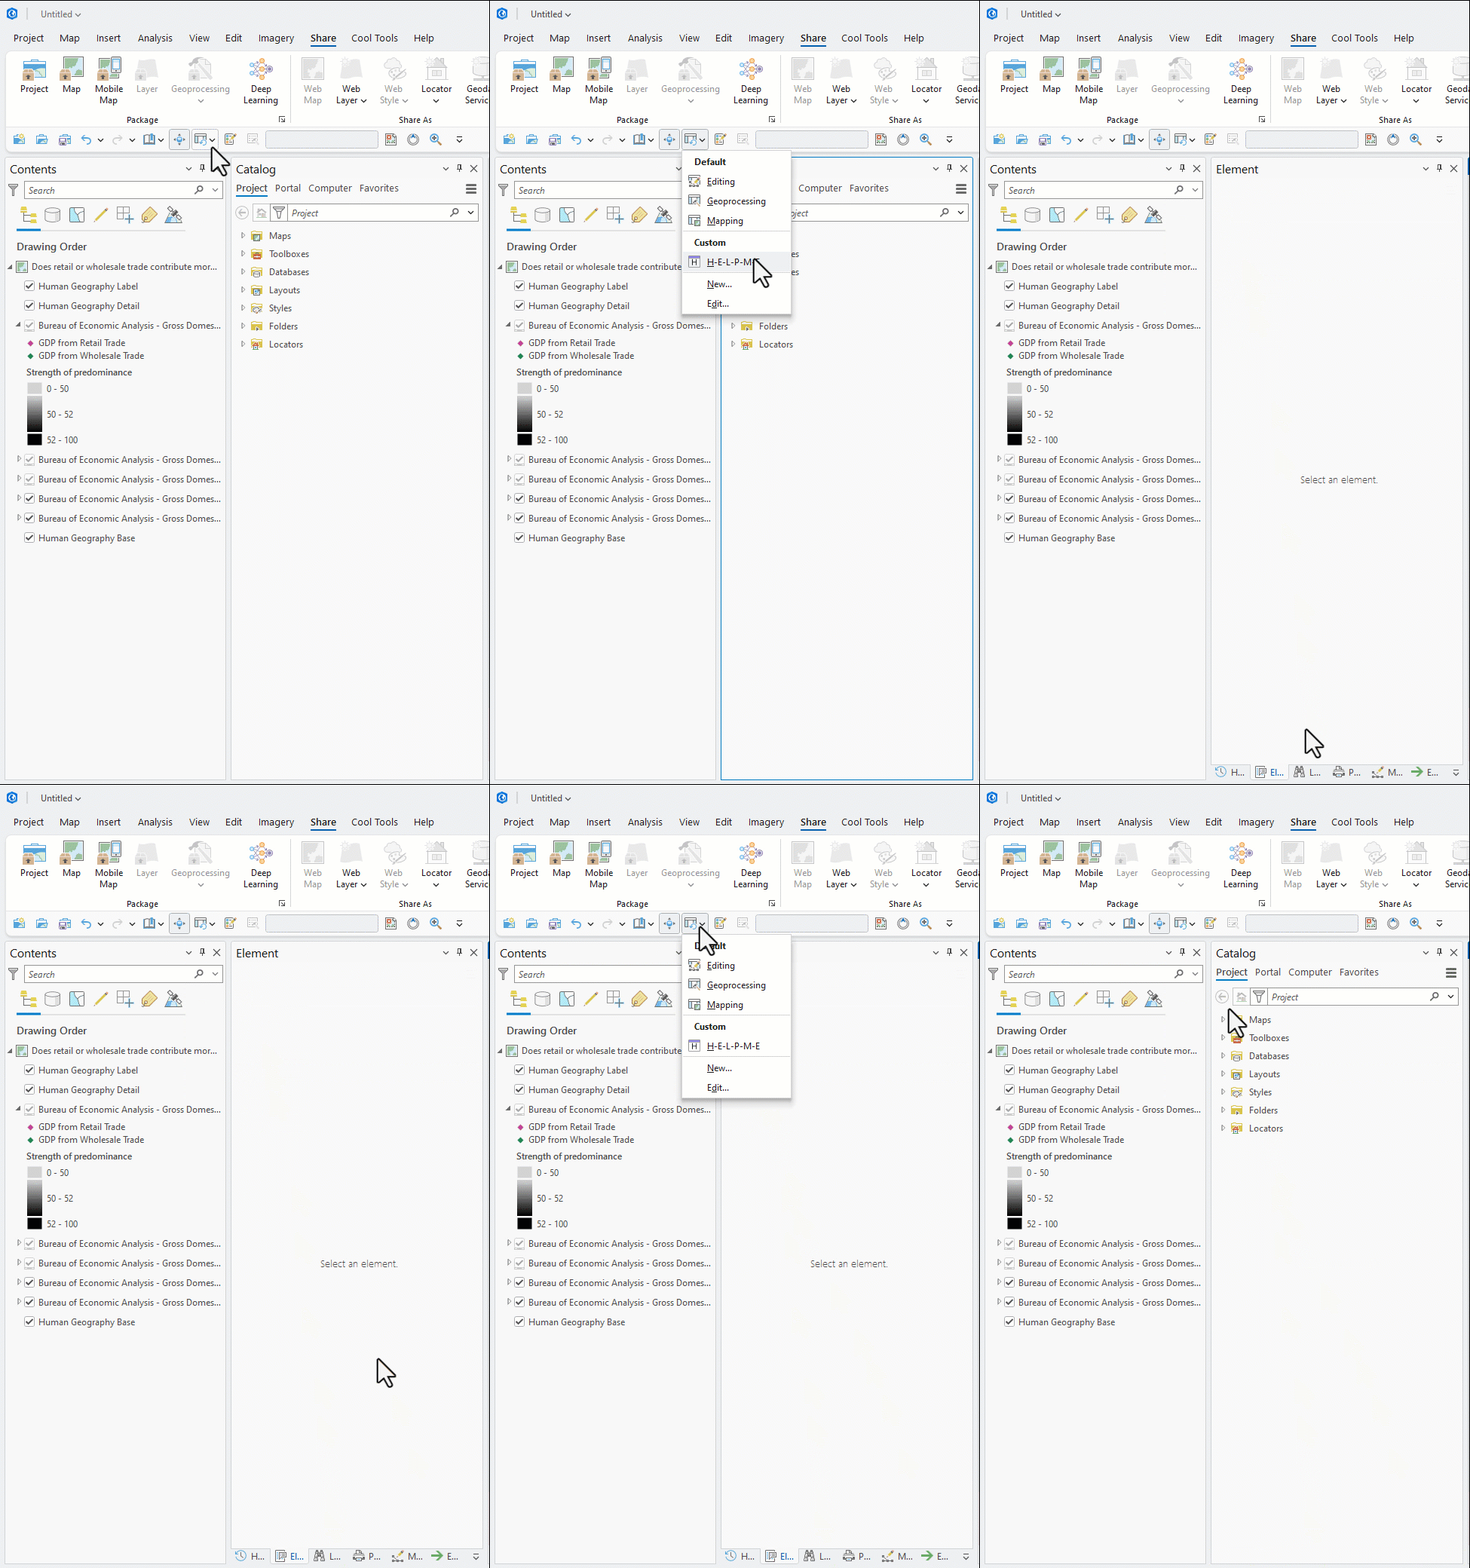
With ArcGIS Pro 3.5 (Q2 2025), we introduce the option to create custom Pane Sets to support your common workflows.
To create a custom Pane Set, open the panes you would like to include.
In the View tab on the Ribbon, in the Windows group, click on Pane Sets and, in the drop down choose New.
Give your Pane Set a name and click OK.
Unlike default Pane Sets, custom sets can be updated as your workflows evolve or even be removed if no longer useful.
To be even more productive, the new pane set functionality allows you to assign shortcuts to custom pane sets or even add them to the Quick Access Toolbar.
NOTE: a Pane Set doesn’t save the position of panes; panes open to the screen location where they last appeared.
Minimize any view
Views are windows for viewing and working with a representation of your data, like the Catalog View, the Map View or the Table View. A project can have many views open at the same time, but only one is active.
This was particularly important to those working on a laptop and having to balance limited screen space. Our team kept a close eye on contributions from our users on Esri Community and approached this pain point in a holistic way.
With ArcGIS Pro 3.4 (Q4 2024), we introduced the ability to minimize all floating views. Now, regardless of whether you’re working on the Catalog View or a Table View, you can float it and minimize it.
To float a View, simply drag it out of the area it’s docked in or right click the View tab and select Float in the context menu. Once the View is floated, you can minimize it just like you would any other application window.
When you hover on the Windows task bar, you’ll see the different minimized views next to one another. To bring a View back up, simply click on it, and once the View is visible again, you can re-dock it.
Final thoughts
In this blog we shared improvements that have been made to ribbon, pane and view management in recent releases of ArcGIS Pro. Knowing that the functionality is there is the first step towards making it work for you. We shared examples of how these enhancements could be used, hoping to pique your curiosity.
Now it’s your turn to explore how you can make your job easier by applying these new possibilities to your work in ArcGIS Pro!


Article Discussion: