When you create a custom Python script or tool, you may want to share your hard work with your coworkers or clients. A common problem users face when sharing packages is that their script tools have dependencies on packages that are not in the default ArcGIS Pro Python distribution (arcgispro-py3). As a result, the script tool may not work in the receiver’s Python environment, making it challenging to share the script tool with coworkers, clients, or the broader community. If you intend on sharing the script tool with others, you should always consider if it will work in the receivers Python environment.
In this blog series, you will learn to package the scripts and tools as a geoprocessing module, and then distribute with Anaconda. Conda will take care of solving the dependencies of your package when it is installed into a user’s Python environment.
This is part one of a two-part blog series. In this blog article, you will learn how to create a geoprocessing module. The next blog article, Build a package for public distribution with Anaconda, will explain how to distribute a geoprocessing module using Anaconda.
💬 Note:
For more in-depth information regarding geoprocessing modules, visit Create geoprocessing modules.
What is a geoprocessing module?
A geoprocessing module is a Python package extended with a package structure containing an esri folder.
- Custom toolboxes and Python toolboxes can be distributed as geoprocessing modules.
- Once a geoprocessing module is installed in a Python environment, you can access toolboxes in ArcGIS Pro, through the Geoprocessing pane and with arcpy.
This framework for geoprocessing modules is explained below.
Create a geoprocessing module

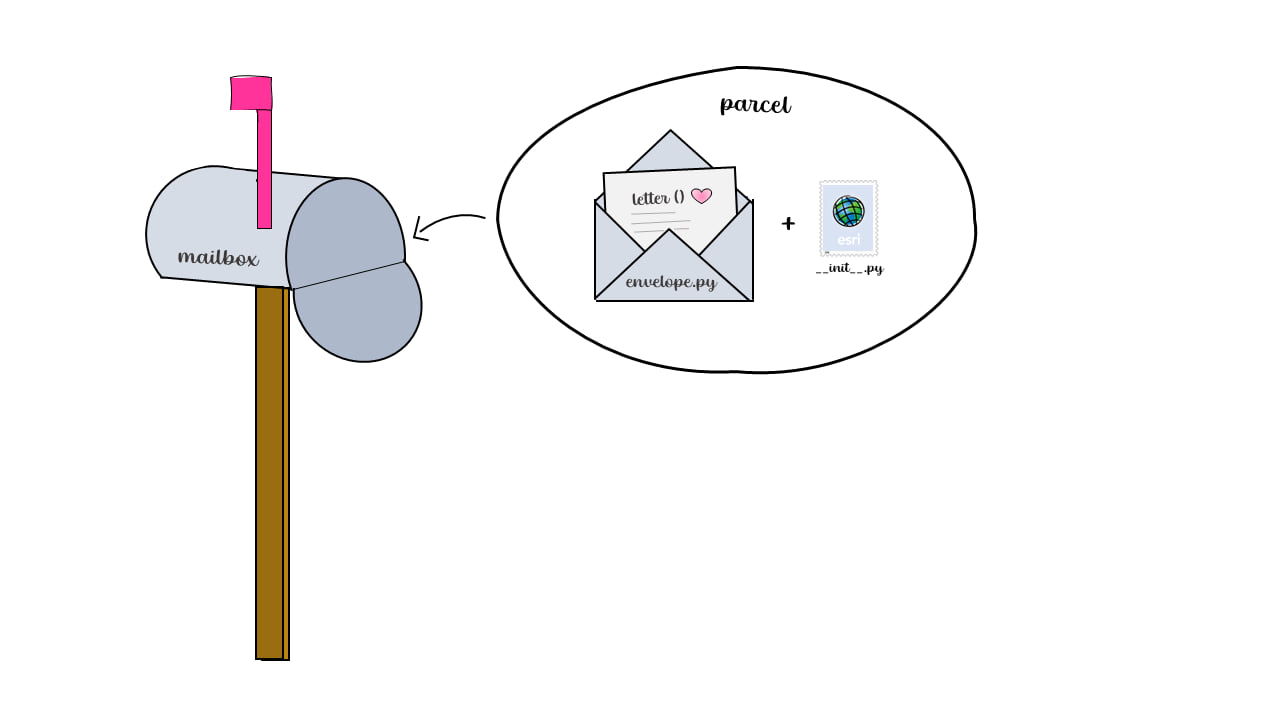
In Tutorial 1, you will assemble a Python package called parcel. The parcel includes a letter (written code) enclosed in an envelope (module). To distribute the parcel, it will be placed in a mailbox (parent directory).
In Tutorial 2, you will create a toolbox to open the parcel in ArcGIS Pro, add toolbox support files and reorganize the folder structure of the Python package, converting the Python module into a geoprocessing module.
Create a Python package
For the Python package to be built and distributed, a specific directory structure must exist. A module must be stored in a directory, which must be housed within a parent directory.
parent_directory
└──package_directory
     ├  __init__.py
     └  module.py
Here is the example directory you will be creating:
mailbox
└───parcel
     ├  __init__.py
     └  envelope.py
💬 Note:
Throughout this process, __pycache__ folders may appear in the directories. To simplify the folder structure diagrams, they are not shown here.
TUTORIAL 1: Assemble a Python package
Estimated time to complete: 5 minutes
In this tutorial, you will create a Python package named parcel that will contain a module called envelope.py. The parcel package will be housed in a parent directory, mailbox.
1. Create envelope.py:
2. Recreate the following directory in your file explorer:
mailbox
└───parcel
     └  envelope.py
💬 Note:
Use Ctrl + Shift + N to create folders.
3. Create __init__.py:
For the envelope.py module to initialize and run specific code once it has been imported, it requires an __init__.py file. By using an __init__.py file, the parcel directory is treated as a package by Python.
The directory structure should now look like this:
mailbox
└───parcel
     ├  __init__.py
     └  envelope.py
With this directory structure, you can import the envelope.py module through import parcel, and you can run the parcel.envelope.letter() function.

You have successfully created a Python package.
Extend a Python package with geoprocessing tools
Now that we have created the Python package parcel, you can extend it to have geoprocessing functionality. By adding an esri folder and reorganizing the package’s folder structure, you extend the package in a way that ArcGIS Pro understands, making it possible to distribute custom toolboxes to other ArcGIS users.
The standard directory structure for the Python package extended with custom geoprocessing functionality is the following:
mailbox
└──parcel
    ├  __init__.py
    ├  envelope.py
    └──esri
        ├──arcpy
        ├──help
        │   └──gp
        │       ├──messages
        │       └──toolboxes
        └──toolboxes
You will create this extended folder structure in Tutorial 2 below.
TUTORIAL 2: Convert a Python module to a geoprocessing module
Estimated time to complete: 15 minutes
1. Create a Python toolbox:
To demonstrate the process of extending geoprocessing through Python packages, create a Python toolbox named “OpenYourEnvelope.pyt”. Learn more about creating a Python toolbox.
Testing your toolbox
Temporarily place OpenYourEnvelope.pyt into the root mailbox folder. Since parcel is being imported in the toolbox, the tool will likely not run properly unless it is in the same directory as the parcel package.
i. Open ArcGIS.
ii. Open the Catalog pane.
iii. Right-click folders and select Add Folder Connection.
iv. Select the mailbox folder.
v. Find the Read Your Letter Tool, double-click on it, and run the tool.
vi. Click View Details.

In the OpenYourEnvelope.pyt toolbox, the parcel package is imported and the method of the Tool class calls the letter() function from the envelope module.
Once the OpenYourEnvelope.pyt toolbox has been created, the parameter help can be configured for the toolbox through the metadata. To edit a tool’s metadata, from the Catalog pane, right-click the tool in the toolbox and choose Edit Metadata.
2. Create toolbox support files:
After the metadata is updated for the tool and toolbox, the arcpy.gp.createtoolboxsupportfiles function can be run to generate the supporting .xml files found in the esri folder structure described above. This command also produces OpenYourEnvelope.py, named after the tool, which allows the toolbox to be accessible from arcpy.
If it isn’t there already, place OpenYourEnvelope.pyt into the root mailbox folder, and use the Python Command Prompt to run the following:
💬 Note:
Ensure that the toolbox has an alias before running arcpy.gp.createtoolboxsupportfiles. The alias is needed to generate the help files.
In the resulting esri folder, create a toolboxes folder and move OpenYourEnvelope.pyt into it. The accompanying metadata (.pyt.xml) files can be discarded. The esri folder should now look like the following:
esri
 ├──arcpy
 │   └  OpenYourEnvelope.py
 ├──help
 │   └──gp
 │       ├  Tool_OpenYourEnvelopeToolbox.xml
 │       ├  OpenYourEnvelopeToolbox_toolbox.xml
 │       ├──messages
 │       └──toolboxes
 │           └  OpenYourEnvelope.xml
 └──toolboxes
     └  OpenYourEnvelope.pyt
💬 Note:
The messages folder is not generated by arcpy.gp.createtoolboxsupportfiles; it must be created manually to make messages used in the script tools or Python toolboxes localizable, but can be omitted if there is no plan to internalize your toolbox. To learn more, see Internationalization of geoprocessing modules.
Move the esri folder into the mailbox\parcel directory. The directory structure for the distribution will now be as follows:
mailbox
└──parcel
    ├  __init__.py
    ├  envelope.py
    └──esri
        ├──arcpy
        │   └  OpenYourEnvelope.py
        ├──help
        │   └──gp
        │       ├  OpenYourEnvelope_toolbox.xml
        │       ├  Tool_OpenYourEnvelopeToolbox.xml
        │       ├──messages
        │       └──toolboxes
        │           └  OpenYourEnvelopeToolbox.xml
        └──toolboxes
            └  OpenYourEnvelope.pyt
The geoprocessing module is ready to deliver. 📦 📬
To learn how to distribute the geoprocessing modules to your coworkers with Python dependencies intact, see part 2: Build a package for public distribution with Anaconda.


Article Discussion: