Welcome to the final installation of our ortho mapping series – ortho mapping products!
In Part I of this blog series, we showed you how to create an ortho mapping workspace in ArcGIS Pro to visualize and manage your aerial imagery.
In Part II, we showed you how to perform a block adjustment and assess the results.
Now, in Part III, we arrive at the culmination of the photogrammetric process: generating ortho mapping products.

After you perform a block adjustment, ortho mapping tools in ArcGIS Pro enable you to generate two types of ortho products:
- Elevation models: Digital terrain model (DTM) or digital surface model (DSM)
- Orthomosaics: orthorectified imagery that has been mosaicked together
You can create these products in their individual wizards in ArcGIS Pro or you can use the Custom Ortho Mapping Products Wizard to create all the ortho mapping products at once.
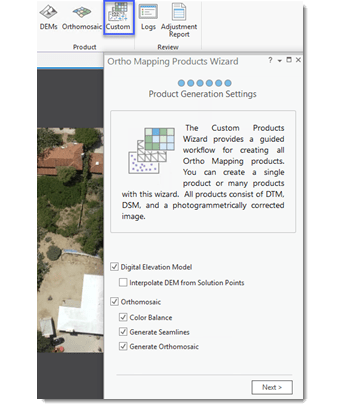
Creating Ortho Mapping Products
Step 1. Open the Custom Ortho Mapping Products Wizard from the Product group on the Ortho Mapping tab.
Step 2. Choose the types of products you want to create. In our workflow, we’re generating the Digital Elevation Model and the othomosaic with color balance and seamlines. Click Next.
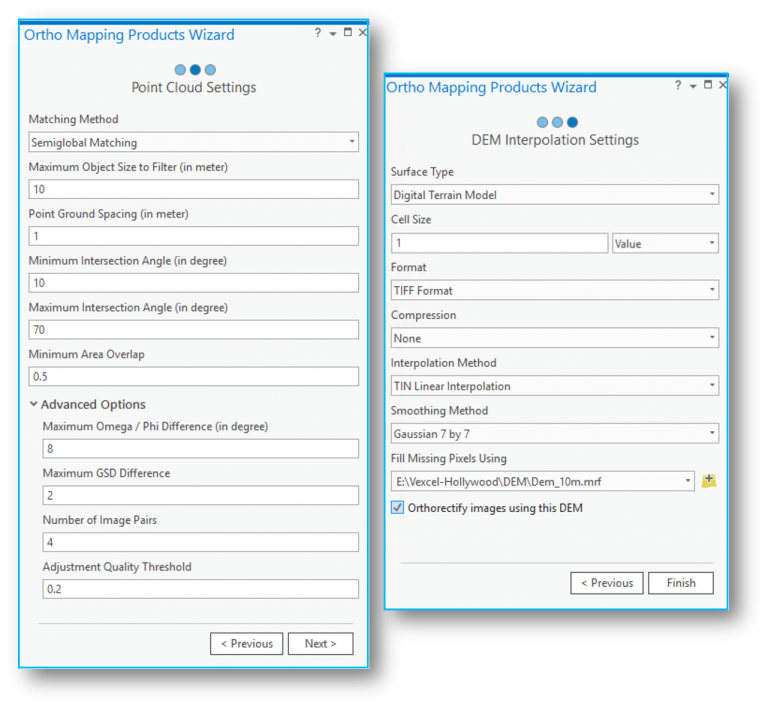
Step 3. DEM generation is configured in the Point Cloud Settings page and the DEM Interpolation Settings page. Check out the parameters and descriptions in the help documentation. See the screen shots below to see how we specified the DEM generation. Parameters were chosen based on best practices, the urban environment imaged, the pixel size and amount of smoothing we want. We also chose to create a Digital Terrain Model (DTM) because we were interested in estimating the ground elevation rather than the top surface elevation, which includes buildings, tree canopy. The DTM can then be used to orthorectify the imagery in the orthomosaic.
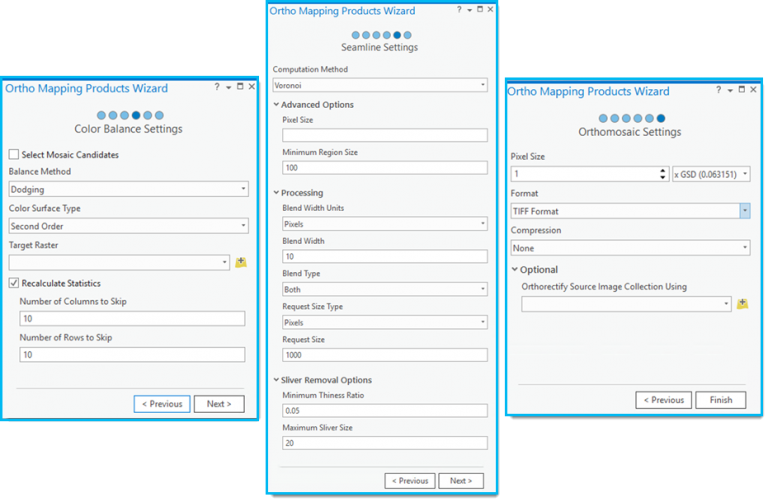
Step 4. Orthomosaic generation is controlled by the parameters with the Color Balance Settings, Seamline Settings, and Orthomosaic Settings pages. Review the parameters and descriptions in the help documentation. Check out the screen shots below to see how we specified the orthomosaic. We used mainly the default settings for orthomosaic generation, but you can modify parameters based on your needs.
Step 5. Click Finish!
Check out the results below. The DTM estimation doesn’t extend to the boundary of the orthomosaic – this is because stereo pairs of overlapping imagery are required to model elevation, and the imagery at the edges of our image collection didn’t meet the overlap criteria that we specified in our DEM settings. In the DTM generation settings, we chose to fill in missing pixels using an existing 10m-resolution DEM. For those areas not estimated by the DTM generated in our model, the existing DEM was used to orthorectify the imagery for the orthomosaic.
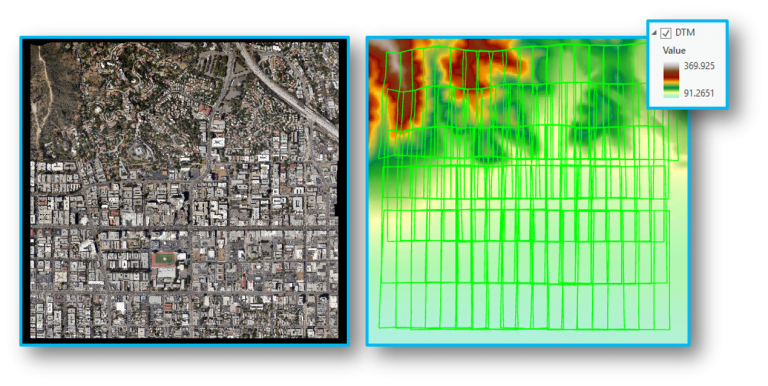
Well we did it – we created a DTM and an orthomosaic with aerial digital imagery using the wizard in ArcGIS Pro. Now you can go on to do all kinds of analysis with elevation data, or use your orthomosaic map for applications in emergency response, resource management, real estate, and more.
Learn more about ortho mapping in ArcGIS Pro!



Commenting is not enabled for this article.