The European Copernicus Data Space is an open ecosystem that provides free instant access to a wide range of data and services from the Copernicus Sentinel missions and more on Earth’s land, oceans, and atmosphere. The Copernicus Data Space Ecosystem ensures the continuity of open and free access to Copernicus data. In addition, it extends the portfolio for data processing and data access possibilities. The data collection available is continually growing. To learn more, see the Copernicus data collections.
The Copernicus Data Space Ecosystem comes with a set of APIs and access paths that are standard with ArcGIS Pro, and it is open for you to use.
Disclaimers
- The system described below is evolving quickly. Any links, content screenshots, conditions, or procedures may change. Refer to the main dataspaces site for most current information: https://dataspace.copernicus.eu.
- The STAC and s3 connect examples will access cloud data in the Copernicus environment stored in a load-balanced system hosted by CloudFerro and the Open Telecom Cloud. The machine you run this from is likely not in any of these infrastructures, which results in egress from those cloud environments, covered by the quota you get with your credentials. This access method might be suitable for infrequent use and low to medium data volumes but is not recommended for mass data processing or frequent use, as it is potentially slow across infrastructures and would quickly exceed the quota granted.
Requirements
While just setting up the STAC connection (see below) will allow you to search for and learn about available data, you will not be able to use the data you find right away.
To use data in ArcGIS Pro, find and use non-imagery data, do more detailed search and filtering, or use code to download the data, you must also create a free account for the Data Space Ecosystem and get free access to the s3 datastore by creating your personal s3 credentials. It is recommended that you do all these steps to be flexible.
You will start with the credentials and the s3 secrets, as they can be important when you create the STAC connection.
1. Create your account.
To sign in or create your account with dataspace.copernicus.eu, open the Copernicus login page, enter your credentials, and click Login, or register as a new user.
2. Get your personal s3 quota and access secrets.
Once you have created your dataspaces-account and logged in, you are ready to create your s3 credentials by following this link. Creating s3 credentials for a quota of 12 TB per month with a transfer bandwidth of 20 MBps is currently free of charge. When you create the s3 credentials, you must set an end date for their validity.
- Note this end-date down and later use it to name the ACS file,
so you know its validity. - Copy and store the credentials (access key and secret key) you get here, as you will need them to create your cloud storage connection file for ArcGIS Pro.
3. Create your cloud storage connection.
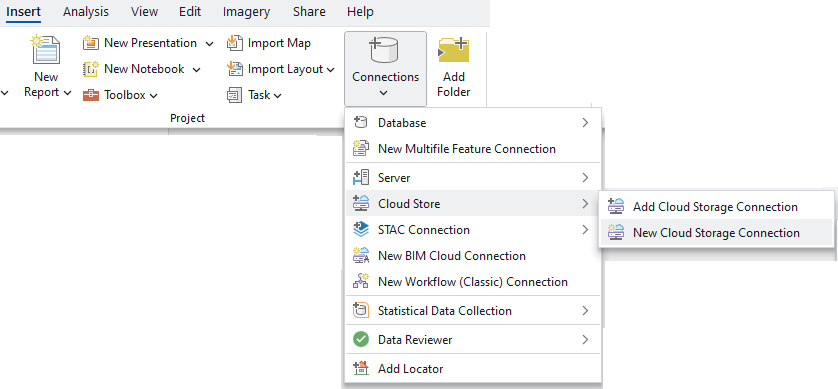
Start to create the cloud storage connection file in ArcGIS Pro by clicking Connections > Cloud Store > New Cloud Storage Connection.
A cloud storage connection allows you to access cloud resources similar to other storage systems. Learn more at Connect to a cloud store. For simplicity, the following screenshot of the ArcGIS Pro user interface contains the settings you will have to use. Instead of the placeholders <access_key> and <secret_key>, you will use the keys of your s3 credentials created above.
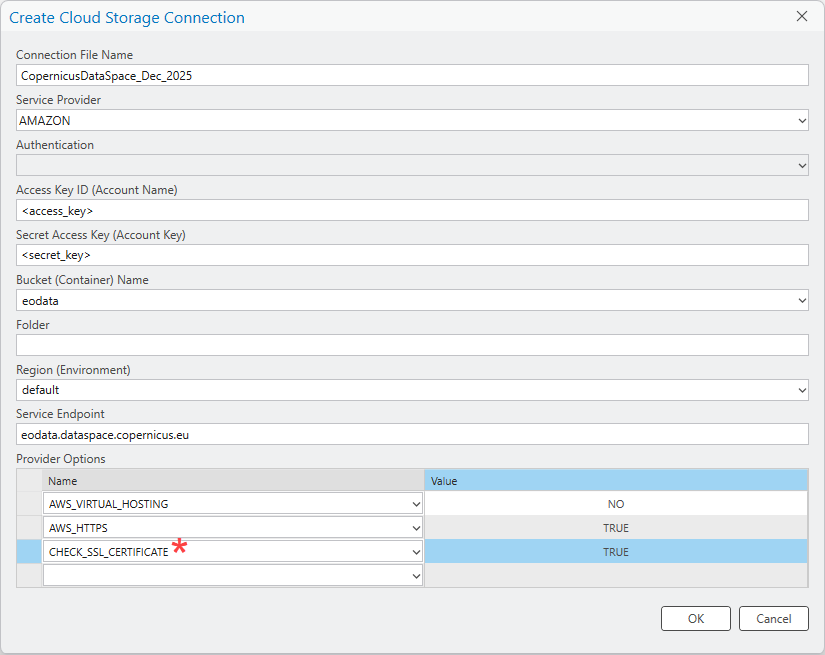
As mentioned above, it is recommended that you date the end date of validity of your secrets as a component to the name of the acs-connection.
Set all Provider Options parameters as displayed. The CHECK_SSL_CERTIFICATE parameter is not in the dropdown list. You will have to type it.
Instead of using the UI to create the ACS connection, you can use the Create Cloud Storage Connection geoprocessing tool or the respective Python command.
Once you have successfully created the ACS connection, it is added to your current project right away. In future projects, you will have to add it from its storage location.
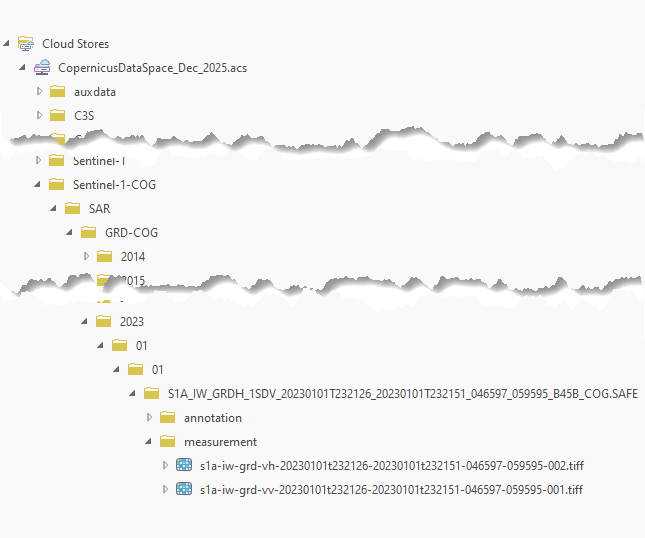
The folder structure displays underneath the connection. The folder structure of available data will change over time. Currently, you can check whether you have access for example in the Sentinel-1-COG folder. Navigate down the tree until you see images in TIFF (COG) format listed.
4. Set up STAC connection to access the dataspace STAC catalog.
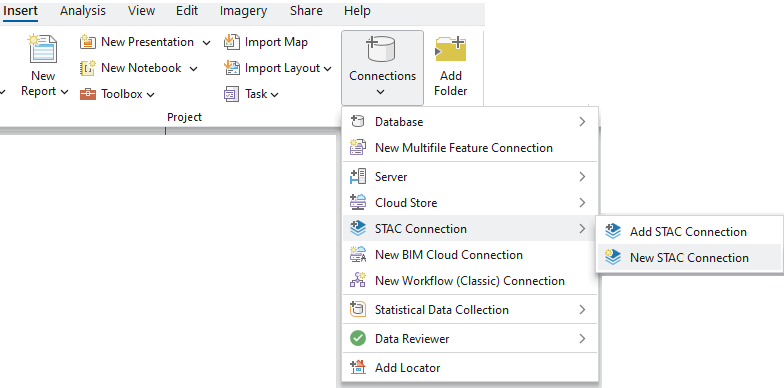
As stated in the introduction, you will do this including full data access, due to the ACS connection created above. Like database, server, or cloud connections, STAC connections can be created once and then added to projects as needed.
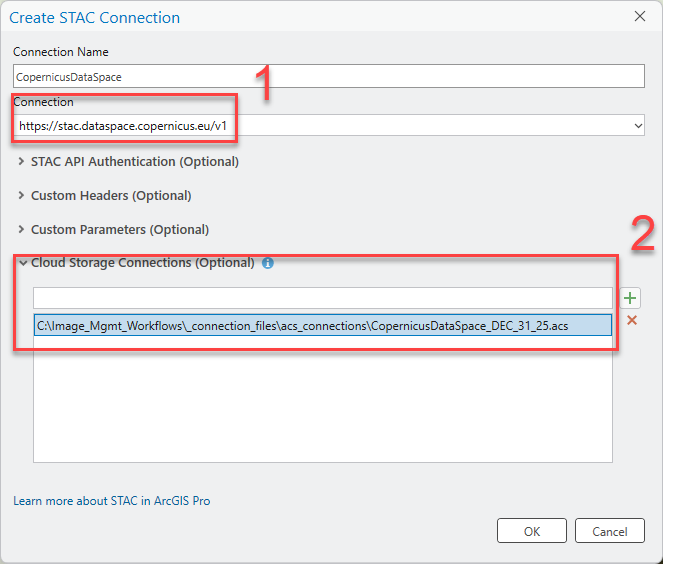
The STAC endpoint address is currently https://stac.dataspace.copernicus.eu/v1.
Due to versioning and new developments, this endpoint may change. For simplicity, the following screenshot of the Pro User interface contains the settings you will have to use.
On the Create STAC Connection dialog box, name your connection, enter the STAC endpoint (1), and reference your s3 credentials, which are stored in the .acs file (2). Click OK.
You have set up the necessary accounts and connections.
Search, find, and use data with the STAC connection
It is recommended that you first read Explore STAC pane and Select STAC assets before proceeding.
The STAC UI will help you find appropriate content by filtering the available data. Often the area of interest is an important first filter. Prepare your sample map with your area of interest as the current map extent. This example will use Strasbourg, France. Follow a similar workflow as outlined in the screenshots. Keep in mind that not all data offerings do contain usable imagery. Its recommended you stick with Sentinel-2 for a first example and then venture into other sources.
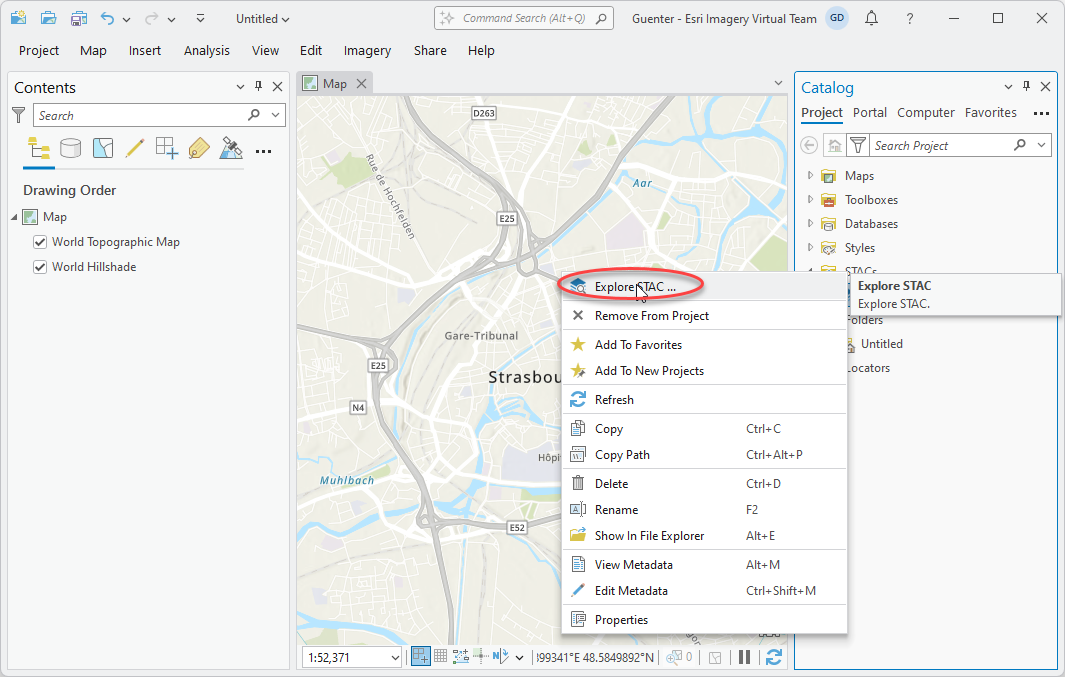
- Set the appropriate map extent, right-click your Copernicus STAC-Connection and click the Explore STAC option.
- Select target collections and set the assets of each.

- Set further query properties, such as dates, extent, and cloud cover.
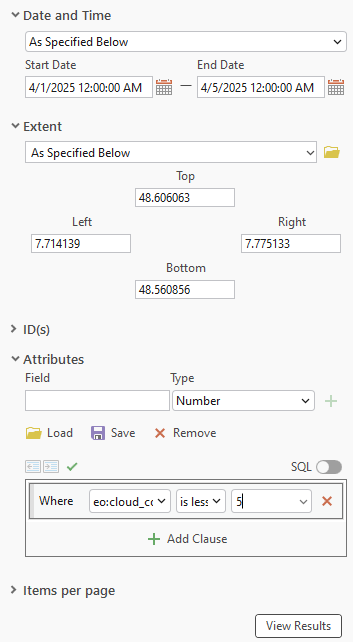
Having set your search criteria, click View Results to send the query to the STAC server.
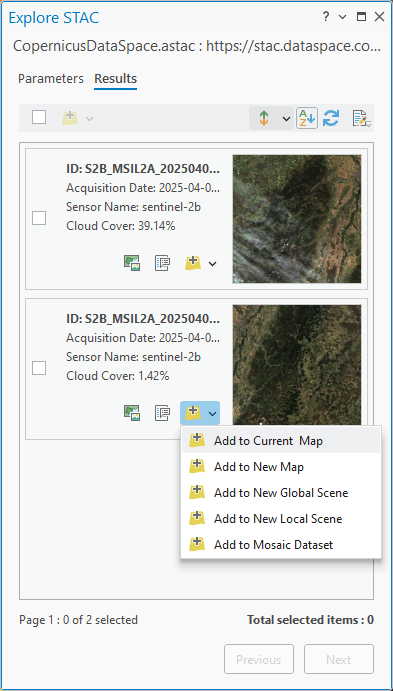
The results display as thumbnails, and for each record, detailed image metadata is provided.
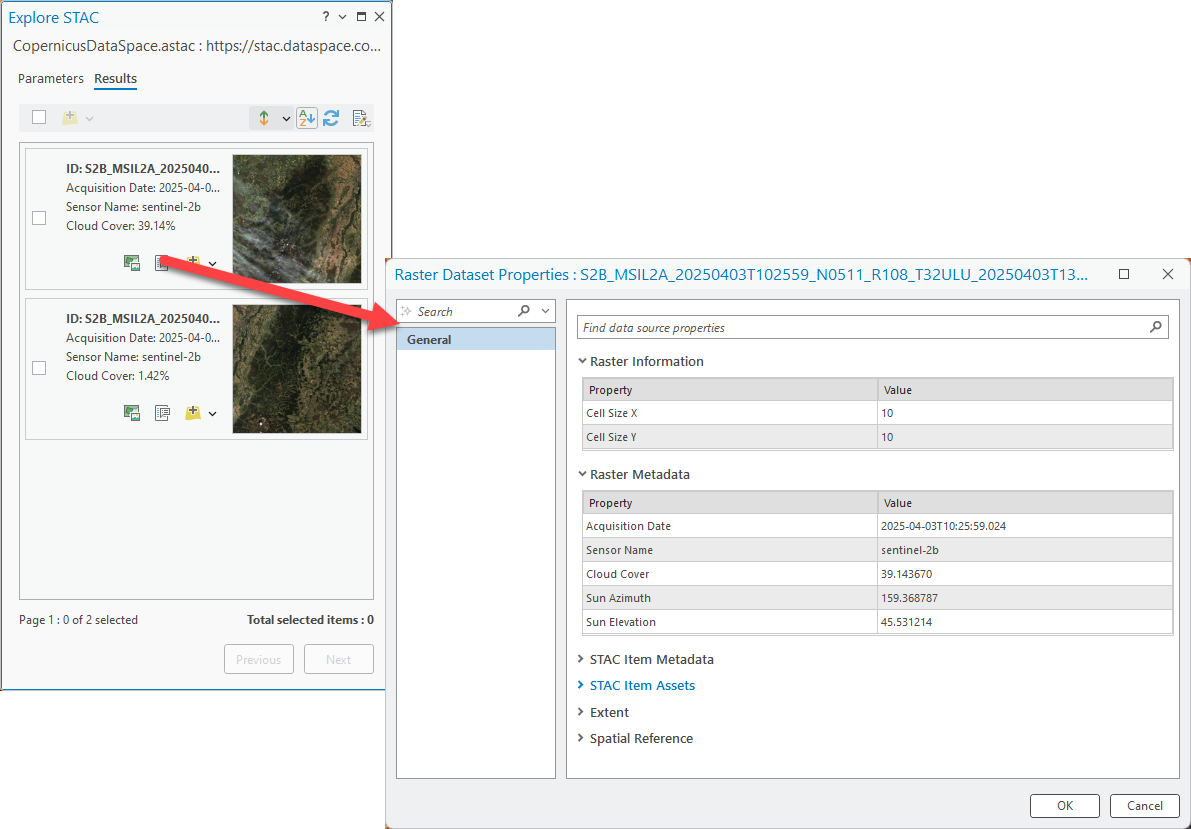
You see several options to add the data. It is recommended that you click Add to Mosaic Dataset to build a collection of data referencing the items in the data spaces instead of adding individual items to the map. To do so, select the items and select Add to Mosaic Dataset on one of them. This will create a temporary list. Next, use the Add Rasters to Mosaic Dataset geoprocessing tool.
Accessing cloud data this way might be slow and cause a lot of data egress. For large data processing and frequent use, it is recommended that you bring processing to the data by spinning up the machines in the same cloud segment that the data is stored in. The planetary computer function in Azure provides an example of this.
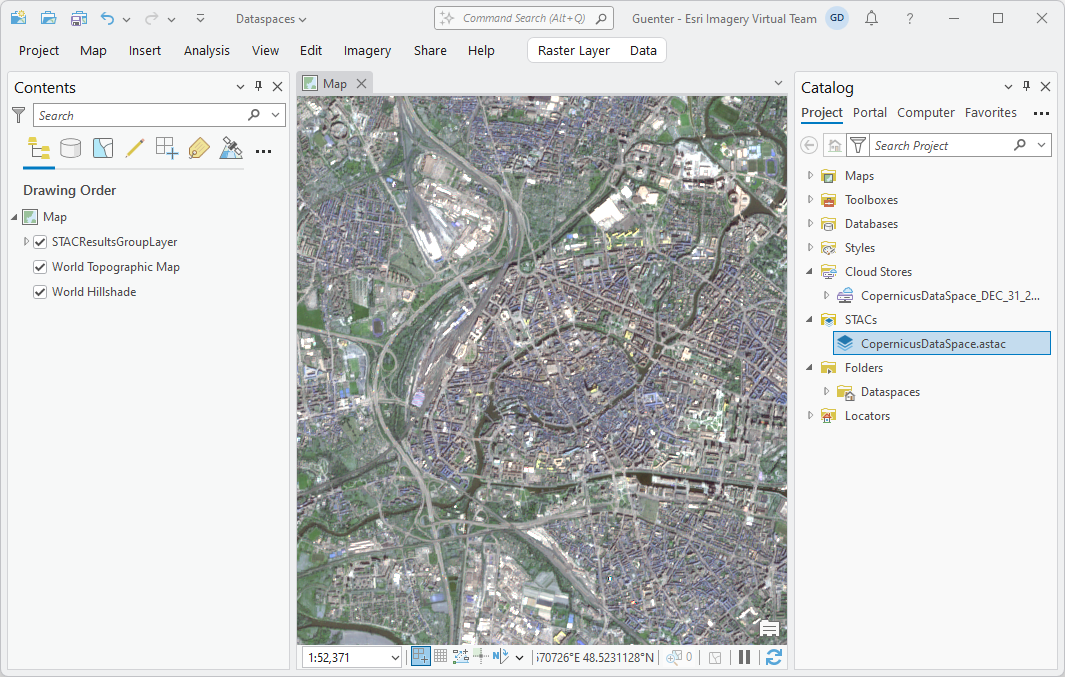
Use the cloud storage connection to add data to the map
Similarly, you can use the cloud storage connection to add recognized imagery to the map, but this method does not expose metadata or allow you to filter for AOI or attributes.
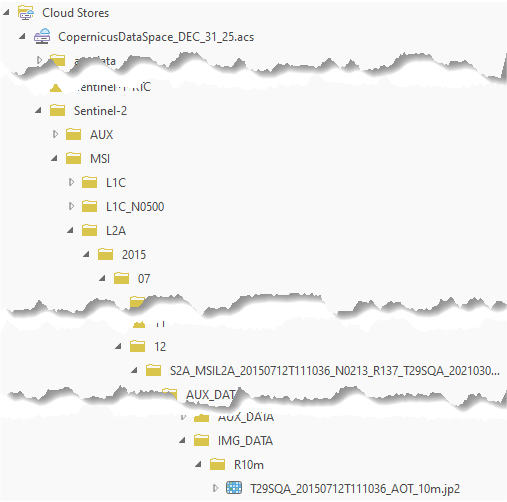
Add imagery to a mosaic dataset with the ACS connection
Searching data this way can be tedious and will not be effective for larger collections. It is also limited to traditional imagery. The mosaic dataset and its Add Rasters tool offers additional capabilities. You can search folder structures for known raster types (like traditional satellite data structures) and for NetCDF and other recognized formats.
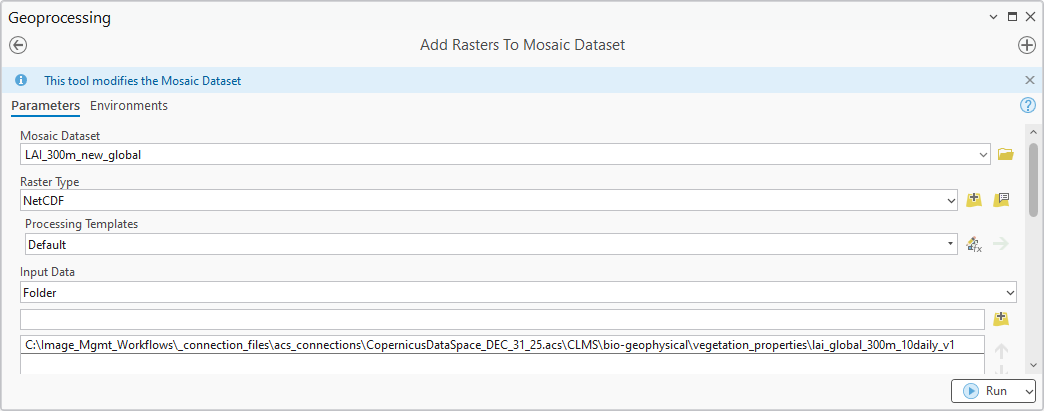
For use cases like this, it is highly recommended that you use the Copernicus Dataspace Catalog first to learn about the data content so you can properly filter and specify parameters. The above command without any additional filters, for example, adds more than 1,800 NetCDF files to the mosaic dataset in about 5 minutes. The result will be a multidimensional mosaic dataset you can now use.
Use advanced methods in Python
All methods above are either limited to traditional imagery or the supported raster types available in ArcGIS. If the data is zipped or if there are PDFs, text files, numpy-arrays, and so on, you must use more advanced methods. The .acs file you have created and the arcpy capabilities allow you to do this without the need to learn about the specific APIs the different cloud providers offer.
The first example shows the AIO object. This code creates a csv-file-list of 2024 NetCDF files (similar to the the mosaic dataset example above) as potential input of type FILE for your mosaic dataset:
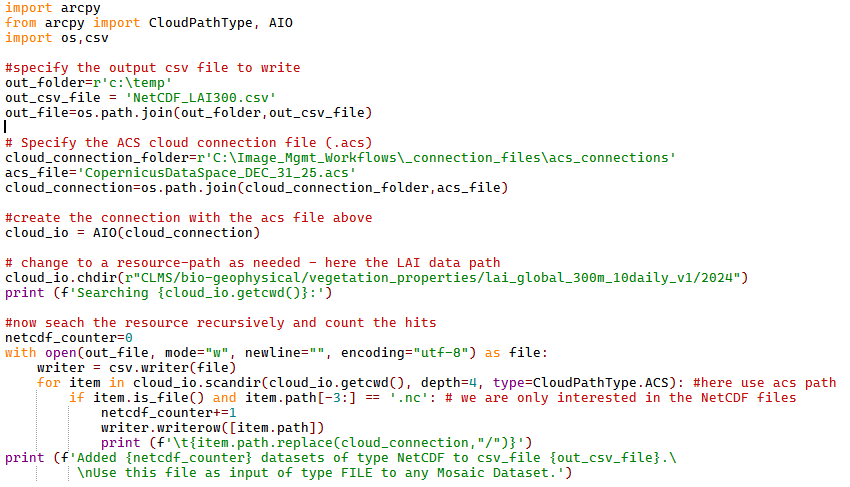
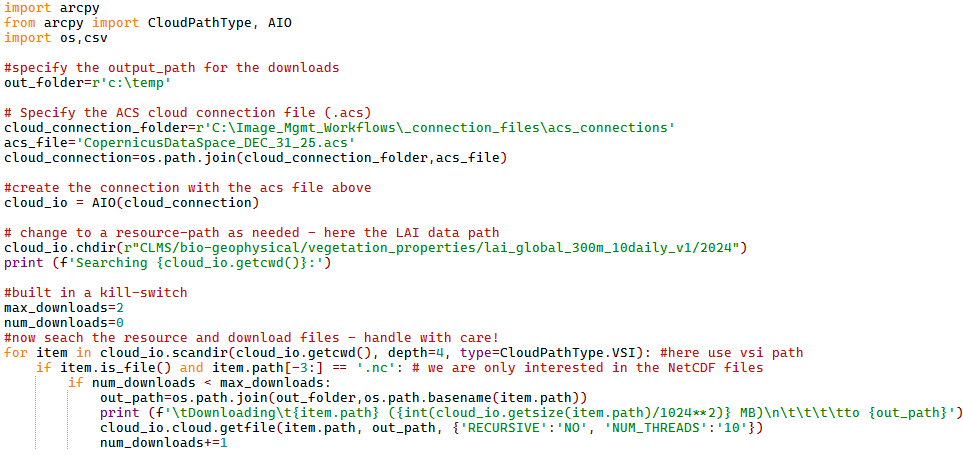
The code can be modified to use the vsi-path instead and download data to a local disk:
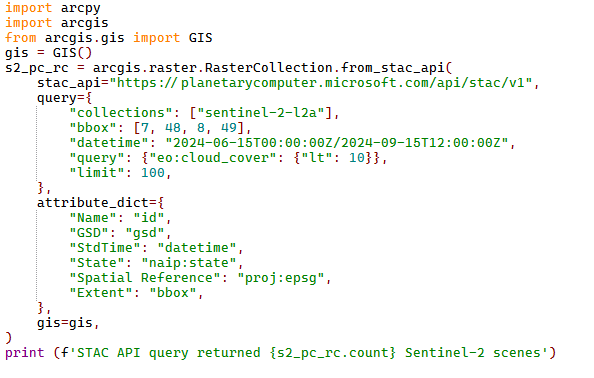
The second example uses ArcGIS API for Python. The Raster Collection class has a method called .from_stac_api()
The Copernicus endpoint is not supported at the moment, but the following example shows the concept referencing the Microsoft Planetary Computer STAC endpoint:

Article Discussion: