In this scenario, the Swiss Federal Office of Energy (SFOE) is preparing the country’s wind turbines for an increase in domestic wind energy. In part 1 of this blog series, we showed how the GIS specialists used editor tracking as a solution to enforce quality standards and maintain data accountability between SFOE and the private turbine manufacturing companies.
During the base assessment process performed by the system operators, editor tracking maintained data accountability by tracking and recording the following information:
| Editor tracking recorded values
Information recorded by the editor tracking |
Your project details
Associated details from the project feature class (for example, the Wind Facilities feature class) |
| User who created a new feature | Manufacturing company that built the wind turbine |
| Date and time the feature was created | Year of construction of the wind turbine |
| User who last edited a feature | System operator who performed the base assessment in the field |
| Date and time the feature was last edited | The timestamp of when the last edit was made for the base assessment |
After the base assessment was completed, to prepare for the increase in production, more testing needs to be done to maximize the rated power of each wind turbine. The testing procedures will be conducted in three phases. During the testing period, the system operators will perform more edits on the wind turbine data that will need to be accounted for at the end of each testing phase, to maintain data accountability.
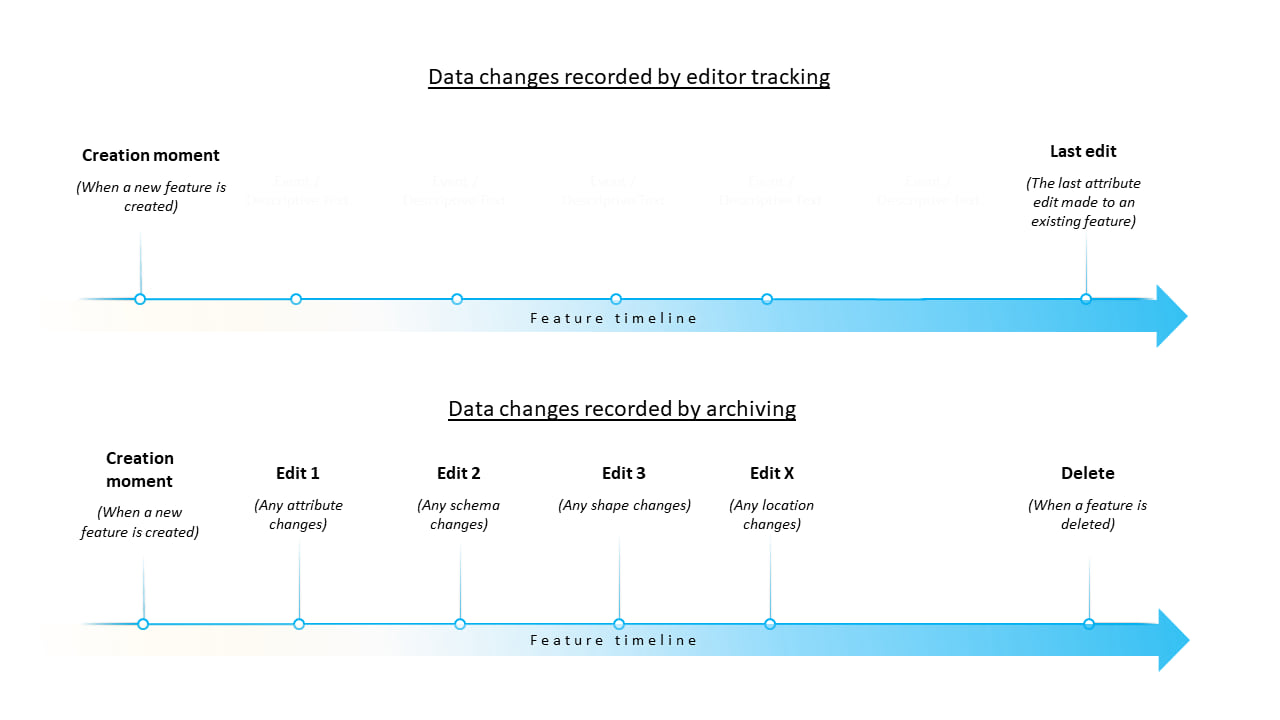
Because editor tracking records only the creation moment of a feature and the last edit of that feature, in the situation where the same features will have different edits made at the end of each testing phase, we will need a tool that records data changes at a more granular level. To address this project need, we will use geodatabase archiving.
Archiving and data accountability
Archiving is the mechanism for capturing, managing, and analyzing data change over time.
Archiving helps maintain data accountability as following:
- Preserves all attribute (create, edit, delete), shape, and schema changes.
- Allows you to connect to a moment in time using a historic marker, which gives you a read-only representation of how your data looked at a date and time.
- Offers the ability to display and query every modification made since archiving was enabled, using the archive class.
Implementing archiving on the Wind Turbine feature class
In ArcGIS Pro, you can enable archiving on your data using the following methods:
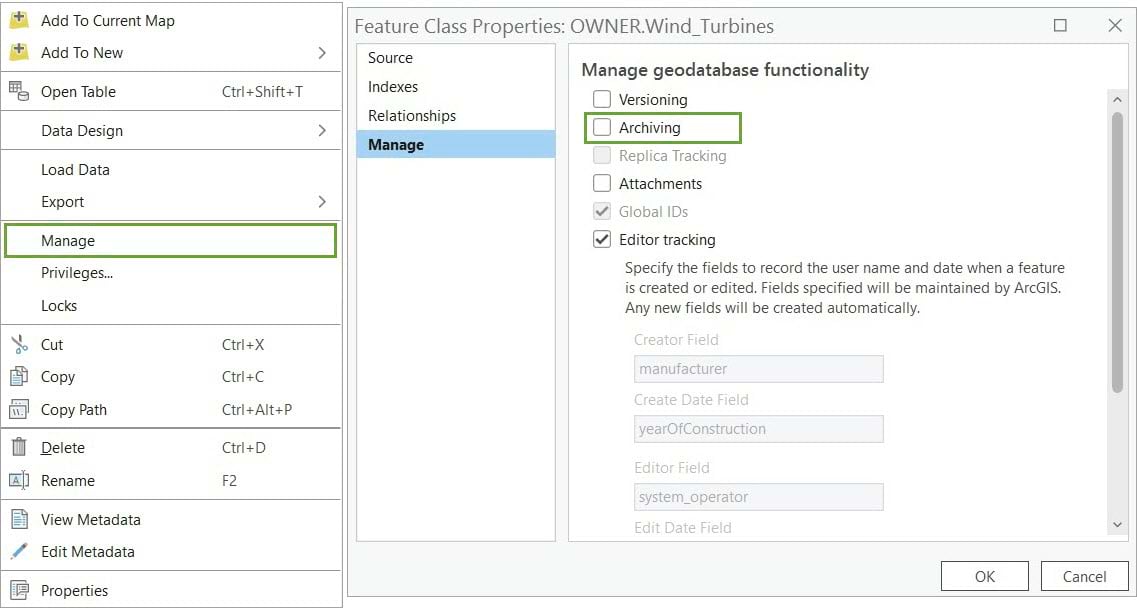
- Right-click a feature class or table, click Manage, and in the Manage tab of the Properties dialog click Archiving.
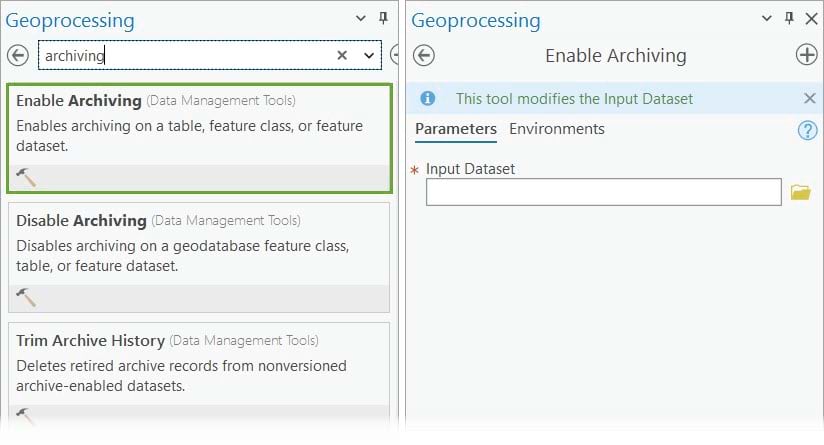
- Use the Enable Archiving geoprocessing tool.
Note: Archiving can be enabled on both versioned and non-versioned data. Although there are a few differences between working with archived data in these two environments, the overall process is very similar.
For this workflow, you will be working with non-versioned data.
When you enable archiving on non-versioned data, the geodatabase creates additional date attributes in the base table for that dataset. These date attributes are columns in the base table, named gdb_from_date and gdb_to_date, and are used to record the time stamp for the effective lifespan of the archived row. As edits are made to the dataset, these attributes are updated to maintain an historical record over time.
After enabling archiving, the system operators will have six days to conduct the testing as following:
| Phase 1 | Phase 2 | Phase 3 | |
| Duration | December 1–2 | December 3–5 | December 6–7 |
| System operators | Gigi, Hans | Elena | Yves |
Fast forward to December 8, and they are ready for the next step.

When the testing phases are completed, the GIS specialist will need to review the edits made and ensure the edits are correct.
Interacting with the archive data
To interact with the archive data, you have two options available:
- Connect to a historical version to view a representation of your data from a specific moment in the testing phase.
- Add the archive class to a map and query it to inspect all changes made since archiving was enabled on the wind feature class.
Connecting to a historic version
To connect to a historic version, you must enable the History pane, which is located in the contextual Versioning tab on the ribbon.
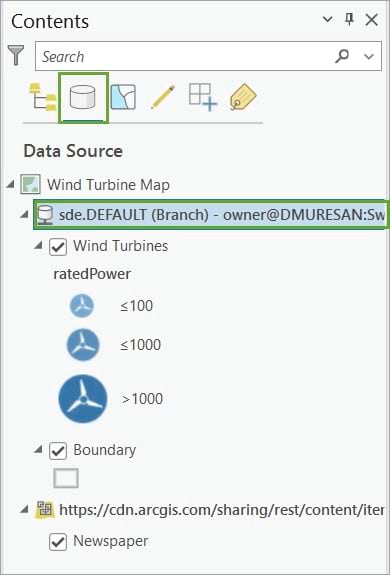
1. In the Contents pane, click List By Data Source. Then click the database connection string to enable the Versioning tab on the ribbon.
2. On the Versioning tab, select the Historical Moments option to open the History pane.

Note: Notice the versioning options are unavailable. This is because the Wind Turbine feature class in not versioned. You might ask, why is the database connection string pointing to a branch transactional version? This is the versioning type of the workspace level and not the feature class level. To learn more about the difference between the versioning type at the workspace level versus the feature class level, check out this blog on versioning enhancements in ArcGIS Pro 3.0 where these terms are explained in depth.
3. In the History pane, there are two ways to connect to a historical moment.
-
- You can specify the exact date and time using the calendar.
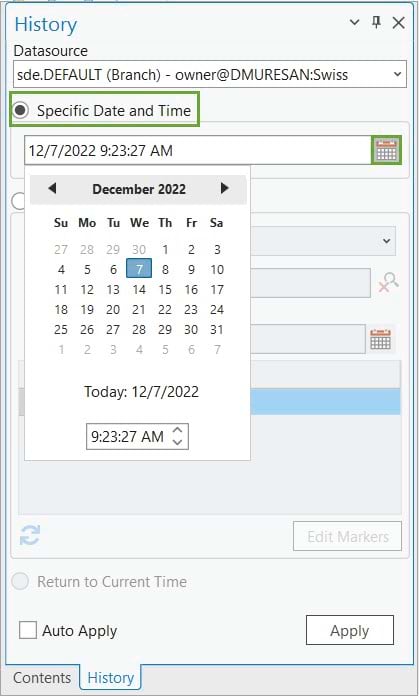
-
- You can use historical markers, named moments in time that you create to connect to specific moments and to navigate between moments. You will go with this option.
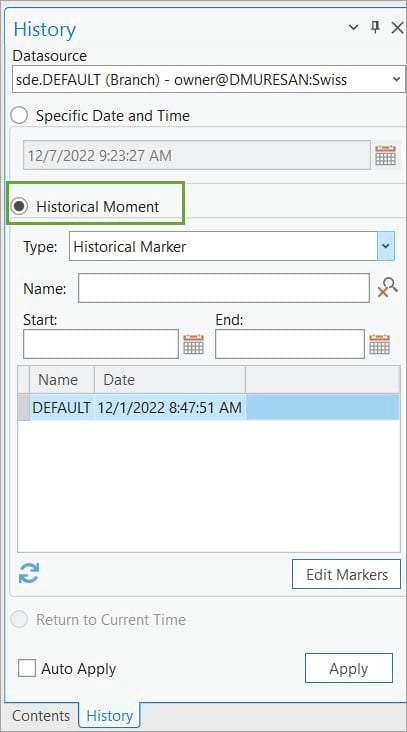
To connect to a moment in time using historical markers, you will first need to create some. These are specific for the project needs. For this workflow, you will create one to mark the end of each testing phase to help you quickly navigate between phases.
Notice there is already one created. The Default historical marker was automatically created when archiving was enabled on the feature class, hence the GDB_FROM_DATE is 12/01/2022. The Default marker displays the current representation of the archive classes, which is equivalent to the class representations in the transactional DEFAULT version. In other words, it shows the current data and how it looks in the present moment.
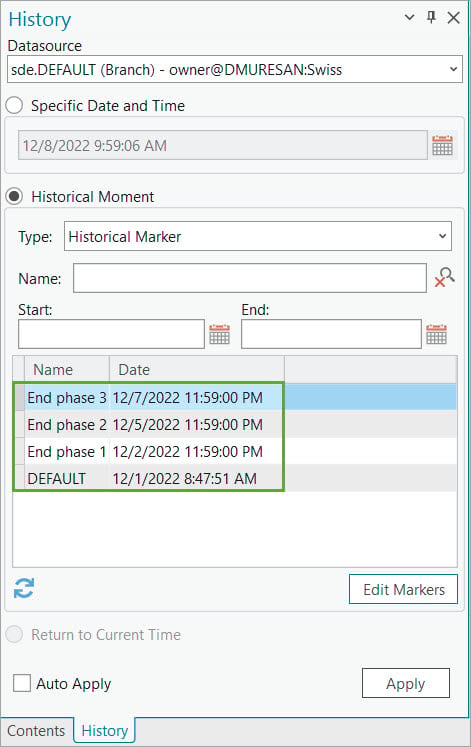
4. To create a historical marker, click the Edit Markers tab, which will prompt you to create a new marker by adding a name and a date.
When finished, the three new historical markers should look something like this.
5. To connect to a historical marker, click one of the markers and click Apply. You can also check the Auto Apply checkbox to maintain a single click navigation between historical moments.
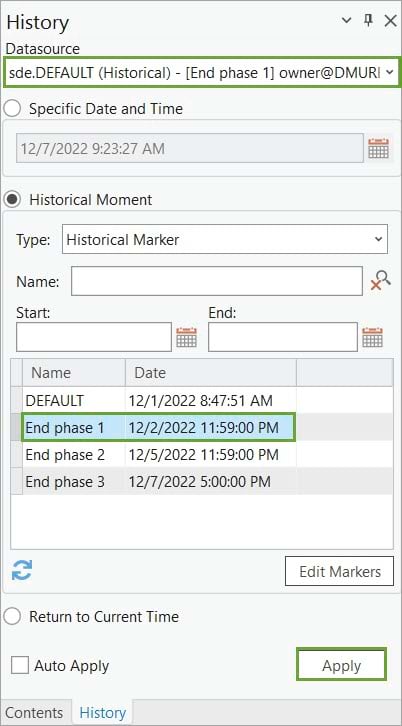
Once connected, notice the data source is now pointing to the historical version associated with the End Phase 1 marker.
Review edits between historical moments
Now that you know how to connect to different historical moments, it’s time to look at the data and inspect the edits made by the system operators.
The first thing that stands out is that at the end of phase 2 there were 85 turbine points and at the end of phase 3 there were only 84. This indicates one turbine feature class was deleted during phase 3.
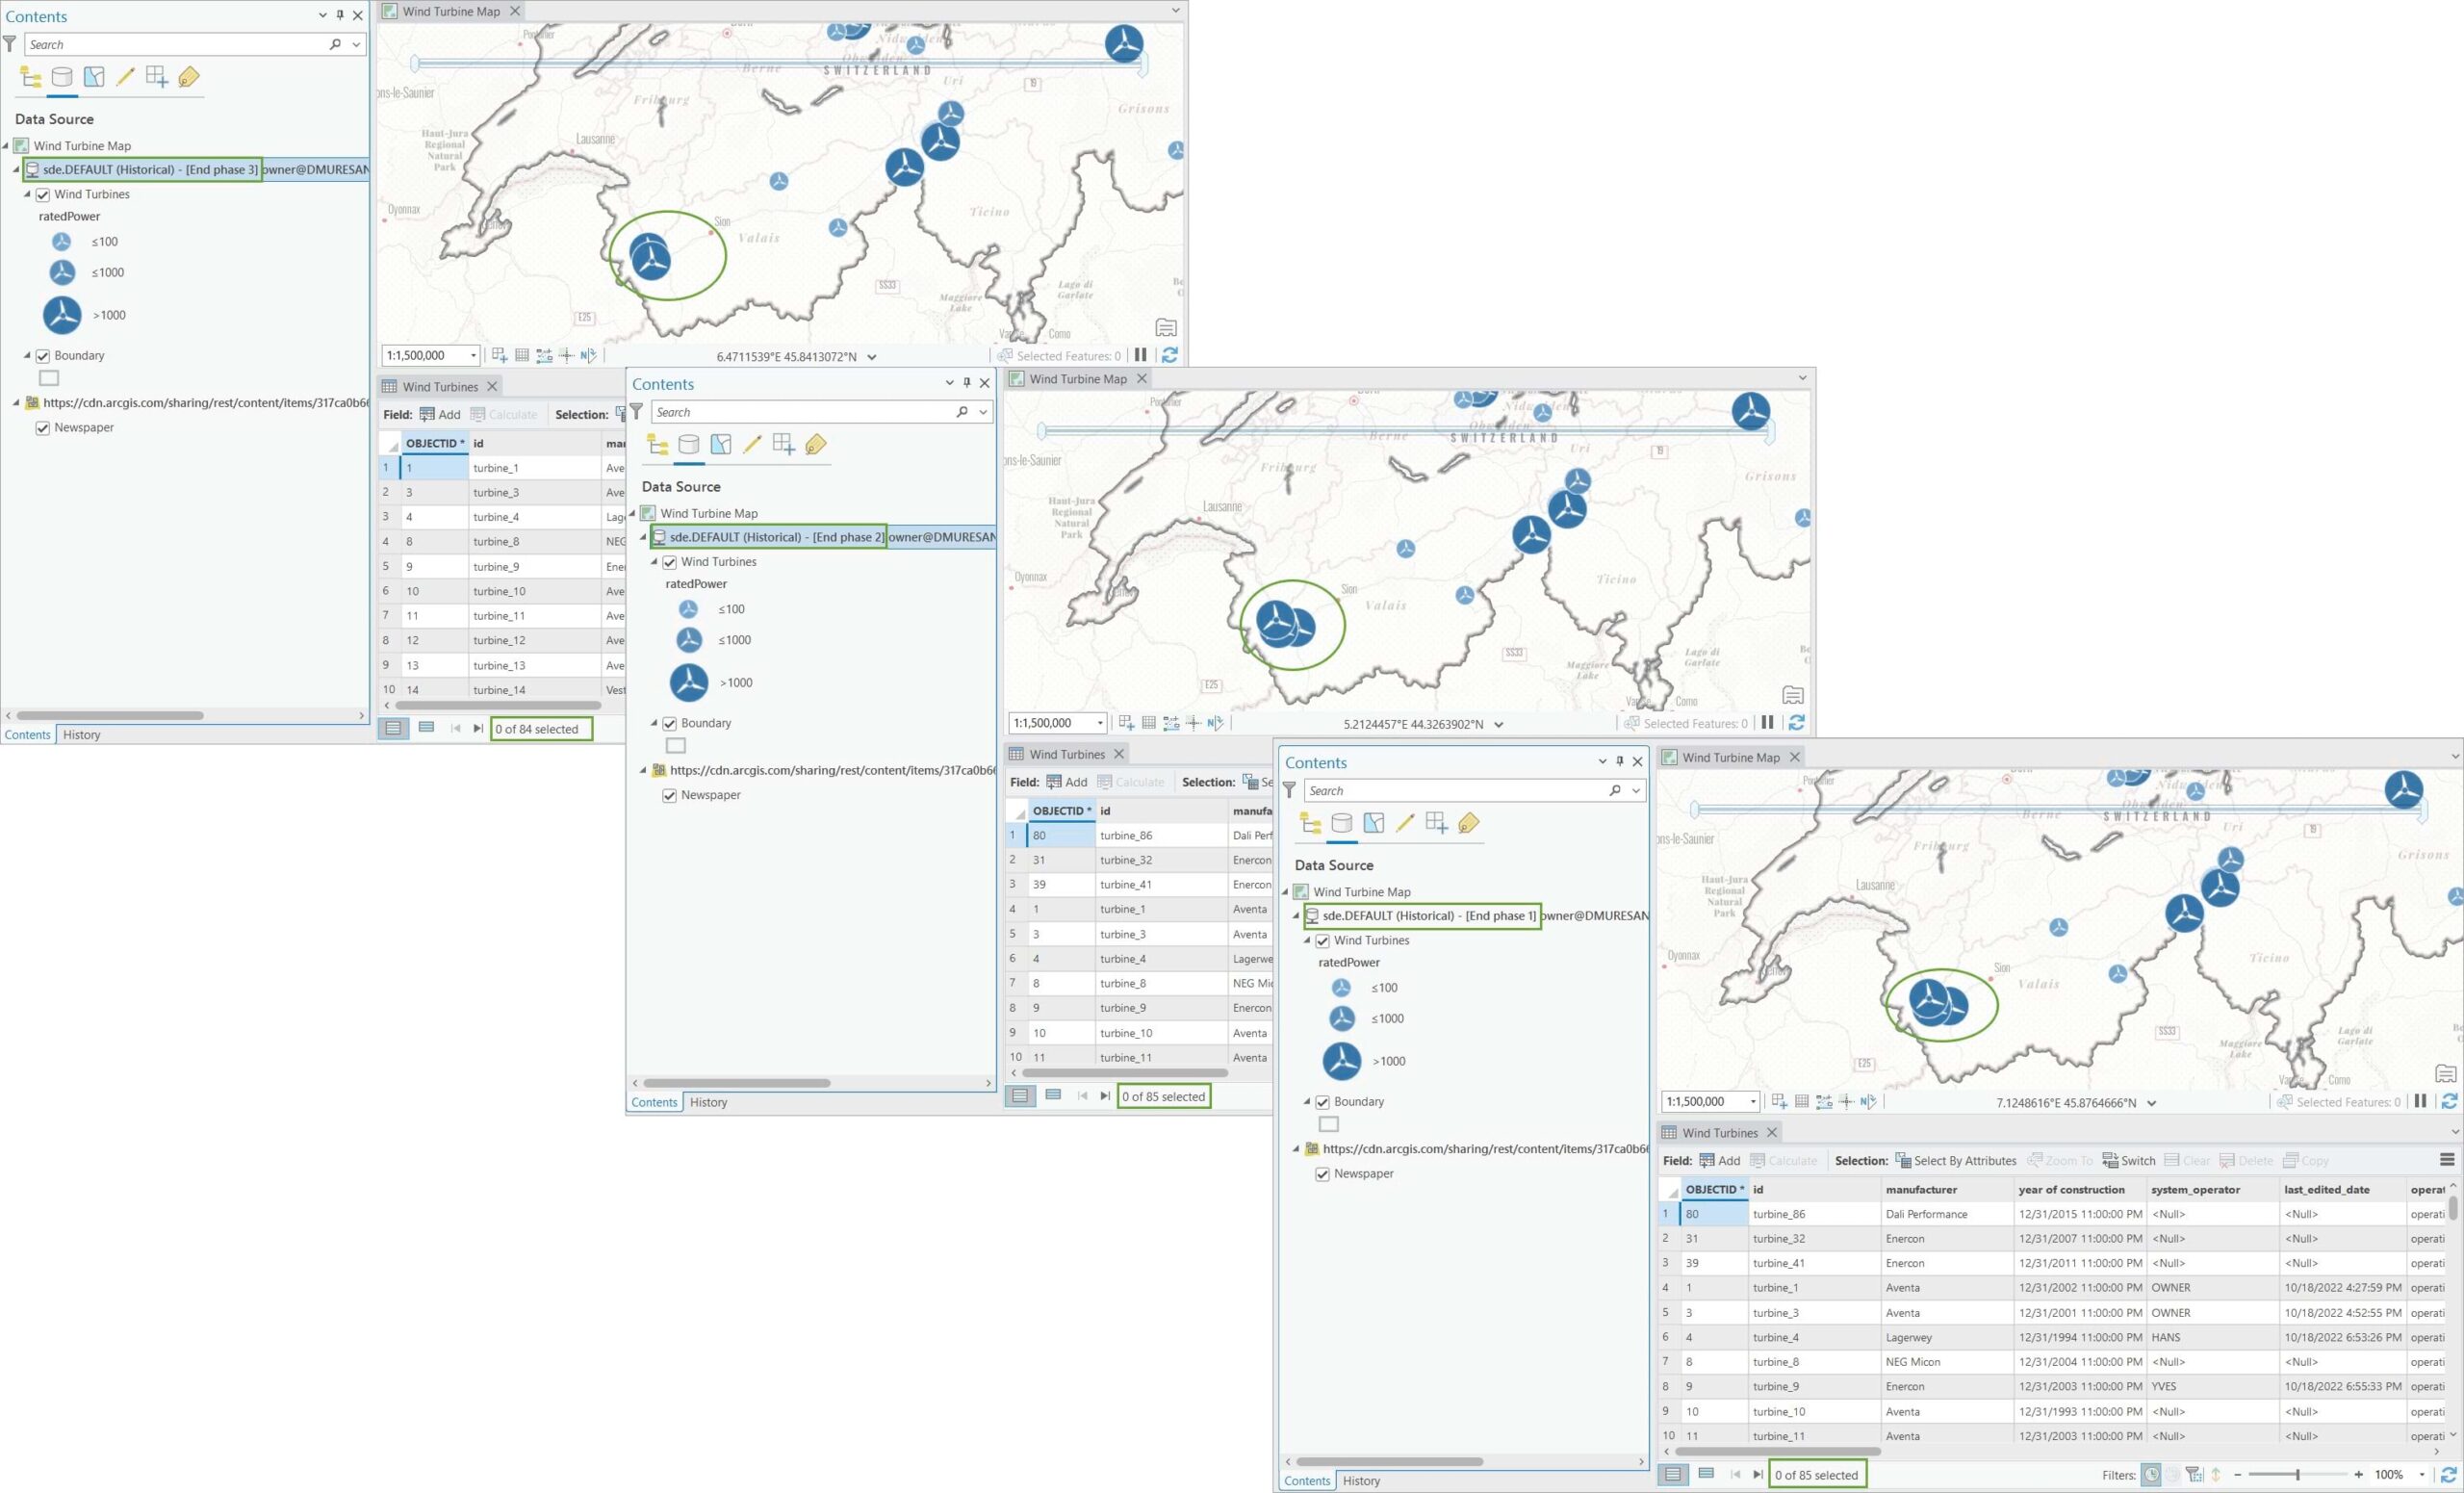
Next, let’s have a closer look at the historic records using the archive class.
Working with the archiving class
The archive class is a collection of all edits made since archiving was enabled on the feature class. It is created and maintained by the geodatabase when a dataset or class is enabled for archiving. The archive class cannot be edited, but it can be added to a map for viewing and querying purposes.
1. To add the archive class to the map, select the Wind Turbine layer from the Contents pane.
2. On the ribbon, on the Data tab, click the Add Archive button.

This adds the archive class as a layer to the map, named Wind Turbines Archive.
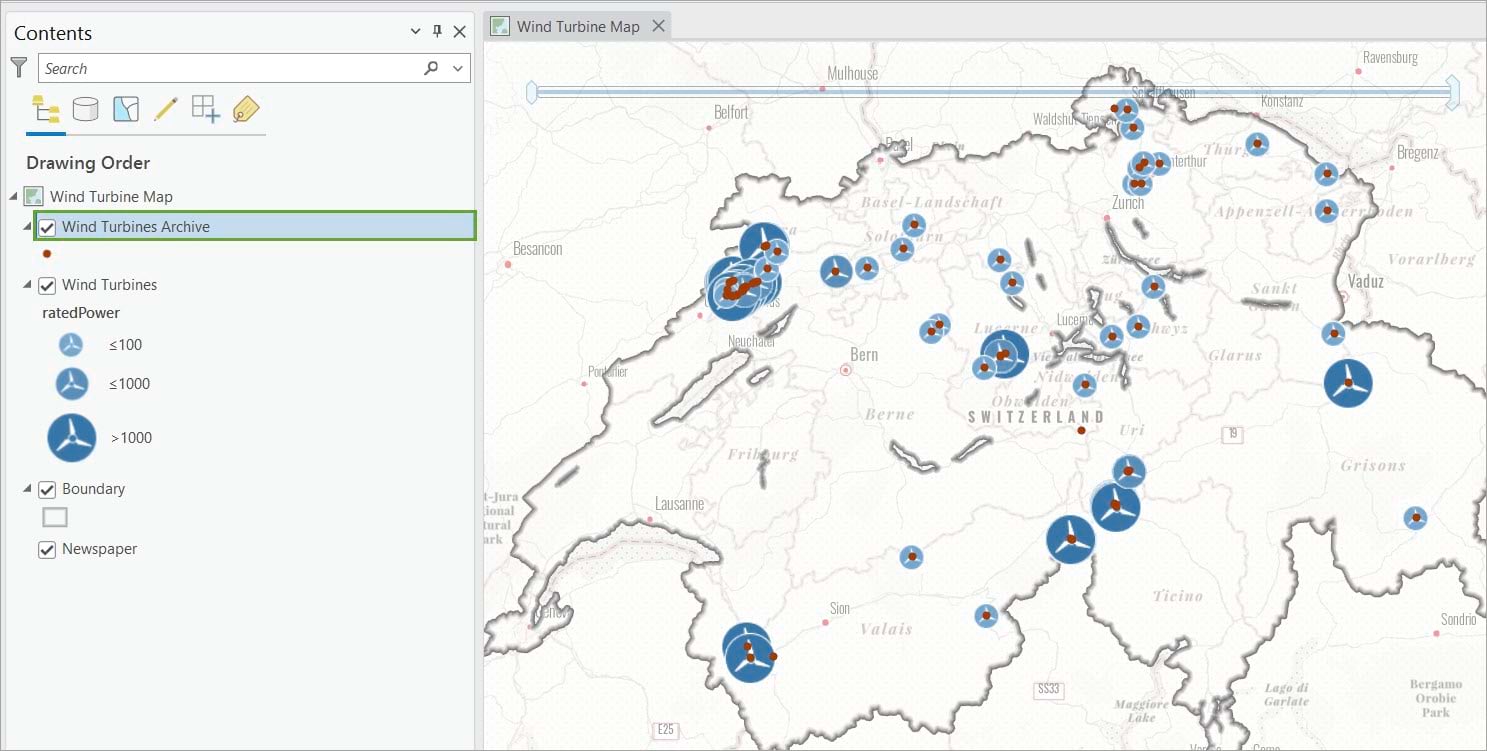
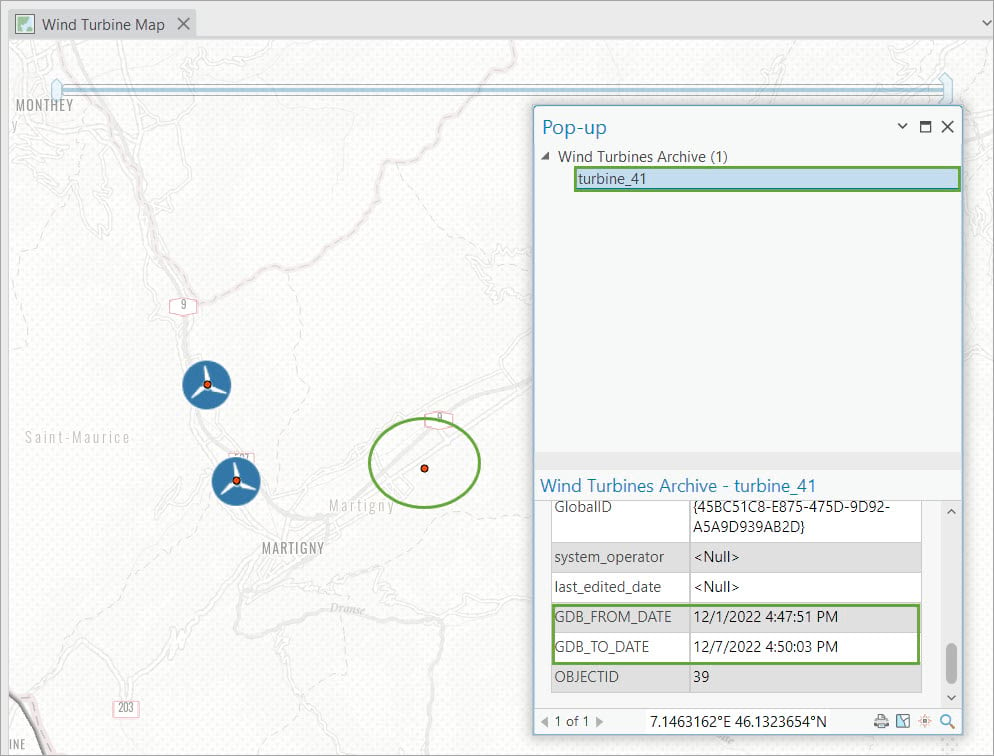
You can zoom in to the area of interest and compare the Wind feature class with the Archive class. From the GDB_T0_DATE field, you confirm that Turnine_41 was indeed deleted on December 7 at 4:47 p.m.
Querying the archive history
First, set up a definition query to look at a specific wind feature. In this example, we will look at feature 5 and assess how this feature changed over the testing process.
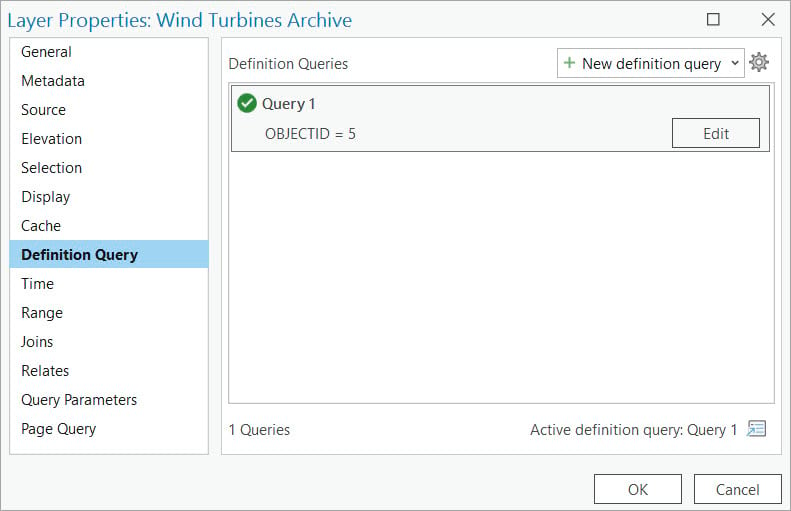
Then you open the Wind Turbine Archive attribute table to see the filtered history records.
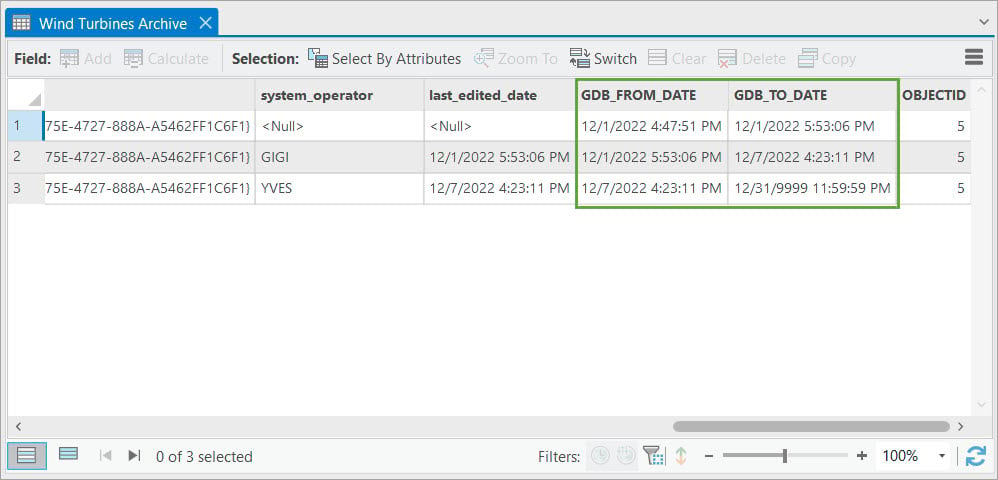
Now let’s read the archive records:
- The first row indicates the earliest archived record. In this example, wind turbine 5 already existed when archiving was enabled; therefore, the GDB_FROM_DATE recorded the date when archiving was enabled, 12/1/2022 at 4:47 p.m. The GDB_T0_DATE is set for one hour later. This means that the state of feature 5 changed at 5:53 p.m. because an edit was made.
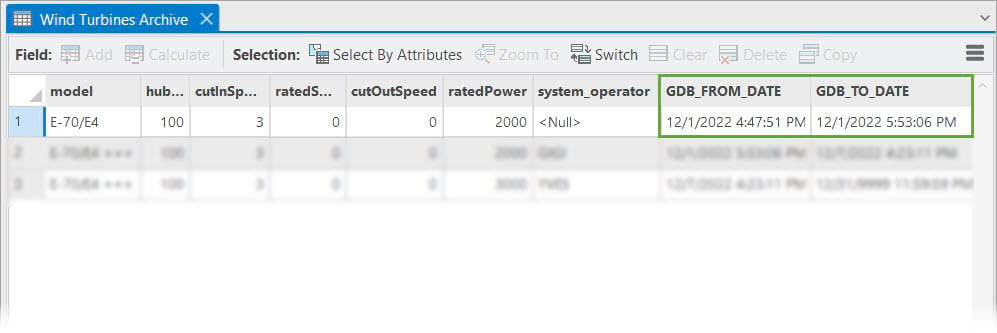
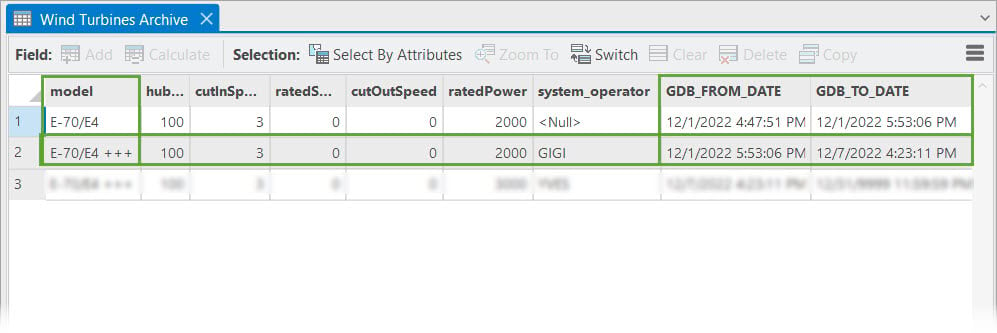
- The second row indicates an edit was performed at 5:53 p.m. Because of editor tracking, we also know the system operator who performed the edit was Gigi. She changed the turbine model from E-70/E4 to E-70/E4 +++. This means an upgrade was made to turbine 5 during phase 1 testing. The feature state remains unchanged until 12/7/2022.
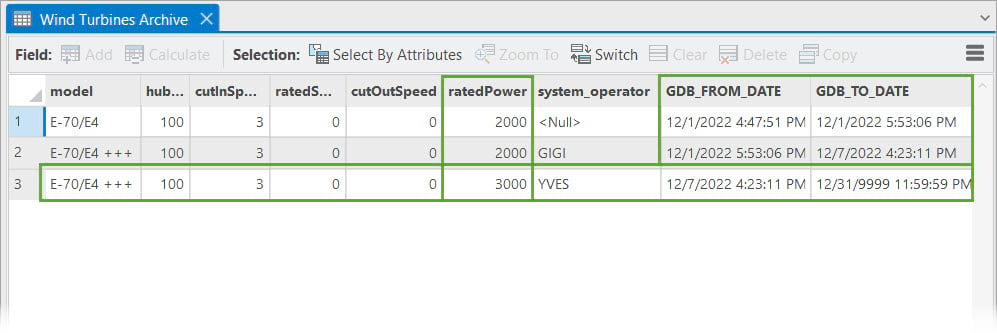
- The final row indicates another edit performed on 12/7/2022. This time, during phase 3, system operator Yves adjusted the turbine rated power to 3000 due to the upgrade made in the previous phase. Notice the GDB_T0_DATE is set to 12/31/9999. This indicates that this is the current state of the feature.
Maintaining the archive
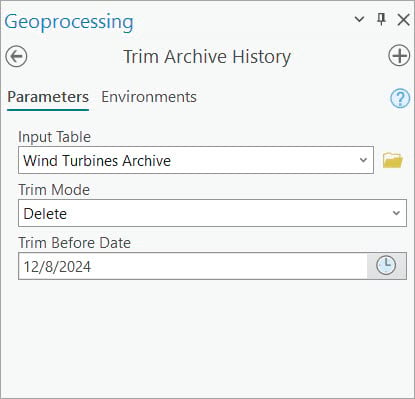
Based on the SFEO privacy policy, the archive class will be kept as an official record for two years starting with the end of the testing process. After that, the GIS specialist will trim the archive history to improve the enterprise geodatabase performance, using the Trim Archive History geoprocessing tool.
In this blog series we focused on the importance of data accountability in an organization and how editor tracking, and archiving can be used to maintain it. In the first blog, we showed how the SFOE used editor tracking to get a clear understanding of who created a wind turbine or edited an existing one and when they did so. In the second blog, we continued the user scenario and showed how geodatabase archiving recorded changes to the turbine data at a more granular level by maintaining a transactional history of all edits made to the feature class. We hope this blog series will raise your awareness of the importance of data accountability and equip you with the right information to implement editor tracking and archiving within your workflows.
Acknowledgments: Swiss Federal Office of Energy (SFOE) and Esri Suisse for the Wind Energy Plants dataset.
Photo by Waldemar Brandt on Unsplash


Commenting is not enabled for this article.