Importing and exporting contingent values are efficient tools for both sharing contingent values with colleagues or as a template for creating new ones. In this scenario, I will show how to create contingent values from existing data by doing the following:
- Export the feature class as a table.
- Use the table to generate unique attribute combinations.
- Use the import contingent values tool to generate the contingent values.
- Solve any possible errors.
Benefits of using contingent values for data editing
Contingent values are data design features that allow you to set up field dependencies in your data so that your choice for a value in one field restricts the list of valid choices for another field. This results in a decision tree. For this workflow example, I will be using hospitals data. Every time a new hospital feature is created, the data editor will be provided with a sequential set of choices that are filtered by the initial choice that was made.
- First, the data editor will specify the hospital ownership category. This can be either Government, Proprietary, or Voluntary non-profit.
- Second, the data editor will choose the hospital ownership type from a list that is filtered based on the hospital ownership category.
- Finally, the contingent values will automatically select the hospital’s type to complete the decision tree according to the contingent values created.
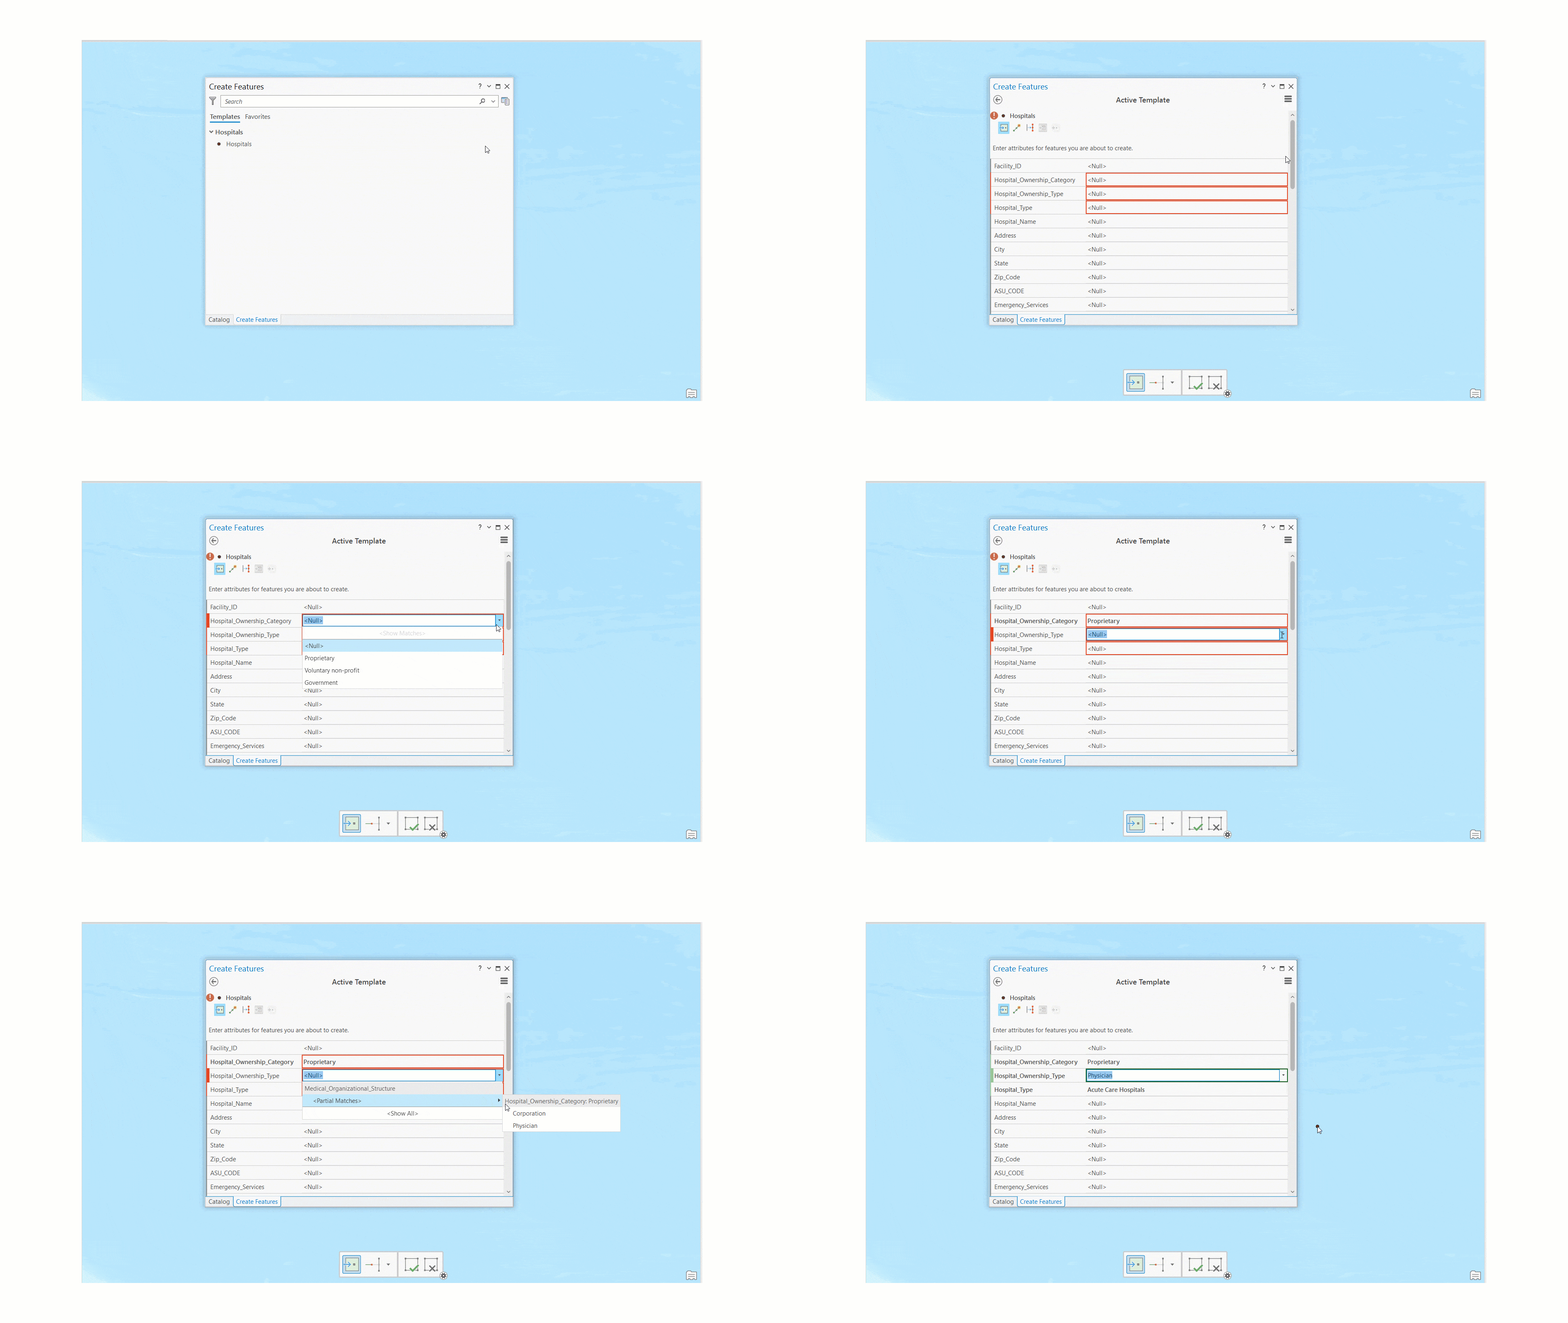
I will use the Hospitals feature class attributes to generate the decision tree table. If you already have the decision tree table that stores the attributes you will use as contingent values, you can proceed to the next step of the workflow.
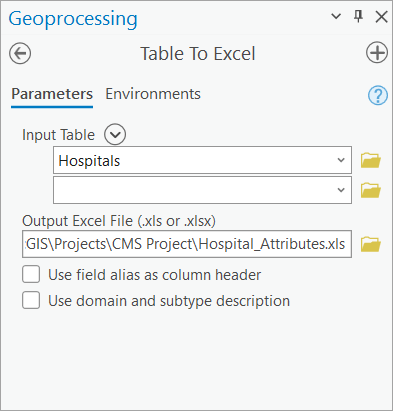
First, I will export the Hospitals feature class as an Excel table using the Table To Excel geoprocessing tool, to allow for better table manipulation.
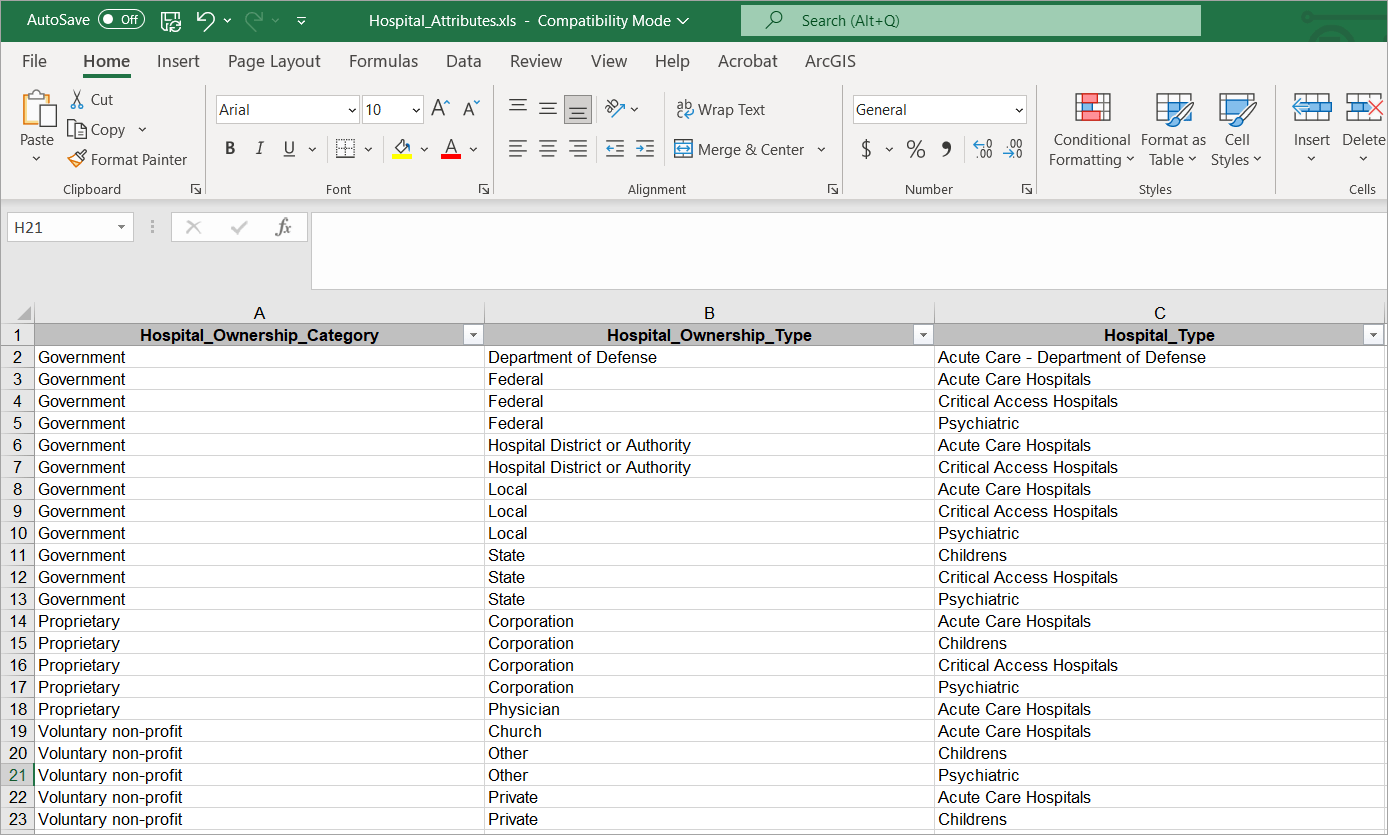
I open the table in Excel and perform the following data cleaning operations:
- Keep only the fields of interest and delete the rest.
- Use the Eliminate Duplicates command to keep only the unique attribute combinations.
- Sort the columns alphabetically to get a better understanding of the logic of the decision tree.
Back to ArcGIS Pro, before I import the contingent values, I need to confirm the Hospital feature class meets all the requirements for contingent values.
1. In the Fields view, I confirm that attribute domains have been assigned to the fields of interest. Attribute domains enforce data integrity by limiting allowed values for a field to a list or range of choices. Domains are required to set up contingent values.

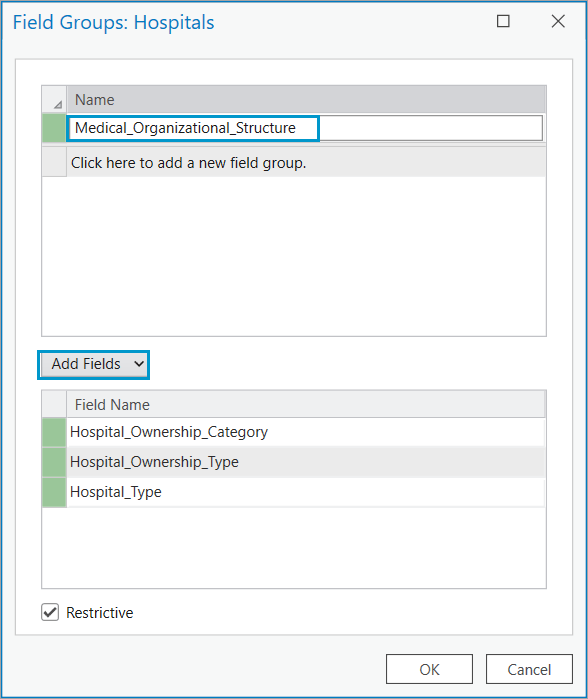
2. In the Contingent Values view, I create a field group named Medical_Organizational_Structure and add the three fields to it. A field group is a named collection of fields, and it must be created from the fields to which you want to apply contingent values.
Now that I have completed the requirements, I can manually create contingent values one by one in the view or I can use the Import Contingent Values geoprocessing tool.
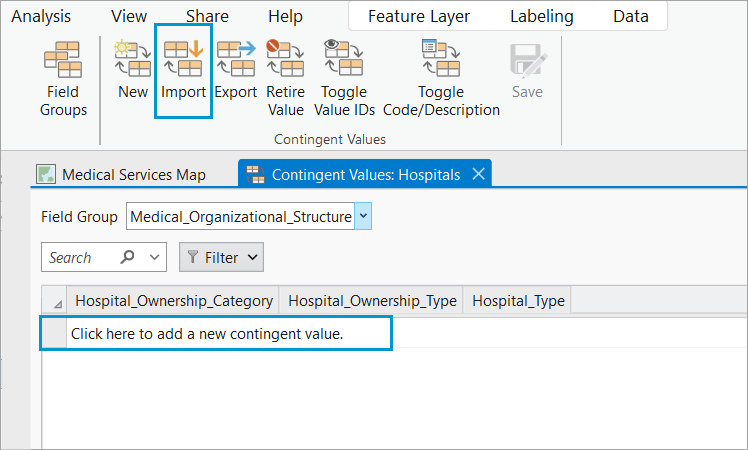
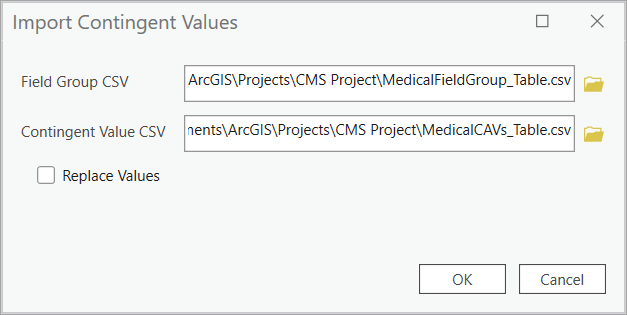
To save time and because I already created the table with the unique attribute combinations, I will use the Import Contingent Values geoprocessing tool. However, when I click the Import button on the ribbon, on the Import Contingent Values dialog box, I am prompted to add two .csv files. These are the Field Group and Contingent Value files.
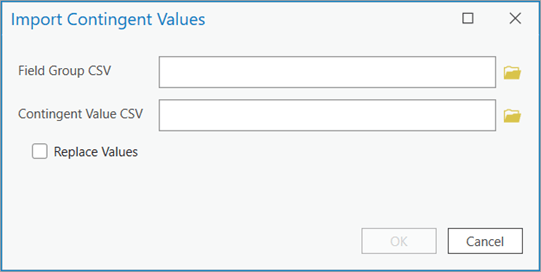
Because I don’t know the format of these two tables, I will first use the Export Contingent Values tool. The tool creates two .csv files, one for the field groups and one for the contingent values. I will then use the schema of this table and plug in the values from the decision tree table I created earlier from the Hospitals feature class.
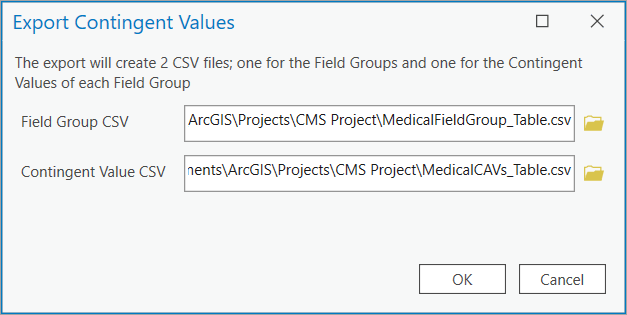
Note: To use the Export Contingent Values tool, you don’t need to have contingent values already created, but at a minimum you will need a field group.
Once the tool successfully creates the files, I will open and review them. I will start with the MedicalFieldGroup_Table.csv file.

The MedicalFieldGroup table is already populated. The tool matched the field group details I manually set, part of the requirements, to the Field Group csv table as follows:
- The NAME column represents the field group name that I previously created, Medical_Organizational_Structure.
- The IS_RESTRICTIVE column specifies whether the field group is restrictive. This option is checked by default when the field group is created.
- The FIELD columns are incremented as needed to include all the fields in the field group. In this example, the schema table shows only three field columns, as I added only three fields to the Medical_Organizational_Structure field group.
Moving on to the MedicalCAVs_Table, here I only have the schema table but not the values. This is because I did not manually create contingent values prior to using the Export Contingent Values tool. In this example, I will manually populate the table using the decision tree table created earlier.

Let’s review the columns:
- The CAV_ID column stores the unique ID for each combination of contingent values. Because in the decision tree table I have 22 unique combinations of values, I will fill in the CAV_ID column with values from 1 to 22.
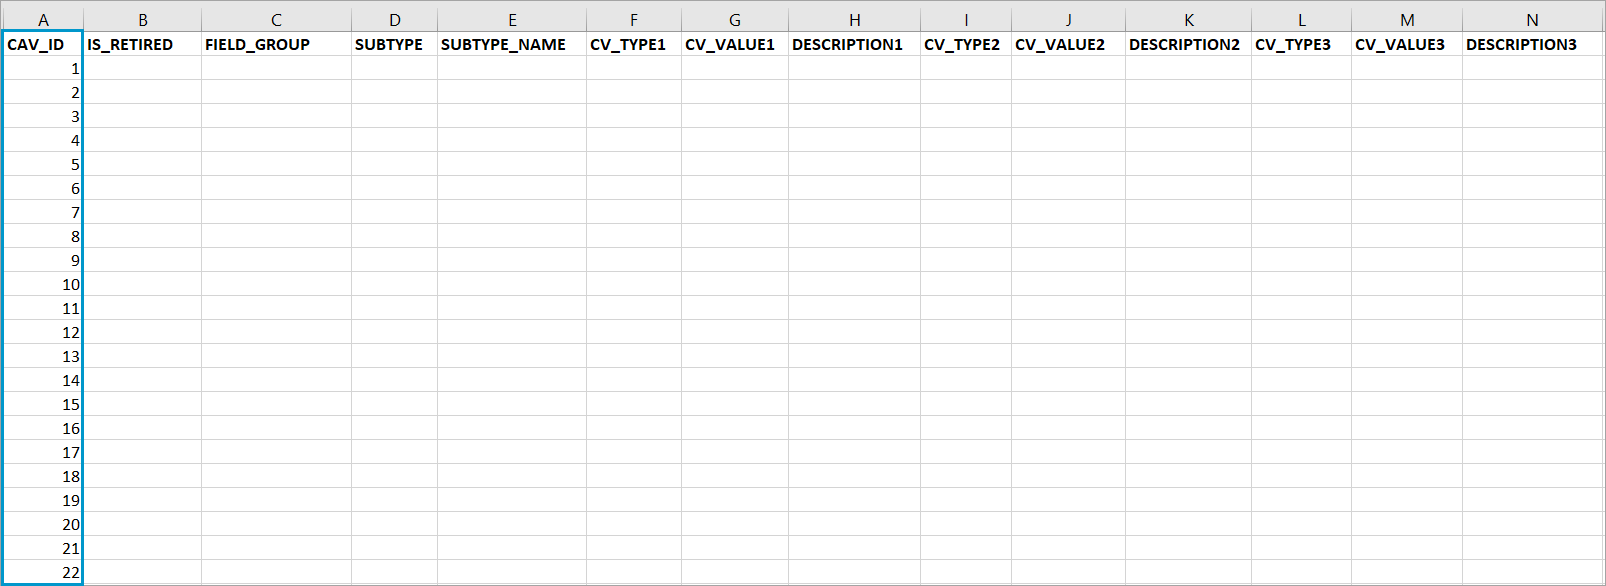
- The IS_RETIRED column takes a Boolean value that indicates whether the contingent value is retired. In this case, because I want my contingent values to be active, I will set the field to FALSE.
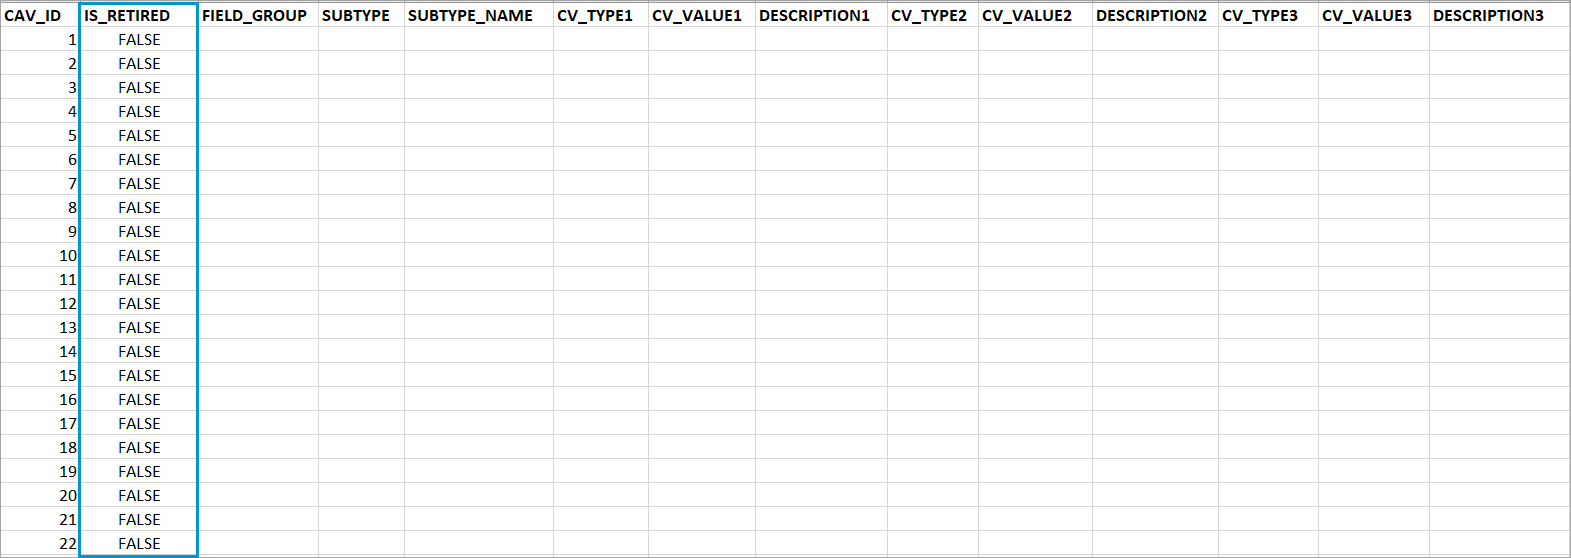
- The FIELD_GROUP column stores the name of the field group to which the contingent value corresponds. In my case, this is Medical_Organizational_Structure.

- The SUBTYPE column indicates whether the dataset has a subtype and if the subtype is used in the contingent value definition, the SUBTYPE column stores the subtype code to which the rule is applied. In this example, because the Hospitals feature class doesn’t have subtypes, I will set the column to 0.

- The SUBTYPE_NAME column stores the text description of the subtype code if a subtype has been applied to the feature class or to the contingent values definition. If the feature class has no subtypes assigned, the column will remain empty.
The next three columns appended with 1 reflect the first field from the Medical_Organizational_Structure field group. And that is Hospital_Ownership_Category.
- The CV_TYPE1 column indicates the type of contingent value. The type of value is stored as an integer, as follows:
- 1 for Any
- 2 for Null
- 3 for Coded Value
- 4 for Range Values
In my example, all my contingent values are coded values, so I will add the value 3 to the CV_TYPE1 column.

- The CV_VALUE1 column shows the specific field value from the attribute domain code. If the type is any or null, the value in the .csv file is empty. In my case, because I have coded values, I will copy the attributes from the Hospital_Ownership_Category field of the Hospital_Attributes decision tree table to this column.

- The DESCRIPTION1 column stores the value from the attribute domain description field. In my example, the attribute domains codes and descriptions are identical, so I will copy the values from the CV_VALUE1 column to the DESCRIPTION1.

For the remaining fields, I will follow the last three steps as follows:
- For the CV_TYPE2, CV_VALUE2, and DESCRIPTION2 columns, I will take the attributes from the Hospital_Ownership_Type field, the second field in the field group and in the decision tree table.
- For the CV_TYPE3, CV_VALUE3, and DESCRIPTION3 columns, I will take the attributes from the Hospital_Type field, the third field in the field group and in the decision tree table.
When done, my MedicalCAVs_Table will look like this:

For the last step, now that I have both the field group and the contingent values .csv files correctly populated, I will import them into the Import Contingent Values geoprocessing tool.
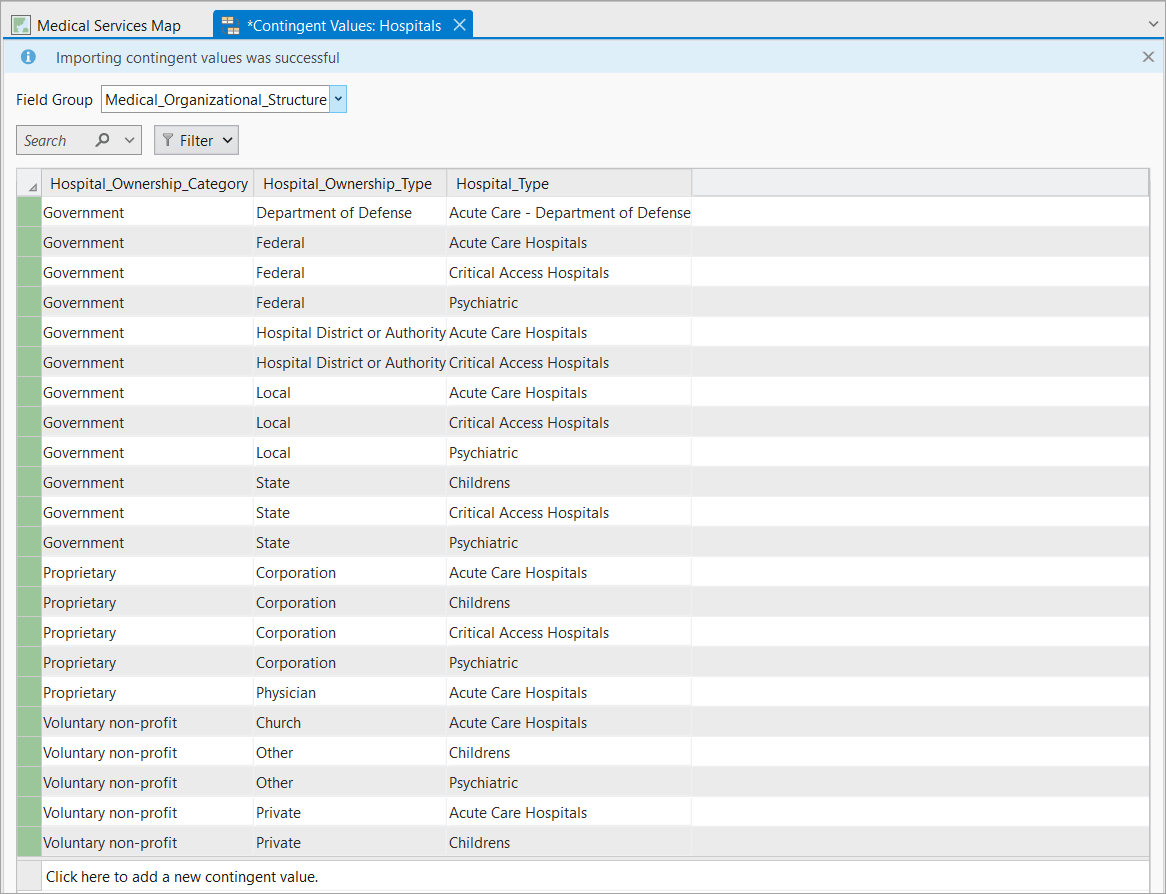
Once the tool runs, I can confirm the Contingent Values view has been automatically updated with the imported contingent values. Now the data editors can use the benefits of contingent values during the data editing process.
Error checking
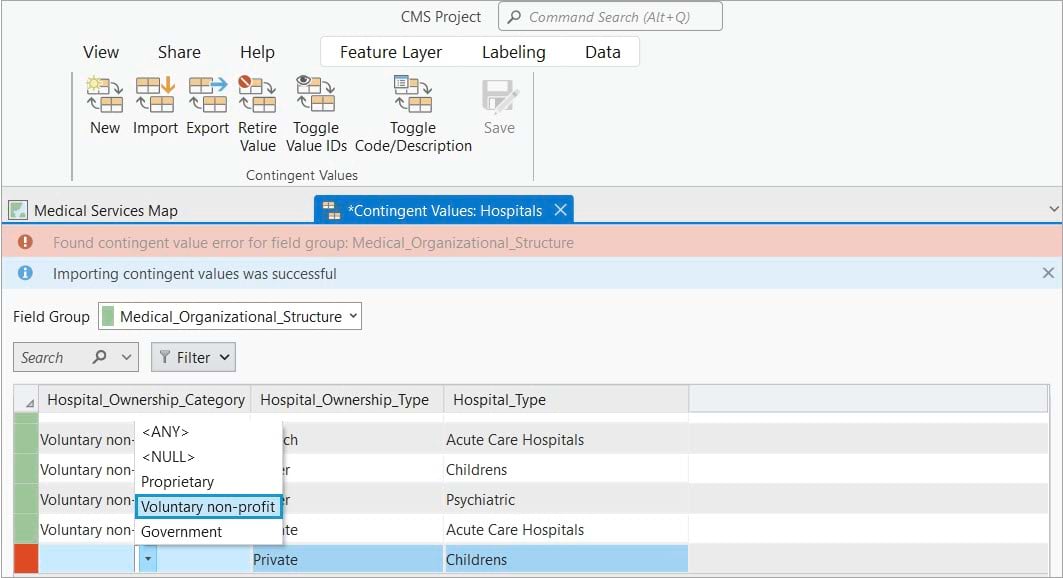
One of the most frequent errors encountered during the import of contingent values is the “Found contingent values error in field group”. It typically occurs when there is a mismatch between the values specified in the attribute domain list and the imported contingent values. In the example below, the last combination of contingent values is flagged as invalid because the value “Voluntary non profit” was spelled without the dash and therefore is not accepted by the attribute domain assigned to the Hospital_Ownership_Category field.
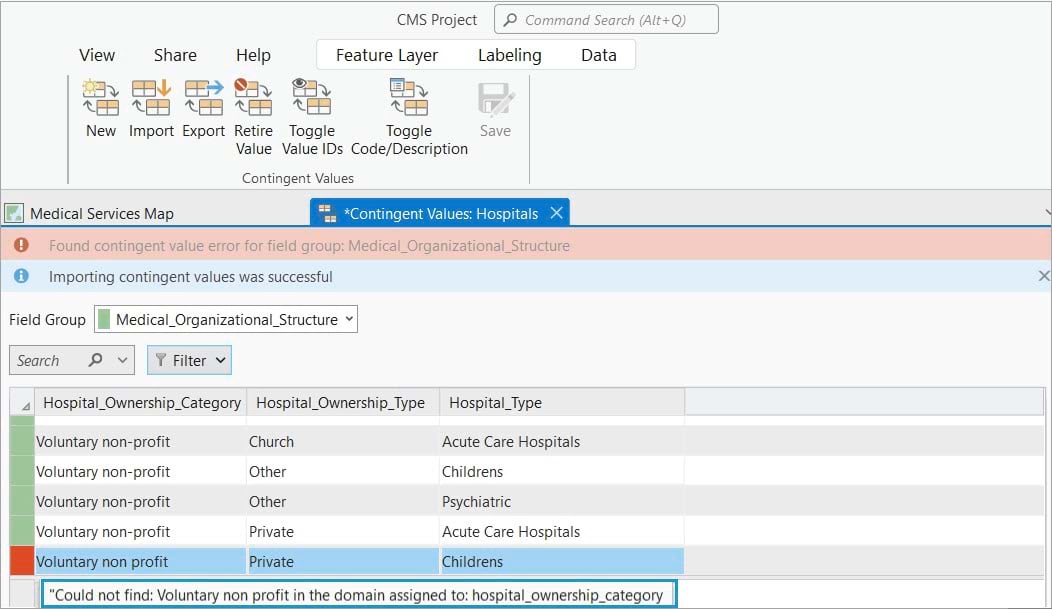
To resolve this error, you need to make sure that all imported contingent values assigned to dependent fields are present in their respective attribute domains. You have two options:
- Update the list of domains: Modify the attribute domain lists by adding any missing valid values.
- Correct invalid values: In either the Contingent Values view or the ContingentValues.csv file. If you choose to correct the .csv file, you will have to run the Import Contingent Values tool again.
In this example, I will clear the issue by replacing the incorrect value direclty in the Contingent Values view. I select “Voluntary non-profit” from the dropdown list for the Hospital_Ownership_Category field as it is a valid value according to its attribute domain.
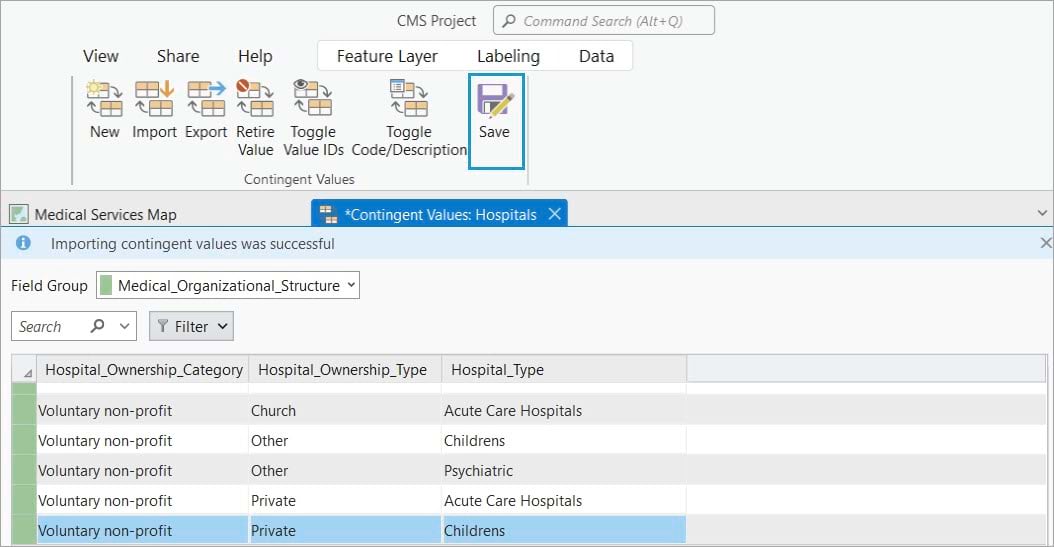
By making the change and selecting the correct value, the combination of values becomes valid. As a result, the error is resolved and I can successfully save the imported contingent values to the Hospitals feature class.
In this workflow, I showed how to use the Import Contingent Values and Export Contingent Values tools to quickly generate contingent values from your existing data. To find out more information about contingent values, check out the Assess urban tree health using contingent values tutorial that shows step by step how to apply contingent values from an assessment form to better evaluate tree conditions in the field. If you are interested in improving the overall quality of your data with contingent values and other data design tools such as attribute domains, subtypes, and attribute rules, check out the Data Design in ArcGIS Pro story.


Commenting is not enabled for this article.