Approximate Reading Time: 7 minutes
The ArcGIS Pro 3.2 release introduces new parameters and features to the Spatial Join, Add Spatial Join, Add Join, and Join Field tools.
Let’s explore these enhancements and how you might use them in more detail!
Spatial Join and Add Spatial Join
The Spatial Join and Add Spatial Join tools have a new Matching Attributes parameter that you can use to fine-tune your joins. Now, you can make matches between the target and join features based on spatial relationship and matching attributes.
The Add Spatial Join tool also has a new checkbox parameter that you can use to join fields to the target dataset permanently. Therefore, there are three ways you can join layers based on spatial relationships:
- Use Spatial Join to create a new output feature class, where the join fields are combined with target features.
- Use Add Spatial Join to create a temporary join to the target layer. This join can be removed.
- Use Add Spatial Join with the new Permanently Join Fields parameter to permanently transfer join fields to the target feature class.
Example: Join Motorcycle Crashes to Road Lines
Suppose you are a GIS analyst for your local transportation department. You are given two feature classes: the road centerlines and point locations of crashes involving a motorcycle.
Your task is to find the number of motorcycle crashes that occurred on each street.
You can do this by joining based spatial relationship using the Spatial Join or Add Spatial Join tools.
Use Add Spatial Join to update the existing dataset
Let’s use the Add Spatial Join tool with the new, Permanently Join Fields parameter to update the existing Roads dataset with the crash count.
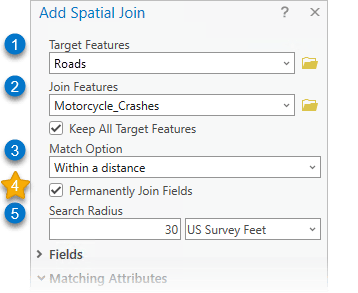
(1) Right-click the Roads layer on the Contents pane> click Joins and Relates> then click  Add Spatial Join. This will set the Target Features to the Roads layer.
The target feature will receive attributes from the join features.
(2) Set the Join Features to the Motorcycle_Crashes layer.
The join features are those that the attributes will transfer from.
(3) Set the Match Option to Within a distance.
This determiens the spatial relationship between the target and join features.
(4) New in ArcGIS Pro 3.2, use the Permanently Join Fields checkbox to create a permanent join without needing to export to a new Feature class.
Note: By checking this parameter you will not be able to remove the join.
(5) Set the Search Radius to 30 US Survey Feet.
This will ensure the attributes from the crash points are mapped to all roads within 30 feet.
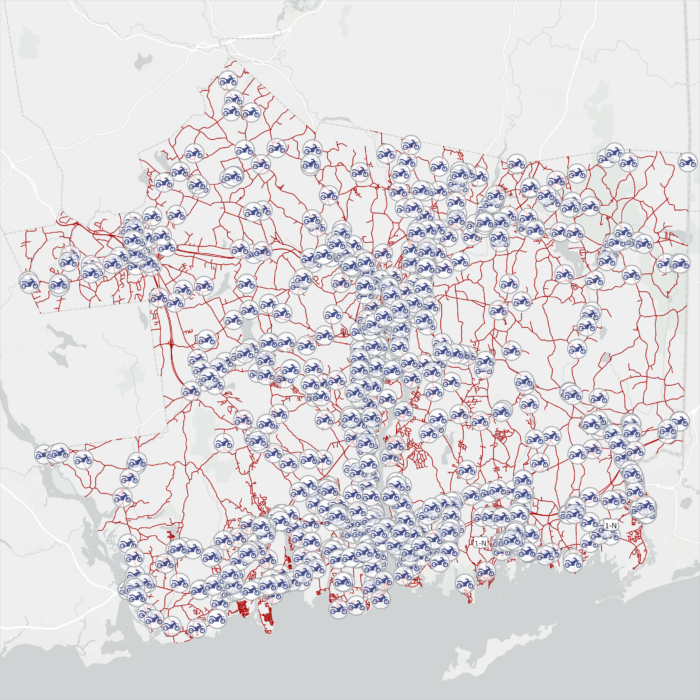
But what happens when a crash point is within 30 feet of more than one street? For example, at an intersection you may end up joining a crash point to multiple street lines within the search distance, resulting in double counting.
Use Matching Fields to join based on matching attributes
That’s why, in ArcGIS Pro 3.2, the Spatial Join and Add Spatial Join tools include a new Matching Attributes parameter to ensure that target features and join features are only joined when they have matching field values. Therefore, if a matching field value is not the same, those join features will be excluded from the spatial join.
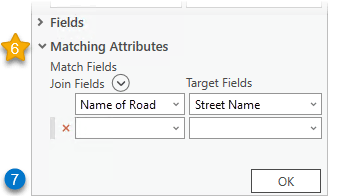
(6) Set the Matching Fields to the Name of Road and Street Name fields for the Join Fields and Target Fields.
Having set this parameter, the join will be made only if the crash point is within 30 feet of the street and has a matching street name.
(7) Click OK to run the tool.
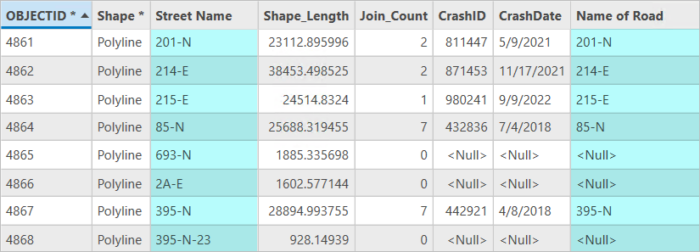
Open the attribute table of the modified Roads dataset.
By comparing values in the Street Name and Name of Road fields (highlighted in the image below), we can verify each crash was joined to the correct street line. A Join_Count greater than 0 indicates a road has experienced one or multiple motorcycle crashes. A Join_Count = 0 will have NULL values for the crash data, meaning there were no recorded crashes on those streets.
Note: the roads with more than one crash should have multiple CrashID and CrashDate values, but only one is listed because no action was set via the field map.
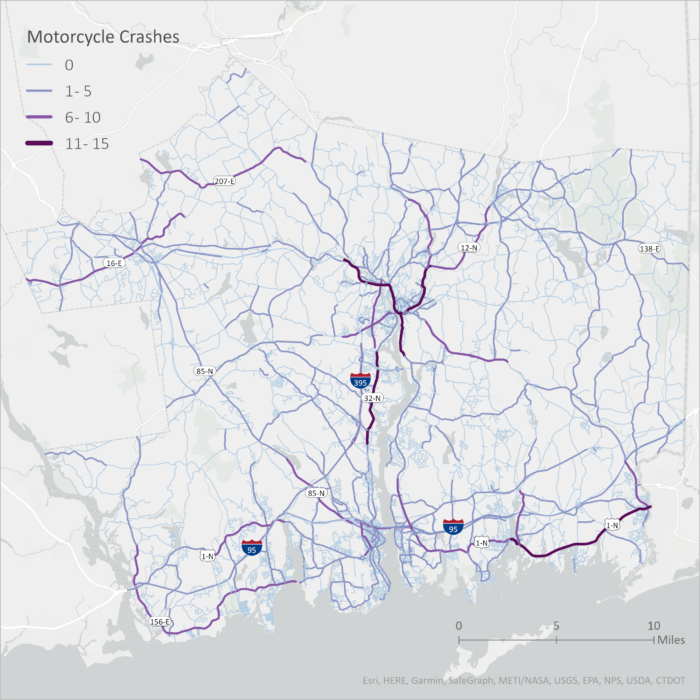
Using the Join_Count field, let’s create a map of streets with the most motorcycle crashes.
Add Join and Join Field
The Add Join and Join Field tools have a new parameter for managing join field indexes. Attribute indexes are a way to increase performance when running operations like joins. You can use the new parameters to rebuild the join field indexes if you get unexpected join results (often due to corrupt or broken indexes).
The Add Join tool also has new messaging that will let you know when you have a definition query on the Join Table, and that the definition query will transfer to the input layer after you make the join.
Example: Join a construction projects table to bridge points
Next, you are given a bridges feature class, and a table of all ongoing bridge construction projects with no geometry.
The Bridge Construction Projects table includes fields for the Bridge Number, Project Number, Project title and Current Project Phase. There are 5 project phases: 01_Planning, 02_Pre-Design, 03_Final-Design, 04_Contract-Processing, and 05_Construction.
| OBJECTID | Bridge Number | Project Number | Project title | Current Project Phase |
|---|---|---|---|---|
| 1 | 00001 | 0056-0316 | I-95 Pavement Rehabilitation | 04_Contract-Processing |
| 2 | 00001 | 0056-0317 | Greenwich: Rehab BR #00001 | 01_Planning |
| 3 | 00001 | 0170-5031 | I-95 Bridges Concrete Sealing | 05_Construction |
| 4 | 00002 | 0056-0316 | I-95 Pavement Rehabilitation | 04_Contract-Processing |
| 5 | 00002 | 0170-5031 | I-95 Bridges Concrete Sealing | 05_Construction |
Preview of the Bridge Construction Projects table
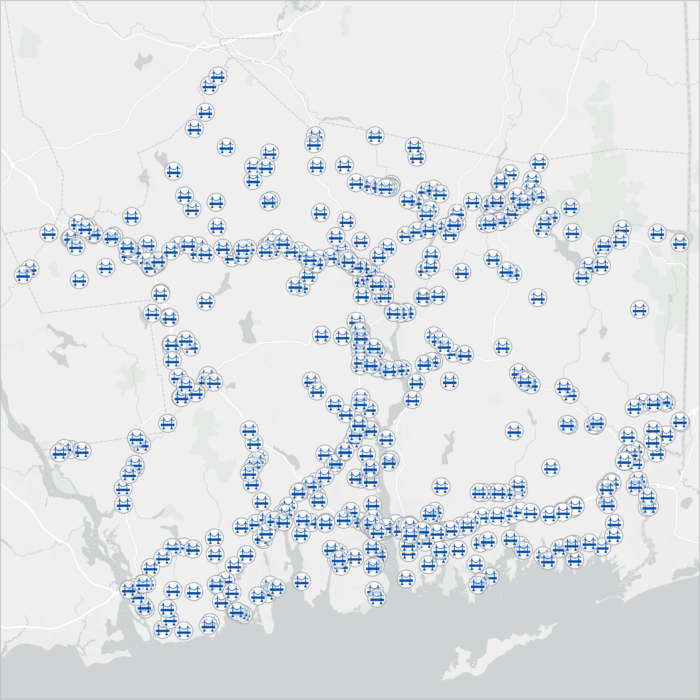
Your task is to join the Bridge Construction Projects table to the Bridges layer to identify the projects that are currently in a design phase of development.
Create a Definition Query
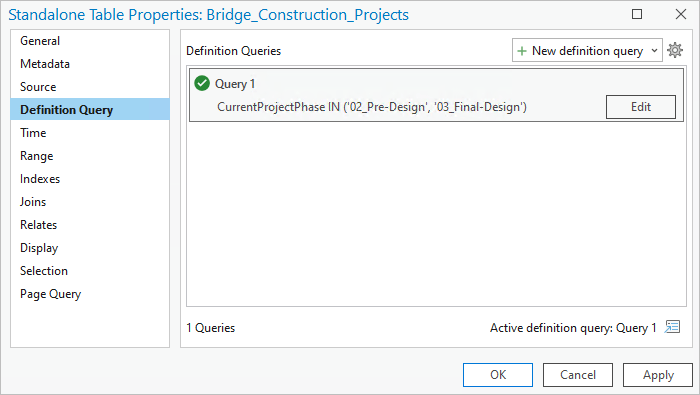
Start with applying a Definition Query to the table view to find all values where the Current Project Phase includes the values 02_Pre-Design or 03_Final-Design.
Use Add Join to join based on a common field
Use the Add Join tool to join the Road Resurfacing Projects table to the Bridges layer.
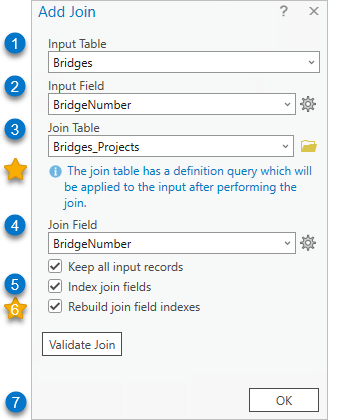
(1) Right-click the Bridges feature layer on the Contents pane>click Joins and Relates> then click  Add Join. The Bridges layer will automatically be set into the Input Table parameter.
(2) Set the Input Field to the BridgeNumber.
(3) Set the Join Table to the Bridge_Construction_Projects.
![]() Note: In ArcGIS Pro 3.2, the Add Join tool will display a tip to indicate when the specified Join Table has a definition query, and that the definition query will be applied to the Input Table (the Bridges feature layer) after the join is made.
Note: In ArcGIS Pro 3.2, the Add Join tool will display a tip to indicate when the specified Join Table has a definition query, and that the definition query will be applied to the Input Table (the Bridges feature layer) after the join is made.
Learn more about how Add Join works with definition queries.
(4) Set the Join Field to the BridgeNumber
(5) Check Index join fields
(6) Check Rebuild joined field indexes
Note: this parameter is for extra assurance. Indexes can become out of sync or corrupt when a dataset is repeatedly updated or for other unknown reasons, which can cause unexpected join results. So, if you want to ensure that a join result is correct, use this option to rebuild the indexes.
(7) Click OK to run the Add Join tool.
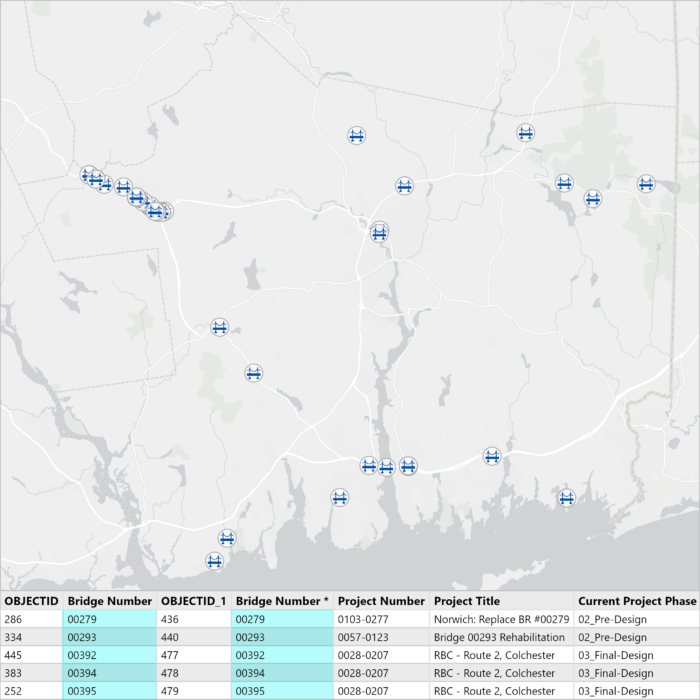
The construction projects table is now joined to the layer. Therefore, the map will only display bridges with ongoing projects in the design stage because the definition query was transferred from the Bridge Construction Projects table to the Bridges layer.
Summary
These enhancements were made to the Add Join, Join Field, Spatial Join, and Add Spatial Join tools to simplify and improve your geoprocessing workflows, and eliminate the need for additional steps or tools. Additionally, several of these updates were made in response to feedback from you, our Esri Community!
Have you ever wished that ArcGIS Pro had a new geoprocessing tool you could use to complete your analysis? Or an existing tool had more functionality to simplify your workflows? You can make enhancement requests for geoprocessing tools in ArcGIS Pro on the ArcGIS Pro Ideas Community Page using the Geoprocessing label.


Commenting is not enabled for this article.