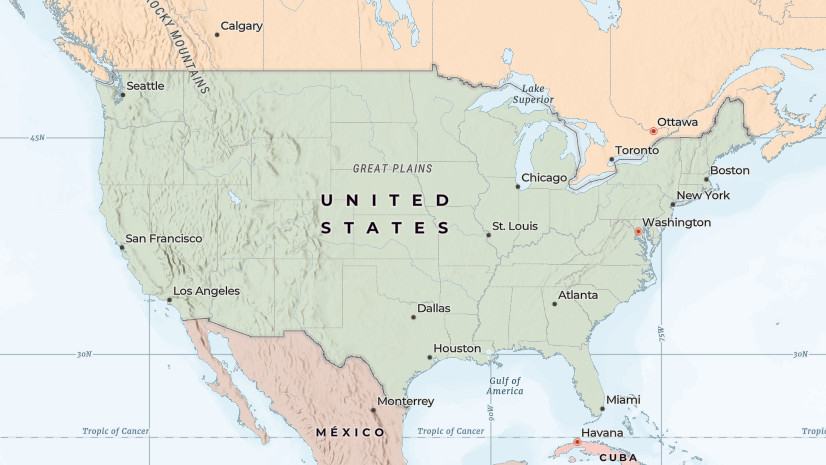
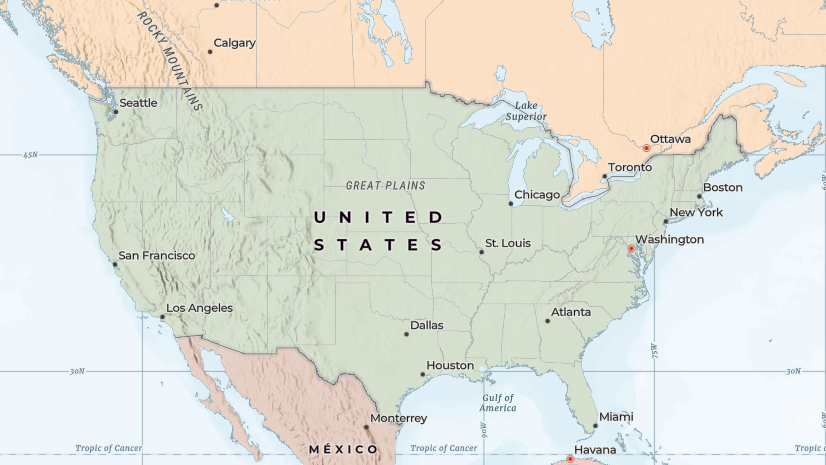
One of the many benefits of using Esri Vector Basemaps is the ability to make custom changes with our ArcGIS Vector Tile Style Editor (VTSE). Changes can be as simple as switching road or water colors, or hiding entire layers of features. Changes can also include customizing specific map labels. In this blog, we’ll go through the process of changing a name of a feature in the map. The process includes editing JSON code using our VTSE application and this exercise should go quickly.
The task at hand is to change the name of the city of New York to a custom label The Big Apple. In reality, any visible basemap label is eligible to be modified by following these steps. Even waterbody or mountain peak names can be changed on the maps this way. For additional information how to use the VTSE for cartographic changes, see this blog.

Step 1: Sign in to ArcGIS Online, launch the VTSE, and select the map style to change
Okay. This is really three action items. They are all required to start editing a map within the VTSE. You can use the app picker or you can go directly to the VTSE’s web site. Choice of the basemap to edit is all yours. If you already have a map style in your Content or Organization, you can use that one. Otherwise select the + New Style button and select one of the many Esri Vector Basemap styles. Make your map style selection carefully depending on what map label you wish to change. For example, our Navigation style basemap does not contain mountain labels, but our Outdoor style does.

2) Identify the Layer ID of the feature label
For this exercise, I’ve selected the Navigation style. The VTSE opens with the map image on the right and the control panel on the left. As you move the crosshair around, the name of the feature layer is displayed in the bottom left of the map. For our example, when the crosshair hovers over the New York city symbol, it shows “Layer: City small scale/x large non capital”. Click on the map and the control panel on the left updates to show the style attributes of this layer. For our purposes, we’re going to select the Edit JSON tool from the far left menu column.

3) Modify the JSON code “filter” of the layer to hide the specific label
Once you click Edit JSON, the block of code is exposed and positioned perfectly for the layer we need to edit (e.g. “id”: “City small scale/x large non capital”,). For this step, the filter values will get adjusted by adding code to turn off the label you are changing. In our example, we are turning off the name “New York”.
The existing filter was:
"filter": ["==", "_symbol", 3],
The new filter is coded to display all names on this layer – except for the label with the name “New York”.
"filter": ["all", ["==", "_symbol", 3],["!=", "_name", "New York"]],
Once you make the change to the filter, click Update to see the changes. This turns off the New York label so it doesn’t interfere with our custom layer and label we’ll add in step 5.

If you have any JSON code errors, the app will identify where those are in the code. If you change a label on a different layer, you’ll want to make similar modifications to the filter code. Add the proper brackets with the “all” command and the section of code that excludes the desired label. If your label layer doesn’t have a filter code, you will need to add one (e.g. “filter”: [“!=”, “_name”, “New York”],).
4) Duplicate the layer in preparation of adding the new name to the map
Now that you removed the label, the next step is to create a duplicate of this layer so you can add your custom map label. Select the Edit layer styles menu button to switch the control panel away from the code view. Make sure your expected layer is still selected. In this example, the layer name is City small scale/x large non capital. Select the Action menu and the Manage layer > Duplicate layer command.

This creates a new layer in your style. The name will include a /1 at the end of the duplicated layer. You may keep this naming convention or you can change it to something more meaningful by clicking the Edit JSON menu button.
Default name of the duplicated “layer id”
City small scale/x large non capital/1
Customized name for the duplicated “layer id”
City small scale/x large non capital/Custom label

5) Modify the JSON code “filter” of the duplicated layer and update the “text-field” to the desired new name
For this step, you’ll be editing the JSON of the duplicated layer (e.g. City small scale/x large non capital/Custom label). There are two changes to make. One, change the filter from excluding (“!=”) the specific name, to including and isolating so your are only impacting that specific name (“==”).
"filter": ["all", ["==", "_symbol", 3],["!=", "_name", "New York"]],
becomes
"filter": ["all", ["==", "_symbol", 3],["==", "_name", "New York"]],

Second, you need to change value of the text-field command. This is what gets displayed on the map.
"text-field": "{_name}",
becomes
"text-field": "The Big Apple",
Because we isolated the label in the filter to only change the value that previously displayed “New York”, this change to the text-field now makes it display “The Big Apple”. Use this example to apply your own name changes for your needs.

6) Update the code and verify the change in the map
After making the code changes, click on the Update button in the Style Editor. If there are any issues with your JSON editing, the VTSE will flag the layer and you’ll need to review and fix your code. Assuming there are no issues, when you update the code, the map portion of the VTSE updates to the new view. For our example, the name changes to “The Big Apple” and if you hover the crosshair over the city symbol, you’ll see it shows this new label is coming from our duplicated layer, named “City small scale/x large non capital/Custom label”.

7) Save the new style to your Content and use the tile layer with the new label in your maps and apps
Now that you have your custom labeled map style, you’ll need to Save or Save as to your Content. This tile layer can be added to your web map or used in other apps where this custom label is needed for display. In this example, Navigation style was the only style that you updated. If your Organization has a custom map gallery of different cartographic styles, you’ll need to apply these same changes to the other styles in use.
Following these straight-forward steps using the Vector Tile Style Editor allows you to make custom label changes to the Esri Vector Basemaps. This is useful if you need a map that conforms to specific naming requirements of your organization. If you have more than one label that needs to be changed in your map, repeat steps to edit the JSON and duplicate the layer to allow your customized names to display. This is just one of the nearly endless ways you can make changes, both to content and to cartographic styles, through the VTSE.
Please feel free to reach out with comments or questions.


Article Discussion: