Does your organization’s data management policy require you to identify content which may contain sensitive information? Maybe this content can only be accessed by certain members of your organization or requires special handling in terms of storage, processing, transmission, and destruction? ArcGIS Enterprise 11.4 has new functionality to help you identify this content: item classification.
The new item classification functionality allows you to assign one or more labels to items in your Enterprise portal to denote sensitivity or dissemination rules. These labels are determined by a unique classification schema configured by your organization based on your data management policy and industry specific needs. It is important to note that item classification can be used to identify sensitive content but will not control permissions for accessing items. Access to items based on your organization’s data management policies must be configured through organization and item permissions.
Item classification will be configured by an organization administrator. Organization members will then have a variety of workflows for classifying items. Let’s take a look at how to use this exciting new functionality!
Create a classification schema:
To get started, you or another member of your organization will need to create a classification schema that reflects your data management policy. This classification schema can be customized to the specific needs of your organization. The user experience for classification in the Enterprise portal will be determined by this classification schema without any need for additional development.
A classification schema is a JSON object that contains all the necessary information about your organization’s classification and dissemination rules for content.
Some organizations may require advanced classification behavior. For example, your organization may want the classification user experience to only display an attribute if a specific value is selected in another attribute or prevent a combination of attributes values from being selected together or convert a selected attribute value into an abbreviated value in the classification label. This advanced behavior can be achieved by using Arcade in your classification schema.
The classification schema can be simple or complex, whatever is necessary to meet the needs of your organization, but it is recommended to start with a simple schema that focuses on core classification labels. To get started, check out example schemas for different industries here.
Assign a classification schema:
Once you have created your unique classification schema, you will need to assign it to your organization in order to enable the item classification functionality. To do so, as an administrator go to the Settings > Items tab. Here, there is now a section for item classification.
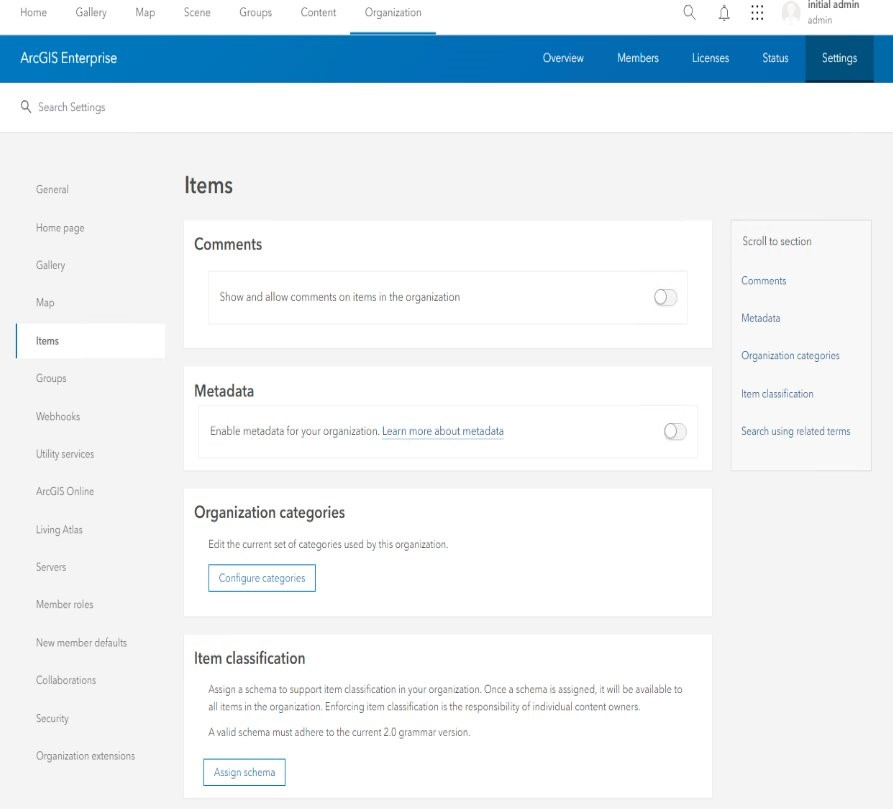
As the administrator, select the “Assign Schema” button. You will be prompted to provide your unique classification schema file.
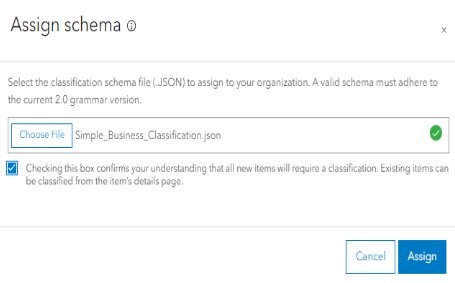
After clicking “Assign,” item classification will be enabled on the organization. The classification user experience for the organization will be driven by the rules determined by the assigned classification schema.
Your organization’s data management policy or your item classification needs may change over time so your classification schema may need to be updated. Administrators can update or remove a classification schema in the Settings > Items > Item classification tab once an original classification schema has been assigned. After updating the assigned classification schema , organization members will be able to modify the classification assigned to an item using the new schema. When an assigned classification schema is removed, organization members will not be able to classify items, and the classification assigned to an item will no longer appear on its item page.

Please note, item classification is an opt-in functionality. Item classification will only be enabled if an administrator creates and assigns a schema to the organization.
User workflows:
Once item classification is enabled for your organization, members of your organization will have a variety of workflows available for classifying items and viewing item classification. Let’s take a look at a few.
Classifying existing items:
Once an administrator has enabled item classification on the organization, users may want to classify existing items. To do so, users can go to the item details page for that item and scroll down to the new “Classification” section and select “Add a classification level to this item.” The classification user experience, determined by the classification schema, will display and the user will be able to classify the item.
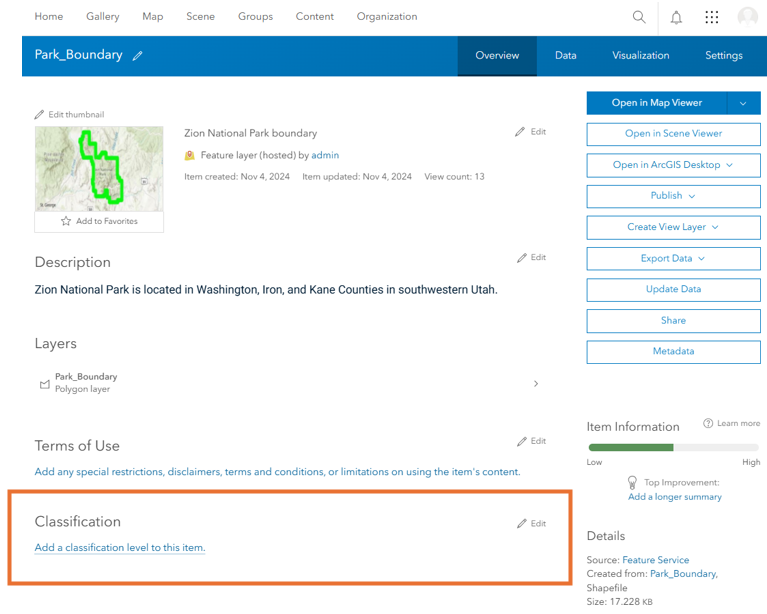
Classifying new items:
Users may also want to classify new items. When a user is adding a new item through the Content > New Item tab, item classification will now be part of this workflow. In addition to providing the title, tags and summary for a new item, users will now be able to assign a classification as well. Again, this item classification user experience will be fully determined by the classification schema assigned to your organization.
Once this item is created, the classification can be viewed on the item details page for the new item.
Updating item classification:
Users may also want to change the classification for an item. The classification of an item can be updated on the item details page. Go to the “Classification” section of the item details page and click “Edit.” The classification user experience will open and you can make changes to the classification.

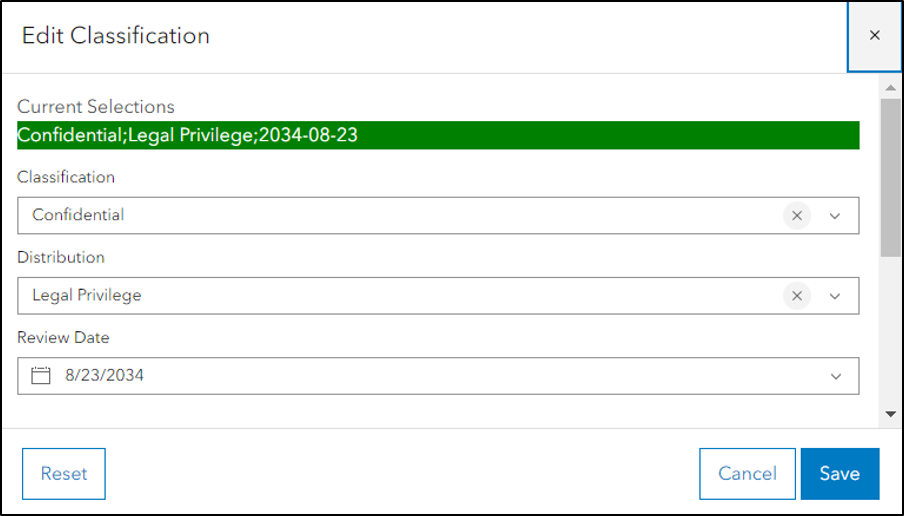
Search by classification:
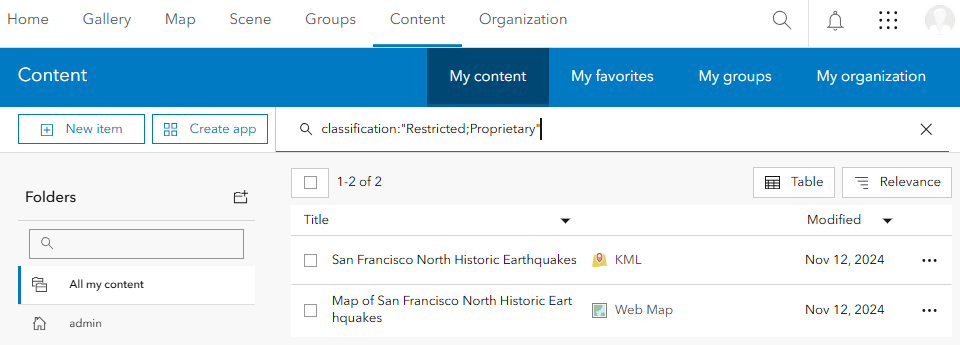
Users may want to easily find items with a particular classification. You can search by item classification in the My Content tab. To do so, search classification: “the classification value you are interested in” for an exact match. The search will return items with that classification.
Classification in Map Viewer:
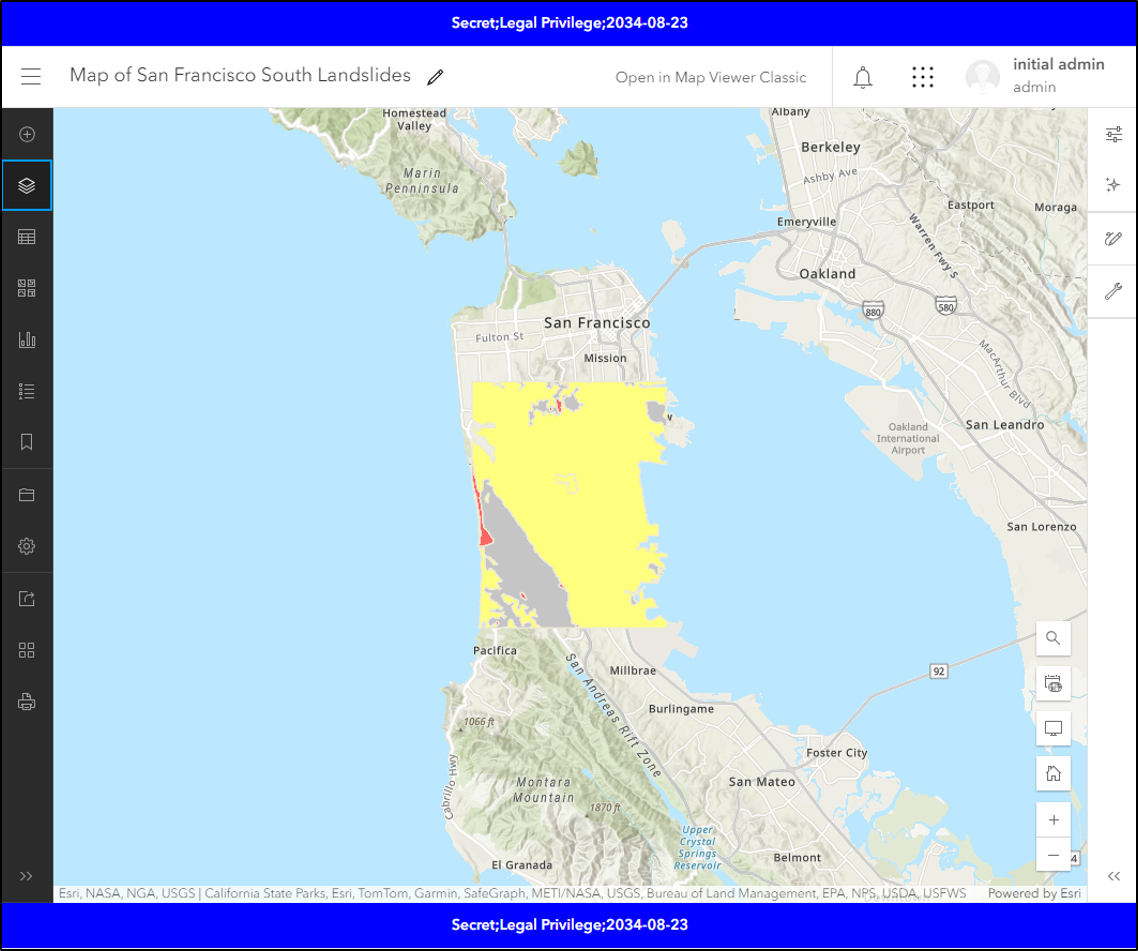
Users also may want to view and work with an item’s classification in applications within the Enterprise portal. With ArcGIS Enterprise 11.4, users can view an item’s classification and save a classification for a web map in Map Viewer. When you open a web map item, which has been classified, in the Map Viewer, a banner will display across the top and bottom of the interface with the classification for the item. This banner background and its font will be color-coded based on the classification schema.
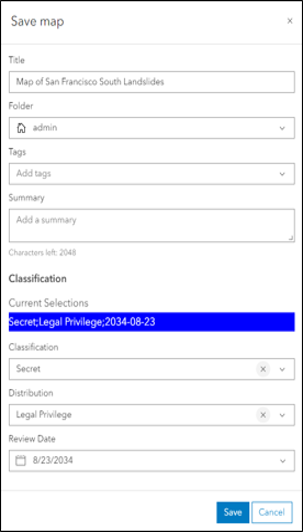
If you are saving a new web map from Map Viewer, classification will now be included as part of the Save map workflow.
Viewing and saving item classification is planned to be supported in different applications across the ArcGIS platform in future releases. If you have specific applications where you would like to work with classification, share your feedback on Esri Community!
Key Takeaways
Item classification is a powerful new functionality in ArcGIS Enterprise 11.4. It supports the specific data management policy needs of your organization with your own unique classification schema. Please remember, item classification is a mechanism for labeling items to denote sensitivity but does not control the access to items. Ensure you are configuring the correct permissions for each item to meet your data management policy.
To get started with item classification, check out product documentation and refer to the classification schema examples in GitHub. Also keep an eye out for future blogs further detailing item classification.
As item classification is brand new, we are excited to continue to enhance this functionality to better meet your needs. Please share your feedback and let us know what you are looking for next on Esri Community!



Commenting is not enabled for this article.