ArcGIS AllSource is an intelligence workstation that blends analysis and production capabilities in one application. But sometimes, especially to new users, it can seem like a disparate set of tools or disconnected commands jumbled into open-ended processes. As with any process, the individual steps that sequence the tools into a cohesive methodology are what makes for a successful result.
With ArcGIS Workflow Manager, you can bring standardized processes to your intelligence work creating a sequence of steps for one or more team members to follow. You can develop workflows that require checks and validation steps, build training workflows from senior analysts teaching new analysts and junior analysts, and document and follow infrequently used processes.
Workflow Manager components
Workflow Manager has two main parts: the Workflow Manager web app that is used to design, manage, and distribute workflows and the Workflow Manager pane in ArcGIS AllSource that is used to discover jobs and follow the steps.
The web app and pane work with the following components of Workflow Manager:
- Workflow items—Workflow items compartmentalize work from groups in your organization and organize sets of workflow diagrams. Workflow items can have different requirements and won’t conflict with items from other groups.
- Step templates—Step templates are predefined steps that are sequenced together to build a workflow diagram. Each step template contains preconfigured name and default values. There are many step templates to choose from, including Add Attachment, Send Email, and Run Pro GP Tool. Step templates become unique steps when added to a workflow diagram.
- Workflow diagrams—Workflow diagrams are block flowcharts of business processes and are made by connecting individual steps in sequence, a branch, in parallel, or in a loop depending on the process design.
- Job templates—Job templates are built from a workflow diagram and contain default properties, such as first assignee or priority or due date, for the job that is created from the template.
- Job—A job is the individual work process created from the job template. A job might be called a task or work order. It is assigned to a user, several users, or a group and can be scheduled to be completed by a specific date. Many jobs can be created from the same job template, which is recommended for jobs that are repeated often—for example, updating a basemap with new data.
The Workflow Manager web app is accessed and licensed through ArcGIS Online or ArcGIS Enterprise. Users open the web app using the app launcher. In ArcGIS AllSource, users must connect to ArcGIS Online or to a portal and then launch the Workflow Manager pane from the View tab
Use Workflow Manager
ArcGIS Workflow Manager is the workflow management system on ArcGIS Enterprise and ArcGIS Online that creates the workflow diagrams from business processes and turns them into workable jobs for ArcGIS AllSource users to follow. As an ArcGIS Enterprise user, you create a Workflow Manager workflow diagram to model a process and then add steps from the step library and connect them together. The steps in the library represent actions such as running a geoprocessing service, creating a database replica, defining a location on a map, sending an email, or adding a comment. Once the diagram is finished, you will create a job template from the diagram and assign it to team members.
As an administrator in Workflow Manager web app, you will configure workflow diagrams, set up job templates, and administer the workflow items. The following is an overview of the process:
- Access the Workflow Manager web app.
- Create workflow diagrams.
- Create job templates from workflow diagrams.
- Create jobs from job templates.
- Run jobs.
- Manage jobs.
- Administer Workflow Manager.
As a team member, you can use Workflow Manager in ArcGIS AllSource to discover jobs that are assigned to you. Each job is started by the assigned user, and each step is completed or skipped as needed. You complete each step by clicking Proceed, following the instructions, and when finished, marking the step as complete. This will move you to the next step, until the job is complete or moved to the next assigned user in the workflow. The following are the two main steps for ArcGIS AllSource users of Workflow Manager:
Helicopter landing zone for new area of interest
In a large organization, processes may be initiated outside of the team who does the work. The Workflow Manager web app can be used to create a process to handle a regular order for creating a new product using steps assigned to users with different roles. For example, a manager validates the request and approves the results, then an analyst gathers the source data and builds the product, and a technician verifies the resulting product. The Workflow Manager pane in ArcGIS AllSource is used to discover the job and do the individual steps to complete it.
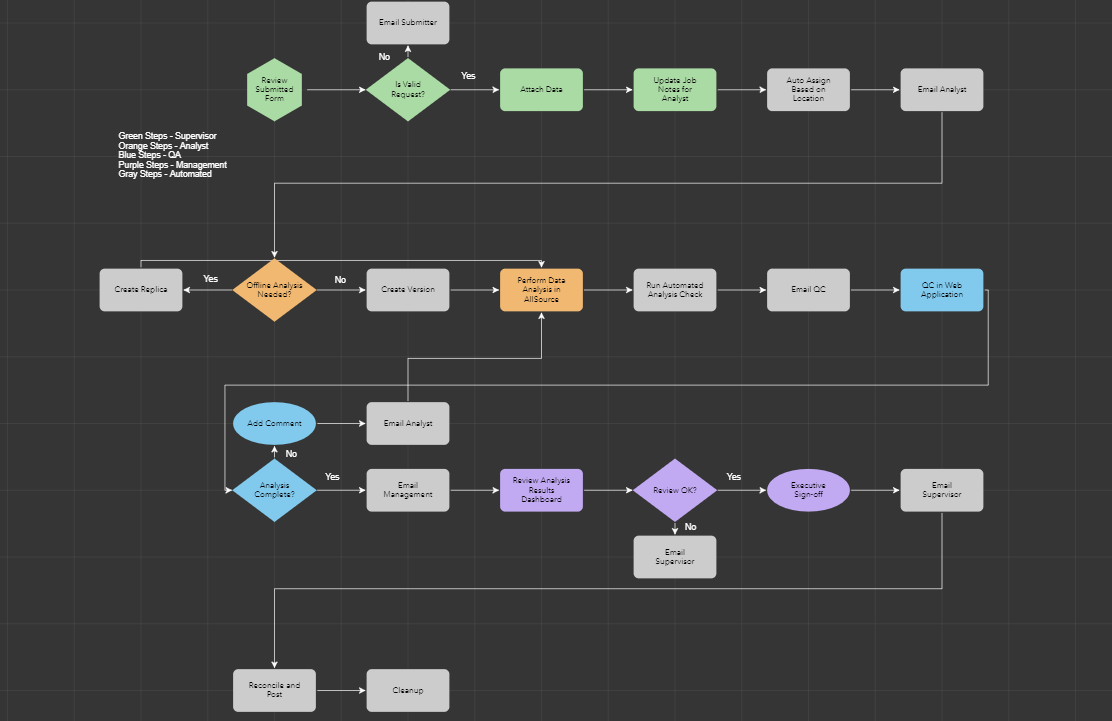
In the example below, a request for a new helicopter landing zone (HLZ) near a location is given from an outside requestor, and the job is processed and handled by users in the organization. Workflow Manager manages the process at each step, ensuring the sequence is followed as designed.

- An outside request is submitted with an ArcGIS Survey123 form requesting HLZ created for a defined area.
- An analyst verifies the initial request is valid and correct.
- Data is attached to the request.
- The request is automatically assigned to an analyst based on the requested location.
- An assigned analyst decides if the database should be replicated or versioned.
- The analysis is performed in ArcGIS AllSource.
- Automated checks are performed on the results.
- QA is assigned and an email is sent to a technician.
- QA is performed in a custom web app.
- The output is reviewed in the dashboard, and a manager signs off on results.
- The output is posted for requestor retrieval.
- Intermediate data is cleaned up.
Gridded reference graphic over imagery for search and rescue
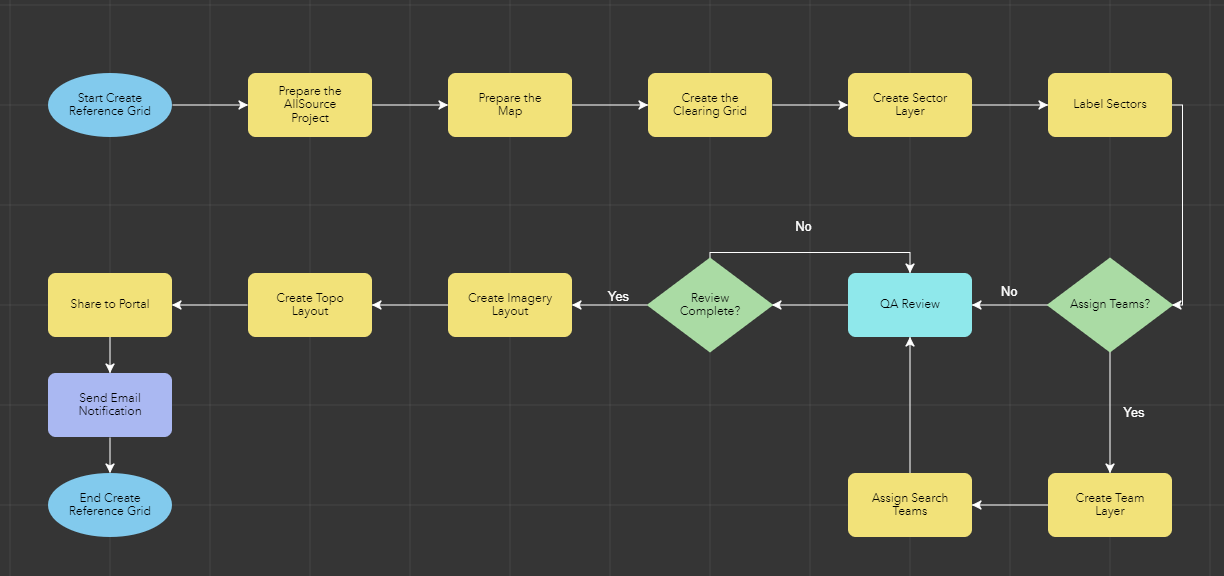
Gridded reference graphics (GRG) are regular arrays of squares laid over imagery with each box bounding a referenced location. Search grids are an example of a GRG used to cover an area for search and rescue operations. How the grid is created, the starting point, and coverage are dependent on the type of search being conducted. The search GRG for a missing hiker in a wilderness is different than that for an Alzheimer’s patient in a suburban setting. Creating a GRG over imagery in an area of interest has several steps that can be done by one or several members in a team. Again, the Workflow Manager web app is used to create the process diagram, and the Workflow Manager pane in ArcGIS AllSource is used to follow the process to create the output products. This diagram includes the following steps:

- Prepare the project in ArcGIS AllSource.
- Prepare the map and collect relevant imagery for the assigned boundary.
- Use the Clearing Grids tool to create the GRG outlines.
- Create and label the GRG sectors in Clearing Grids.
- Optionally, create teams and assign them to the grid squares.
- Review the project work.
- Create imagery layout for the operations center.
- Create a topographic layout for the search teams.
- Distribute layouts.
ArcGIS Workflow Manager and ArcGIS AllSource integrate to create a system for managing intelligence processes across your organization. Workflow Manager designs the methodologies and controls the process, and ArcGIS AllSource connects as a client and provides analytic capabilities. Together, they bring an end-to-end solution for providing consistency and timeliness to intelligence reporting and production.

Article Discussion: