How can I calculate the distance from each student’s home to their assigned school to determine if they’re eligible to ride the school bus? How can I calculate the commute time from each employee’s home to their work site so I can most effectively target ridesharing incentives? How can I calculate the driving time from each patient’s home to the location of their doctor’s appointment to better understand access to health care in my state?
All these questions are examples of a common class of network analysis problem: calculating the travel time, distance, or route path between preassigned pairs of origins and destinations.
In this type of analysis, the goal isn’t to find the closest destination (a closest facility analysis) or to calculate the travel time or distance from all origins to all destinations (an origin destination cost matrix analysis). Nor is the goal to find the optimal way to dispatch a fleet of vehicles for paired pick-ups and drop-offs (a vehicle routing problem analysis). Rather, the goal is to calculate the optimal path from each origin to its assigned destination and get the travel time, distance, or route geometry of that path. This type of problem can be solved using the Network Analyst route solver.
Learn more about the Network Analyst analysis types
This post describes how to set up and solve this type of problem using the route solver. Then, it covers some ready-to-use tools that make solving this type of problem easier.
Configure the route solver for preassigned origin-destination pairs
As long as you set up the problem correctly, the Network Analyst route solver can calculate routes between multiple pairs of locations within one solve operation.
The input to the route solver is a single table of stops. Ordinarily, when you solve the analysis, you get a single route that visits all the stops in the table.
For example, you can set up a Stops table with four stops:

When you solve the route, you get a single route that visits each stop:

However, you can assign stops to different routes by setting a value in the RouteName field. Stops with the same RouteName field value will be assigned to the same route, and the analysis results will include a separate route for each unique RouteName in the table.
Revisit the example with four stops, but this time, use the RouteName field to split the four stops into two routes. Stops A and B both have a RouteName field value of Route 1, and Stops C and D have a RouteName field value of Route 2.
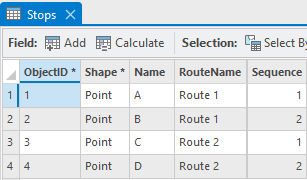
When you solve the analysis, there are two separate routes: one from Stop A to Stop B and another from Stop C to Stop D.

So, if you have preassigned origin-destination pairs, you can load each pair into the Stops table and give them a unique RouteName field value. This way, when you solve the analysis, each pair will get a unique route connecting the origin and destination.
The screenshots above show an analysis in ArcGIS Pro, but this configuration works for all the various APIs across the ArcGIS platform where you can access the Network Analyst route solver.
Learn more about the route solver in ArcGIS Pro, in the ArcPy site package, and the ArcGIS developer APIs.
A real-world example
Unfortunately, real-world data is usually a little more complicated, and it may take some effort to manipulate it into the right format for the Stops table. Next, you’ll look at a more realistic example.
Suppose you have a dataset of commuters with their assigned work sites and another dataset with the locations of the work sites. You want to calculate the route and mileage of each commuter to their work site.


You want to add each commuter and their assigned work site to the Stops input table for the route analysis. Because you want a separate route for each commuter to their work site, you must use a unique RouteName field value for each commuter-work site pair. You’ll learn how to set this up in a moment, but first, the table below shows the output you want to achieve:

The Stops table has eight stops: four for each of the four commuters and four for the work sites each commuter is assigned to. Since two commuters work at the same site (Excellent Elementary), that site is included in the Stops table twice, once for each worker assigned there.
Each commuter-work site pair has a unique RouteName field value to ensure that there’s a separate route connecting each commuter and their work site. Since the commuter names are unique, you can use them for the RouteName values, but you could use anything, as long as each origin and its assigned destination have the same value and that value is unique to the pair.
The map below shows the resulting routes:

To load the Stops table from the original inputs, you have to do a bit of data manipulation.
When loading the commuters, you can use field mapping to transfer the commuter’s name from the original dataset to the Name and RouteName fields in Stops. In ArcGIS Pro, this is accomplished using the Add Locations tool.
Loading the work sites is trickier because you must make a copy of each work site for each commuter who works there. You can do this using a one-to-many join with the Add Join tool.

Joining the Commuters table to WorkSites using a one-to-many join results in a copy of each work site for each commuter assigned there. The fields on the right side of the table come from the joined Commuters table.

Now you can load the joined WorkSites table into the Stops table for the Route analysis. Use field mapping to map the WorkSites table’s Name field (the work site’s name) to the Stops table’s Name field and the joined Commuters table’s Name field (the commuter’s name) to the Stops table’s RouteName field. With the Add Locations tool in ArcGIS Pro, it looks like this:

As shown earlier, the resulting Stops table includes an entry for each commuter and an entry for each commuter’s work site with the RouteName field used to define origin-destination pairs.
Ready-to-use tools to solve preassigned origin-destination pair problems
Manually configuring your data in the format described above can be challenging. However, ready-to-use tools for solving preassigned origin-destination pair problems are available in the Map Viewer and ArcGIS Pro. These tools use the route solver, but they simplify setting up the inputs.
Solve preassigned origin-destination pair problems in Map Viewer
The Calculate Travel Cost tool in Map Viewer in ArcGIS Online and ArcGIS Enterprise is specifically designed to calculate routes between origins and destinations. You can specify matching ID fields in the input origins and destinations to define which origin is paired with which destination.
If you’re a developer, you can also access this tool with ArcGIS REST API and ArcGIS API for Python.
Solve large preassigned origin-destination pair problems in ArcGIS Pro
If you have a large set of paired locations or you’re struggling to set up your data as described above, you can download and use the Solve Large Analysis With Known OD Pairs tool from Esri’s large-network-analysis-tools GitHub repository.
This tool offers two options for setting up pairs of input locations:
- A field in the origins table defines the assigned destination (one-to-one).
- A separate table defines the origin-destination pairs (many-to-many).
The tool improves performance by solving the routes in parallel. It’s usable out of the box in ArcGIS Pro with no coding required, but it’s also open-source Python code you can modify to suit your needs.
Conclusion
You can calculate the travel time, distance, and route paths between paired locations using the ArcGIS Network Analyst route solver. You can configure the analysis manually, or you can use ready-to-use tools in the Map Viewer or ArcGIS Pro. Give it a try!
If you have questions or suggestions about this workflow, reach out on Esri Community. We would love to hear from you!

Article Discussion: