.NET applications commonly use the Model-View-ViewModel (MVVM) design pattern, in which code can be broken up into classes with a small number of well defined responsibilities. This can help improve code understandability, maintenance and ease of modification in larger code bases.
What is MVVM?
Model-View-ViewModel (MVVM) is a pattern that separates application business logic from the user interface (UI). In short, the view describes the user interface (UI) and interacts with the view model through data bindings and commands, and it updates the model state. This helps keep the model separated from the view, which means changes do not need to be reflected in the view and vice versa.
MVVM in an ArcGIS Maps SDK for .NET application
To demonstrate how to implement the MVVM pattern in a .NET Maps SDK app this blog post looks at the following use cases:
- Create a .NET application
- Add NuGet packages
- Setup dependency injection
- Display data on a MapView
- Add a GeoViewController to a MapView
- Implement layer identification
- Change viewpoint from the view model
If you haven’t installed the .NET Maps SDK already, you can do so by visiting the install and set up pages on the Esri Developer’s website.
In the following sections I describe how to build an ArcGIS Maps SDK for .NET app that follows an MVVM pattern. As I am focusing on MVVM in this blog post I will highlight the areas of the application that are relevant to MVVM, where this is not the case I will provide a brief overview and link to more information on the topic.
Create a .NET application
You can easily get started building an MVVM app by downloading the ArcGIS Maps SDK for .NET template for .NET from the Microsoft Visual Studio marketplace. This template references the appropriate NuGet packages for each platform, using the MVVM design pattern. In this blog I will be using .NET MAUI but the same patterns and practices apply to WPF, WinUI and UWP.
The template provides boiler-plate code with a view model called MapViewModel.cs which is bound to the view in MainPage.xaml.cs.
public partial class MainPage : ContentPage
{
    public MainPage()
    {
	InitializeComponent();

	this.BindingContext = new MapViewModel();
    }
}
Note that there are multiple ways to bind the view model to the view. In the template, BindingContext is defined in MainPage.xaml.cs code-behind but it could also be set in the MainPage.xaml file via xaml, as shown below.
<ContentPage.Resources>
   <local:MapViewModel x:Key="VM" />
</ContentPage.Resources>
ArcGIS location services, data hosting services, and content management services require authentication with an API key or by authenticating with ArcGIS Online. You can learn more about API keys and how to generate them from the Create an API key tutorial. Once you have it, this API key can be added in the MauiProgram.cs file, and if you’re using a project from the template, you can replace the placeholder text with the key for your app.
.UseApiKey("YOUR_API_KEY")
Add NuGet packages
To simplify the code and enhance the view model’s capabilities, add the following package references to the project file.
<PackageReference Include="CommunityToolkit.Maui" Version="8.0.1" />
<PackageReference Include="CommunityToolkit.Mvvm" Version="8.2.2" />
<PackageReference Include="Esri.ArcGISRuntime.Toolkit.Maui" Version="200.5.0" />
Include the UseArcGISToolkit() and UseMauiCommunityToolkit() statements in the host builder in MauiProgram.cs.
var builder = MauiApp.CreateBuilder();
builder
    .UseMauiApp<App>()
    .ConfigureFonts(fonts =>
    {
        fonts.AddFont("OpenSans-Regular.ttf", "OpenSansRegular");
        fonts.AddFont("OpenSans-Semibold.ttf", "OpenSansSemibold");
    })
    .UseArcGISRuntime(config => config
       .UseApiKey("YOUR_API_KEY")
       .ConfigureAuthentication(auth => auth
           .UseDefaultChallengeHandler())
      )
    .UseArcGISToolkit()
    .UseMauiCommunityToolkit();
Let’s review the components used in the workflow described in this blog post.
ArcGIS Maps SDK for .NET Toolkit (Esri.ArcGISRuntime.Toolkit.Maui) | NuGet
The ArcGIS Maps SDK for .NET Toolkit is an open-source library of controls and components that can be used to improve your ease of development with the .NET Maps SDK. The toolkit repo can be found on GitHub.
The GeoViewController in the toolkit provides a helper class which enables performing view operations such as layer identification and setting viewpoints on the MapView from the view model.
.NET MAUI Community Toolkit (CommunityToolkit.Maui) | NuGet
EventToCommandBehavior is used to invoke a command on the bound view model using an event. Using this behavior, the view model can react to tap events on the MapView, change events on pickers, and loaded events on UI elements. This is used in this example application to handle tap events on clusters and features. Note that no toolkit is available to replicate this EventToCommandBehavior on WPF and WinUI but other solutions are possible.
MVVM Toolkit (CommunityToolkit.Mvvm) | NuGet
This package simplifies the code in the view model by taking care of notify property changed boilerplate code through use of the provided ObservableObject type and simplified command binding using [RelayCommand]. Other MVVM libraries are available, and this is not a required package but I find it simplifies the code.
Setup dependency injection
The MVVM example app I am sharing in this blog post will utilize a single view model instance shared across one page that occurs in a single instance and another page that opens to display data based on current view model state.
Add the following lines to MauiProgram.cs to register the single view model and page instances.
builder.Services.AddSingleton<MainPage>();
builder.Services.AddSingleton<MapViewModel>();
The MainPage.xaml.cs constructor can then be updated as a dependency injection container will identify the dependency upon MapViewModel.cs when the object is created and handle the injection of the service.
public partial class MainPage : ContentPage
{
    public MainPage(MapViewModel mapViewModel)
    {
	InitializeComponent();

	this.BindingContext = mapViewModel;
    }
}
Using dependency injection provides some benefits. It removes the need for a class to locate its dependencies. Furthermore, dependencies can be mocked to improve testability.
Display data on a MapView
Start by updating MapViewModel.cs to be a partial class inheriting from ObservableObject in the MVVM toolkit package. This gives access to [RelayCommand] and [ObservableProperty] attributes which are used to reduce code length and complexity. In this case you don’t need to directly implement INotifyPropertyChanged.
public partial class MapViewModel : ObservableObject
Then, remove the existing property changed code and update the Map property to use the [ObservableProperty] attribute.
[ObservableProperty]
private Map? _map;
Display a feature service using a feature layer
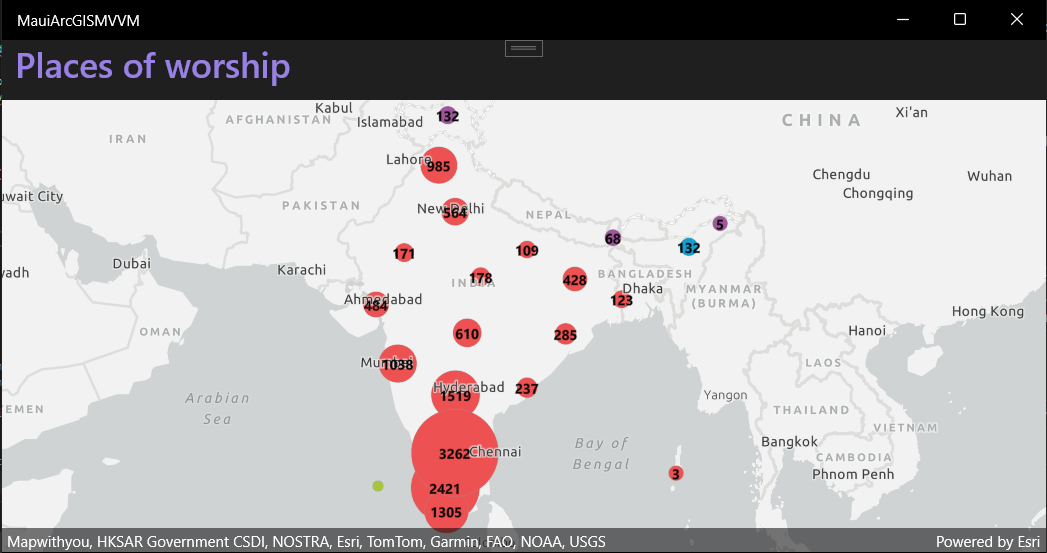
In the example app I use a feature service to display places of worship in India. To do this, instantiate the Map object in MapViewModel.cs with a basemap then create a feature layer using the feature service URL and add it to the maps operational layers. For more information on displaying a feature service see the Feature layer (feature service) sample.
Set up clustering data
To ensure the data from the feature layer displays as clusters when the map loads, clone the UniqueValueRenderer used by the feature layer to create a ClusteringFeatureReduction object. Then create a SimpleLabelExpression to display the total number of points in each cluster as a label. To see more in depth clustering content have a look at the Display clusters and Configure clusters samples

Add a GeoViewController to a MapView
To make use of layer identification and setting viewpoints, add a GeoViewController to the view-model and a GeoViewTappedCommand to respond to tap events.
public GeoViewController Controller { get; } = new GeoViewController();

[RelayCommand]
public async Task GeoViewTapped(GeoViewInputEventArgs eventArgs) { }
Note that using the MVVM Toolkit commands with the attribute [RelayCommand] are exposed with the word “Command” appended to the end of the method signature. So, in this case the view will bind to GeoViewTappedCommand.
Add the following namespaces to the view:
xmlns:mauitoolkit="http://schemas.microsoft.com/dotnet/2022/maui/toolkit"
xmlns:toolkit="clr-namespace:Esri.ArcGISRuntime.Toolkit.Maui;assembly=Esri.ArcGISRuntime.Toolkit.Maui"
Update the MapView to include the GeoViewController and an EventToCommandBehavior which allows commands to be invoked on the view model when a GeoViewTapped event occurs.
<esri:MapView x:Name="MyMapView"
              Grid.ColumnSpan="2"
              toolkit:GeoViewController.GeoViewController="{Binding Controller}"
              Map="{Binding Map}">
    <esri:MapView.Behaviors>
        <mauitoolkit:EventToCommandBehavior x:TypeArguments="esri:GeoViewInputEventArgs"
                                            Command="{Binding GeoViewTappedCommand}"
                                            EventName="GeoViewTapped" />
    </esri:MapView.Behaviors>
</esri:MapView>
In this case, the Map is bound to a Map object on the view model, the GeoViewController is bound to the GeoViewController and the GeoViewTapped event invokes the GeoViewTappedCommand, passing GeoViewInputEventArgs as a parameter.
Implement layer identification
The GeoViewController is set up to invoke a GeoViewTappedCommand which means the view model can respond to tap events from the view.
The main concept to understand when performing layer identification from the view model is to use the GeoViewController. Once you have a GeoViewController configured to react to a GeoViewTapped event you can update your code in MapViewModel as follows.
[RelayCommand]
public async Task GeoViewTapped(GeoViewInputEventArgs eventArgs) => await Identify(eventArgs.Position, eventArgs.Location);

public async Task Identify(Point location, MapPoint? mapLocation)
{
        // Identify the tapped observation.
        IdentifyLayerResult? results = await Controller.IdentifyLayerAsync(_featureLayer, location, 10, false);
}
The following sections give an overview of the code used in the example app. To view the context of these code snippets, see the full code and try the app out yourself or clone the repo on GitHub.
I’ve added an additional view model to wrap the GeoElement objects. This keeps the GeoElement data model separate from the view and allows for the data to be validated or formatted prior to presentation.
public PlaceOfWorshipViewModel(int index, ArcGISFeature feature)
{
    // Set the default property values.
    Name = Religion = Fid = "null";

    // Set the display index and feature.
    ArcGISFeature = feature;
    DisplayIndex = index;

    // Get attribute values from the attributes dictionary.
    if (feature.Attributes.TryGetValue("fid", out object? fidValue) && fidValue != null && fidValue is long fid) Fid = fid.ToString();
    if (feature.Attributes.TryGetValue("religion", out object? religionValue) && religionValue != null) Religion = (string)religionValue;
    if (feature.Attributes.TryGetValue("name", out object? nameValue) && nameValue != null) Name = (string)nameValue;

    // Given the feature geometry get a formatted coordinate string.
    FormattedCoordinates = CoordinateFormatter.ToLatitudeLongitude((MapPoint)ArcGISFeature.Geometry!, LatitudeLongitudeFormat.DegreesDecimalMinutes, 2);
}
I then create PlaceOfWorshipViewModel objects by passing in an ArcGISFeature and populating properties used in the view. None of the properties on this view model change once presented so they do not need to be observable. Each feature’s geometry is formatted using the CoordinateFormatter to present the information in a way that is easier to read in the view. The DisplayIndex field is added to the view model to display the item index in the view and improve readability when scrolling through large numbers of items.
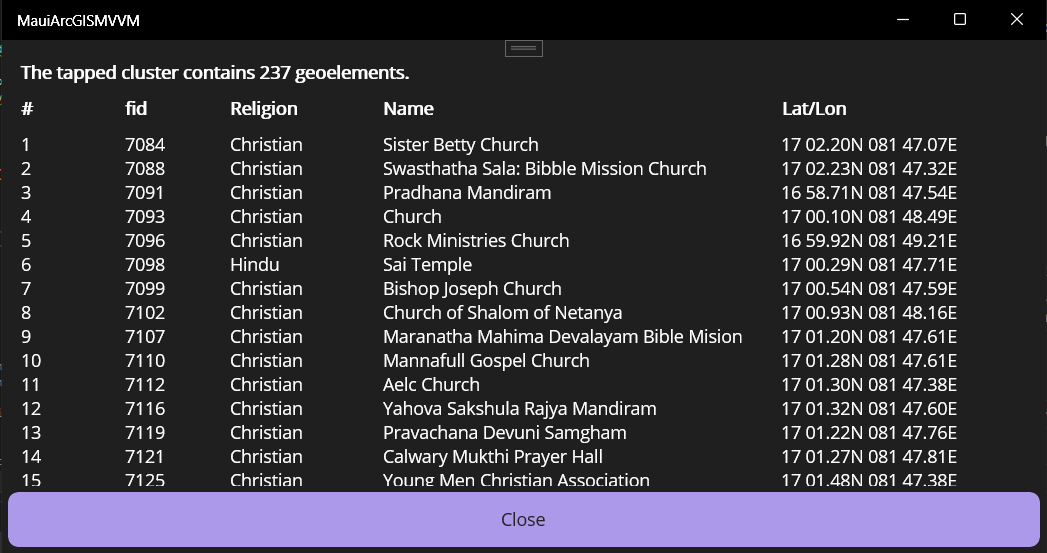
I have created another .NET MAUI view called GeoElementSelectionPage, this is used to display the data contained in a tapped cluster.
A collection view on the GeoElementSelectionPage is used to display an ObservableCollection of PlaceOfWorshipViewModel objects in the MapViewModel.
As clusters in this data set can contain thousands of GeoElement objects, the number of items in the collection is incrementally increased as you scroll. This is achieved by adding a LoadMore() method in the MapViewModel which is called when the number of items in the collection hits a specified threshold.
The core concept is to use the GeoViewController to perform identification in the view model – see the example app repo for the full code that deals with the more complex workflow of identifying clustered data on a layer.
public async Task Identify(Point location, MapPoint? mapLocation)
{
// Identify the tapped observation.
    IdentifyLayerResult? results = await Controller.IdentifyLayerAsync(_featureLayer, location, 10, false);
}
Flesh out the view and view model
Add more commands and properties with [RelayCommand] and [ObservableProperty] attributes to perform actions like navigating away from the GeoElementSelectionPage and hold the displayed GeoElement objects etc. Using properties in the PlaceOfWorshipViewModel and commands in the MapViewModel you can create a UI to display all of the elements within a tapped cluster and format their data for presentation.

Change viewpoint from the view model
This section will outline how to update the viewpoint of the MapView from the MapViewModel.
First lets update the viewpoint when a picker selection change event occurs.
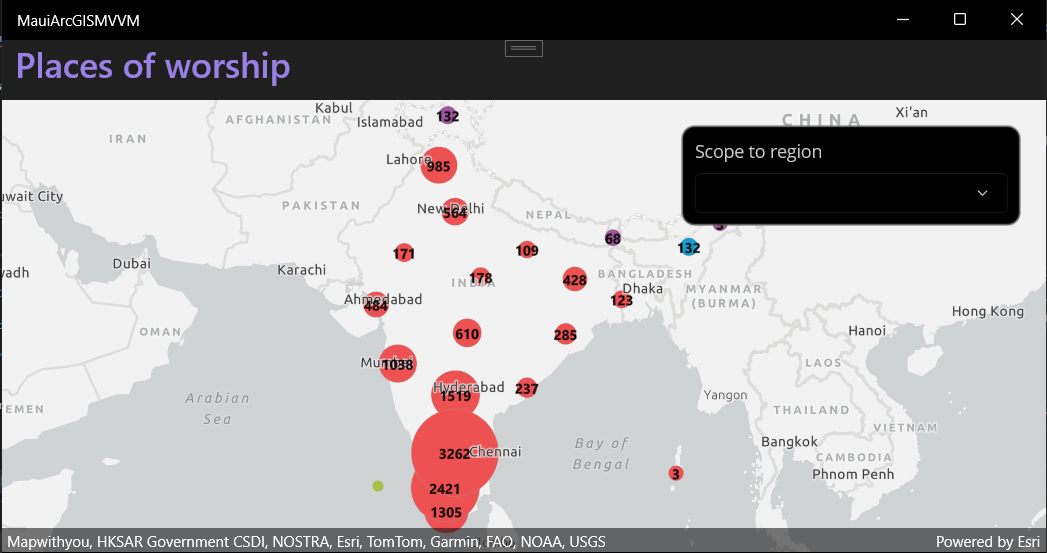
Add a picker to MainPage update the current viewpoint of the MapView.
<Picker x:Name="RegionPicker"
        Title="Scope to region"
        SelectedItem="{Binding SelectedRegion}">
    <Picker.Behaviors>
        <mauitoolkit:EventToCommandBehavior Command="{Binding SelectedRegionChangedCommand}"
                                            CommandParameter="{Binding Source={x:Reference RegionPicker}, Path=SelectedIndex}"
                                            EventName="SelectedIndexChanged" />
    </Picker.Behaviors>
    <Picker.Items>
        <x:String>North</x:String>
        <x:String>South</x:String>
        <x:String>East</x:String>
        <x:String>West</x:String>
        <x:String>Central</x:String>
    </Picker.Items>
</Picker>
Again, use the EventToCommandBehavior to invoke a command on the view model when the picker’s selection changes.
In MapViewModel, implement a command to respond to the index changed event.
[RelayCommand]
public async Task SelectedRegionChanged(int selectedIndex)
{
    // Get the full extent of the feature layer.
    Viewpoint viewpoint = new Viewpoint(_featureLayer!.FullExtent!);

    // Get the spatial reference of the feature layer.
    SpatialReference spatialReference = SpatialReference.Create(3857);

    double scale = 10.5e6;

    switch (selectedIndex)
    {
        case 0:
            viewpoint = new Viewpoint(new MapPoint(8597888, 3622342, spatialReference), scale);
            break;
        case 1:
            viewpoint = new Viewpoint(new MapPoint(8617655, 1603703, spatialReference), scale);
            break;
        case 2:
            viewpoint = new Viewpoint(new MapPoint(9947837, 2859542, spatialReference), scale);
            break;
        case 3:
            viewpoint = new Viewpoint(new MapPoint(7966035, 2803998, spatialReference), scale);
            break;
        default:
            break;
    }

    // Set the viewpoint based on the desired selection.
    await Controller.SetViewpointAsync(viewpoint);

    // Reset the selected region for the next navigation.
    SelectedRegion = null;
}
Use the GeoViewController to update the viewpoint with SetViewpointAsync(), this will update the view from the view model.

Now, lets respond to a changed selection in a collection view. We will update the viewpoint and show a callout using the GeoViewController.
In the GeoElementSelectionPage the GeoElementCollectionView.SelectionChangedCommand can be bound to the MapViewModel.
Add a new SelectedGeoElementChanged() method with the [RelayCommand] attribute. This will take the selected item as a parameter to be used to update the viewpoint.
[RelayCommand]
public async Task SelectedGeoElementChanged(PlaceOfWorshipViewModel selectedItem)
{
    if (selectedItem == null) return;

    // Clear any currently selected features.
    _featureLayer?.ClearSelection();

    // Get the map point for the selected view model.
    MapPoint mapPoint = (MapPoint)selectedItem.ArcGISFeature.Geometry!;

    // Close the modal page.
    await Shell.Current.GoToAsync("..");

    // Select the feature associated with the selected view model.
    _featureLayer?.SelectFeature(selectedItem.ArcGISFeature);

    // Navigate to the selected feature and show a callout.
    // Scale is set to a value smaller than the layers feature reduction max scale so that clusters do not render when the navigation completes.
    await Controller.SetViewpointAsync(new Viewpoint(mapPoint, 1e4), TimeSpan.FromSeconds(1));

    // Use an arcade expression to fallback to a default value if the properties used in the callout are null.
    var calloutDefn = new Esri.ArcGISRuntime.UI.CalloutDefinition(selectedItem.ArcGISFeature, "DefaultValue($feature.name, 'null')", "DefaultValue($feature.religion, 'null')");
    Controller.ShowCalloutForGeoElement(selectedItem.ArcGISFeature, default, calloutDefn);
}
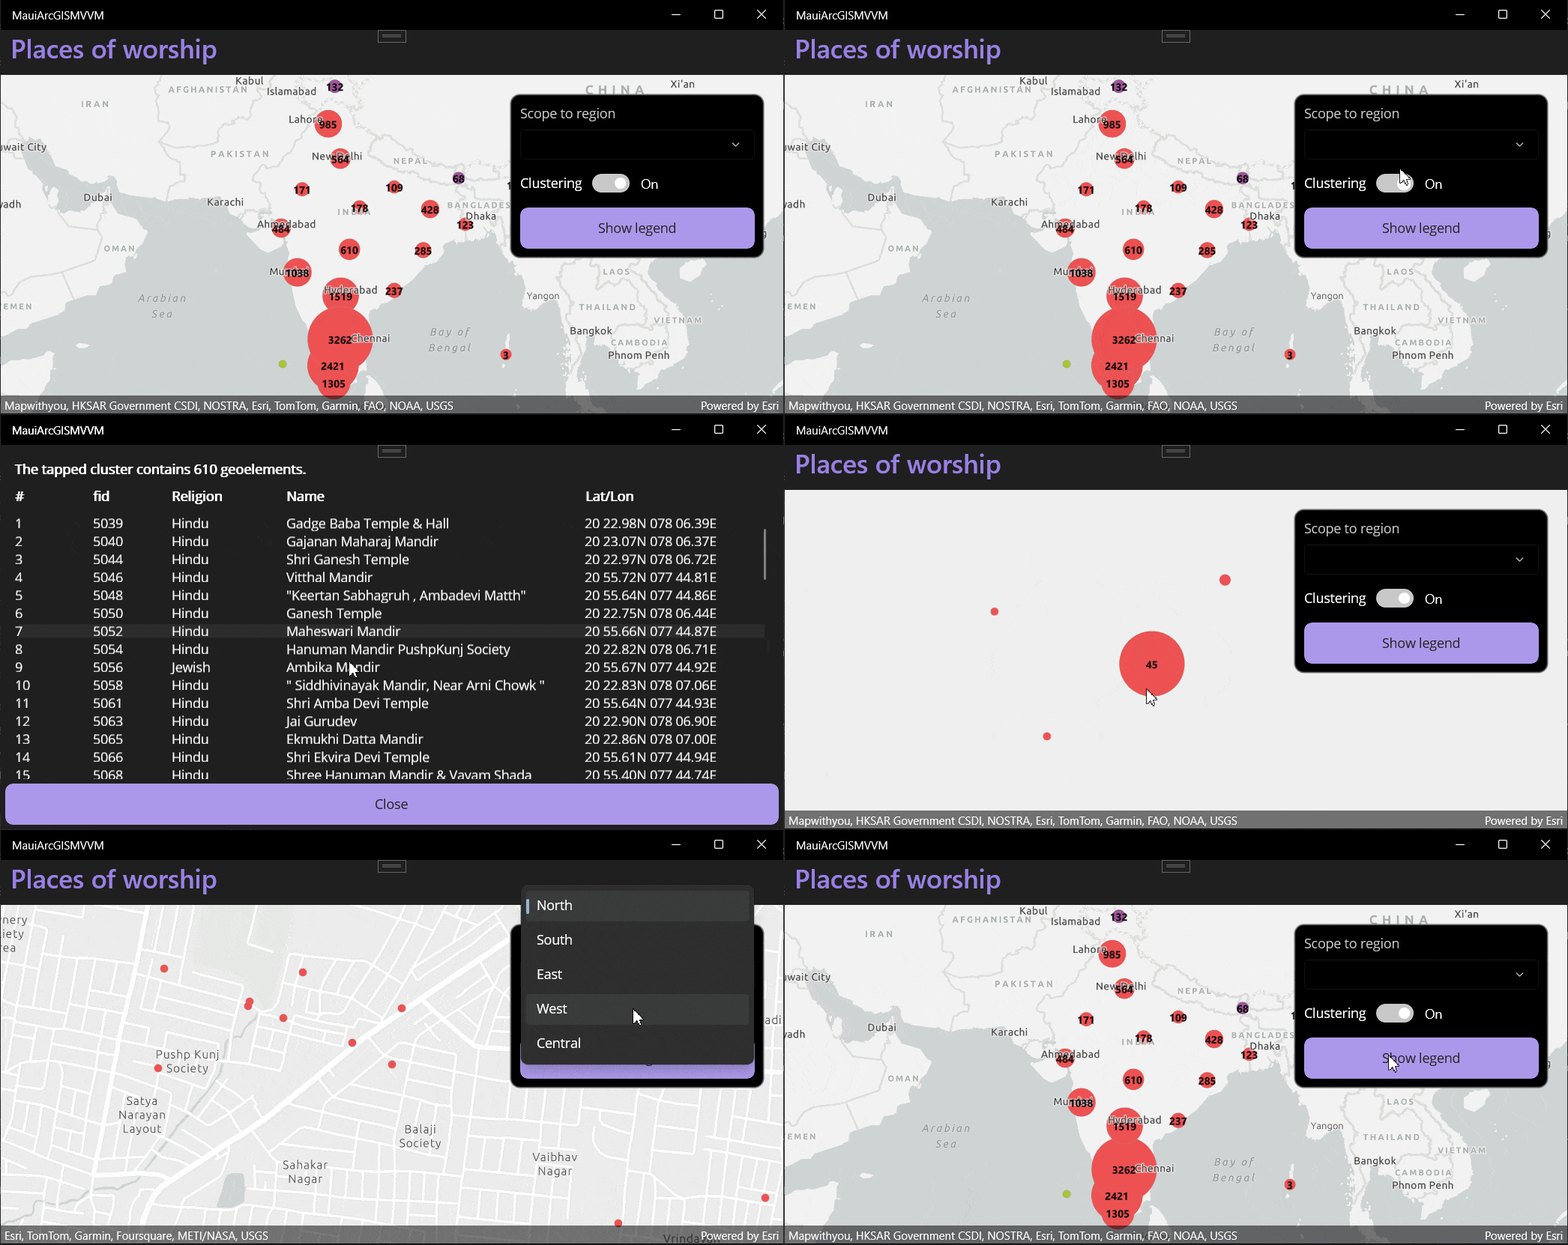
When a GeoElement is selected in the CollectionView the GeoElementSelectionPage closes and any selected items on the feature layer are cleared. The GeoElement is then selected on the feature layer and the viewpoint is updated to center on its geometry. A callout is displayed for the GeoElement to display its name using GeoViewController.ShowCalloutForGeoElement().
The point to highlight here is the use of the GeoViewController.SetViewpointAsync() as this is the key to performing viewpoint change operations on the view from the view model.
Finishing up
In the completed code in the example app I have included a toggle to enable and disable clustering and a legend to display the predominant religion in each cluster. These have been added following the processes outlined earlier in this blog post.

Summary
Model-View-View-Model (MVVM) is widely used pattern in .NET applications. In this blog post I’ve demonstrated how to get started with a simple MVVM application using a mixture of helpful external packages.
As an example, I’ve shown how to bind a Map object in view model to a MapView in a view. I gave an overview of the usage of the GeoViewController and walked through implementing identification functionality in the view-model to respond to tap events in the view. I discussed how to configure the view model to update the MapView viewpoint and display callouts using the ArcGIS Maps SDK for .NET Toolkit GeoViewController.
Let us know how you’re getting on with your MVVM apps in the Esri Community forums, and if you haven’t already, check out our developer documentation for more tips and guides on how to use the ArcGIS Maps SDK for .NET.
Useful resources
The ArcGIS Maps SDK for .NET samples applications showcase capabilities and functionality offered by ArcGIS Maps SDKs for Native Apps via simple workflows. These focused samples enable you to easily understand the concepts and allow you to copy code snippets directly into your application. To maintain that simplicity, the applications implement sample logic in the code-behind for each sample. This also makes it easier to copy the sample code into another application without additional steps. This blog post can be used in conjunction with the .NET samples applications to implement the broad range of functionality offered by the ArcGIS Maps SDK for .NET.
- MauiArcGISMVVM: the project described in this article
- Display clusters Native Maps SDKs sample: Kotlin | .NET | Qt | Swift
- ArcGIS Maps SDK for .NET sample code
- ArcGIS Maps SDK for .NET Toolkit
- ArcGIS Maps SDK for .NET API Reference
- Sign up for an ArcGIS Location Platform or ArcGIS Account


Commenting is not enabled for this article.