Extracting accurate and usable features through deep learning might be a challenging task. A good knowledge of the deep learning hyperparameters will be essential to guarantee accurate and usable results. Moreover, if you are familiar with deep learning feature extraction workflows, you are aware that you must conduct a deliberate quality assurance and quality control (QA/QC) process to assure the best and most accurate results.
In this blog post, you will discover how adjusting the hyperparameters will help enhance your feature extraction workflow to take it from unconvincing results, similar to the left photo below, to more production-like results, similar to the right photo below.

You will start by working with one of the latest released ArcGIS Living Atlas of the World deep learning models, Text SAM, and the three-band 5-centimeter RGB tile layer located in Alexandra, South Africa, and provided by South Africa Flying Labs. Next, you must understand how the three parameters below are essential for any object detection workflow:
- Extracted feature size
- Imagery cell size
- Tile sizes
Extracted feature size
When undergoing any imagery deep learning workflow, the features you might be looking to extract are guaranteed to vary. For instance, in an urban context, you will see buildings of small, medium, and large footprints. Another common feature to extract from imagery is trees, and tree canopies also differ in size. See the image below highlighting the different building and tree sizes for your reference.

Imagery cell size
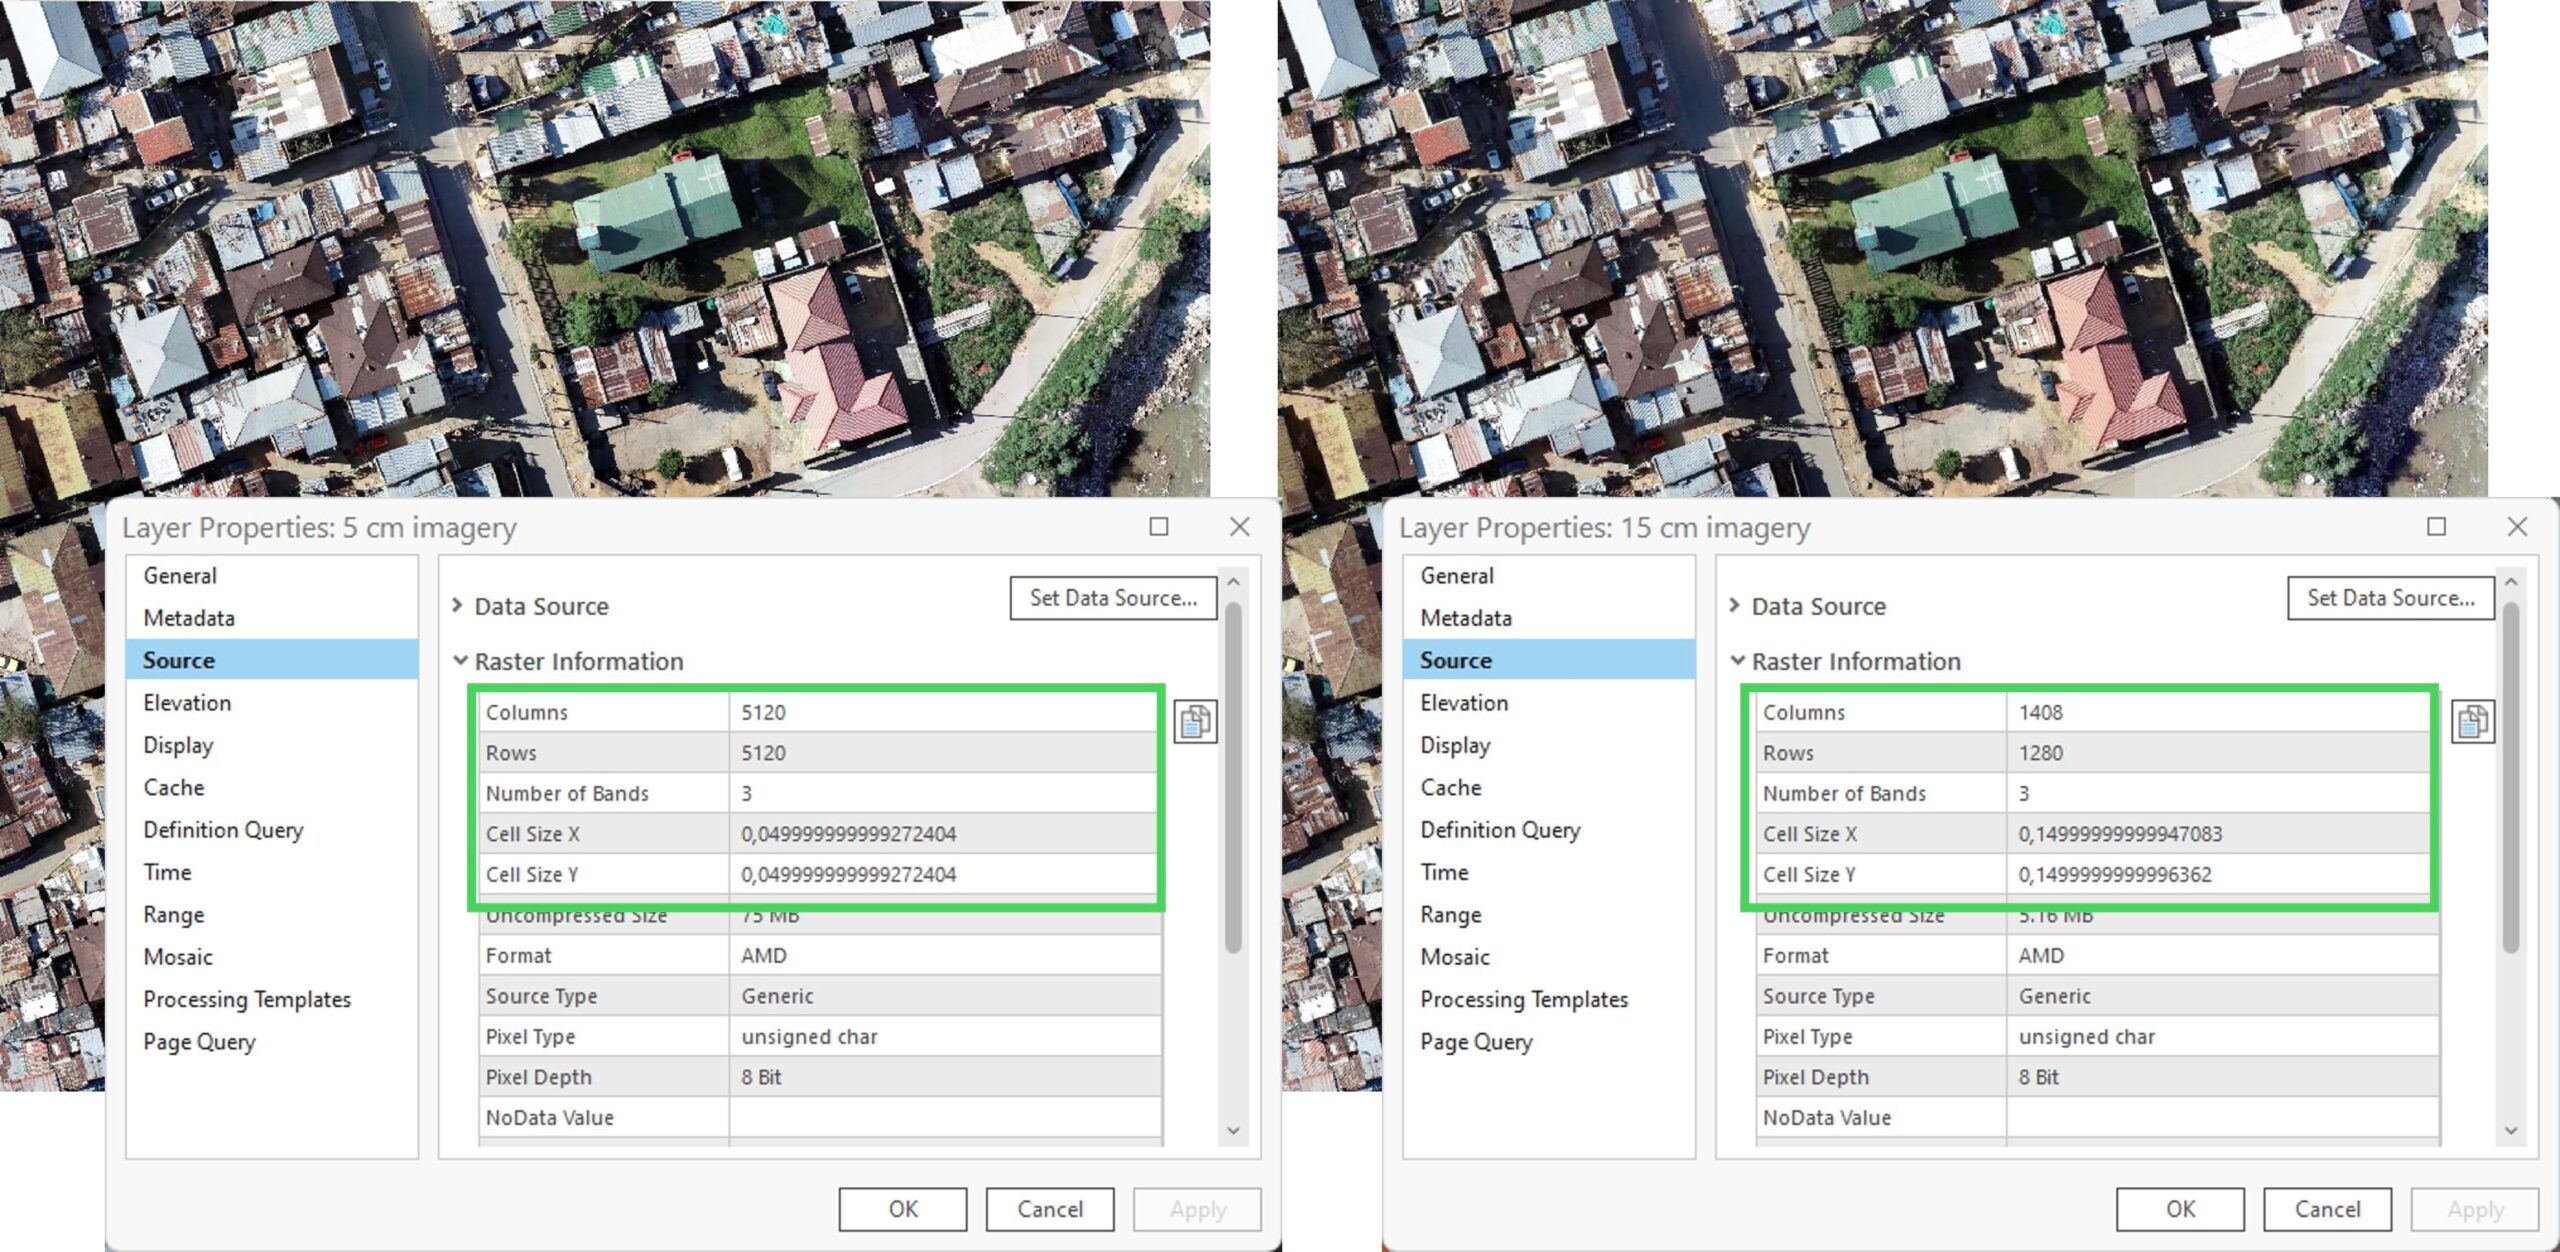
When working with deep learning in ArcGIS, you will be either acquiring or creating a deep learning model package (.dlpk). These .dlpk files are usually trained on multiple input imagery resolution. For instance, the Input section of the Building Footprint Extraction – USA and Text SAM .dlpk file documents using imagery at 10-40 centimeter resolution. This means that the model will provide optimal performance between the 10 and 40 centimeter ranges in buildings. To put this into context, the Columns and Rows counts in the images below show a difference of approximately 4,000 columns and rows variations from the 5 centimeter to the 15 centimeter imagery. At this size, you can barely tell the difference through visual inspection, yet in the final section about tile sizes, you will see how the deep learning model will be looking at two different things when taking the resolution into perspective.

Tile sizes
The last concept to cover is tile size. A .dlpk file in ArcGIS runs with a preconfigured tile size (pixels) hyperparameter that you can edit according to your workflow. That means that based on the user specified tile size, the deep learning tool in use will split the input image into a grid. Each grid contains the number of pixels specified in the tile size. You will work with the 256 and 512 tiles sizes most of the time. If you add the above introduced concept of resolution, you can directly anticipate that a 512 pixels tile size on 5 centimeter imagery will cover a smaller portion of your AOI compared to the same tile size on 15 centimeter imagery. See the figures below for a view of this concept.

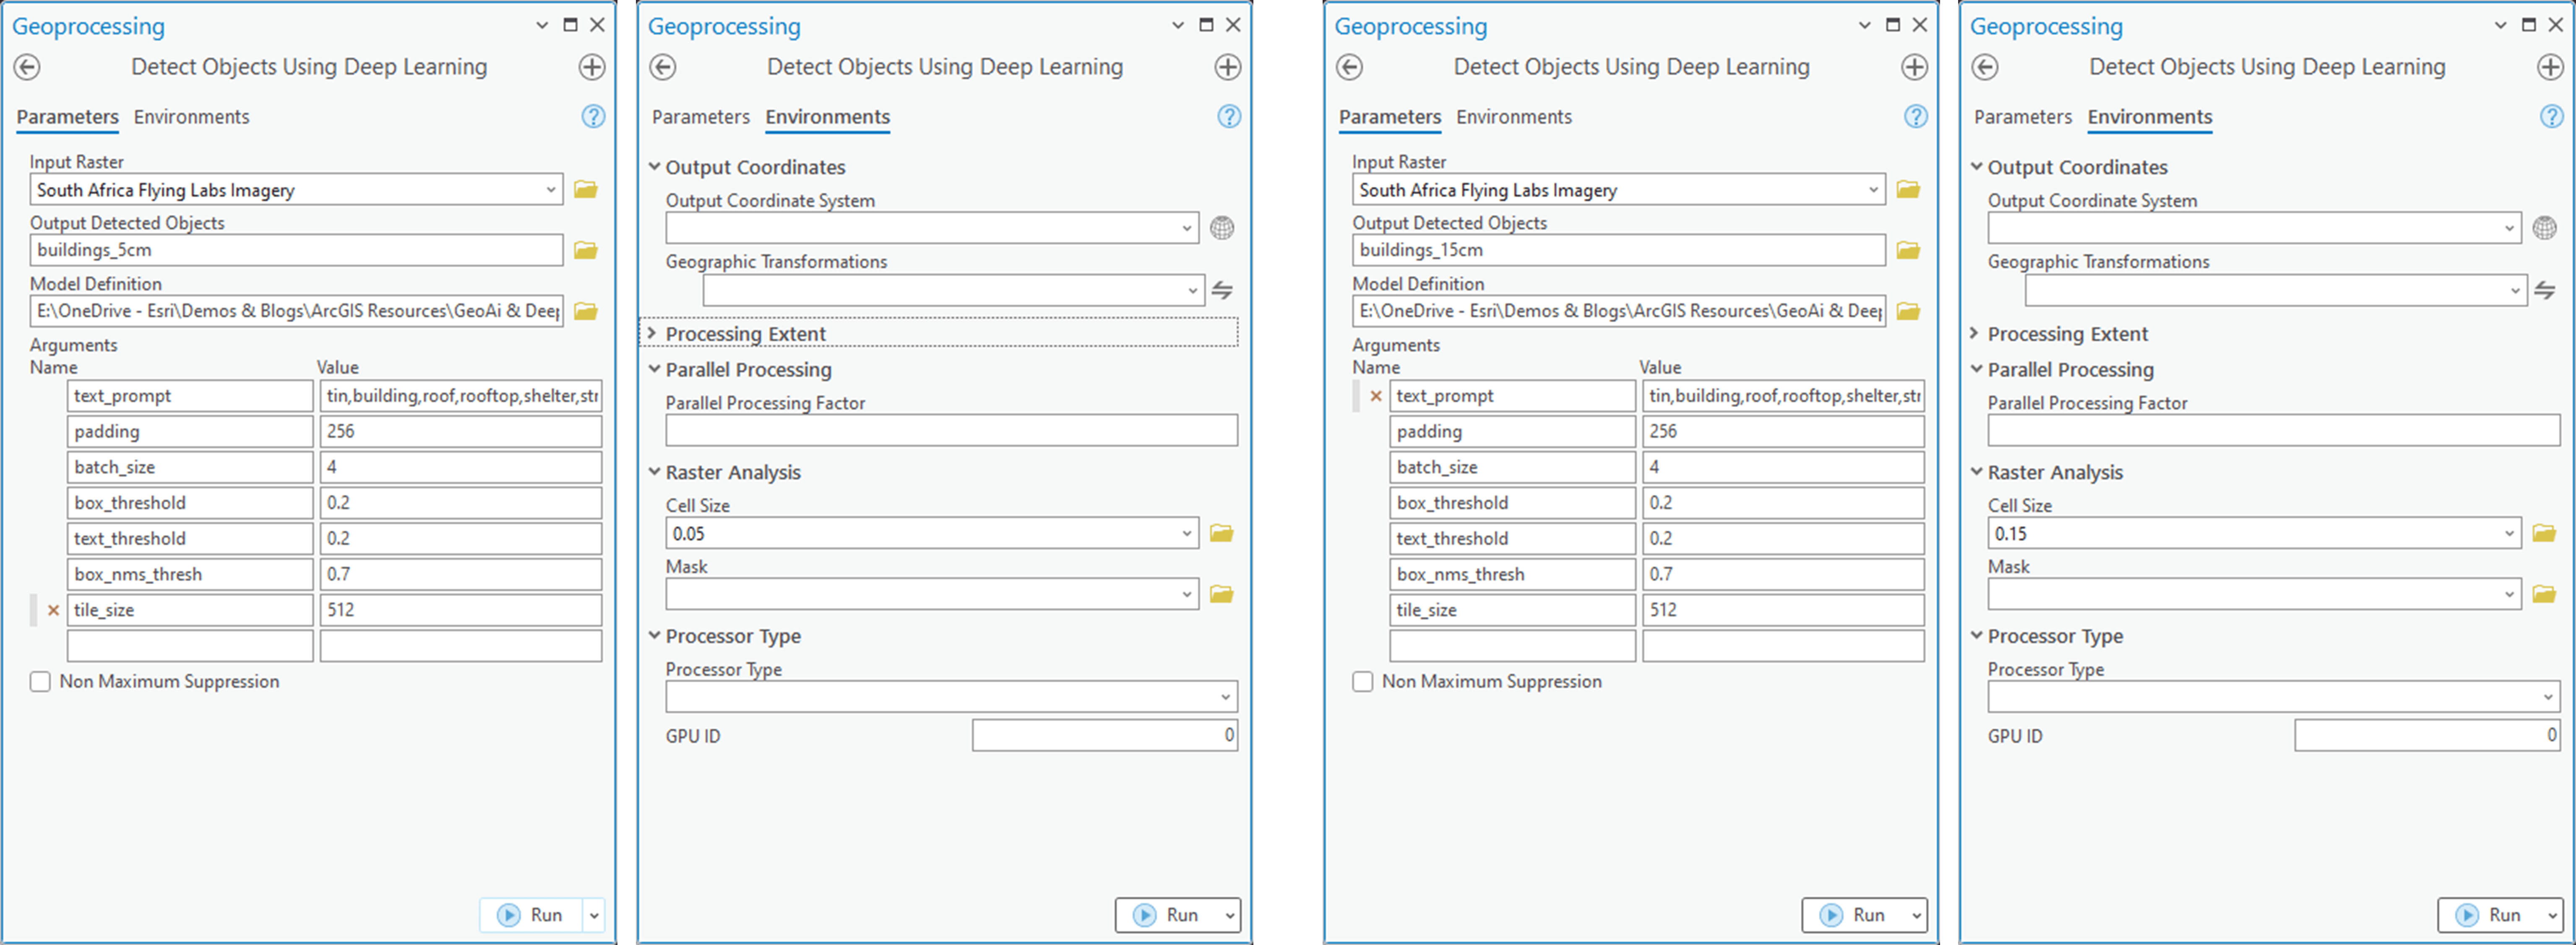
Putting the above concepts together, run the Detect Objects Using Deep Learning geoprocessing tool in ArcGIS Pro with the Imagery and Text SAM Model referenced earlier in the blog post. If you have not tried the deep learning geoprocessing tools in ArcGIS Pro, you can start with Identify infrastructure at risk of landslides to get a step-by-step guide to extracting features with ArcGIS. Fill the Detect Objects Using Deep Learning parameters similar to the screen captures below. You can use similar text prompt as a hyperparameter:
“tin,grey,roof,rooftop,shelter,house,building,structure “
On the Environments tab, define a small AOI under Processing extent to test the concept. Then run the tool twice: with cell sizes 0.05 and 0.15.
Note: The results produced here demonstrate the concept of varying extracted features based on different cell sizes


After exploring the concepts of feature size, resolution, and tile size, you will work with a custom geoprocessing tool that takes the challenges described above into consideration while extracting features using deep learning. To start, download the multiresolution object detection custom geoprocessing toolbox.

Since this is a custom toolbox, the Python editing functionality is disabled. If you plan to dive deeper into the tool and customize the code on your own, you can access the tool through the ArcGIS Code GitHub Repo to dive deeper into the different concepts that are implemented in it.

Connect the downloaded toolbox to ArcGIS Pro. For further details on connecting a geoprocessing toolbox to your ArcGIS Pro project, see Add an existing toolbox to a project documentation page.

These outputs are there to provide you with an idea of the different inferencing and QA/QC processes that are performed. The tool is designed to extract features using deep learning packages supported in the ArcGIS ecosystem. The tool has been tested with ArcGIS Living Atlas deep learning packages. This blog post shows a workflow using Text SAM, and further blog posts will explore some of these QA/QC concepts.

Run the tool
The tool parameters are designed to dynamically update depending on the chosen deep learning package. The tool will also help you through your QA/QC process as it will allow you to only include features within a set area and treat the outputs based on a set algorithm for regularizing right angles, regularizing circles, and generalizing the output feature.
The tool includes backend functionality to further treat overlapping data by merging the outputs from different cell sizes, dissolve the merged output, and perform a variety of different spatial analysis tools to extract cleaned features. It then calculates the mean and standard deviation of the area of the features for each join ID and deletes features that deviate significantly from the mean. The tool also includes functionality to filter extracted features by user-defined minimum and maximum areas.
At this stage, you are ready to run the tool locally. Open the Multi Resolution Deep Learning tool and fill in the following parameters:
- For Input Raster, add the input raster used to apply the deep learning.
The specifications of the image must match the requirements of the used deep learning model. - For Cell Sizes, type the comma-separated list of spatial resolutions to use. In this use case, type 0.1,0.15,0.2,0.25,0.3.
Units must match the SRS used. - Leave Use Average Cell Size
This is a Boolean parameter. If TRUE, it uses the average cell size calculated from list of cell sizes above. - For Specified Cell Size, define the custom output cell size as a decimal value. In this use case, set the specified cell size to 2.
It should be one of the above specified cell sizes. The chosen custom value will be used as the base feature that the tool will append missing inferenced features from other cell sizes to. - For Deep Learning Workflow, choose whether to use Text SAM or a General Feature Extraction Model. Note that this is a hardcoded functionality to enable the right hyperparameters in the backend. For this example, use Text SAM Feature Extraction.
- For Model Definition, link to the previously downloaded Text SAM model.
This is the file path to the deep learning model definition. This is a required parameter. - For Output Geodatabase, set the geodatabase where the output feature class will be stored.
- For Output Feature Class Name, set the name of the output feature class. When tool is finished running, check the geodatabase for the intermediate features that follow the same naming convention.
- For Text Prompt, enter search terms that the SAM model will use as comma-separated list. For this workflow, use “tin,grey,roof,rooftop,shelter,house,building,structure”.
This will be used when specifying the workflow as Text SAM Feature Extraction - For Batch Size, provide the batch size as integer.
The value will depend on capabilities of the hardware used. Common batch sizes are 1,2,4,8,16. - For Threshold, enter a float value between 0 (any result qualifies) and 1.0 (only 100 percent matches qualify) to parse the minimum statistical confidence value for a result being regarded as valid. Common values start at about 0.65 (65 percent), very good models provide results higher than 0.9 (90 percent).
Note: This is not a supported parameter for the Text Sam Feature Extraction workflows. - For Processor Type, provide a processor type to use as string. If available, use GPU. Otherwise, use CPU.
Caution: Running this workflow on CPU is not recommended. - For GPU ID, if GPU is the processor type, specify the GPU ID of the GPU to use on your system. Refer to
- For Processing Extent, use any of the existing methods (Current Extent, Feature Class, and so on) to specify the processing extent to use.
- For Processing Mask, specify the processing mask feature class or dataset as a full qualified string.
- For Minimum Area, set the integer or float value for the minimum area (in SRS units) to qualify as result during postprocessing. For this example, use 15 square meters as the smallest acceptable area of a structure in this workflow.
- For Maximum Area, set the integer or float value for the maximum area (in SRS units) to qualify as result during postprocessing. For this example, use 4,500 square meters as the smallest acceptable area of a structure in this workflow.
- For Regularize or Generalize the output feature, specify a postprocessing workflow to use as a string: Regularize Right Angle, Generalize, or Regularize Circle. For this example, use Regularize Right Angle.

In conclusion, this code provides a comprehensive toolbox for performing multiresolution deep learning for feature extraction in ArcGIS Pro. By adjusting the hyperparameters and conducting a rigorous QA/QC process, you can enhance your feature extraction workflow and achieve more accurate and production-like results while avoiding a reinforcement learning workflow. This workflow is not guaranteed to work on all user-specified features or geographies. There will be use cases that need further reinforcement learning investment.


Article Discussion: