Capturing Imagery of a Complex Structure
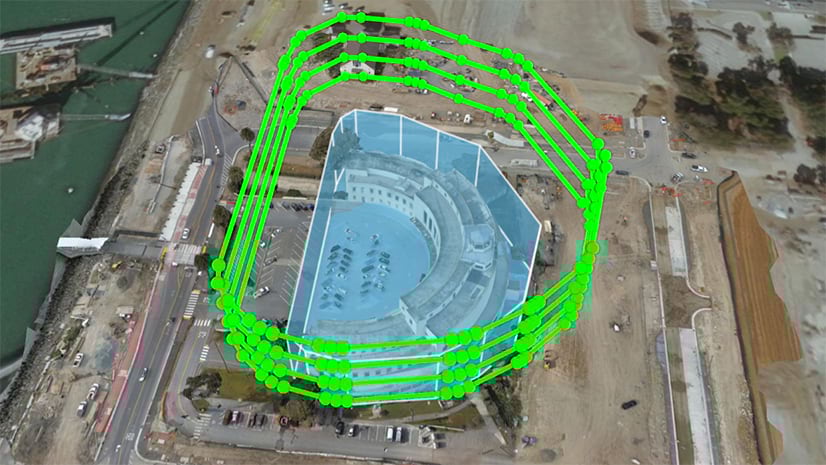
Capturing consistent and comprehensive imagery of complex structures with drones can be tricky. Empower Field at Mile High, a stadium, has many unique angles and curves. It is an enclosed area that starts at a high point but then gradually descends to ground level to account for different levels of spectator seats. A traditional drone flight can capture nadir or oblique imagery of the stadium from a fixed height in the air. It could also capture oblique imagery on the outside perimeter of the stadium at various levels. This method, however, does not account for the changes in height inside the stadium as the seats descend to the field. So, what is the solution for capturing complex changing measurements in a structure like this?

Leveraging 3D Data from ArcGIS
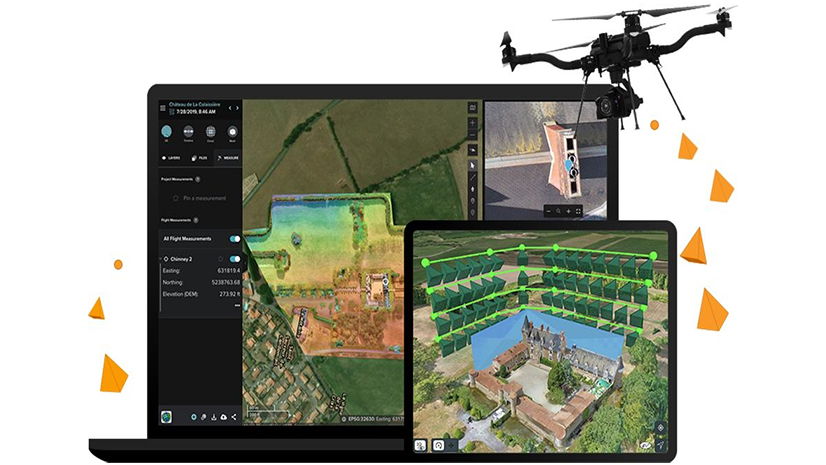
If you are exceptionally talented, you could capture imagery with a manual flight, adjusting altitude as you move through the stadium. But, the industry standard is using automated flights to capture consistent imagery. An automated flight can come with its own potential mishaps. The pilot must ensure the flight will not collide with the complex structure while gathering the required coverage. It can help to have a 3D model to guide in the creation of a flight plan. ArcGIS Flight can import 3D data like a lidar derived point cloud create automated flight plans that capture complex structures consistently, efficiently, and safely.
Using Lidar as Reference
ArcGIS Flight allows pilots to use existing spatial data from their ArcGIS Online or ArcGIS Enterprise in flight planning. So, a pilot could use 3D data to help construct a flight that will not collide with the existing structure. In our example, we worked with the City of Denver to plan a flight and create a detailed and extensive model of Empower Field at Mile High with Site Scan for ArcGIS. During flight planning, we used existing lidar data from the Denver Regional Council of Governments (DRCOG) hosted as a scene layer service in ArcGIS Online to provide flight planning guidelines. With the lidar for reference, we made a complex vertical flight plan resembling an upside-down cone to gather consistent imagery inside the stadium. Similarly, we used the lidar dataset to create the flight plan for the unique curved sides of the stadium. The results were a beautifully detailed 3D model of the stadium.


Workflow Steps
Designing a flight plan like this can take a few simple steps. We will provide high-level steps here, but we described more detailed steps in this blog using a 3D mesh instead of lidar.
- Add spatial data to your ArcGIS Online or ArcGIS Enterprise. In this case, it was a scene layer derived from lidar and saved inside a web scene.
- Open a mission in ArcGIS Flight, select the ArcGIS Layers button, log into your ArcGIS account if needed, navigate to the web scene, and switch it on.
- Switch on Terrain Follow.
- Draw your flight plan accounting for the 3D data around it.
- Begin your automated flight.
One of the best features of using ArcGIS Flight for a mission like this is that we do not need to remake the flight plan in the app if the stadium needs to be reflown in the future or by a different pilot. Anyone in the organization can access the saved flight plan and use it again.
Our Flight
This flight was completed in several segments, capturing different sides of the stadium, its interior, and a nadir flight. We flew an Astro from Esri’s business partner, Free Fly, to capture the imagery. We captured the images as seven flight sections: north, south, east, and west façade, internal, area survey, and cross hatch. Site Scan Manager can process all 766 images from each component to create a single orthomosaic and 3D model. The result is an intricate 3D mesh of the seating that we could not complete with a traditional flight.


We encourage you to test bringing your own spatial data into your next flight. It doesn’t have to be 3D data. ArcGIS Flight can build flight plans from polygons and polylines or use existing imagery as a reference. ArcGIS Flight makes it easy to create unique flight plans, making the most out of the spatial data you already have.


Commenting is not enabled for this article.