ArcGIS for SharePoint allows you to geotag and geosearch documents and data, add infographics cards, conduct spatial analysis, and much more. But sometimes, all you need is a simple map on your SharePoint page.
Dan Peterson, Esri project manager and former United States Marine Corps officer, outlines how he used SharePoint in the military and how ArcGIS for SharePoint can elevate his workflows in his blog, Build a digital COC with ArcGIS for SharePoint. In the United States Marine Corps, Microsoft SharePoint lists play a significant role in tracking deployments, enemy locations, others’ suspected actions, plans, and much more. Using SharePoint, he used custom list views to filter and sort information entered in a master log. Then, he explains how ArcGIS for SharePoint could have made an impact on the way the Marine Corps tracks field operations by adding a map to their SharePoint sites.
Work with your list
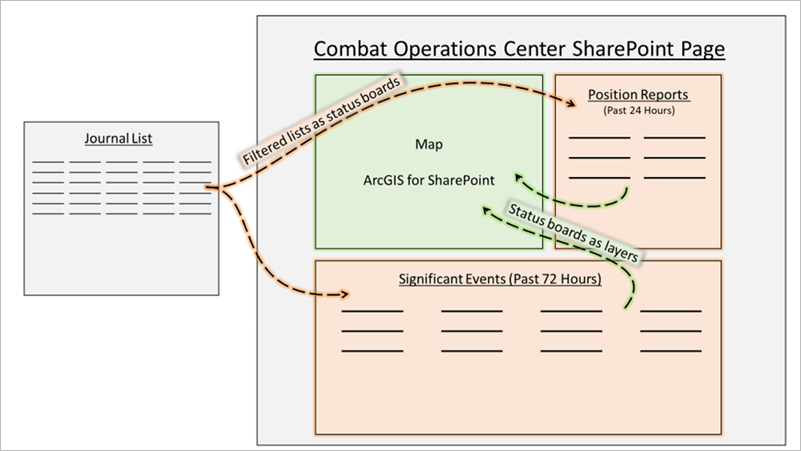
In a well-functioning Combat Operations Center (COC), as Dan Peterson outlines in his article, the COC journal tracks all events and information (often in the form of abbreviated reports) that are passed through the COC or are regularly communicated over radio or in digital chat. In SharePoint, this journal takes the form of a primary list, edited and monitored by authorized personnel (those given the correct permissions by the site owners). See the Microsoft documentation for more information about setting custom permissions.
When you are entering extensive information into a SharePoint list, you may get overwhelmed. Keep in mind that a purposefully designed SharePoint list (journal) can transform into multiple views of that list, mimicking Dan’s analog status poster boards. Or, to put it another way, it’s a nimble way to manipulate information.
With custom list views, you can group, filter, sort, organize, and distill data to use on a SharePoint page. ArcGIS for SharePoint then helps you to overlay and display your list views as spatial layers, bringing simplicity and cohesion to the mission. In the military, being able to visualize where defense forces are located and significant events are happening is critical to informed decision-making. To learn more about creating views for a SharePoint list, see the Microsoft documentation.

Build the SharePoint page
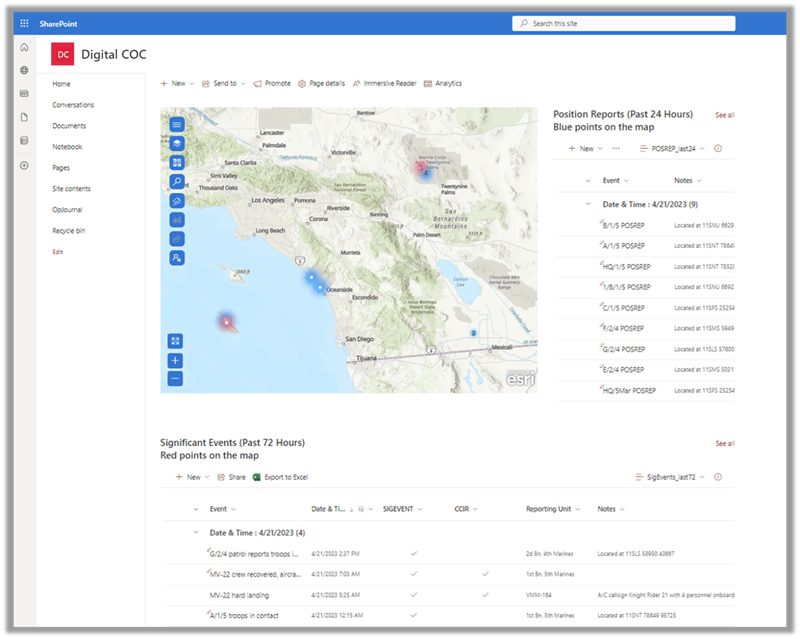
Once the filtered views are created, you can start building your command center. First, make sure your data has spatial information. Then, add the ArcGIS for SharePoint web part and the filtered list web parts to the page. It may look messy in the beginning, but once you ensure your lists reflect the filtered views, it will begin to come together.
Map the lists
The key step is adding the filtered list views on the active SharePoint page to the map. Start by putting the entire SharePoint page into edit mode, adding the list views you want to become your layers, and saving the page. Only layers added while the page is in edit mode are saved with the map.
Step 1—Click Layers from the map tools.
Step 2—Click Add from SharePoint at the bottom of the pane to display available lists or list views available in the current SharePoint site.
The Add from SharePoint pane appears, displaying available lists in the current SharePoint site.
Step 3—From the list of available data, click the button next to a list to expand its contents.
Depending on how the list view is configured, the contents may list one or more views of the list, or only All items.
Step 4—Find the list or list view you want to add and click the Add button  .
.
A layer containing the data is added to the map and the map view zooms to display the full extent of the layer. The layer is listed in the Layers list.
Step 5—Click the Back button  when you finish adding layers from SharePoint to return to the Layers list.
Step 6—Repeat for each list view you want to add to the map.
Set up dynamic data connections
Now that your master list has been filtered down and accurately depicted on the map, take the list-to-map connection one step further by setting up dynamic data connections. When you add ArcGIS for SharePoint and another SharePoint web part (like a list) to a SharePoint page, you can connect the two web parts and interact with the map layers using the added list.
Once connected, use the SharePoint list to interact with the map. For example, select rows from a filtered view of your SharePoint list and see those selected features highlighted on the map.
Step 1—Open your SharePoint page with your map and filtered list views.
Step 2—Ensure that you are signed in to an ArcGIS account and that the page is in edit mode.
Step 3—On the ArcGIS for SharePoint web part, click Edit web part  .
.
The ArcGIS pane appears on the right side.
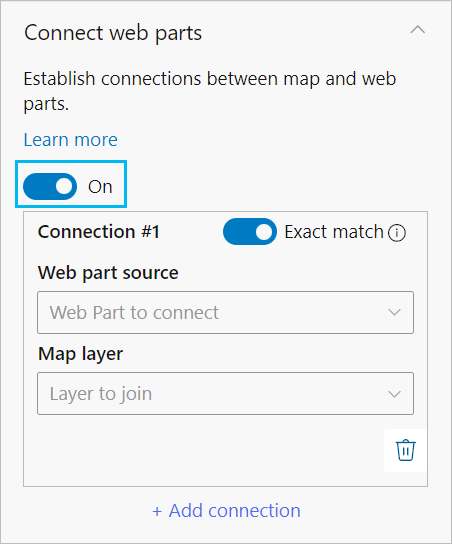
Step 4—Expand the Connect web parts section.
The toggle button is turned off by default. Turn it on to activate the Add connection link. You can add up to five connections.

Step 5—Click Add connection.
The Exact match toggle button is turned on by default.
If you turn it off, a fuzzy (broader) match of the object query may result when connecting the list and map.
Step 6—For Web part source, click the Web Part to connect drop-down arrow and choose the web part that has the list view you want to connect.
Step 7—Click the Choose list column drop-down arrow and choose a column name to match with the mapped layer.
Step 8—For Map layer, click the Layer to join drop-down arrow and choose a map layer.
Step 9—Click Choose layer column and choose a column in the map layer to match the list and connect the two web parts.
The connections are automatically made.
Step 10—Click the Validate button to verify that matching records exist.
Step 11—Optionally, perform validation for each connection.
The top 100 unique records from the columns you specified are matched. A percentage bar appears indicating a percentage match. If there is no match, a warning message appears. You can cancel the validation process at any time.
Step 12—Repeat steps 8 through 11 to set up multiple connections.
Step 13—Optionally, click Delete to remove a connection.
Your dynamic dashboard
Your SharePoint site now has your SharePoint list views, filtered the way you want, on display next to your map containing your key information. With dynamic data connections, when you select and filter your lists, you also filter the related features on your map.
Starting with a basic SharePoint site, you have taken a single list, filtered the information, transformed it into a map, and created a dynamic dashboard to help you draw conclusions and make decisions with spatial information. As Dan mentioned in his article, having an ArcGIS for SharePoint map on his SharePoint site would have elevated his military digital COCs. What might mapping your SharePoint list do for you?

Learn more
To explore more about what you can do in ArcGIS for SharePoint, check out the ArcGIS for Microsoft 365 resources page, the ArcGIS for SharePoint documentation, or the ArcGIS for SharePoint Esri Community site.
Blog banner and card image by Kelsey Knight on Unsplash


Article Discussion: