You have data with a range of values, and you want to represent it on a map using symbols that range in size. Sounds simple enough. But it turns out there is more than one way to size your symbols in ArcGIS Pro, including Graduated symbols, Proportional symbols, Vary symbology by attribute and Symbol property connections. How do these work differently and how do you know which one you want to use?
Want the short version? Scroll to the end of this article.
GRADUATED SYMBOLS
Use this to break your data up into a series of classes or bins. For example:
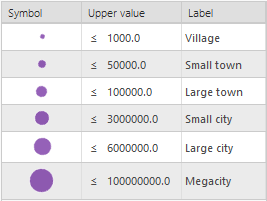
This map only has 6 sizes, not a continuous range of sizes. You get to decide how many people a settlement needs before it qualifies as a small town vs a large town. And if you don’t know where to make the break there’s a number of different methods available for classifying your data, including Natural Breaks, Quantile, and Standard Deviation.
PROPORTIONAL SYMBOLS
Use this if you want to show a continuous range of sizes instead of discrete classes. But there’s more to it than just that. In fact there are three different ways to use this symbology method:
Size range
Use this if you want the simplest representation of your data as size. Pick a min size – your smallest village will draw at this size. Pick a max size – your largest megacity will draw at this size. All other towns will scale between these min and max sizes.
Hint: Use the histogram to understand how your data is distributed. In the example below, almost all of the values are going to draw with small symbols, thanks to an outlier of 3 million. Also note how those pesky -99999s, meant to represent null values, are skewing the results:
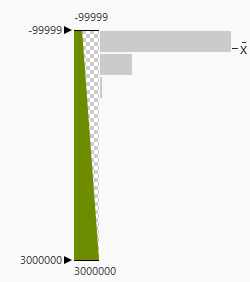
You can drag the “stops” on the histogram or edit their values if you want to show a more noticeable range of sizes on your map:
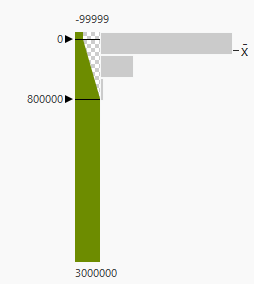
Now features with a value of 0 or less will draw with the minimum size, and features with a value of 800,000 or greater will draw with the maximum size.
True proportional size
Use this if you want to draw symbols which are truly proportional to one another. For example: City A has a population that is twice as large as City B, so you want Symbol A to draw twice as large as Symbol B. To accomplish this, choose None as the max size. Now your smallest value will draw with your min size. All other symbols will grow proprotionally from there.
Notes:
• Only values greater than zero will draw.
• Often when you choose this option, your symbols will blow up to enormous sizes, sometimes flooding the entire screen. True proportional symbols are not appropriate for all value ranges.
• When I say that one symbol is twice as large as another, I mean its area is twice as large, not its point size, or diameter, or circumference. Specifically, the square root of the data value will be used as the radius to calculate the area of a circle symbol.
Direct size
Use this if you want to represent the real sizes of your features. This option does not make sense for our cities example. But it does make sense if you have a dataset of trees, with an attribute representing their crown width in meters:

But wait – your values represent the diameters of the trees, not their radii. So set an Arcade expression instead of a field: $feature.SIZE/2. Now your symbols will draw on the map at the same size as the trees grow on the ground.
Notes:
• This option is only available if your map uses a projected coordinate system.
• Your symbol choices are limited to circles and squares. That’s because calculating the area or radius of a bicycle-shaped symbol can’t be done with any real accuracy.
• Only values greater than zero will draw. Only magic can draw a symbol that is -3 meters large.
VARY SYMBOLOGY BY ATTRIBUTE
Use this if you are already symbolizing your features with color or shape and want to vary them by size as well. Maybe your cities are drawing with a range of colors to represent average income, and you also want to vary their size to represent population.
You have three options here:
Size range
This works the same way as Size range in Proportional Symbols, described above. To access this option, check the Enable size range checkbox and a histogram will appear.
Random
Maybe you don’t know how big each tree is in your dataset, you just need to show that the city has trees, and sizing them randomly will create a more realistic effect. Choose Random from the field picker and pick a min and max size.
Direct size
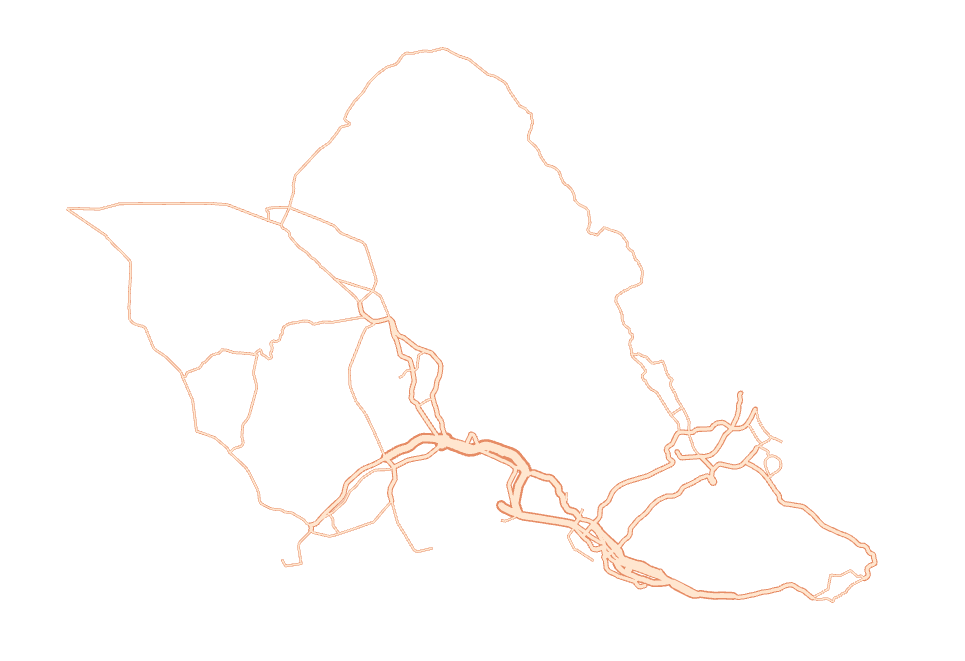
This works almost the same way as Direct Size in Proportional Symbols, described above. But it’s less strict. You don’t need to use a projected coordinate system, and you can apply it to any symbol you want. Using this option, symbol sizes are derived directly from the attribute values, and drawn using the current symbol unit. Usually that’s points. So a town with 500 people will draw as 500 points. Clearly this is not the option you want to use for population data. But it can work well with roads, to make a 4 lane highway draw as 4 points wide:
SYMBOL PROPERTY CONNECTIONS
Use this to control the size of specific properties or layers within symbols. Sometimes you may want only one part of your symbol to change in size, while the rest remains the same. For example you have county polygons drawn with a hatch fill. You would like those hatches to be thicker or thinner based on how much herbicide was used in each county.
On the Format Polygon Symbol pane, check Allow symbol property connections and then click on the data icon next to the property you want to scale:
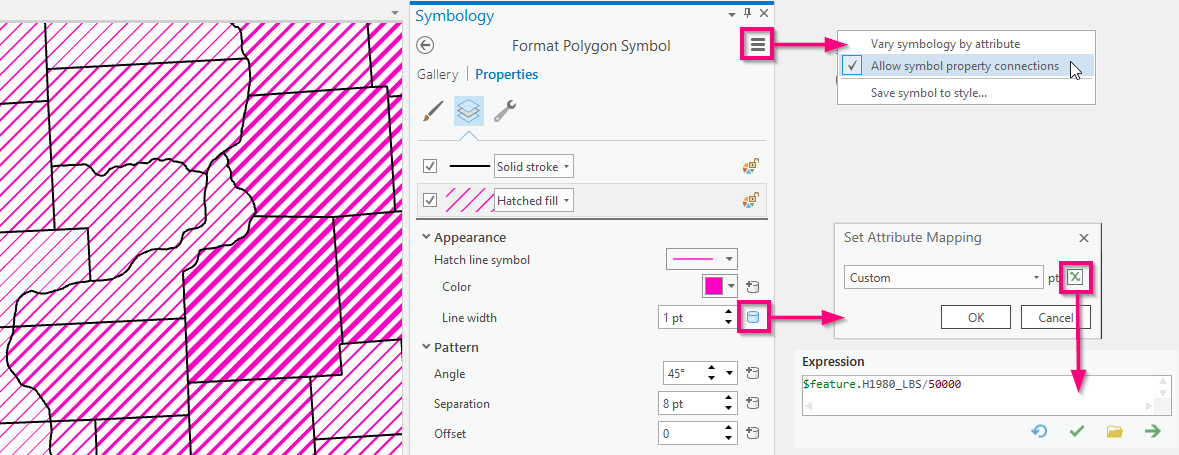
Notes:
• This property works in the same way as Direct Size in Vary Symbology by Attribute: if the value is 5, the symbol will draw 5 pt large. If your values range from 1,000 – 5,000, that’s going to be a problem. But don’t worry. You can use an Arcade expression instead of a field. Maybe $feature.yourfield/1000.
• The control still says “1 pt” but when the data icon turns blue, it means that an attribute has been connected, and this will override the size property.
EXTRA OPTIONS IN 3D
If you are working in a scene, having three dimensions offers extra possibilities. If you want to, you can scale each of those dimensions separately. Use this if you want to vary symbols by perspective height or volume. Note that height and volume aren’t the same thing as size visual variable, but they are used with similar intentions.
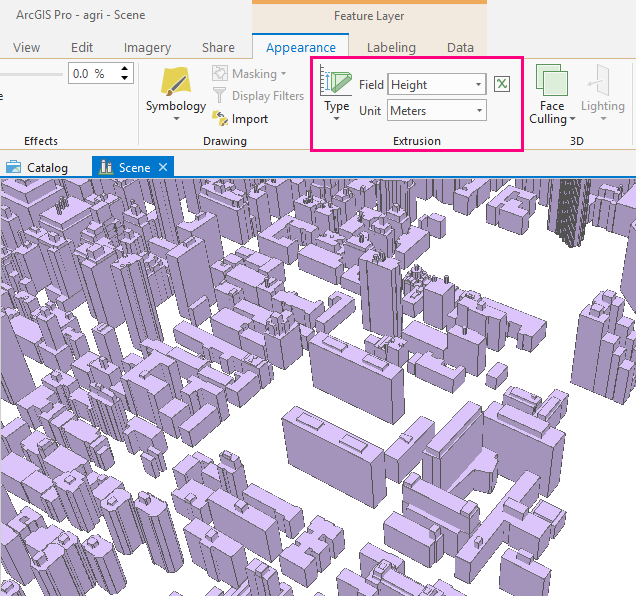
Extrusion
Use this if you want to extrude your feature’s geometries based on a field or expression. This is fun when you have building footprints with an attribute for height:
Vary symbology by attribute
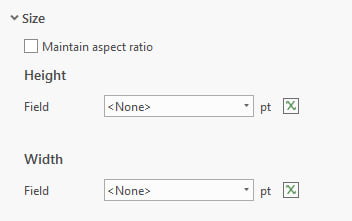
Use this if you want to symbolize by volume, or if you want to scale the height of a 3D symbol differently than the width. In 3D, you are offered an extra checkbox for Maintain aspect ratio. Leave it checked to show true volumetric differences with 3D symbols. Uncheck it and you will see all of the options duplicated – once for Height (Z axis) and once for Width (X and Y axes.)
Hint: In scenes, you can choose to display your data in real-world units (such as meters) instead of screen-size units (such as points). Open Layer properties to the Display tab and check Display 3D symbols in real-world units. In the example below I’ve drawn well bores with their true depths and exaggerated diameters:
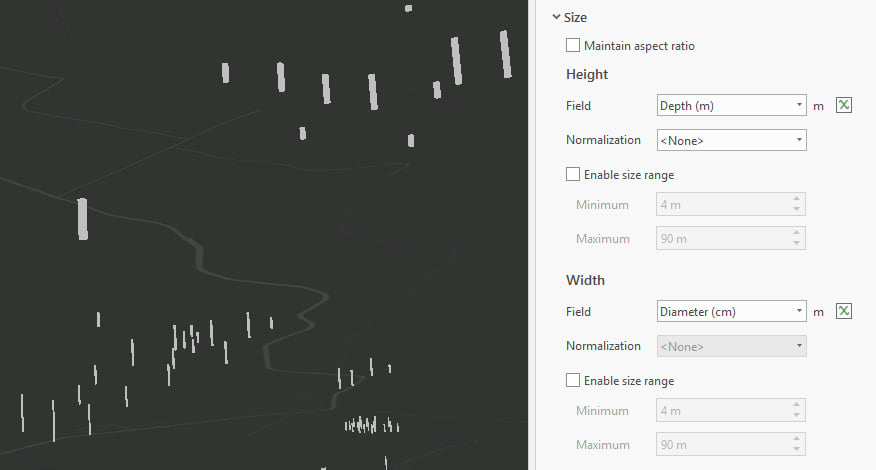
You need to do a few extra steps to accomplish an underground well map like this:
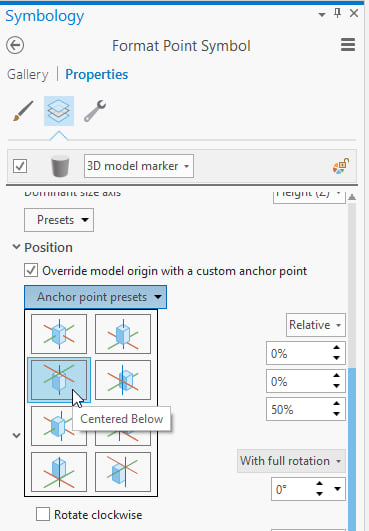
• Choose one of the cylinder symbols from the ArcGIS 3D style.
• Modify the symbol’s properties so the anchor point is on the top of the symbol:
• Open Map Properties to the Elevation Surface page and check Allow navigation below ground.
Proportional symbols
Use this when you want to scale only the height of a symbol, and you also want to take advantage of the special properties of True proportional or Direct size.
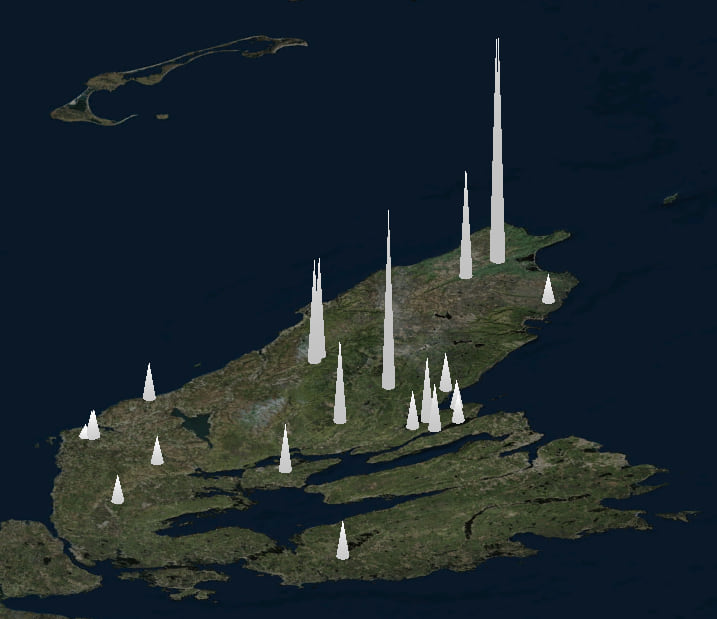
Hint: Extrusion only stretches geometry. So if you extruded some points and were disappointed because they turned into hollow cylinders, try using Proportional symbols instead. Set the Data represents property to Height and choose a 3D symbol for your template:
Notes:
• The size of the base/width of these stretched symbols can be set by changing the size of the template symbol.
• Remember that perspective can skew perception of size – those symbols which are farther away will be smaller, rendering your proportional symbology inaccurate. To avoid this, use a local scene instead of a global one, and on the View tab of the ribbon, change the Drawing mode to Isometric.
Symbol property connections
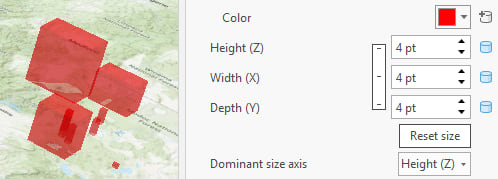
Use this if you want to symbolize volume and control the size of each axis (X, Y, and Z) separately. You may want X and Z to draw at 10 pt, while Y scales based on your data. Or you may want each axis to scale based on a different attribute or expression:
To summarize, there’s a lot of different ways to symbolize by size! Below is a recap to help you pick the right one for your map:
Graduated symbols: Use this to break your data up into a series of classes or bins.
Proportional symbols: Use this if you want to show a continuous range of sizes.
Size range: Use this if you want the simplest representation of your data as size.
True proportional size: Use this if you want to draw symbols which are truly proportional to one another.
Direct size: Use this if you want to represent the real size of your features.
Vary symbology by attribute: Use this if you are already symbolizing your features with color or shape and want to vary them by size as well.
Size range: Use this if you want the simplest representation of your data as size.
Random: Use this if you want your symbols to vary in size randomly in order to create a visual effect.
Direct size: Use this if you want to represent the real size of your features.
Symbol property connections: Use this to control the size of specific properties or layers within symbols.
Extra options in 3D: Use this if you want to vary symbols by perspective height or volume.
Extrusion: Use this if you want to extrude your feature’s geometries based on a field or expression.
Vary symbology by attribute: Use this if you want to symbolize by volume, or if you want to scale the height of a 3D symbol differently than the width.
Proportional symbols: Use this when you want to scale only the height of a symbol, and you also want to take advantage of the special properties of True proportional or Direct size.
Symbol property connections: Use this if you want to symbolize volume and control the size of each axis (X, Y, and Z) separately.


Commenting is not enabled for this article.