Google’s Android Studio is a developer IDE based on IntelliJ IDEA platform. The platform is still in early access preview. If you are not comfortable using an unfinished product, you may want to continue to use the Eclipse Plugin bundled with the ArcGIS Android SDK.
Android Studio Basics
In Eclipse you have the concept of a workspace which can consist of multiple projects linked or unlinked. In Android Studio, projects are replaced by App Modules and Libary Modules. Modules are a discrete unit of functionality that can be run, tested, and debugged independently. Modules are somewhat similar to an Eclipse project with a few key differences:
- Each module has it’s own Gradle build file
- Some modules can be Library Modules which are conceptually the same as Libary Projects in Eclipse.
Including Jar lib dependencies
Local jar files go in the libs folder at the root of your module directory. In Android Studio you need to add the jars as a gradle dependency. This should be added to your gradle build file as follows:
|
1
2
3
4
|
dependencies {compile fileTree(dir: 'libs', include: ['*.jar'])} |
The code above adds all the *.jar files from the modules libs directory as dependencies.
Including pre-built Native .so libs
Local pre-built native libs go in the jniLibs folder in your modules /src/main/ folder. There is no need to add a gradle dependency when using this folder. Native libs outside this folder would require a gradle dependency.
Manifest changes
Several common items and settings which in Eclipse are in the Android Manifest have either automatically added, e.g: allowBackup=true or have been moved to build.gradle such as version codes and minSdkVersion, targetSdkVersion, etc. Feature and permission requirements are still declared in the manifest.
Integrate ArcGIS Android SDK
In this section we will step through the process of creating a new Android Studio project and integrate the ArcGIS Android SDK in the app module.
Create a new Android Studio Project
- Open up Android Studio and choose New Project under Quick Start
- Choose and Application name and Module name. These can be the same in this example. We will use Hello World for both.
- Choose a Package name, e.g. com.arcgis.android.sample.maps.helloworld.
- Set the Minimum required SDK to API 15: Android 4.0.3 (IceCreamSandwich)
- Keep the defaults for the rest and click Next.
- Continue to accept the defaults in the remaining windows by clicking Next and complete the wizard.
- Your project should open up.
Update the Projects Gradle build
As we stated earlier, each module has it’s own gradle build file. This include the project as well. In this step we want to ensure that your project is using the latest Gradle plugin. Gradle plugins are on a different release cycle then Android Studio so you may have to manually update until Android Studio directly supports the latest version of Gradle plugin.
- Double click on your projects build.gradle file to open it in the editor. This will be the one at the project root directory, not in your app module directory.
- Ensure that under dependencies you have the following classpath
|
7
8
9
|
dependencies { classpath 'com.android.tools.build:gradle:0.10.+' } |
- Click the Sync Project with Gradle Files button from the toolbar.
Gradle Plugin v0.10.0 is the latest version of the Gradle Plugin at the time of the writing so the version will change as more releases come out.
Update App Module Manifest
The Android.manifest file is now located in the /src/main/ directory of your app module.
- Double click the manifest file to open it.
- Add the following to your manifest above the <application> element:
|
5
6
7
8
9
10
11
|
<uses-permission android:name="android.permission.INTERNET" /><uses-permission android:name="android.permission.WRITE_EXTERNAL_STORAGE" /><uses-permission android:name="android.permission.ACCESS_FINE_LOCATION" /><uses-feature android:glEsVersion="0x00020000" android:required="true" /> |
Add ArcGIS Android dependent libraries
The ArcGIS Android dependent libraries are available in the ArcGIS Runtime SDK for Android libs folder. You will be coping files from this directory into your app module directory in your project.
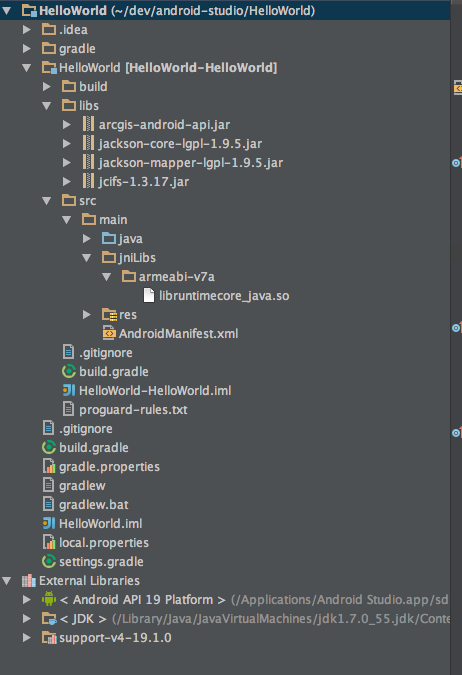
- Copy all the jar files from your [sdk-install-dir]/libs folder into your projects HelloWorld/HelloWorld/libs directory.
- Create a HelloWorld/HelloWorld/src/main/jniLibs folder in your project.
- Copy the native processor directory containing the libruntimecore_java.so pre-built native library to the jniLibs folder created in the previous step.
Below is a image representing an Android Studio project with module including android sdk jars and native libs. Note we are only including on native processor directory into jniLibs.
Update the App Module Gradle Build
- Double click on your applications build.gradle file to open it in the editor. This will be the file at the root of your app modules directory.
- Add the following exclusions above buildTypes
|
14
15
16
17
18
|
packagingOptions{ exclude 'META-INF/LGPL2.1' exclude 'META-INF/LICENSE' exclude 'META-INF/NOTICE'} |
- Click the Sync Project with Gradle Files button from the toolbar.
Create Hello World App
Our project is now ready to start coding against the ArcGIS Android API. We will create a Hello World app to ensure everything is working as expected.
Add MapView to the layout
The layout resource file is now located in the /src/res/layout directory of your app module.
- Double click the activity_main.xml file from the resource layout directory.
- Remove the <TextView> element and all it’s attributes.
- Add the MapView XML layout with some mapoptions defined by adding the following code snippet where you removed the <TextView>element:
|
11
12
13
14
15
16
17
18
|
<!-- MapView --><com.esri.android.map.MapView android:id="@+id/map" android:layout_width="fill_parent" android:layout_height="fill_parent" mapoptions.MapType="Topo" mapoptions.center="34.056215, -117.195668" mapoptions.ZoomLevel="16"/> |
Create MapView in source
Now we need to create a MapView object and access the map from the layout
- Instatiate a MapView variable by adding the following:
|
13
|
MapView mMapView; |
- Add the following code to the onCreate method after setContentView():
|
20
21
22
|
// after the content of this activity is set// the map can be accessed from the layoutmMapView = (MapView)findViewById(R.id.map); |
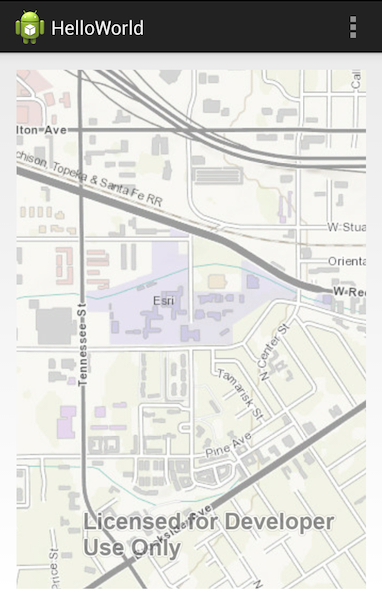
- Run the app!
Summary
In this post we directly integrated the ArcGIS Runtime SDK for Android into Android Studio and created the Hello World sample app. I will re-state that Android Studio and the Gradle plugin are still in an early access preview release state. Several features are either incomplete or not yet implemented so there may be breaking changes when releases are updated.
In part 2 of this series we will introduce a library module to allow multiple app modules the ability to re-use the ArcGIS Android API libraries.


Commenting is not enabled for this article.