ArcGIS Pro 3.0 includes the new and improved Multifile Feature Connection (MFC).
What’s different?
Multifile feature connections (or MFCs) are an enhanced and renamed version of big data connections (or BDCs) introduced at ArcGIS Pro 2.6. In ArcGIS Pro 3.0, MFCs offer all the capabilities of BDCs but with a more inclusive name and added functionality! If the MFCs or BDCs are new to you, this blog provides an introduction and the steps to get started with MFCs. If you’re already familiar with them, keep reading to see what’s new.
Note: ArcGIS Pro 3.0 still supports Big Data Connection (.bdc) files, so you can still use the ones you have in existing projects.
Why use a multifile feature connection?
A MFC is used to connect a single source folder containing one or more datasets. Each dataset is represented by a subfolder containing one or multiple files — this is where the name “multifile” comes from. When you connect to a source folder, each subfolder is registered as a unique dataset, and all of the files in the subfolder are stitched together into that dataset.
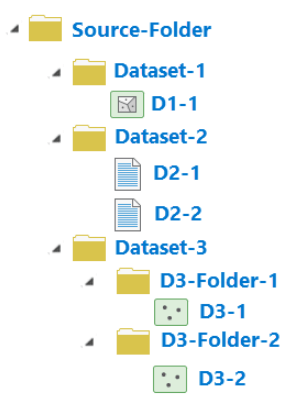
For example, you could have multiple .csv files in a subfolder (like Dataset-2 in the image above) and register them as a single dataset on the fly by creating an MFC. Once created, you can use your MFC dataset just like any other feature layer or table in ArcGIS Pro without needing to append, merge, or create a whole new dataset with your .csvs.
CSV files are not the only file type you can connect to; MFCs support the following data formats:
- Delimited files (.csv, .tsv, etc.)
- .txt
- .shp
- .parquet
- .orc
MFCs are appropriate for data of any size, not only big data, as the old name may have suggested. If you want to get multiple files ready for mapping and spatial analysis fast with less data preparation, use MFCs!
How do I create a multifile feature connection?
In ArcGIS Pro 3.0, there are a few ways you can create a new MFC or add an existing MFC (or BDC if you have one already):
To create a new MFC, you can use one of the following methods:
- On the ribbon, in the Insert tab, in the Project group, click the Connections dropdown arrow and choose New Multifile feature Connection

- In the Catalog pane (or Catalog view), right-click and select New, then choose New Multifile Feature Connection
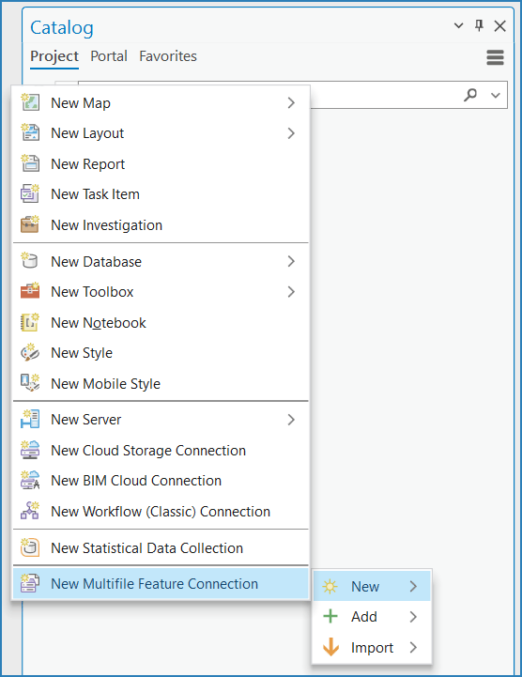
- Use the geoprocessing tool’s “Create Multifile Feature Connection.” You can find this tool using the search bar at the top of the Geoprocessing
If you already have a MFC or BDC file
- In the Catalog pane (or in Catalog view), right-click and select Add, then choose Add Multifile Feature Connection. In the browse dialog box that opens, you can select an existing connection file (a .mfc or .bdc) to add it to your project.
- In the Catalog pane or view, you can browse to the folder containing your MFC, right-click on the connection file, and choose Add to project.
New at 3.0, the Catalog pane has a dedicated container ![]() in the Project tab specifically for adding, managing, and accessing your MFCs. Any MFCs that you create or add are then directly available for use.
in the Project tab specifically for adding, managing, and accessing your MFCs. Any MFCs that you create or add are then directly available for use.
Let’s take a look at the new MFC workflow in action with an example.
Example: Create and use multifile feature connections
In the following example, we will walk through the new MFC features in ArcGIS Pro 3.0 using the example dataset below:

Note: Data and files must be contained within a subfolder to be considered a dataset
Step 1: Open ArcGIS Pro and connect to the data source using one of the three methods listed above.
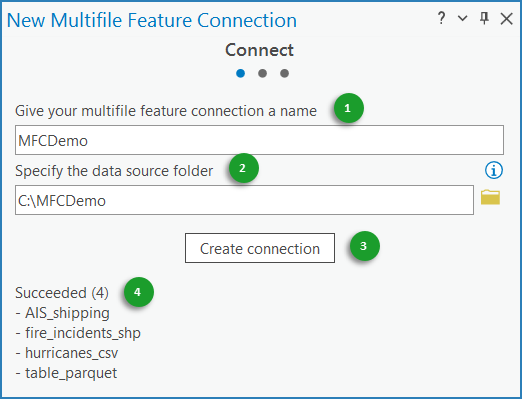
Step 2: Name your multifile feature connection (1); specify the data source folder (2); click Create connection (3); a list of the successfully connected data sources will appear below (4):
Click Next at the bottom of the pane
Step 3: The dialog box will prompt you to configure your multifile feature connection datasets. Here you’ll notice that the datasets maybe have geometry enabled immediately. For example, AIS_shipping, composed of 3 .csv files contained in the AIS_shipping subfolder, shows it has a point geometry ![]() . This is because when you create the connection, the tool automatically detects field names that may contain geometry or time information and sets those properties for you! So easy.
. This is because when you create the connection, the tool automatically detects field names that may contain geometry or time information and sets those properties for you! So easy.
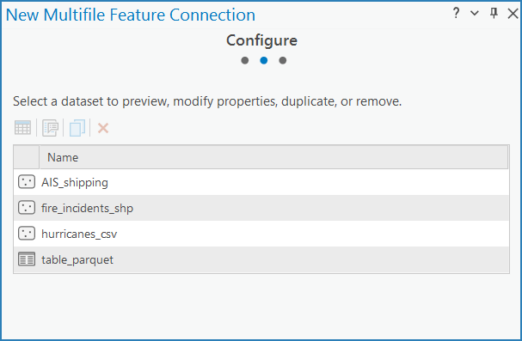
In the Configure panel, you can choose the following actions for your dataset: previewing your data, editing a dataset’s properties, and duplicating or removing a dataset. For example, you could set geometry or time properties for your dataset without needing to calculate new fields or add a filter to turn your full dataset into an actionable subset.
Note: You can still access a dataset’s properties after the MFC is connected
Click Next at the bottom of the pane
Step 4: Review your multifile feature connection.
The Review pane covers the output location, the source folder, and information on the dataset, including its name (e.g., AIS_shipping, hurricanes_csv, etc.), geometry (points, lines, polygons, or none), time (instant or interval), and file type (delimited, shapefile, ORC, or parquet).
Click Finish at the bottom of the pane.
A multifile feature connection (.mfc) with four feature classes will appear in its own project container in the Catalog pane.
Recall: In the source folder, MFCDemo, there are four folders, each representing a dataset. In the .mfc file, each dataset became a new feature class or table within the MFC.
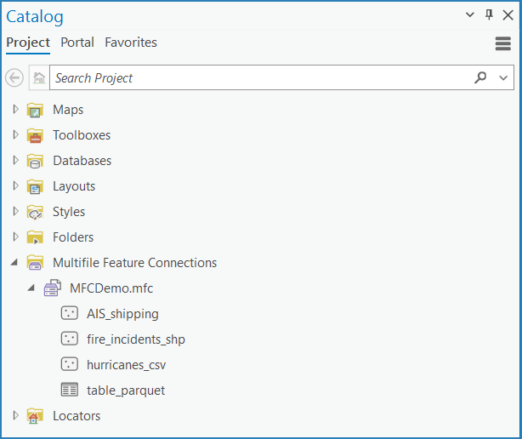
Step 5: You’re ready to use your datasets! You can map the new datasets by right-clicking one and selecting Add to Current Map
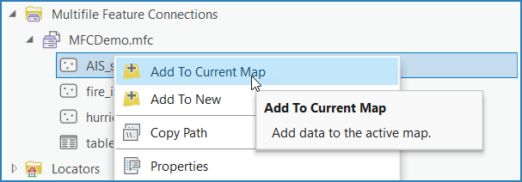
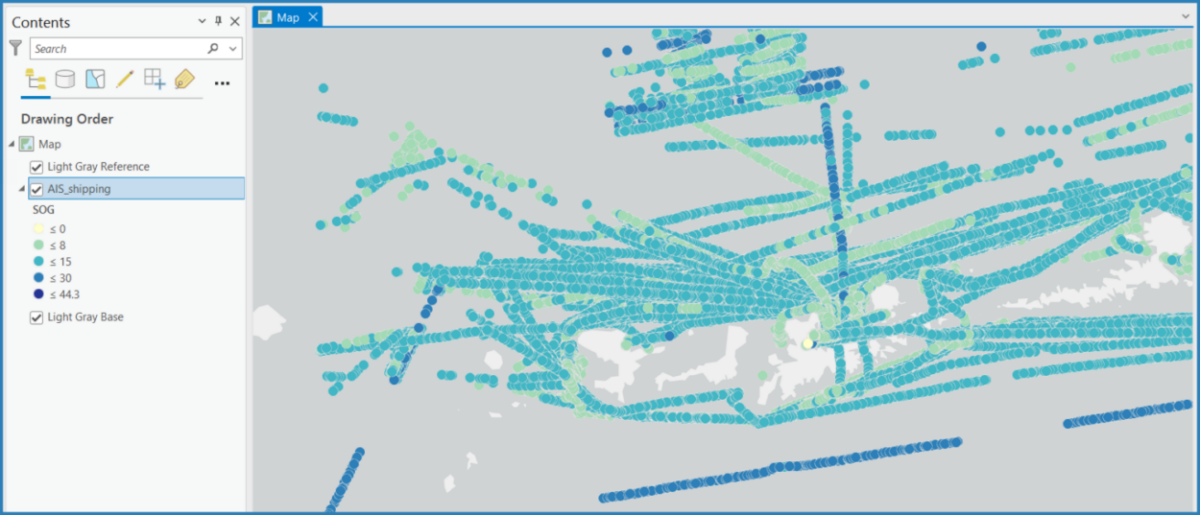
Now that you’ve connected to your data, you’re ready to continue mapping and exploring it or using it as input to a geoprocessing tool. When you use MFC datasets as input to the GeoAnalytics Desktop geoprocessing tools, the analysis is optimized to read the data and run in parallel across all the cores of your machine, resulting in improved performance.
Need to make changes after you’ve connected?
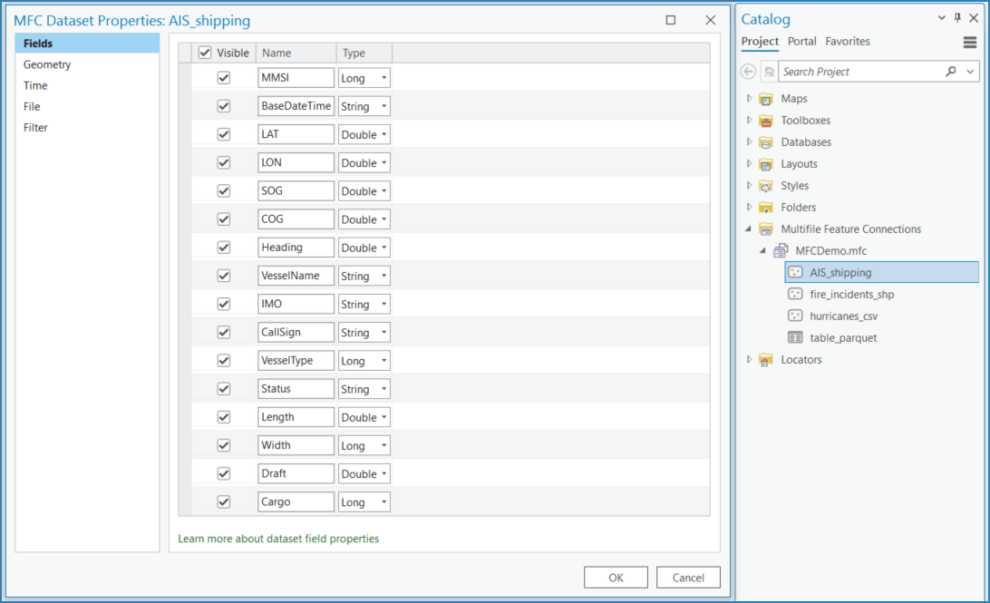
In previous releases, you would have had to either set properties simultaneously as connecting or use a geoprocessing tool to update them. Now in 3.0, we’re excited to say you can continue to configure your MFC datasets after they are created using the properties page:
- Right-click the multifile feature connection in the Catalog pane and choose Properties.
This opens the same properties pane found in the New Multifile Feature Connection dialog, and can be accessed anytime.
Summary
Multifile Feature Connections make connecting to and using complex datasets that span multiple files easy. With the new enhancements at ArcGIS Pro 3.0, you can efficiently access and manage your MFCs and their datasets. If you want to learn more about MFCs, see the documentation here.


Article Discussion: