Drone2map supports a wide range of popular camera models. With each new release we test and implement additional camera models into the camera database. However, there are cases in which we may not have a dataset for a specific camera to test, or you have an uncommon camera model used in drone processing. Regardless of what camera model you have, if the proper metadata is present, you should be able to process the imagery.
How images are loaded in Drone2Map
There are a few ways you can provide camera model information and metadata for imagery in Drone2Map.
The first and most used workflow is to let Drone2map automatically extract the Exif and XMP data from your drone imagery. This will allow it to match the camera maker and model with a known camera in our database.
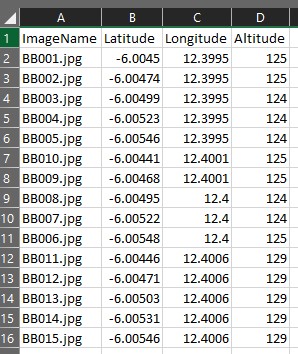
The second is used when you have the camera model information, but not the GPS metadata attached to the images. You can use a GPS information file (.txt, .csv, .mrk) to provide all the necessary imagery GPS metadata in a table format to the software.
Last, if you don’t have camera metadata or imagery metadata attached to the images, you can load the images in with the GPS information file and manually define camera model parameters through the Edit Camera pane.
Exif headers and necessary metadata
At the very least, the following image metadata and camera information is required to process drone imagery into useable projects in Drone2Map:
Images – Image Name, Latitude, Longitude, Altitude.
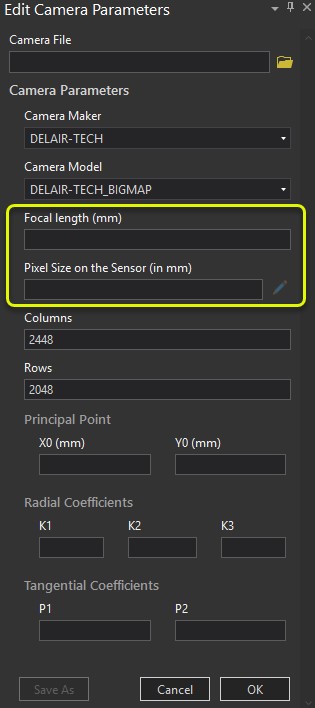
Camera – Focal length, Pixel size on the Sensor, Columns, Rows.

Most drone platforms record all the necessary image and camera model metadata to each captured image. This metadata is stored on the image’s Exchangeable image file (Exif) header. The Exif format is a well-established standard used in most modern digital cameras.
How do I use my own camera in Drone2Map?
If you are going the route of defining both your own GPS and camera model information, you first need to create a GPS file with a row corresponding to each image being loaded (see below). This information should not be a guess and should be as accurate as possible.

If the imagery successfully loads into Drone2Map and a known camera model is detected, you are likely ready to process. You can double-check if you have all the necessary camera model information by going to the Flight Data tab and clicking the Edit Camera button to pull up the Edit Camera Parameters pane. If any of the above necessary camera information is missing, you will need to manually define it.

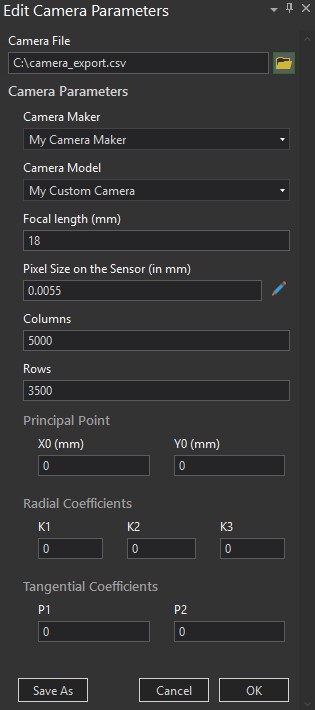
If your camera is not recognized at all, you will need to import your own custom camera file. The camera file can be imported in CAM, CSV, TXT, or D2M format. If importing from CSV format, you will need to have it formatted like the example below.

While Principal Point values, Radial Coefficients, and Tangential Coefficients are recommended for the best quality reconstruction, they are not necessary. Pixel Size, Focal Length, and Principal Point are in millimeters when displayed in Drone2Map. The values from the camera file will be automatically divided by 1,000 to obtain the necessary conversion when importing.


It is important to note that if you do not know the value for Pixel Size on the Sensor, you can attempt to calculate it using either field of view, 35mm equivalent focal length, or dimensions of the CCD. To do so, click the edit button next to the Pixel Size on the Sensor field. This allows you to choose one of the three options to try to derive the correct pixel size value.
Once the values are imported into Drone2Map, you can click OK to save them to the project. Any processing now done on that project will honor the custom camera values that you have set.
Summary
Having the proper camera parameters and GPS metadata for your imagery will provide you with optimal products. There are multiple methods that you can use to load this information into Drone2Map. If you are unsure of your camera’s specifications, there is more than likely some manufacturer information on the internet that goes into those details. If you have a camera that is not recognized in Drone2Map and you would like to see it incorporated into the software’s camera database, email drone2map@esri.com with some sample imagery and your camera information. We add new camera models with every release and are always looking to incorporate the latest technology.


Article Discussion: